Guide to Calibration of Panasonic Plasma TC-P42S1 - FatWallet
Guide to Calibration of Panasonic Plasma TC-P42S1 - FatWallet
Guide to Calibration of Panasonic Plasma TC-P42S1 - FatWallet
You also want an ePaper? Increase the reach of your titles
YUMPU automatically turns print PDFs into web optimized ePapers that Google loves.
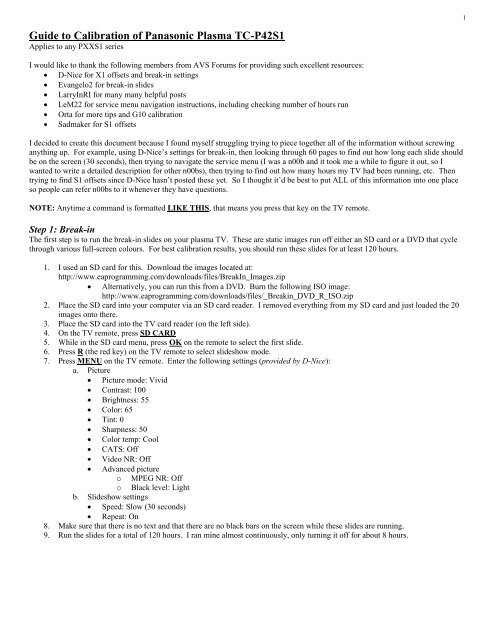
<strong>Guide</strong> <strong>to</strong> <strong>Calibration</strong> <strong>of</strong> <strong>Panasonic</strong> <strong>Plasma</strong> <strong>TC</strong>-<strong>P42S1</strong><br />
Applies <strong>to</strong> any PXXS1 series<br />
I would like <strong>to</strong> thank the following members from AVS Forums for providing such excellent resources:<br />
D-Nice for X1 <strong>of</strong>fsets and break-in settings<br />
Evangelo2 for break-in slides<br />
LarryInRI for many many helpful posts<br />
LeM22 for service menu navigation instructions, including checking number <strong>of</strong> hours run<br />
Orta for more tips and G10 calibration<br />
Sadmaker for S1 <strong>of</strong>fsets<br />
I decided <strong>to</strong> create this document because I found myself struggling trying <strong>to</strong> piece <strong>to</strong>gether all <strong>of</strong> the information without screwing<br />
anything up. For example, using D-Nice’s settings for break-in, then looking through 60 pages <strong>to</strong> find out how long each slide should<br />
be on the screen (30 seconds), then trying <strong>to</strong> navigate the service menu (I was a n00b and it <strong>to</strong>ok me a while <strong>to</strong> figure it out, so I<br />
wanted <strong>to</strong> write a detailed description for other n00bs), then trying <strong>to</strong> find out how many hours my TV had been running, etc. Then<br />
trying <strong>to</strong> find S1 <strong>of</strong>fsets since D-Nice hasn’t posted these yet. So I thought it’d be best <strong>to</strong> put ALL <strong>of</strong> this information in<strong>to</strong> one place<br />
so people can refer n00bs <strong>to</strong> it whenever they have questions.<br />
NOTE: Anytime a command is formatted LIKE THIS, that means you press that key on the TV remote.<br />
Step 1: Break-in<br />
The first step is <strong>to</strong> run the break-in slides on your plasma TV. These are static images run <strong>of</strong>f either an SD card or a DVD that cycle<br />
through various full-screen colours. For best calibration results, you should run these slides for at least 120 hours.<br />
1. I used an SD card for this. Download the images located at:<br />
http://www.eaprogramming.com/downloads/files/BreakIn_Images.zip<br />
Alternatively, you can run this from a DVD. Burn the following ISO image:<br />
http://www.eaprogramming.com/downloads/files/_Breakin_DVD_R_ISO.zip<br />
2. Place the SD card in<strong>to</strong> your computer via an SD card reader. I removed everything from my SD card and just loaded the 20<br />
images on<strong>to</strong> there.<br />
3. Place the SD card in<strong>to</strong> the TV card reader (on the left side).<br />
4. On the TV remote, press SD CARD<br />
5. While in the SD card menu, press OK on the remote <strong>to</strong> select the first slide.<br />
6. Press R (the red key) on the TV remote <strong>to</strong> select slideshow mode.<br />
7. Press MENU on the TV remote. Enter the following settings (provided by D-Nice):<br />
a. Picture<br />
Picture mode: Vivid<br />
Contrast: 100<br />
Brightness: 55<br />
Color: 65<br />
Tint: 0<br />
Sharpness: 50<br />
Color temp: Cool<br />
CATS: Off<br />
Video NR: Off<br />
Advanced picture<br />
o MPEG NR: Off<br />
o Black level: Light<br />
b. Slideshow settings<br />
Speed: Slow (30 seconds)<br />
Repeat: On<br />
8. Make sure that there is no text and that there are no black bars on the screen while these slides are running.<br />
9. Run the slides for a <strong>to</strong>tal <strong>of</strong> 120 hours. I ran mine almost continuously, only turning it <strong>of</strong>f for about 8 hours.<br />
1
Step 2: Check number <strong>of</strong> hours<br />
This step is optional. It will allow you <strong>to</strong> check how many hours your TV has been running so that you can assess whether you’ve<br />
accumulated 120 hours <strong>of</strong> break-in (assuming you haven’t run anything else).<br />
1. In order <strong>to</strong> check the number <strong>of</strong> hours, you need <strong>to</strong> enter the service menu (SM). To do this, hold the Vol– but<strong>to</strong>n on the TV<br />
itself. While holding this, press INFO on the remote three times. Continue holding Vol–. The blue service menu should<br />
appear.<br />
2. Press 2 on the TV remote.<br />
3. Press OK on the TV remote.<br />
4. Press the down arrow (▼) on the TV remote until you highlight “P<strong>TC</strong>T”<br />
5. Press the right arrow (►) on the TV remote.<br />
6. Hold MUTE on the TV remote for three seconds. The number <strong>of</strong> hours and minutes will appear. See image below (125<br />
hours and 36 minutes).<br />
7. To exit, hold the power but<strong>to</strong>n on the TV until the set turns <strong>of</strong>f.<br />
2
Step 3: Service menu <strong>of</strong>fsets<br />
In this step, we will be entering the SM in order <strong>to</strong> apply the calibration <strong>of</strong>fsets. Currently, D-Nice has only posted the X1 series<br />
<strong>of</strong>fsets. As a result, I have decided <strong>to</strong> use Sadmaker’s <strong>of</strong>fsets in the meantime. If you have a G10, you may wish <strong>to</strong> use Orta’s <strong>of</strong>fsets.<br />
There are other peoples’ <strong>of</strong>fsets out there as well; I only chose <strong>to</strong> use these for personal preference.<br />
It is a smart idea <strong>to</strong> take pictures using a camera <strong>of</strong> ALL your original settings in the service menu BEFORE you apply the <strong>of</strong>fsets.<br />
Not every TV will have the same original values so it is very IMPORTANT that you keep track <strong>of</strong> these original values. I have<br />
provided pictures below <strong>to</strong> show you what you need <strong>to</strong> record.<br />
NOTE: There are a <strong>to</strong>tal <strong>of</strong> SIX (6) different sets <strong>of</strong> values. There is one for each temperature (cool, normal, warm) and for each<br />
input mode (SD or HD). So: SD cool, SD normal, SD warm, HD cool, HD normal, HD warm. For Sadmaker’s <strong>of</strong>fsets, we have<br />
settings for warm and normal, so you will need <strong>to</strong> change the <strong>of</strong>fsets for FOUR sets. In order <strong>to</strong> access the SD values, you need <strong>to</strong><br />
have the input mode set <strong>to</strong> an SD source (480i or 480p). I used a Wii. In order <strong>to</strong> access the HD values, you need <strong>to</strong> have an HD<br />
source. This is anything 720i or higher: 720i, 720p, 1080i, 1080p. I used my PC input via HDMI for this.<br />
1. Enter the SM: hold the Vol– on the TV itself. While holding this, press INFO on the remote three times. Continue holding<br />
Vol–. You should see something like the following:<br />
3
2. In order <strong>to</strong> scroll through the menu options that are in the box in the left-hand side, you press 1 (forward) and 2 (back) on the<br />
TV remote. All <strong>of</strong> our adjustments will be in WB-ADJ, so press 1 twice.<br />
3. On this screen (above left image), we can assess exactly which settings we are modifying. You can see in the above image<br />
that we are in the Vivid picture mode, Normal colour temp, and HD source. Let us start with adjusting the HD warm temp<br />
settings. If you have a different temp, press 7 on the TV remote until it displays Warm. Also, press 9 on the TV remote until<br />
WB-ADJ is listed as Cus<strong>to</strong>m. Your menu should look like the above right image.<br />
4. The following are Sadmaker’s <strong>of</strong>fsets: (I will show you how <strong>to</strong> make these changes below, listing these here for reference):<br />
Warm Normal<br />
R-CUT 0 R-CUT 0<br />
G-CUT 0 G-CUT 0<br />
B-CUT –1 B-CUT –1<br />
R-DRV –15 R-DRV –8<br />
G-DRV –14 G-DRV –6<br />
B-DRV +4 B-DRV –1<br />
5. The first setting is R-CUT (should be highlighted, original value <strong>of</strong> mine was 80). Looking at Warm in the table above, we<br />
see that the <strong>of</strong>fset is 0, so make no changes here. To move between the different sub-menu settings, you press 3 (forward)<br />
and 4 (backward) on the TV remote. Since we’re making no changes here, let’s move <strong>to</strong> the next setting: press 3 once.<br />
6. The second setting is G-CUT. Again, no change. Press 3 once.<br />
4
7. The third setting is B-CUT (see left image below). Here we need <strong>to</strong> apply –1. SINCE WE ARE MAKING CHANGES,<br />
TAKE A PICTURE OF THIS PAGE. In order <strong>to</strong> apply changes, use Vol+ (increase) and Vol– (decrease) on the TV remote.<br />
Since we need <strong>to</strong> apply –1, press Vol– once. I would suggest taking another picture here before you move <strong>to</strong> the next setting,<br />
because it temporarily shows your original value and your new value. Press 3 AFTER YOU’VE TAKEN A PICTURE.<br />
NOTE: You can simply take a picture <strong>of</strong> the screen after you’ve made the changes with the Vol+ and Vol– but<strong>to</strong>ns<br />
BEFORE PRESSING 3, because here it shows your original and new values. However, I’ve suggested taking<br />
pictures before and after making changes just in case you accidently press something and you can’t go back.<br />
8. The fourth setting is R-DRV (see right image below). We need <strong>to</strong> apply –15 here. TAKE PICTURE AGAIN. Then press<br />
Vol– fifteen times. TAKE PICTURE AGAIN. Press 3.<br />
New<br />
Original<br />
9. Next is G-DRV (left image below): –14. TAKE PICTURE. Then Vol– fourteen times. PICTURE. Press 3.<br />
10. Next is B-DRV (right image below): +4. TAKE PICTURE. Then Vol+ four times. PICTURE. Press 3.<br />
5
11. Next is AllCut. Don’t change anything here. You may wish <strong>to</strong> take a picture <strong>of</strong> this screen. I did, just in case. Press 3.<br />
12. Last is AllDrv. Don’t change anything here. You may wish <strong>to</strong> take a picture <strong>of</strong> this screen. I did, just in case. Press 3.<br />
13. You should be back at R-CUT now. You have now completed the changes for HD warm. Next is HD normal temp.<br />
14. To switch <strong>to</strong> normal temp, Press 7 on the TV remote. Make sure that the Color Temp reads Normal (left image below).<br />
15. Repeat all <strong>of</strong> the above steps as above, but instead using the <strong>of</strong>fsets for normal temp. These are:<br />
16. R-CUT: 0. No change. 3<br />
17. G-CUT: 0. No change. 3<br />
18. B-CUT: –1. Vol– once. TAKE PICTURE. 3<br />
19. R-DRV: –8. Vol– eight times. TAKE PICTURE. 3<br />
20. G-DRV: –6. Vol– six times. TAKE PICTURE. 3<br />
21. B-DRV: –1. Vol– once. TAKE PICTURE. 3<br />
22. Press 3 two more times <strong>to</strong> get back <strong>to</strong> R-CUT. You have now completed the <strong>of</strong>fsets for HD warm and normal. The next step<br />
is <strong>to</strong> complete these for SD warm and normal.<br />
23. To do so, first save the SM settings and exit. To do this, press and hold the power but<strong>to</strong>n on the TV itself until it turns <strong>of</strong>f.<br />
24. Turn the TV back on, then switch the input <strong>to</strong> an SD source.<br />
25. Enter the SM again: hold the Vol– on the TV itself. While holding this, press INFO on the remote three times. Continue<br />
holding Vol–.<br />
26. Press 1 twice <strong>to</strong> get <strong>to</strong> the WB-ADJ menu.<br />
27. Make sure that your settings are as follows (right image above).: WB-ADJ as Cus<strong>to</strong>m, Format as SD, Color Temp as Warm.<br />
In order <strong>to</strong> change WB-ADJ, press 9 on the TV remote until it displays Cus<strong>to</strong>m. In order <strong>to</strong> change Color Temp, press 7 on<br />
the TV remote until it displays Warm. If Format does not display SD, then you are not currently hooked up <strong>to</strong> an SD input.<br />
Exit the service menu by holding the power but<strong>to</strong>n on the TV until it turns <strong>of</strong>f, turn the TV back on, and switch <strong>to</strong> an input<br />
that is SD (480i or 480p). Go back <strong>to</strong> Step 25.<br />
28. Now we need <strong>to</strong> repeat the exact same steps as we did for HD. Go back <strong>to</strong> Step 5 and continue until Step 23. The <strong>of</strong>fsets for<br />
HD and SD are both the same. MAKE SURE TO TAKE PICTURES OF EACH SCREEN AS WE DID BEFORE. Make<br />
sure <strong>to</strong> apply the changes for both temperatures (warm and normal) in SD mode, just as we did above for HD mode.<br />
29. Bravo! You have completed the SM <strong>of</strong>fsets. Last, but not least, is <strong>to</strong> make adjustments <strong>to</strong> the picture quality using the TV’s<br />
built-in settings.<br />
6
Step 4: Picture settings<br />
This set is the easiest and most fool-pro<strong>of</strong>. You just need <strong>to</strong> change the picture settings that suit your preference. All I shall do here is<br />
list Sadmaker’s picture settings. Feel free <strong>to</strong> tweak these. I am only listing them here for sake <strong>of</strong> completeness.<br />
To enter the picture settings menu, press MENU on the TV remote. Then move down the Picture and adjust your settings here.<br />
Cinema (Night) Cus<strong>to</strong>m (Day)<br />
Contrast 76 78<br />
Brightness 49 56<br />
Color 39 43<br />
Tint 0 0<br />
Sharpness 60 75<br />
Color Temp Warm Warm<br />
CATS Off Off<br />
Video NR Off Off<br />
MPEG NR Off Off<br />
Black Level Light Light<br />
Thanks for taking the time <strong>to</strong> read this guide. If you find any errors, please let me know. My alias is mistah_g on AVS Forums. As<br />
well, make sure that you give credit where it is due. I did not come up with any <strong>of</strong> these settings and I used other peoples’ tips <strong>to</strong><br />
navigate the SM. Please see the credits at the beginning <strong>of</strong> this document and THANK THEM FOR THEIR CONTRIBUTIONS!<br />
Last updated: August 4, 2009<br />
7


