69-0653 - MagicStat CT3200 Programmable Thermostat ... - Geisel
69-0653 - MagicStat CT3200 Programmable Thermostat ... - Geisel
69-0653 - MagicStat CT3200 Programmable Thermostat ... - Geisel

Create successful ePaper yourself
Turn your PDF publications into a flip-book with our unique Google optimized e-Paper software.
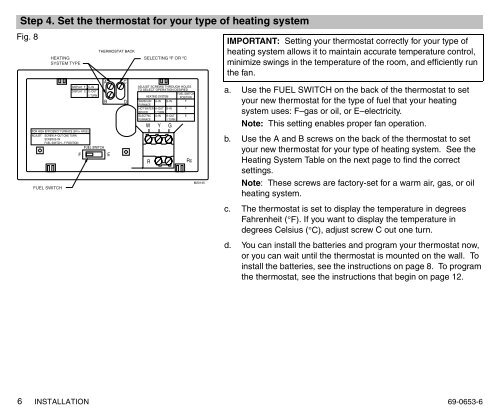
Step 4. Set the thermostat for your type of heating system<br />
Fig. 8<br />
DISPLAY F<br />
DISPLAY C<br />
C–IN<br />
C–OUT<br />
1 TURN<br />
FOR HIGH EFFICIENCY FURNACE (90%+ AFUE)<br />
ADJUST: SCREW A–OUT ONE TURN<br />
SCREW B–IN<br />
FUEL SWITCH – F POSITION<br />
FUEL SWITCH<br />
F<br />
E<br />
FUEL SWITCH<br />
HEATING<br />
SYSTEM TYPE<br />
THERMOSTAT BACK<br />
A C<br />
B D<br />
SELECTING ºF OR ºC<br />
ADJUST SCREWS THROUGH HOLES<br />
TO SELECT OPERATION DESIRED<br />
FUEL SWITCH<br />
HEATING SYSTEM POSITION<br />
WARM AIR<br />
FURNACE<br />
HOT WATER<br />
BOILER<br />
ELECTRIC<br />
FURNACE<br />
W Y G<br />
R<br />
A–IN B–IN<br />
A–OUT B–IN<br />
1 TURN<br />
A–IN B–OUT<br />
1 TURN<br />
F<br />
F<br />
E<br />
Rc<br />
M20145<br />
IMPORTANT: Setting your thermostat correctly for your type of<br />
heating system allows it to maintain accurate temperature control,<br />
minimize swings in the temperature of the room, and efficiently run<br />
the fan.<br />
a. Use the FUEL SWITCH on the back of the thermostat to set<br />
your new thermostat for the type of fuel that your heating<br />
system uses: F–gas or oil, or E–electricity.<br />
Note: This setting enables proper fan operation.<br />
b. Use the A and B screws on the back of the thermostat to set<br />
your new thermostat for your type of heating system. See the<br />
Heating System Table on the next page to find the correct<br />
settings.<br />
Note: These screws are factory-set for a warm air, gas, or oil<br />
heating system.<br />
c. The thermostat is set to display the temperature in degrees<br />
Fahrenheit (°F). If you want to display the temperature in<br />
degrees Celsius (°C), adjust screw C out one turn.<br />
d. You can install the batteries and program your thermostat now,<br />
or you can wait until the thermostat is mounted on the wall. To<br />
install the batteries, see the instructions on page 8. To program<br />
the thermostat, see the instructions that begin on page 12.<br />
6 INSTALLATION <strong>69</strong>-<strong>0653</strong>-6