

HKTS 7 OM - Harman Kardon
HKTS 7 OM - Harman Kardon
HKTS 7 OM - Harman Kardon

Create successful ePaper yourself
Turn your PDF publications into a flip-book with our unique Google optimized e-Paper software.
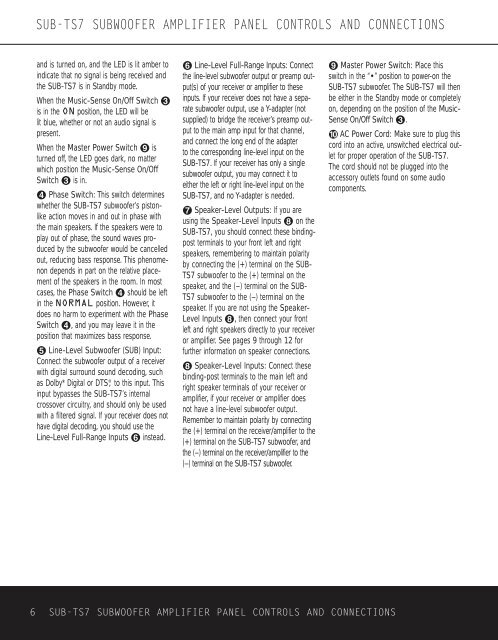
SUB-TS7 SUBWOOFER AMPLIFIER PANEL CONTROLS AND CONNECTIONS<br />
and is turned on, and the LED is lit amber to<br />
indicate that no signal is being received and<br />
the SUB-TS7 is in Standby mode.<br />
When the Music-Sense On/Off Switch £<br />
is in the ON position, the LED will be<br />
lit blue, whether or not an audio signal is<br />
present.<br />
When the Master Power Switch ª is<br />
turned off, the LED goes dark, no matter<br />
which position the Music-Sense On/Off<br />
Switch £ is in.<br />
¢ Phase Switch: This switch determines<br />
whether the SUB-TS7 subwoofer’s pistonlike<br />
action moves in and out in phase with<br />
the main speakers. If the speakers were to<br />
play out of phase, the sound waves produced<br />
by the subwoofer would be cancelled<br />
out, reducing bass response. This phenomenon<br />
depends in part on the relative placement<br />
of the speakers in the room. In most<br />
cases, the Phase Switch ¢ should be left<br />
in the NORMAL position. However, it<br />
does no harm to experiment with the Phase<br />
Switch ¢, and you may leave it in the<br />
position that maximizes bass response.<br />
∞ Line-Level Subwoofer (SUB) Input:<br />
Connect the subwoofer output of a receiver<br />
with digital surround sound decoding, such<br />
as Dolby* Digital or DTS ® , to this input. This<br />
input bypasses the SUB-TS7’s internal<br />
crossover circuitry, and should only be used<br />
with a filtered signal. If your receiver does not<br />
have digital decoding, you should use the<br />
Line-Level Full-Range Inputs § instead.<br />
§ Line-Level Full-Range Inputs: Connect<br />
the line-level subwoofer output or preamp output(s)<br />
of your receiver or amplifier to these<br />
inputs. If your receiver does not have a separate<br />
subwoofer output, use a Y-adapter (not<br />
supplied) to bridge the receiver’s preamp output<br />
to the main amp input for that channel,<br />
and connect the long end of the adapter<br />
to the corresponding line-level input on the<br />
SUB-TS7. If your receiver has only a single<br />
subwoofer output, you may connect it to<br />
either the left or right line-level input on the<br />
SUB-TS7, and no Y-adapter is needed.<br />
Speaker-Level Outputs: If you are<br />
using the Speaker-Level Inputs • on the<br />
SUB-TS7, you should connect these bindingpost<br />
terminals to your front left and right<br />
speakers, remembering to maintain polarity<br />
by connecting the (+) terminal on the SUB-<br />
TS7 subwoofer to the (+) terminal on the<br />
speaker, and the (–) terminal on the SUB-<br />
TS7 subwoofer to the (–) terminal on the<br />
speaker. If you are not using the Speaker-<br />
Level Inputs •, then connect your front<br />
left and right speakers directly to your receiver<br />
or amplifier. See pages 9 through 12 for<br />
further information on speaker connections.<br />
• Speaker-Level Inputs: Connect these<br />
binding-post terminals to the main left and<br />
right speaker terminals of your receiver or<br />
amplifier, if your receiver or amplifier does<br />
not have a line-level subwoofer output.<br />
Remember to maintain polarity by connecting<br />
the (+) terminal on the receiver/amplifier to the<br />
(+) terminal on the SUB-TS7 subwoofer, and<br />
the (–) terminal on the receiver/amplifier to the<br />
(–) terminal on the SUB-TS7 subwoofer.<br />
ª Master Power Switch: Place this<br />
switch in the “•” position to power-on the<br />
SUB-TS7 subwoofer. The SUB-TS7 will then<br />
be either in the Standby mode or completely<br />
on, depending on the position of the Music-<br />
Sense On/Off Switch £.<br />
‚ AC Power Cord: Make sure to plug this<br />
cord into an active, unswitched electrical outlet<br />
for proper operation of the SUB-TS7.<br />
The cord should not be plugged into the<br />
accessory outlets found on some audio<br />
components.<br />
6 SUB-TS7 SUBWOOFER AMPLIFIER PANEL CONTROLS AND CONNECTIONS


