HKTS 7 OM - Harman Kardon
HKTS 7 OM - Harman Kardon
HKTS 7 OM - Harman Kardon
Create successful ePaper yourself
Turn your PDF publications into a flip-book with our unique Google optimized e-Paper software.
MOUNTING OPTIONS<br />
Satellites and Surrounds<br />
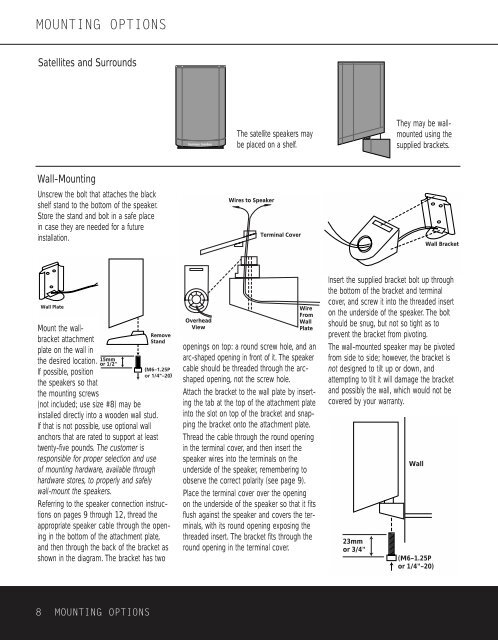
The satellite speakers may<br />
be placed on a shelf.<br />
They may be wallmounted<br />
using the<br />
supplied brackets.<br />
Wall-Mounting<br />
Unscrew the bolt that attaches the black<br />
shelf stand to the bottom of the speaker.<br />
Store the stand and bolt in a safe place<br />
in case they are needed for a future<br />
installation.<br />
Wires to Speaker<br />
Terminal Cover<br />
Wall Bracket<br />
Wall Plate<br />
Mount the wallbracket<br />
attachment<br />
plate on the wall in<br />
the desired location.<br />
If possible, position<br />
the speakers so that<br />
the mounting screws<br />
15mm<br />
or 1/2"<br />
Remove<br />
Stand<br />
(not included; use size #8) may be<br />
installed directly into a wooden wall stud.<br />
If that is not possible, use optional wall<br />
anchors that are rated to support at least<br />
twenty-five pounds. The customer is<br />
responsible for proper selection and use<br />
of mounting hardware, available through<br />
hardware stores, to properly and safely<br />
wall-mount the speakers.<br />
Referring to the speaker connection instructions<br />
on pages 9 through 12, thread the<br />
appropriate speaker cable through the opening<br />
in the bottom of the attachment plate,<br />
and then through the back of the bracket as<br />
shown in the diagram. The bracket has two<br />
Overhead<br />
View<br />
Wire<br />
From<br />
Wall<br />
Plate<br />
openings on top: a round screw hole, and an<br />
arc-shaped opening in front of it. The speaker<br />
cable should be threaded through the arcshaped<br />
opening, not the screw hole.<br />
Attach the bracket to the wall plate by inserting<br />
the tab at the top of the attachment plate<br />
into the slot on top of the bracket and snapping<br />
the bracket onto the attachment plate.<br />
Thread the cable through the round opening<br />
in the terminal cover, and then insert the<br />
speaker wires into the terminals on the<br />
underside of the speaker, remembering to<br />
observe the correct polarity (see page 9).<br />
Place the terminal cover over the opening<br />
on the underside of the speaker so that it fits<br />
flush against the speaker and covers the terminals,<br />
with its round opening exposing the<br />
threaded insert. The bracket fits through the<br />
round opening in the terminal cover.<br />
Insert the supplied bracket bolt up through<br />
the bottom of the bracket and terminal<br />
cover, and screw it into the threaded insert<br />
on the underside of the speaker. The bolt<br />
should be snug, but not so tight as to<br />
prevent the bracket from pivoting.<br />
The wall-mounted speaker may be pivoted<br />
from side to side; however, the bracket is<br />
not designed to tilt up or down, and<br />
attempting to tilt it will damage the bracket<br />
and possibly the wall, which would not be<br />
covered by your warranty.<br />
23mm<br />
or 3/4"<br />
Wall<br />
(M6–1.25P<br />
or 1/4"–20)<br />
8 MOUNTING OPTIONS


