

AVR 1600 - Harman Kardon
AVR 1600 - Harman Kardon
AVR 1600 - Harman Kardon

You also want an ePaper? Increase the reach of your titles
YUMPU automatically turns print PDFs into web optimized ePapers that Google loves.
INITIAL SETUP<br />
In this section, you will configure the <strong>AVR</strong> <strong>1600</strong> to match your actual<br />
system. A video display must be connected to one of the video<br />
monitor outputs on the receiver.<br />
USING THE ON-SCREEN MENU SYSTEM<br />
Although it’s possible to configure the <strong>AVR</strong> using only the remote<br />
and the front-panel messages, it is easier to use the full-screen<br />
menu system.<br />
The menu system is accessed by pressing the OSD Button on the<br />
remote.<br />
The Master menu will appear (see Figure 18).<br />
Eliminate extraneous background noise, such as noisy air conditioning.<br />
Avoid making any loud noises while running EzSet/EQ setup.<br />
IMPORTANT SAFETY NOTE: During the EzSet/EQ<br />
procedure, a series of very loud test sweeps will be played<br />
through all of the speakers. Avoid sitting or standing close to<br />
any one speaker during the procedure. If you are particularly<br />
sensitive to loud noises, you may wish to leave the room and<br />
have someone else run the EzSet/EQ process.<br />
STEP ONE – Place the included EzSet/EQ microphone in the<br />
listening position or in the center of the room, at about the same<br />
height as the listeners’ ears. The microphone features a threaded<br />
insert on the bottom, for mounting on a camera tripod.<br />
STEP TWO – Plug the EzSet/EQ microphone into the<br />
Headphone Jack/EzSet/EQ Microphone Input Jack on the front of<br />
the receiver, and set the level control on the subwoofer to the<br />
halfway point.<br />
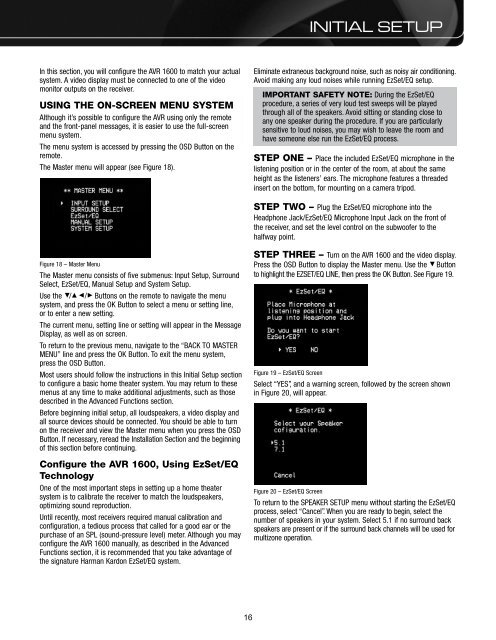
Figure 18 – Master Menu<br />
The Master menu consists of five submenus: Input Setup, Surround<br />
Select, EzSet/EQ, Manual Setup and System Setup.<br />
Use the 5/17/3 Buttons on the remote to navigate the menu<br />
system, and press the OK Button to select a menu or setting line,<br />
or to enter a new setting.<br />
The current menu, setting line or setting will appear in the Message<br />
Display, as well as on screen.<br />
To return to the previous menu, navigate to the “BACK TO MASTER<br />
MENU” line and press the OK Button. To exit the menu system,<br />
press the OSD Button.<br />
Most users should follow the instructions in this Initial Setup section<br />
to configure a basic home theater system. You may return to these<br />
menus at any time to make additional adjustments, such as those<br />
described in the Advanced Functions section.<br />
Before beginning initial setup, all loudspeakers, a video display and<br />
all source devices should be connected. You should be able to turn<br />
on the receiver and view the Master menu when you press the OSD<br />
Button. If necessary, reread the Installation Section and the beginning<br />
of this section before continuing.<br />
Configure the <strong>AVR</strong> <strong>1600</strong>, Using EzSet/EQ<br />
Technology<br />
One of the most important steps in setting up a home theater<br />
system is to calibrate the receiver to match the loudspeakers,<br />
optimizing sound reproduction.<br />
Until recently, most receivers required manual calibration and<br />
configuration, a tedious process that called for a good ear or the<br />
purchase of an SPL (sound-pressure level) meter. Although you may<br />
configure the <strong>AVR</strong> <strong>1600</strong> manually, as described in the Advanced<br />
Functions section, it is recommended that you take advantage of<br />
the signature <strong>Harman</strong> <strong>Kardon</strong> EzSet/EQ system.<br />
STEP THREE – Turn on the <strong>AVR</strong> <strong>1600</strong> and the video display.<br />
Press the OSD Button to display the Master menu. Use the 5 Button<br />
to highlight the EZSET/EQ LINE, then press the OK Button. See Figure 19.<br />
Figure 19 – EzSet/EQ Screen<br />
Select “YES”, and a warning screen, followed by the screen shown<br />
in Figure 20, will appear.<br />
Figure 20 – EzSet/EQ Screen<br />
To return to the SPEAKER SETUP menu without starting the EzSet/EQ<br />
process, select “Cancel”. When you are ready to begin, select the<br />
number of speakers in your system. Select 5.1 if no surround back<br />
speakers are present or if the surround back channels will be used for<br />
multizone operation.<br />
16<br />
23


