ExamView: Training Session #1 Math Department The Startup Menu ...
ExamView: Training Session #1 Math Department The Startup Menu ...
ExamView: Training Session #1 Math Department The Startup Menu ...

Create successful ePaper yourself
Turn your PDF publications into a flip-book with our unique Google optimized e-Paper software.
<strong>ExamView</strong>: <strong>Training</strong> <strong>Session</strong> <strong>#1</strong><br />
<strong>Math</strong> <strong>Department</strong><br />
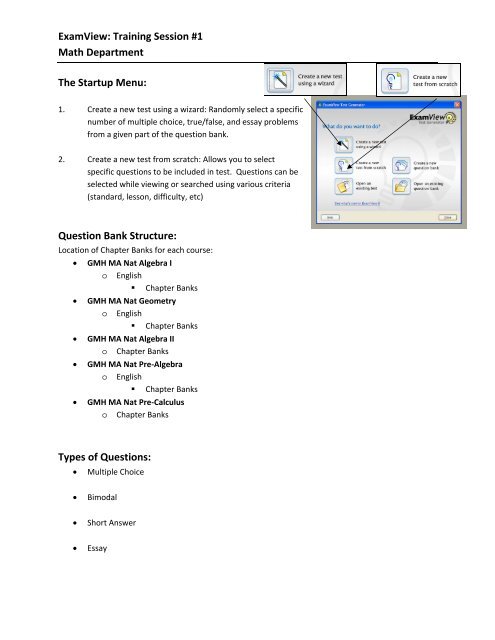
<strong>The</strong> <strong>Startup</strong> <strong>Menu</strong>:<br />
1. Create a new test using a wizard: Randomly select a specific<br />
number of multiple choice, true/false, and essay problems<br />
from a given part of the question bank.<br />
2. Create a new test from scratch: Allows you to select<br />
specific questions to be included in test. Questions can be<br />
selected while viewing or searched using various criteria<br />
(standard, lesson, difficulty, etc)<br />
Question Bank Structure:<br />
Location of Chapter Banks for each course:<br />
• GMH MA Nat Algebra I<br />
o English<br />
• Chapter Banks<br />
• GMH MA Nat Geometry<br />
o English<br />
• Chapter Banks<br />
• GMH MA Nat Algebra II<br />
o Chapter Banks<br />
• GMH MA Nat Pre‐Algebra<br />
o English<br />
• Chapter Banks<br />
• GMH MA Nat Pre‐Calculus<br />
o Chapter Banks<br />
Types of Questions:<br />
• Multiple Choice<br />
• Bimodal<br />
• Short Answer<br />
• Essay
Create a new test using a wizard:<br />
1. Select “Create a new test using a<br />
wizard” from the startup menu.<br />
2. Type in a name for the test you would<br />
like to create (ex. Algebra I: Mid‐Term)<br />
3. Double Click on the appropriate<br />
textbook (GMH MA Nat Algebra I 10).<br />
4. Double Click on the appropriate<br />
subfolder (English‐English language<br />
question bank)<br />
5. Double Click on the appropriate subfolder<br />
(Chapter Banks: Question banks by chapter)<br />
6. Double Click on the appropriate chapters for<br />
your test (Chapter 1, 2, and 3)<br />
7. Click next.<br />
8. Type the number of each type of question you would like<br />
on your test (30 Bimodal, 5 Short Answer, and 1 Essay).<br />
9. Click next.<br />
10. Click Finish.<br />
11. Congratulations, you just created your first test!
Formatting Options in Exam View:<br />
Adding Work Space and/or Editing Questions:<br />
1. Double click on the question<br />
2. Move cursor to the location you would like<br />
to add space<br />
3. Hit enter to add additional space<br />
4. Edit questions in this screen<br />
5. Double click on equations to open math<br />
editor.<br />
6. Anything shaded grey is part of a formula<br />
(don’t change)<br />
7. Change correct answer by clicking on the<br />
circle next to the correct response<br />
8. Click on Record to save changes<br />
9. Many more options for a later session on<br />
question writing and editing options<br />
Printing Options:<br />
1. If you are happy with what you see in exam view you can<br />
select “Print Test” from the File <strong>Menu</strong>.<br />
2. If you would like to be able to open the document in<br />
Word and add your own questions, you can select<br />
“Rich Text Format” from the File/Export <strong>Menu</strong>.<br />
This saves the document as a .rtf file which can be<br />
opened and edited in Microsoft Word.<br />
Be aware that the questions are formatted in tables<br />
and are very hard to efficiently edit once in word.
Create a new test from scratch:<br />
1. Select “Create a new test from scratch” from<br />
the startup menu<br />
2. Type in a name for your new test (ex. Alg I –<br />
MidTerm)<br />
3. <strong>The</strong> screen to the right will pop up to remind<br />
you of the ways you can select questions.<br />
Click Ok.<br />
Option 1: Select While Viewing<br />
4. Click on “Select While<br />
Viewing.”<br />
5. Select appropriate question banks (see earlier in this document).<br />
Click Next.<br />
6. Select the question bank to view<br />
7. Place a check mark next to questions<br />
you want to include<br />
8. Click Finish<br />
9. You will now have a test and answer key<br />
with your selected questions.
Option 2: Select By Criteria<br />
10. Click on “Select by Criteria”<br />
11. Select appropriate question banks (see earlier in this<br />
document). Click Next.<br />
12. Select the appropriate criteria<br />
13. Choose: “Select While Viewing” or<br />
“Select Randomly”<br />
14. If you “select while viewing” follow<br />
steps earlier in document.<br />
15. If you “select randomly” you will be asked for the number of<br />
problems you would like to include. Type in the number and<br />
click ok.
Other Options:<br />
Printing Multiple Versions<br />
1. Select “Print Test” under the file menu.<br />
2. On the pop‐up menu, select the number of different<br />
versions you would like to print.<br />
3. Select how you would like alternate version created.<br />
4. Select whether or not to print answer strips.<br />
5. Click Ok.<br />
Other Question Banks:<br />
1. Standardized Test Prep: Questions aligned to various state and national testing<br />
2. Chapter Resources Bank: Identical to the print resources that came with textbook<br />
3. Diagnostic Tests: Identical to placement test booklet<br />
4. Many more