Therma - Rad Draft.pdf - Hurlcon Heating
Therma - Rad Draft.pdf - Hurlcon Heating
Therma - Rad Draft.pdf - Hurlcon Heating

You also want an ePaper? Increase the reach of your titles
YUMPU automatically turns print PDFs into web optimized ePapers that Google loves.
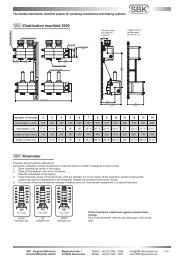
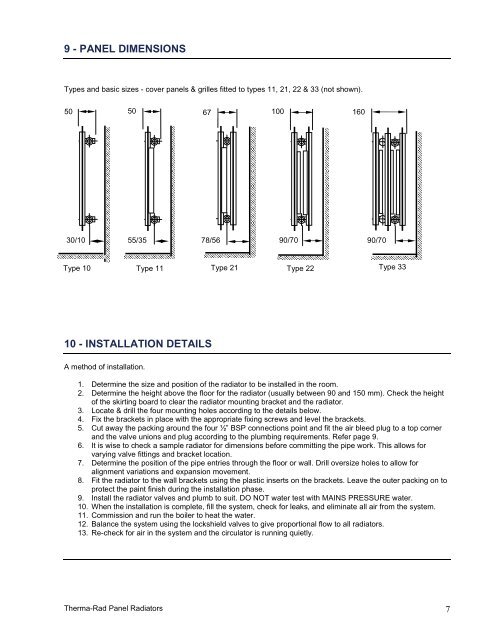
9 - PANEL DIMENSIONS<br />
Types and basic sizes - cover panels & grilles fitted to types 11, 21, 22 & 33 (not shown).<br />
50 50 67 100 160<br />
30/10 55/35 78/56 90/70 90/70<br />
Type 10 Type 11 Type 21 Type 22 Type 33<br />
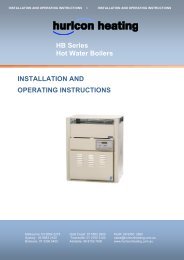
10 - INSTALLATION DETAILS<br />
A method of installation.<br />
1. Determine the size and position of the radiator to be installed in the room.<br />
2. Determine the height above the floor for the radiator (usually between 90 and 150 mm). Check the height<br />
of the skirting board to clear the radiator mounting bracket and the radiator.<br />
3. Locate & drill the four mounting holes according to the details below.<br />
4. Fix the brackets in place with the appropriate fixing screws and level the brackets.<br />
5. Cut away the packing around the four ½” BSP connections point and fit the air bleed plug to a top corner<br />
and the valve unions and plug according to the plumbing requirements. Refer page 9.<br />
6. It is wise to check a sample radiator for dimensions before committing the pipe work. This allows for<br />
varying valve fittings and bracket location.<br />
7. Determine the position of the pipe entries through the floor or wall. Drill oversize holes to allow for<br />
alignment variations and expansion movement.<br />
8. Fit the radiator to the wall brackets using the plastic inserts on the brackets. Leave the outer packing on to<br />
protect the paint finish during the installation phase.<br />
9. Install the radiator valves and plumb to suit. DO NOT water test with MAINS PRESSURE water.<br />
10. When the installation is complete, fill the system, check for leaks, and eliminate all air from the system.<br />
11. Commission and run the boiler to heat the water.<br />
12. Balance the system using the lockshield valves to give proportional flow to all radiators.<br />
13. Re-check for air in the system and the circulator is running quietly.<br />
<strong>Therma</strong>-<strong>Rad</strong> Panel <strong>Rad</strong>iators 7