Winlens lab instructions
Winlens lab instructions
Winlens lab instructions

Create successful ePaper yourself
Turn your PDF publications into a flip-book with our unique Google optimized e-Paper software.
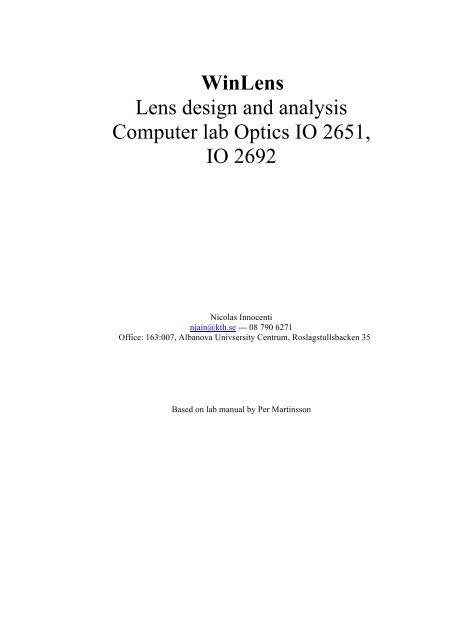
WinLens<br />
Lens design and analysis<br />
Computer <strong>lab</strong> Optics IO 2651,<br />
IO 2692<br />
Nicolas Innocenti<br />
njain@kth.se --- 08 790 6271<br />
Office: 163:007, Albanova Univsersity Centrum, Roslagstullsbacken 35<br />
Based on <strong>lab</strong> manual by Per Martinsson
Introduction<br />
In this computer <strong>lab</strong>oratory, you will design and analyze a few different optical<br />
systems using the software WinLens Basic.<br />
Working on your own computer<br />
The computer <strong>lab</strong> is performed on your own computer. You can download and<br />
install the software (WinLens Basic) and the Lens Library on your own<br />
computer from http://www.winlens.de/, and do the assignments on you own<br />
computer. You need to install<br />
• WinLens Basic, http://www.winlens.de/index.php?id=25<br />
• WinLens Library 2002, http://www.winlens.de/index.php?id=68<br />
Please do not hesitate to contact the teaching assistant if you have any problems<br />
installing the software.<br />
Working with other software<br />
If you are familiar with (and have access to) other lens design software, such as<br />
OSLO or Zemax, you can to do the assignments using your favorite lens design<br />
software. However, the teaching assistant may not be able to answer questions<br />
regarding the specifics of the software.<br />
Optional Computer <strong>lab</strong> sessions<br />
One or two computer <strong>lab</strong> sessions can be organized during weeks 43 and 44<br />
(October 22 nd – Nov 2 nd ) upon request from the students. During those sessions,<br />
the teaching assistant will answer questions and assist you in the use of the<br />
software on your personal laptops.<br />
Requests for sessions need to be sent to the teaching assistant by October<br />
26 th latest, preferably in groups and with all possible time slots for the<br />
session (plan about 4 hours/session).<br />
The <strong>lab</strong> report<br />
In order to receive credits for the <strong>lab</strong> assignment you must hand in a <strong>lab</strong> report.<br />
The <strong>lab</strong> report should include answers to the questions in the <strong>lab</strong> <strong>instructions</strong>,<br />
motivations for choices you have made, results and (brief) conclusions for the<br />
different assignments. You are encouraged to report your results in the form of<br />
graphs, tables and lens drawings from WinLens, when possible. (To copy the<br />
screen to the clipboard, press SHIFT-PrntScrn. You can then paste a snapshot of<br />
the screen into Paint, or a similar application. To copy individual graphs or<br />
tables, right click on the graph/table and choose Copy graph/table to clipboard.)<br />
If you do to the computer <strong>lab</strong> together with other students (co-operation is<br />
encouraged), you only need to hand in one report per group.<br />
The <strong>lab</strong> needs to be submitted by e-mail to the teaching assistant by Monday<br />
November 5 th , 8.59 AM at the latest. Use PDF format and include<br />
[<strong>Winlens</strong>2012] in the subject of the e-mail.
Please note that the teaching assistant will send a confirmation e-mail upon<br />
reception of your report. If you don’t receive the confirmation within ~24<br />
hours, send the report once again!<br />
If you need help<br />
If you have any questions regarding the <strong>lab</strong> assignment, or the installation of the<br />
software, please do not hesitate to contact the teaching assistant. You find the e-<br />
mail address, telephone number, and room number on the front page of this<br />
document.<br />
‘Major’ issues should be kept for computer <strong>lab</strong> sessions when possible.<br />
Remark about the <strong>lab</strong> notes<br />
The present <strong>lab</strong> manual was originally written for <strong>Winlens</strong> Free 4.4. You will<br />
likely notice a few minor differences between the screenshots in the <strong>lab</strong> notes<br />
and the interface in <strong>Winlens</strong> Basic. The usage principles of the software and its<br />
functions however remain to a large extend identical.<br />
Remark about the software<br />
Some stability problems with Windows 7 64 bits have been reported. If you<br />
face such problem, try running the software using “Windows XP Mode”<br />
(Avai<strong>lab</strong>le for download at http://www.microsoft.com/windows/virtualpc/download.aspx<br />
--- Short tutorial here:<br />
http://www.sevenforums.com/tutorials/8247-windows-xp-mode-installsetup.html)
Getting started with WinLens 4.4<br />
The purpose of this section is to get to know WinLens. You do not need to<br />
include anything from this section in the <strong>lab</strong> report.<br />
About LINOS Photonics WinLens 4.4<br />
WinLens 4.4 is an optical design and analysis application that uses ray tracing to<br />
calculate geometrical quantities, aberrations, optical performance etc. Using the<br />
various menu options, spreadsheets and buttons, you can easily set and change<br />
the parameters of the system, or otherwise modify the design.<br />
Finding Help<br />
WinLens has a good help system, with a well-structured table of contents. A<br />
good way to get an overview of the functionality of the application is to browse<br />
through the help files (starting from the table of contents). The help files include<br />
a glossary of terms, where you can find explanations to important concepts of<br />
geometrical optics. The help system is context sensitive, i.e. if you want help on<br />
what you are currently doing, press F1 and the help page concerning your<br />
current action (or more precisely, the currently active window) will be<br />
displayed.<br />
Getting started<br />
Starting WinLens<br />
You find WinLens on the Start menu under Start → All Programs → LINOS<br />
Photonics → WinLens 4.4.<br />
A note about decimal separator<br />
Depending on the language settings for Windows on the computer you are using,<br />
the decimal separator may be either a point or a comma. For instance, if you are<br />
running WinLens on a Swedish version of Windows, you should use the comma<br />
as separator. If you use the point it will be ignored, i.e. “3.5” is interpreted as<br />
“35”.<br />
The windows<br />
When you start WinLens 4.4, two windows<br />
• the System Data Editor (Fig. 1), and<br />
• the System Parameter Editor (Fig. 2)<br />
are displayed within the main window (“LINOS Photonics WinLens 4.4”).<br />
These two windows are always displayed, you can not close them. The System<br />
Data Editor is where you set up the lens system by adding parts to the<br />
Component column. In the section “A user-defined lens” we will try this.
The System Parameter Editor has six tabs – Main, Conjugates, Aperture etc –<br />
that you access by clicking the tabs. The System Parameter Editor is where you<br />
set parameters such as wavelengths, field size, object distance etc.
The Windows menu<br />
When you have many windows open, you may want to use the Windows menu<br />
to find windows that have gone missing behind other windows. The System<br />
Parameter Editor is always number 1 in the list, and the System Data Editor is<br />
always number 2 – so you can access these from the keyboard by pressing Alt-<br />
W-W-1 or Alt-W-W-2, respectively. The Tile Vertically option fills the<br />
workspace with all open windows, and gives them equal sizes. You cannot undo<br />
this, so if you have arranged the windows to a layout you like, don’t use this<br />
option. The Cascade option puts the windows on top of each other, slightly<br />
displaced so you can see all of them. Like Tile Vertically, Cascade cannot be<br />
undone.<br />
Adding a lens<br />
A catalogue lens<br />
In this section we set up a simple imaging system with one single lens and have<br />
a look at some of its characteristics.<br />
To open a catalogue of lenses with their respective design data,<br />
• open the menu Data Base (ALT-D) and then choose Component Data<br />
Base (SHIFT-C), or quicker: press F3 2<br />
If you look at row 339 you will find an achromat, with focal length f=100mm,<br />
and part no (NoMount) 322288000. If you don’t see it, click Full Database, and<br />
it should appear. Click on the part no, and WinLens gives you a drawing of the<br />
lens and informs you that the focal length is 100.04 mm at wavelength 587.6<br />
nm, and that the diameter is 31.5 mm. To add the lens to your system,<br />
• drag and drop the part no to the Component column in the System Data<br />
Editor.<br />
Now the lens is in place. (Typing the number into the Component column has<br />
the same effect.) “Stop” on the same row as the lens means that the aperture stop<br />
is immediately in front of the first surface of the lens.<br />
The next step is to set the parameters of the imaging system. The System<br />
Parameter Editor is where you do this. Look at the Main tab. Here you find,<br />
among other things, the object distance. Its default value is –1000mm. To place<br />
the object at infinity,<br />
• change to the Conjugates tab and click the radio button Object at<br />
Infinity.<br />
To set the size of the aperture stop,<br />
• go to the Aperture tab.<br />
There, you find a number of different terms (NA, F/No etc) all describing the<br />
size of the stop. If you are primarily interested in the flux of light through the<br />
aperture, you should set the stop radius. To set the stop radius:<br />
• click the Stop Rad radio button. Then enter the desired stop radius, say<br />
5.0 mm, into the text box to the right of the radio button. Press Enter<br />
and WinLens calculates the values for NA, F/No etc and fills in their values.
Now we need to set parameters for the object field.<br />
• Select the Field tab.<br />
• Select Object Angle and enter 10 (degrees). Press Enter.<br />
WinLens now calculates the angle on the image side and the resulting image size<br />
(radius) and displays their values (in this case the image has a radius of<br />
17,665mm). If you would like a nicely formatted printout of all system<br />
parameters, click the Show button on the Main tab and then click Print.<br />
To display a drawing of the lens,<br />
• select Lens Drawing in the Graphs menu (or click the icon with a lens<br />
on it on the Graphs tab in the toolbar, or quicker: Press CTRL-D.).<br />
The drawing contains the achromat, the stop (two red dots) and the chief ray<br />
from the object point at 10 degrees from the optical axis.<br />
To add more rays or other features to the drawing,<br />
• right click on the drawing and select Select options for this drawing (or<br />
press S). If you select the following features:<br />
o Image Plane,<br />
o Entrance Pupil [E],<br />
o Exit Pupil [E’],<br />
o Rear Focus [F’],<br />
o Principal Plane 1 [P], and<br />
o Principal Plane 2 [P’],<br />
on the Paraxial features tab, and<br />
o Paraxial Rays, and<br />
o Extreme Rays in Fans,<br />
on the Rays tab – you will have the lens drawing shown in Fig. 3.<br />
Fig 4: <strong>Winlens</strong>’ drawing of lens with rays
A user-defined lens<br />
Before you continue, remove the achromat:<br />
• select the cell containing the part no (322288000), and press delete.<br />
To create a lens,<br />
• type “lens” in the Component column of the System Data Editor window<br />
and then press Enter.<br />
This gives you a spreadsheet (User defined lens: Component 1) where you can<br />
enter lens radii, thickness, material, and aperture half diameter. First, create a<br />
lens with the same data as that of the catalogue lens in the previous section. This<br />
makes it easy to verify that you have got everything right. The lens data for the<br />
catalogue lens can be found in the Surface by Surface table in Fig. 4.<br />
The bi-convex first lens of the achromat has the radii 61.748 mm and –45.153<br />
mm. The thickness (Sepn=separation between the surfaces) is 7.50 mm, and the<br />
aperture half-diameter is 15.75 mm. Enter all these values into their respective<br />
boxes. The material of the first lens is Shott N-BK7. Delete “air” from the Glass<br />
box and type N-BK7, then press Enter, select glass maker Schott and click OK.<br />
The negative meniscus lens has radii -45.153 mm (shared with the first lens) and<br />
–130.04 mm. Its thickness is 2.00 mm and the lens material is N-SF5. When you<br />
have entered all the data for the compound lens, press Enter. This gives you a<br />
picture of the lens. The spreadsheet should now look as in Fig. 5. If it does, click<br />
OK.
Now set the system parameters (object distance, aperture size, object angle) to<br />
the same values you used in the previous section. Look at the Lens Drawing and<br />
compare it to the one in Fig 3. It should look the same. If it does, you have<br />
managed to create a lens using your “own” data!<br />
More spreadsheets<br />
Surface by Surface<br />
To view the Surface by Surface table,<br />
• click the Surf Data icon on the Tables tab on the toolbar.<br />
You can see that your own lens gives the same Surface by Surface table as the<br />
one in Fig. 4.<br />
Pressing F1 (Help) tells you that this table is called Surface Data Table/Editor.<br />
In other words, you can use this table as an editor to change surface parameters.<br />
The parameters that can be changed have a yellow background. Try this; change<br />
the first radius from 61.748 mm to 51.748 mm. The refractive power of the lens<br />
increases and the back focal length decreases from 95.38 mm to 81.39 mm. You<br />
can also see the difference in the lens drawing.<br />
Undo<br />
WinLens has an ”undo” option (Edit menu -Undo option, CTRL-Z, or this<br />
icon). Undo takes the program back to the state it was in before the last change.<br />
The undo-functionality in WinLens doesn’t hold a list of previous states. This<br />
means that you can only change between the state after the latest change and the<br />
state before the latest change. If you do undo several times, you switch between<br />
these two states. Try this; after changing the radius to 51.748 mm, press CTRL-<br />
Z. The radius is 61.748 mm again. Press CTRL-Z again and the radius changes
ack to 51.748 mm. This way you can switch between the two radii and observe<br />
the difference in the lens drawing.<br />
Paraxial values at mid wave<br />
Paraxial values at mid wave gives you the values of all the important quantities<br />
you find along the optical axis of the system. (“Mid wave” refers to the Mid<br />
Wavelength that is set on the Waveband tab of the System Parameter Editor.)<br />
To open this table,<br />
• click Parax Sys on the Tables tab<br />
Paraxial Data: Surfaces<br />
Paraxial Data: Surfaces is the component level equivalent of the Paraxial<br />
values at mid wave table.<br />
To open Paraxial Data: Surfaces,<br />
• click Parax Comp on the Tables tab<br />
Paraxial Ray Trace<br />
This table shows the ray tracing data in numbers. The height and angle of the<br />
marginal and principal rays, at each surface through the whole system, are<br />
displayed.<br />
To open the Paraxial Ray Trace table,<br />
• click Parax Rays on the Tables tab<br />
Performance characteristics<br />
Spot Diagrams and Geometric MTF<br />
Spot Diagrams and Geometric MTF show the spreading (blurring) of object<br />
points as they are reproduced in the image by the optical system, i.e. they give<br />
you information on detail reproduction, resolution and sharpness.<br />
Spot Diagrams<br />
Spot Diagrams show where rays intersect the Gaussian image plane, as well as<br />
planes in front of and behind the Gaussian image plane.<br />
To view the spot diagrams,<br />
• Click the Spot icon on the Graphs tab on the toolbar.<br />
In Fig. 6 the spot diagrams show the intersection of the rays with planes located<br />
at -2mm, -1mm, 0, 1mm and 2mm relative to the Gaussian image plane. The<br />
distance between the planes can be set in the Spacing box above the spot<br />
diagrams. You can also change the scale of the diagrams (in the Scale box). In<br />
Fig. 6, there are two rows of diagrams. Each row corresponds to one object<br />
point. With the parameters you entered in the section “A catalogue lens”, the top<br />
row corresponds to the on-axis object point, and the bottom row corresponds to
the object point at 10 degrees from the optical axis.<br />
The spot diagram shows a distribution of light around a point in the image. With<br />
an infinite number of rays, the distribution would be the point spread function<br />
(PSF). To get a good approximation of the PSF, you should make sure that you<br />
use enough rays.<br />
• Select Number of Ray Rings in the Options menu<br />
• choose 15 rings.<br />
WinLens can reduce the dots in the spot diagram to numerical values by<br />
calculating the root mean square of the distances from the Gaussian image point<br />
to the points where the rays intersect the plane. To see these r.m.s. distances,<br />
• click the Summary button<br />
Even a diffraction-limited system will reproduce a dot as a distribution (the Airy<br />
disc); the radius of the Airy disc is given in the summary (look for Diffraction in<br />
the Field column, and Spot Rad in the Data type column), so you can compare<br />
the performance of your system to the physical limit.<br />
The size of the Airy disc is also displayed in the spot diagrams, as a red circle,<br />
when the Airy checkbox is checked. To see the Airy disc, make sure that the<br />
scale is small enough.<br />
• Close the summary<br />
• Change the scale to 0.1 and press Enter<br />
The red circle corresponding to the diffraction-limited spot size should now<br />
appear in the spot diagrams.
Geometric MTF<br />
The Modulation Transfer Function (MTF) is a measure of how contrast is<br />
preserved in the imaging process. Modulation (or contrast) is defined as<br />
Modulation = M = I !"# − I !"#<br />
I !"# + I !"#<br />
,<br />
and the MTF is defined as the ratio of the image modulation to the object<br />
modulation, i.e.<br />
MTF = M !<br />
M !<br />
.<br />
The object can be envisioned as a superposition of sinusoidal gratings of<br />
different spatial frequencies. Each sinusoidal component is affected differently<br />
by the imaging system (the image modulation deteriorates for high-frequency<br />
components), and accordingly the MTF is a function of spatial frequency.<br />
To view the Geometric MTF diagram<br />
• click the MTF icon on the graphs tab<br />
In this double diagram, which is shown in Fig. 7, you find on the left hand side<br />
the MTF in the Gaussian (paraxial) image plane. The horizontal axis<br />
corresponds to spatial frequency. The scale is set in the text box below the<br />
graphs. WinLens, by default, sets the scale to the cut-off spatial frequency of a
diffraction-limited system 13<br />
with the same numerical aperture as the current<br />
system. As in the spot diagram, the rows of graphs correspond to the different<br />
object points.<br />
On the right hand side you find what WinLens calls the Thru MTF, i.e. the MTF<br />
for a specific spatial frequency, in planes in front of and behind the Gaussian<br />
image plane. The horizontal axis corresponds to the distance to the Gaussian<br />
image plane, known as the defocus. In the Thru MTF diagrams, you can see in<br />
which plane you have maximal focusing. For Thru MTF, WinLens uses the half<br />
cut-off frequency by default – you have to choose a reasonable frequency<br />
yourself - for instance 100 cyc/mm for a camera objective. For further<br />
information on the MTF graphs, see Help (press F1).<br />
Chromatic Aberration<br />
Chromatic Abn: EFL/BFL displays the longitudinal chromatic aberration, i.e. the<br />
focal length as a function of wavelength.<br />
To open the Chromatic Abn graph,<br />
• click the COL icon on the Graphs tab of the toolbar.<br />
You can choose between effective focal length (EFL) and back focal length<br />
(BFL). Numerical values are given for the five wavelengths that can be set on<br />
the Waveband tab of the System Parameter Editor.<br />
1 The cut off frequency of a diffraction limited system (where the MTF approaches zero) is
Field Aberrations and Transverse Ray Aberrations<br />
Field Aberrations<br />
To view the field aberrations<br />
• click the FLD icon on the Graphs tab of the toolbar.<br />
Field Aberrations displays three diagrams: Astigmatism, Distortion and Lat<br />
Colour. In each diagram, the horizontal axis represents the aberration, and the<br />
vertical axis represents the position in the image field. The highest point on the<br />
vertical axis corresponds to the maximum value for the image field (the Image<br />
Size Radius on the Field tab of the System Parameter Editor).<br />
The Astigmatism is the difference in focus between the meridian and sagittal ray<br />
fans. The horizontal axis of the Distortion graph represents the quantity<br />
h − h′<br />
h ,<br />
where h’ is the distance from the optical axis to the chief ray, and h the distance<br />
from the optical axis to the paraxial chief ray. The distances, h and h’, are<br />
calculated at the image plane.<br />
The Lat Colour graph shows the lateral chromatic aberration, i.e. the deviation,<br />
calculated in the image plane, of the chief ray due to dispersion. See Fig. 8. The<br />
deviation is calculated relative to the chief ray corresponding to the mid<br />
wavelength.<br />
Transverse Ray Aberrations<br />
To view the transverse ray aberration graphs,<br />
• click the TRA icon on the Graphs tab of the toolbar.<br />
Transverse Ray Aberrations shows the displacement of a non-paraxial ray from
the chief ray originating in the same object point. The displacement is calculated<br />
in the image plane. There are two graphs for each object point, one for the<br />
sagittal ray and one for the meridional ray. The horizontal axis represents the<br />
normalised aperture coordinate. A meridional ray (from an object point below<br />
the optical axis) going through the lower edge of the aperture has its aperture<br />
coordinate at the leftmost point of the horizontal axis. The vertical scale shows<br />
how much higher the ray intersects the image plane, compared to the chief ray.<br />
By reason of symmetry, the sagittal ray fan aberrations are the same on either<br />
side of the aperture, so only one half is plotted. For further information, see Help<br />
(F1).<br />
Seidel Aberrations<br />
Seidel Abberations (icon SEIDEL ABNS, tab Tables) will only be briefly<br />
commented here: For a wavefront to converge to a point, it has to leave the exit<br />
pupil as a sphere whose center is the image point, known as the Gaussian<br />
reference sphere. In 1856, Ludwig Seidel derived an expression for the<br />
difference between the true wave front and the Gaussian reference sphere. (The<br />
“true” wavefront in this context is the wavefront as described by third order<br />
theory.) He found that the difference can be expressed as a polynomial of five<br />
terms, containing different powers of the image field angle, the aperture radius<br />
and the azimuth angle of the ray fan. Each of these five terms relate to one of the<br />
aberrations: spherical aberration, coma, astigmatism, curvature of field, and<br />
distortion. Every surface in an optical system introduces wavefront aberrations.<br />
These add up on the way through the system, and the aim of the designer is to<br />
make the sum of the aberrations as small as possible. The quantitative relations<br />
between the Seidel aberrations and the ray aberrations require a lot of<br />
mathematics, but we can use the Seidel Aberrations table to look at the sums for<br />
each aberration (in the first row of the table – Totals), and to see the contribution<br />
of each surface of the system to the total aberrations. We can, for instance, see<br />
how we through “lens bending” (the redistribution of refractive power between<br />
the surfaces) can reduce the spherical aberration. See also the help files (“Seidel<br />
Aberration Table”, “Seidel Aberrations”, “Wavefront Aberration Polynomial”).
Simulation, design, and analysis of<br />
simple optical systems with LINOS<br />
Photonics WinLens 4.3<br />
This section is the actual <strong>lab</strong> assignment.<br />
1. Lenses and some characteristics<br />
General comments<br />
In this part of the assignment you will set up a simple convex planar lens and<br />
analyze its performance using the criteria you find appropriate. You will also<br />
compare it to an achromat from the component database. An achromat is a lens<br />
(most commonly a doublet lens) designed to limit the effects of chromatic and<br />
spherical aberration. Suggestions of graphs and tables to analyze are<br />
o Spot Diagram<br />
o Spot Diagram Summary<br />
o MTF<br />
o Transverse Ray Aberrations<br />
o Field Aberrations<br />
o Chromatic Aberration<br />
o Seidel Aberrations<br />
To achieve good accuracy for spot diagrams and MTF, always use 15 Ray Rings.<br />
(You set the number of ray rings on the Options menu).<br />
Use screen printouts or screen snapshots, with your own comments, for your <strong>lab</strong><br />
report. To copy the screen to the clipboard, press SHIFT-PrintScrn. To copy<br />
individual graphs or tables, right-click the graph or table and click Copy<br />
graph/table to clipboard.<br />
Tasks<br />
Typing “lens” in the Component column of the System Data Editor, set up a<br />
simple planar convex lens with focal length approximately f=100 mm, aperture<br />
diameter > 30 mm, and glass type Schott BK7 (having refractive index n=1.52).<br />
a) Set the following system parameters<br />
o Object Distance = infinity (the Conjugates tab of the System<br />
Parameter Editor)<br />
o Stop Radius = 10 mm (Aperture tab)<br />
o Object Angles 0 and 10 deg (Field tab)
Compare and discuss the imaging performance of the lens, and its most<br />
important aberration(s), for<br />
a. The planar side of the lens towards the object<br />
b. The convex side of the lens towards the object (Fig. 1 illustrates how<br />
to change the orientation of the lens)<br />
b) Choose the better orientation of the two above and reduce the Stop Radius to 5<br />
mm. What do you gain, in terms of imaging performance? What is the trade-off,<br />
i.e. try to think of what you loose by reducing the stop radius. (It is not in any of<br />
the tables or diagrams in WinLens.)<br />
c) Use the catalogued achromat with part no. 322288000 (drag and drop the part no.<br />
from the component database, or type it directly into the Component column of<br />
the System Data Editor). Discuss the differences of its performance to that of<br />
your simple lens.<br />
2. Six-lens objective<br />
General comments<br />
In this task you should analyze a six-lens objective, how it is affected by a<br />
planar filter, and how it performs at short object distances. To analyze the<br />
system, use<br />
o Geometric MTF<br />
o Chromatic Aberration (COL)<br />
o Field Aberrations (FLD).<br />
Tasks<br />
Load the six-lens objective for a small-image camera 1.8/50 mm of double gauss<br />
type. You find it under \LIBRARY\Double_Gauss_Lenses\wldg014.spd in the<br />
folder where you extracted the ZIP containing the library download from<br />
WinLens’ website. Reduce the aperture size - set F/number to 4 (on the Aperture<br />
tab of the System Parameter Editor). Set the object angle to 10 deg (on the Field<br />
tab of the System Parameter Editor).
With the object at infinity, register the Geometric MTF, Chromatic Aberration<br />
(COL) and Field Aberrations (FLD).<br />
a) The effect of a filter on the quality of the image<br />
In photography, filters are used for many different purposes. In this part of the<br />
exercise, you will examine the effect of the filter on the quality of the image.<br />
The exercise does not concern the actual filtering effect (color correction,<br />
polarization etc), only the effect on the image due to refraction at the filter<br />
surfaces. For this reason the “filter” is modelled as a simple glass plate. To make<br />
the effect visible, use a rather thick filter: a planar parallel plate of BK7, 20mm<br />
thick, and 50mm in diameter. Create the filter as a user defined lens with infinite<br />
radius of curvature for both surfaces. To achieve infinite radius of curvature, set<br />
the radius to 0. Place the “filter”<br />
a. on the image side, immediately behind the objective<br />
b. on the object side, immediately in front of the objective. (Use the<br />
Insert Blank Row option on the Edit menu to make room for the filter in the<br />
system data editor.)<br />
Compare the Geometric MTF, Chromatic Aberration and Field Aberrations for<br />
the three cases<br />
o No filter<br />
o Filter behind the objective<br />
o Filter in front of the objective<br />
Discuss what happens when a planar parallel component (the filter) is added to<br />
the optical system. (Feel free to use additional characteristics for your analysis.)<br />
Draw conclusions and make a recommendation regarding where to place the<br />
filter.<br />
b) The effect of object distance on the imaging performance<br />
Most camera objectives are designed to give their best image formation for<br />
distances of 100 focal lengths or more (i.e. image distances approximately equal<br />
to the focal length). We will now change parameters to analyse what happens<br />
when we use the objective for<br />
1:1 imaging.<br />
Remove the filter. Then do a and b below.
a. Choose (on the Conjugates tab) Finite conjugates and Magnification = -1.<br />
Compare the performance (primarily using MTF) with the performance you saw<br />
with the object at infinity. You should see a dramatic loss in performance.<br />
b. Now put the achromat 322288000 in front of the objective, and look at the<br />
image quality at 1:1 imaging for the combination of the achromat and the<br />
objective. Compare the results to 1:1 imaging without the achromat.<br />
Analyse and comment the results.<br />
3. Optical connector for fiber communication<br />
Design a connector for optical fibers. The connector should be of the type<br />
illustrated in Fig. 2 below. Don’t include the fibers in your design – instead let<br />
the object be the end of one fiber and the image the end of the other fiber. Use<br />
one single object point on the optical axis. For the connector, use a pair of glass<br />
spheres with 4 mm diameter. Use glass<br />
Fig 2. Optical fibre connector<br />
the spheres be 2 mm. Put a stop, with 2 mm diameter, between the spheres. Set<br />
the wavelength to 850 nm, i.e.<br />
• go to the Waveband tab of the System Parameter Editor. Enter a value<br />
larger than 850 in the Long Wavelength and the Long Wavelength 2<br />
textboxes. Then enter 850 in the Mid Wavelength text box.<br />
• set the number of wavelengths, on the Options menu, to 1
The fiber ends should be very close to the spheres, in other words, let the object<br />
distance be small (fractions of a millimetre). Your objective is to maximize the<br />
coupling efficiency by imaging the end of the first fiber onto the end of the<br />
second fiber. Due to spherical aberration, the image spot in the Gaussian image<br />
plane is large. Reduce the size of the spot by compensating as much as possible<br />
with defocus on the image side. (You find Defocus on the Options menu.) Check<br />
the result with Spot Diagram and Spot Diagram Summary.<br />
Report your results, with your own comments, a printout or snapshot of the<br />
System Parameters, and a printout or snapshot of the screen containing at least<br />
o<br />
o<br />
o<br />
o<br />
Main Parameters<br />
Lens Drawing<br />
Paraxial Values at mid wave<br />
Surface by Surface.<br />
4. Reverse engineering<br />
In this exercise you are going to design the optics of the simplest of all cameras,<br />
a disposable one-lens camera. You can find the information you need from the<br />
pictures below.<br />
Before continuing, make sure to restore the wavelengths to visible light. You<br />
can find default settings for visible light in the Default Wavebands dropdown list<br />
on the Waveband tab of the System Parameter Editor.<br />
In Figs. 3, 4 and 5, the lens of the camera is shown. Make an estimate of the lens<br />
diameter and the radius of curvature of the convex surface of the lens. The<br />
estimates do not have to be accurate - they are merely intended as a starting<br />
point for you to optimize from. As can be seen from the pictures, the lens is of<br />
the meniscus type. The radius of curvature of the concave surface is difficult to<br />
estimate, but it has to be larger than that of the convex surface. (Otherwise, the<br />
lens is negative, and will not form a real image.)
To make it easier to compare different solutions we will make a few<br />
assumptions. We assume that the focal length is 35 mm and the f/number is 11.<br />
The lens is to be made of Plexi-Glass (polymethylmetacrylate PMMA). This<br />
leaves the following variables for your optimization:<br />
o the two radii of the lens<br />
o the thickness of the lens<br />
o the position of the aperture stop<br />
o the position of the image plane relative to paraxial focus on the axis<br />
o the curvature of the image plane<br />
PMMA is not in the WinLens materials database. You can create a temporary<br />
material by typing PMMA in the Glass column of the spreadsheet for the user<br />
defined lens, and then pressing Enter. A dialog box appears. Choose Select index<br />
data from n1, V and enter the values n = 1.491, and V = 57.2. If you make a<br />
mistake, you can not edit the data for the temporary material PMMA. Instead,<br />
create another temporary material, e.g. PMMA2, with the correct data.<br />
In most disposable cameras, the aperture stop is positioned immediately behind<br />
the lens, as in Fig. 6. You can choose to position it elsewhere, but keep in mind<br />
that the image distortion generally increases with the distance from the aperture<br />
stop to the lens.
From Fig. 7, you can get an idea of what the curvature of the image plane is for<br />
a disposable camera.
This camera has no mechanism for adjusting the focus, so we choose 4 m as<br />
fixed focus distance.<br />
Let WinLens use three points for its calculations: the axis, the long side of the<br />
negative (r=18 mm) and a third point in between.<br />
A planar object normal to the optical axis, imaged by a simple lens, will be<br />
imaged as a plane only approximately. The image field is actually curved. To<br />
compensate for this curvature, we will bend the film. Let the curvature of the<br />
image plane be spherical, and only consider the meridional plane, ignoring that<br />
the film in practice only can be cylindrically bent. The radius of curvature of the<br />
film (i.e., of the image field) cannot be arbitrarily small, so you have to choose<br />
parameters that give you a reasonable field curvature. See the hint on field<br />
curvature below.<br />
Analyse the spot diagrams and try to optimize the spot-sizes. Don’t forget to<br />
consider the off-axis points.<br />
Analyse the MTF. The 24x36 mm 2 negatives are usually enlarged to 10x15 cm 2<br />
paper copies, i.e. approximately 4 times. When observing paper copies the<br />
perceived sharpness is correlated to the MTF of the image at approximately 2<br />
cycles/mm. Therefore, optimize the MTF for the spatial frequency 7.5 cyc/mm<br />
in the image plane.<br />
To analyse the depth of focus of your camera, investigate its performance at<br />
object distances ∞ and 1 m. At 1 m, the camera is defocused and you have to use<br />
defocus to achieve good imaging.<br />
Report your considerations and results, specifically the values you choose for<br />
the six design parameters. Make sure to report all relevant data. (You can, for<br />
instance, report your parameter values in form of a screen printout or snapshot<br />
as in Fig. 8)<br />
Hint about field curvature<br />
Neglecting astigmatism, the displacement Δx of an image point from the<br />
paraxial image plane is given by (the Petzval curvature)<br />
∆x = y!<br />
2<br />
!<br />
R !<br />
1<br />
n ! ′ − 1 n !<br />
,<br />
where y is the height in the image plane, Ri is the radius of curvature of the i:th<br />
surface, and ni and ni’ are the refractive indices in front of and behind the i:th<br />
surface, respectively. For a simple meniscus lens as those in the disposable<br />
cameras,<br />
∆x = y!<br />
2 R ! − R ! 1 − 1 n !<br />
,
where n i is the refractive index of the lens, so to reduce image curvature, the<br />
radii of curvature should be chosen so that R2 – R1 is small. Because the focal<br />
length is fixed, this means that the radii of curvature have to be small. This<br />
causes strong spherical aberration, so there is a trade-off between field curvature<br />
and spherical aberration. Remember that spherical aberration can be reduced by<br />
proper placement of the stop.