DIGITAL DVD RECORDER AND PLAYER - Medion
DIGITAL DVD RECORDER AND PLAYER - Medion
DIGITAL DVD RECORDER AND PLAYER - Medion

You also want an ePaper? Increase the reach of your titles
YUMPU automatically turns print PDFs into web optimized ePapers that Google loves.
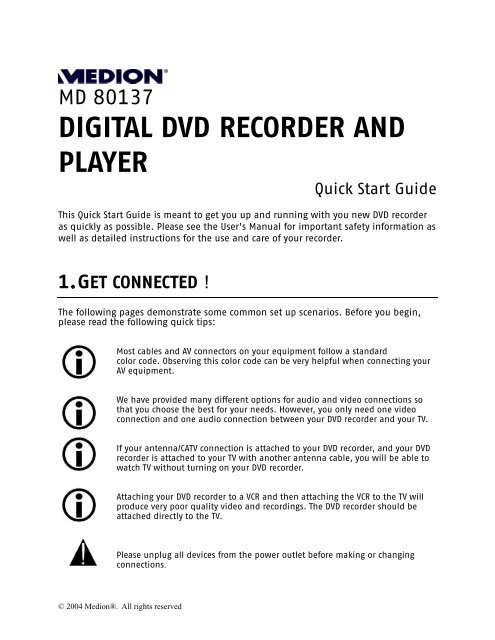
MD 80137<br />
<strong>DIGITAL</strong> <strong>DVD</strong> <strong>RECORDER</strong> <strong>AND</strong><br />
<strong>PLAYER</strong><br />
Quick Start Guide<br />
This Quick Start Guide is meant to get you up and running with you new <strong>DVD</strong> recorder<br />
as quickly as possible. Please see the User’s Manual for important safety information as<br />
well as detailed instructions for the use and care of your recorder.<br />
1. GET CONNECTED!<br />
The following pages demonstrate some common set up scenarios. Before you begin,<br />
please read the following quick tips:<br />
Most cables and AV connectors on your equipment follow a standard<br />
color code. Observing this color code can be very helpful when connecting your<br />
AV equipment.<br />
We have provided many different options for audio and video connections so<br />
that you choose the best for your needs. However, you only need one video<br />
connection and one audio connection between your <strong>DVD</strong> recorder and your TV.<br />
If your antenna/CATV connection is attached to your <strong>DVD</strong> recorder, and your <strong>DVD</strong><br />
recorder is attached to your TV with another antenna cable, you will be able to<br />
watch TV without turning on your <strong>DVD</strong> recorder.<br />
Attaching your <strong>DVD</strong> recorder to a VCR and then attaching the VCR to the TV will<br />
produce very poor quality video and recordings. The <strong>DVD</strong> recorder should be<br />
attached directly to the TV.<br />
Please unplug all devices from the power outlet before making or changing<br />
connections.<br />
© 2004 <strong>Medion</strong>®. All rights reserved
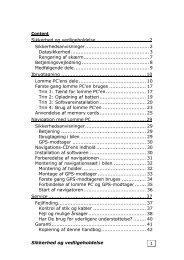
A TV + Antenna or Cable without a Cable Box<br />
1. Connect a TV antenna cable from your wall outlet to ANTENNA IN on the <strong>DVD</strong> recorder.<br />
2. Connect another TV antenna cable from ANTENNA OUT on the recorder to ANTENNA IN on your TV.<br />
3a. Connect red, white, and yellow AV cable to your TV, and to VIDEO OUT, AUDIO OUT R, and AUDIO OUT<br />
L on the back of your recorder.<br />
3b. For higher quality video, connect S-video cable to your TV’s S-video in and the recorder’s<br />
S-video out. You will need to make a separate audio connection. To hear sound from your TV,<br />
make an audio connection by following the instructions for step 3a without the yellow video<br />
cable. To hear sound from speakers connected to an amplifier or receiver, follow the instructions<br />
for 4a, 4b, or 4c.<br />
4a. For stereo sound through an amplifier, connect red and white audio cables from AUDIO OUT R<br />
and AUDIO OUT L on the back of your recorder to audio in on your amplifier.<br />
4b. For digital surround sound, you can connect a coaxial digital audio cable between the recorder<br />
and your amplifier, or<br />
4c. Connect an optical digital audio cable between the recorder and your receiver.<br />
5a. To connect a VCR, use another AV cable to connect to the AV1 IN connections on your recorder, or<br />
5b. Connect S-video out on the VCR to S-video in on the recorder, using the audio connections from<br />
5a.<br />
6. Connect all power cords.<br />
2 MD 80137 Digital <strong>DVD</strong><br />
Recorder and Player<br />
Quick Start Guide
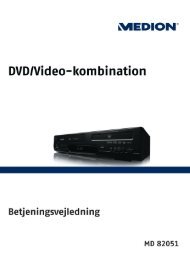
B TV + Satellite Receiver or Digital Cable Box<br />
1. Connect a TV antenna cable from your wall outlet to ANTENNA IN on the <strong>DVD</strong> recorder.<br />
2a. Connect red, white, and yellow AV cable from your cable box to the AV1 IN connections on your<br />
recorder, or<br />
2b. For higher quality video, connect S-video cable from your cable box to S-video in on your<br />
recorder, using the audio connections from 2a to carry sound.<br />
3a. Connect red, white, and yellow AV cable to your TV, and to VIDEO OUT, AUDIO OUT R, and AUDIO OUT<br />
L on the back of your recorder.<br />
3b. For higher quality video, connect S-video cable to your TV’s S-video in and the recorder’s<br />
S-video out. You will need to make a separate audio connection. To hear sound from your TV,<br />
make an audio connection by following the instructions for 3a without the yellow video cable.<br />
To hear sound from speakers connected to an amplifier or receiver, follow the instructions for 4a,<br />
4b, or 4c.<br />
4a. For stereo sound through an amplifier, connect red and white audio cables from AUDIO OUT R<br />
and AUDIO OUT L on the back of the recorder to audio in on your amplifier.<br />
4b. For digital surround sound, you can connect a coaxial digital audio cable between the recorder<br />
and your amplifier, or<br />
4c. Connect an optical digital audio cable between the recorder and your receiver.<br />
5. Connect all power cords.<br />
MD 80137 Digital <strong>DVD</strong><br />
Recorder and Player<br />
Quick Start Guide<br />
3
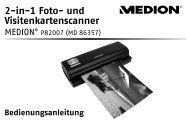
C TV + Analog Cable Box<br />
1. Connect a TV antenna cable from your wall outlet to your cable box.<br />
2. Connect another TV antenna cable from ANTENNA OUT on the cable box to ANTENNA IN on your<br />
recorder.<br />
3. Connect one more TV antenna cable from ANTENNA OUT on the recorder to ANTENNA IN on your TV.<br />
4a. Connect red, white, and yellow AV cable to your TV, and to VIDEO OUT, AUDIO OUT R, and AUDIO OUT<br />
L on the back of your recorder.<br />
4b. For higher quality video, connect S-video cable to your TV’s S-video in and the recorder’s<br />
S-video out. You will need to make a separate audio connection. To hear sound from your TV,<br />
make an audio connection by following the instructions for 4a without the yellow video cable.<br />
To hear sound from speakers connected to an amplifier or receiver, follow the instructions for 5a,<br />
5b, or 5c.<br />
5a. For stereo sound through an amplifier, connect red and white audio cables from AUDIO OUT R<br />
and AUDIO OUT L on the back of the recorder to audio in on your amplifier.<br />
5b. For digital surround sound, you can connect a coaxial digital audio cable between the recorder<br />
and your amplifier, or<br />
5c. Connect an optical digital audio cable between the recorder and your receiver.<br />
6a. To connect a VCR, use another AV cable to connect to the AV1 IN connections on your recorder, or<br />
6b. Connect S-video out on the VCR to S-video in on the recorder, using the audio connections from<br />
5a.<br />
7. Connect all power cords.<br />
4 MD 80137 Digital <strong>DVD</strong><br />
Recorder and Player<br />
Quick Start Guide
Primary Settings<br />
This <strong>DVD</strong> recorder can be set easily by using the buttons. To make selections,<br />
move the cursor to the desired item with the navigation buttons and then press ENTER to confirm.<br />
1. When the <strong>DVD</strong> recorder is turned on for the first time, the TV screen shows the following message:<br />
Select your language<br />
● English<br />
Espanol<br />
Francais<br />
中文<br />
Press the direction keys to choose the menu language, and then press ENTER to confirm.<br />
2. Selection of input signal:<br />
● TV<br />
CATV<br />
Set the TV input<br />
Scanned: 120<br />
Found: 20<br />
Select CATV if the recorder is connected to an analog cable TV signal; otherwise select TV if it is<br />
connected to an antenna. Press keys to select the signal input source. Then press ENTER to<br />
confirm. The <strong>DVD</strong> recorder auto-searches the selected signal type to find channels.<br />
3. Time and date:<br />
●Automatic<br />
Manual<br />
Set the Time<br />
M D Y<br />
01/ 01/ 01<br />
H M A/P<br />
00: 00 AM<br />
Use the direction keys to move the cursor. Use the direction keys to change to the<br />
correct the numbers. When you are finished setting the time and date, highlight the green arrow<br />
and press ENTER to confirm.<br />
4. Press ENTER to exit setup.<br />
MD 80137 Digital <strong>DVD</strong><br />
Recorder and Player<br />
Quick Start Guide<br />
5
NTSC/PAL & Progressive Scan<br />
The NTSC/PAL button cycles between normal NTSC, NTSC progressive scan, and PAL viewing modes.<br />
NTSC is the normal format for Nothern American TV broadcasts.<br />
NTSC Progressive Scan can be used with a component connection to a TV that supports progressive<br />
scan to watch <strong>DVD</strong> movies at a higher resolution.<br />
PAL is the color format for Europe and other areas. If you select PAL, North American movies and<br />
television programs will appear incorrectly on your screen.<br />
NTSC/PAL<br />
If you accidentally put the <strong>DVD</strong> recorder into PAL viewing mode, you will receive a<br />
very bad image on your TV. If you are having trouble displaying video properly, one<br />
of the first things to check is whether pressing the NTSC/PAL button fixes the error.<br />
Buttons<br />
and ENTER<br />
6 MD 80137 Digital <strong>DVD</strong><br />
Recorder and Player<br />
Quick Start Guide
Preparing Discs for Recording<br />
Compatible Discs<br />
� Recordable Disc Types<br />
<strong>DVD</strong>+R/+RW<br />
� Playable Disc and Media Types<br />
<strong>DVD</strong> video, VCD, SVCD, Audio CD, MP3, and Photo CD<br />
We cannot guarantee that your recorded discs will play on another <strong>DVD</strong> player. Please check the<br />
manual for the other <strong>DVD</strong> player to make sure that it can play <strong>DVD</strong>+R and <strong>DVD</strong>+RW discs.<br />
Although your <strong>DVD</strong> recorder can play <strong>DVD</strong>-R, music CDs, and MP3s, you can not use it to record video-<br />
whether a TV broadcast or a home movie - to <strong>DVD</strong>+R or <strong>DVD</strong>+RW.<br />
Disc Types<br />
<strong>DVD</strong>+RW discs can be erased and copied over again, although this may reduce the quality of your<br />
recording. <strong>DVD</strong>+R discs cannot be copied over, and you cannot add new data to a <strong>DVD</strong>+R disc once it<br />
has been finalized.<br />
You may not be able to record to a <strong>DVD</strong>+RW disc that already contains recordings from another <strong>DVD</strong><br />
recorder or PC. If you are able to add a new recording to a disc from another <strong>DVD</strong> recorder, your<br />
recorder will rewrite the <strong>DVD</strong> menu. If the disc contains data from a personal computer, this data will<br />
be erased by your <strong>DVD</strong> recorder.<br />
Initialize a New Disc<br />
Your <strong>DVD</strong> recorder will automatically initalize a new <strong>DVD</strong>+R or <strong>DVD</strong>+RW disc the first time it is placed<br />
into the recorder. This takes about 1 minute, during which the TV screen shows READING. After the<br />
procedure is complete, the TV screen shows a blank title and indicates the recording capacity is 100%.<br />
Recording TV<br />
1. Place an initialized <strong>DVD</strong>+R or <strong>DVD</strong>+RW disc in the <strong>DVD</strong> recorder.<br />
2. Press MONITOR on the remote to switch from <strong>DVD</strong> mode to external input mode.<br />
3. Select the channel you want to record, or<br />
4. Press SOURCE to select the input source you want to record. Press SOURCE multiple times to cycle<br />
through the options:<br />
CVBS1 � CVBS2 � SVIDEO01 �SVIDEO02 �Channel<br />
5. Press RECORD key on remote control or front panel to start recording.<br />
6. Press STOP to stop recording. Please wait while the screen displays “WAIT”. After 15 to 17 seconds,<br />
the recording action is completed.<br />
7. Press MONITOR to switch to <strong>DVD</strong> mode. The recorded title will appear on the screen. Press ENTER to<br />
view your recorded video.<br />
MD 80137 Digital <strong>DVD</strong><br />
Recorder and Player<br />
Quick Start Guide<br />
7
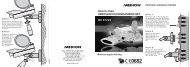
Recording from Other Devices<br />
Recording from a VCR or <strong>DVD</strong> Player<br />
You can record the signal from external devices, such as<br />
VCR, video camcorder, or <strong>DVD</strong> player onto<br />
<strong>DVD</strong>s using your <strong>DVD</strong> recorder.<br />
1. Please confirm the external device is properly<br />
connected to the <strong>DVD</strong> recorder.<br />
2. Place an initialized <strong>DVD</strong>+R or <strong>DVD</strong>+RW disc in the<br />
<strong>DVD</strong> recorder.<br />
3. Press MONITOR on the remote to switch to<br />
external input mode.<br />
4. Press SOURCE key to select source input for<br />
recording.<br />
Input<br />
(Internal tuner)<br />
Screen Display<br />
(Channel)<br />
AV 1 IN CVBS1<br />
AV 2 IN CVBS2<br />
S-VIDEO S-VIDEO<br />
ANTENNA CHANNEL<br />
5. Press RECORD key to start recording immediately.<br />
Finalize a <strong>DVD</strong> +R<br />
Press RECORD key<br />
to start recording.<br />
Press<br />
MONITOR key<br />
to switch<br />
between<br />
external<br />
input mode<br />
and <strong>DVD</strong><br />
Press SOURCE key to<br />
select the recording<br />
source (CVBS1, CVBS2 or<br />
S-VIDEO, CHANNEL).<br />
This function allows a <strong>DVD</strong>+R disc to be played on general <strong>DVD</strong> players. A finalized disc cannot be<br />
recorded with new or revised content.<br />
1. Press SETUP to enter the setup menu and select “Disc”.<br />
2. Select “Finalize <strong>DVD</strong>” and press ENTER to execute.<br />
3. The screen displays status of the finalization and the remaining time required.<br />
The time required for this function depends on the disc type, length of the recorded content and the<br />
quantity of the titles.<br />
8 MD 80137 Digital <strong>DVD</strong><br />
Recorder and Player<br />
Quick Start Guide