installation manual - Kreon
installation manual - Kreon
installation manual - Kreon

You also want an ePaper? Increase the reach of your titles
YUMPU automatically turns print PDFs into web optimized ePapers that Google loves.
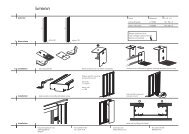
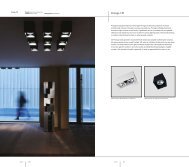
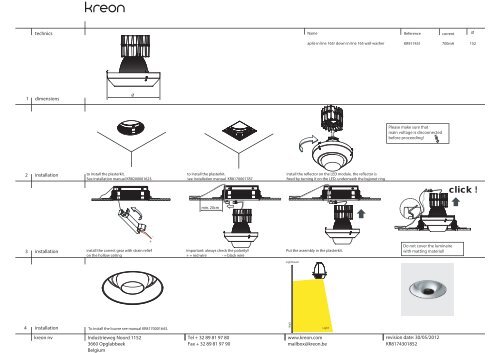
technics<br />
Name<br />
Reference<br />
current<br />
Ø<br />
aplis-in line 165/ down in line 165 wall washer<br />
KR917431<br />
700mA<br />
152<br />
1<br />
dimensions<br />
Ø<br />
Please make sure that<br />
main voltage is disconnected<br />
before proceeding!<br />
2<br />
<strong>installation</strong><br />
to install the plasterkit.<br />
See <strong>installation</strong> <strong>manual</strong> KR8200001623.<br />
to install the plasterkit.<br />
see <strong>installation</strong> <strong>manual</strong> KR8170001787<br />
install the reflector on the LED module. the reflector is<br />
fixed by turning it on the LED, underneath the bajonet ring<br />
click !<br />
min. 20cm<br />
3<br />
<strong>installation</strong><br />
install the correct gear with strain relief<br />
on the hollow ceiling<br />
-<br />
+<br />
important: always check the polarity!!<br />
+ = red wire - = black wire<br />
Put the assembly in the plasterkit.<br />
Do not cover the luminaire<br />
with matting material!<br />
Lightbeam<br />
4<br />
<strong>installation</strong><br />
To install the louvre see <strong>manual</strong> KR8170001643.<br />
Wall<br />
Light<br />
kreon nv<br />
Industrieweg Noord 1152<br />
3660 Opglabbeek<br />
Belgium<br />
Tel + 32 89 81 97 80<br />
Fax + 32 89 81 97 90<br />
www.kreon.com<br />
mailbox@kreon.be<br />
revision date: 30/05/2012<br />
KR8174301852
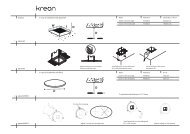
technics<br />
Name<br />
Reference<br />
L x B x H<br />
Louvre down in line 80<br />
KR717116 /KR717112 80 x 80 x 22,5<br />
Louvre down in line 165 KR717216 /KR717212 164 x 164 x 39<br />
B<br />
L<br />
H<br />
1<br />
dimensions<br />
Align the springs with the slots.<br />
2<br />
<strong>installation</strong><br />
In case of 165, fix the fall safety cable with added screw to the louvre.<br />
Insert the louvre in the plasterkit.<br />
Result without shadow gap, when plasterkit<br />
KR717114/ KR717214 is used.<br />
Result with shadow gap, when plasterkit<br />
KR717118/KR717218 is used.<br />
kreon nv<br />
Industrieweg Noord 1152<br />
3660 Opglabbeek<br />
Belgium<br />
Tel + 32 89 81 97 80<br />
Fax + 32 89 81 97 90<br />
www.kreon.com<br />
mailbox@kreon.be<br />
revision date: 21/09/11<br />
KR8170001762
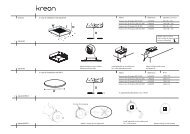
technics<br />
A<br />
A<br />
Name<br />
Plasterkit box without shadow gap<br />
Plasterkit box with shadow gap<br />
In case of QT12-ax type<br />
Reference<br />
KR717214<br />
KR717218<br />
KR917813<br />
A<br />
186<br />
186<br />
In case of QT12-ax Wall Washer type KR917413 170: 175:<br />
195:<br />
H min<br />
200:<br />
Tmin-T max<br />
H<br />
T<br />
In case of HIT-TC type<br />
KR917883<br />
225: 230:<br />
In case of HIT-TC Wall Washer type KR917483 200: 205:<br />
In case of QR-LP111 type<br />
In case of HIR-CE111 type<br />
KR917823<br />
KR917853<br />
178:<br />
203:<br />
230:<br />
230:<br />
1<br />
cut out<br />
Plasterboard thickness 9-26<br />
320<br />
73<br />
Name<br />
Reference<br />
B<br />
Plasterkit box without shadow gap<br />
KR717214<br />
171<br />
Plasterkit box with shadow gap KR717218 177<br />
188<br />
B<br />
2<br />
dimensions<br />
3<br />
<strong>installation</strong><br />
Insert the plasterkit through the hole on the<br />
ceiling<br />
Fix the plate with plasterboard screws<br />
4<br />
<strong>installation</strong><br />
Align the box with the plasterboard using the thumb screw.<br />
Fix these screws with a hexagon screw key.<br />
Fill around perimeter of plasterkit using suitable filler and plaster<br />
to hide screws and plasterkit.<br />
kreon nv<br />
Industrieweg Noord 1152<br />
3660 Opglabbeek<br />
Belgium<br />
Tel + 32 89 81 97 80<br />
Fax + 32 89 81 97 90<br />
www.kreon.com<br />
mailbox@kreon.be<br />
revision date: 22/03/11<br />
KR8170001787
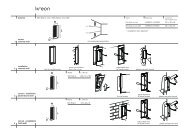
technics<br />
In case of precast concrete panels,<br />
gear inclusive.<br />
In case of finished concrete ceiling,<br />
gear exclusive.<br />
Name<br />
Concrete plasterkit down IL 80<br />
(shadow gap)<br />
Reference<br />
KR717111<br />
(9)<br />
Lamptype<br />
Ø A<br />
E F G<br />
QR-CBC51<br />
Ø 140 320 320 200 170 130<br />
LED dir, fixed, WW Ø 140 300 300 157 170 140<br />
Audio Ø 140 200 200 130 150 130<br />
B<br />
D<br />
1<br />
cut out<br />
G<br />
ExF<br />
A<br />
D<br />
Ø<br />
B<br />
Concrete plasterkit down IL 80 double KR727119 QR-CBC51<br />
Ø 210 400 400 200 220 130<br />
LED dir, fixed, WW Ø 210 400 400 200 220 140<br />
Audio<br />
Ø 210 230 230 130 150x220 130<br />
Concrete plasterkit down IL 165<br />
(shadow gap)<br />
KR717211<br />
(9)<br />
QT12-ax<br />
QR-LP111<br />
HIT_TC<br />
HIR-CE111<br />
Ø 252 or 200<br />
Ø 252 or 200<br />
Ø 252 or 200<br />
Ø 252 or 200<br />
200 450 200<br />
200 450 230<br />
200 450 230<br />
200 450 230<br />
210<br />
210<br />
210<br />
210<br />
195<br />
178<br />
225<br />
203<br />
180<br />
246<br />
37<br />
270<br />
73<br />
180<br />
200<br />
246<br />
270<br />
246<br />
270<br />
191<br />
200<br />
37<br />
270<br />
246<br />
2<br />
dimensions<br />
Down in-line 80<br />
Down in-line 80 double<br />
Down in-line 165<br />
In case of down IL 165.<br />
3<br />
<strong>installation</strong><br />
Put the plasterkit through the hole.<br />
Fix the plasterkit with screws.<br />
Align the box with the plasterboard using the thumb screw.<br />
Fix these screws with a hexagon screw key.<br />
In case of 80 range<br />
please make sure that<br />
sticker is removed<br />
before proceeding!<br />
Min 75<br />
4<br />
<strong>installation</strong><br />
Fill around perimeter of plasterkit using suitable filler<br />
and plaster to hide screws and plasterkit.<br />
Minimum filler distance, spread out until zero.<br />
kreon nv<br />
Industrieweg Noord 1152<br />
3660 Opglabbeek<br />
Belgium<br />
Tel + 32 89 81 97 80<br />
Fax + 32 89 81 97 90<br />
www.kreon.com<br />
mailbox@kreon.be<br />
revision date: 16/01/14<br />
KR8170001801<br />
sheet 1/1