

Download Seagull Mustang Instruction Manual - Green Hobby ...
Download Seagull Mustang Instruction Manual - Green Hobby ...
Download Seagull Mustang Instruction Manual - Green Hobby ...

You also want an ePaper? Increase the reach of your titles
YUMPU automatically turns print PDFs into web optimized ePapers that Google loves.
MUSTANG P-51.<br />
<strong>Instruction</strong> <strong>Manual</strong>.<br />
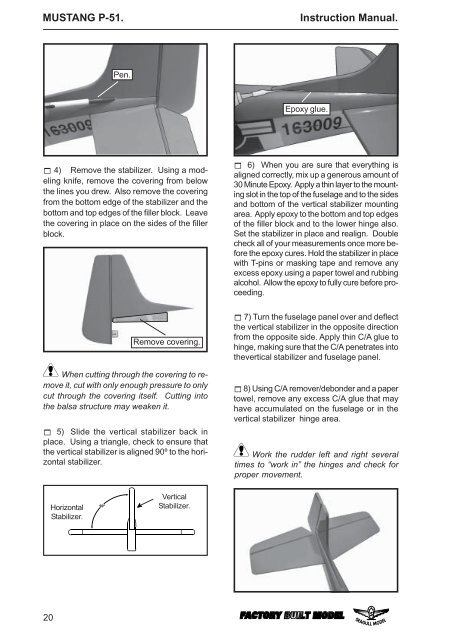
Pen.<br />
Epoxy glue.<br />
! 4) Remove the stabilizer. Using a modeling<br />
knife, remove the covering from below<br />
the lines you drew. Also remove the covering<br />
from the bottom edge of the stabilizer and the<br />
bottom and top edges of the filler block. Leave<br />
the covering in place on the sides of the filler<br />
block.<br />
! 6) When you are sure that everything is<br />
aligned correctly, mix up a generous amount of<br />
30 Minute Epoxy. Apply a thin layer to the mounting<br />
slot in the top of the fuselage and to the sides<br />
and bottom of the vertical stabilizer mounting<br />
area. Apply epoxy to the bottom and top edges<br />
of the filler block and to the lower hinge also.<br />
Set the stabilizer in place and realign. Double<br />
check all of your measurements once more before<br />
the epoxy cures. Hold the stabilizer in place<br />
with T-pins or masking tape and remove any<br />
excess epoxy using a paper towel and rubbing<br />
alcohol. Allow the epoxy to fully cure before proceeding.<br />
Remove covering.<br />
When cutting through the covering to remove<br />
it, cut with only enough pressure to only<br />
cut through the covering itself. Cutting into<br />
the balsa structure may weaken it.<br />
! 5) Slide the vertical stabilizer back in<br />
place. Using a triangle, check to ensure that<br />
the vertical stabilizer is aligned 90º to the horizontal<br />
stabilizer.<br />
! 7) Turn the fuselage panel over and deflect<br />
the vertical stabilizer in the opposite direction<br />
from the opposite side. Apply thin C/A glue to<br />
hinge, making sure that the C/A penetrates into<br />
thevertical stabilizer and fuselage panel.<br />
! 8) Using C/A remover/debonder and a paper<br />
towel, remove any excess C/A glue that may<br />
have accumulated on the fuselage or in the<br />
vertical stabilizer hinge area.<br />
Work the rudder left and right several<br />
times to “work in” the hinges and check for<br />
proper movement.<br />
Horizontal<br />
Stabilizer.<br />
90º<br />
Vertical<br />
Stabilizer.<br />
20


