

Download Seagull Mustang Instruction Manual - Green Hobby ...
Download Seagull Mustang Instruction Manual - Green Hobby ...
Download Seagull Mustang Instruction Manual - Green Hobby ...

You also want an ePaper? Increase the reach of your titles
YUMPU automatically turns print PDFs into web optimized ePapers that Google loves.
MUSTANG P-51.<br />
<strong>Instruction</strong> <strong>Manual</strong>.<br />
HINGING THE AILERONS.<br />
Note: The control surfaces, including the<br />
ailerons, elevators, and rudder, are<br />
prehinged with hinges installed, but the<br />
hinges are not glued in place. It is<br />
imperative that you properly adhere the<br />
hinges in place per the steps that follow<br />
using a high-quality thin C/A glue.<br />
! 1) Carefully remove the aileron from one<br />
of the wing panels. Note the position of the<br />
hinges.<br />
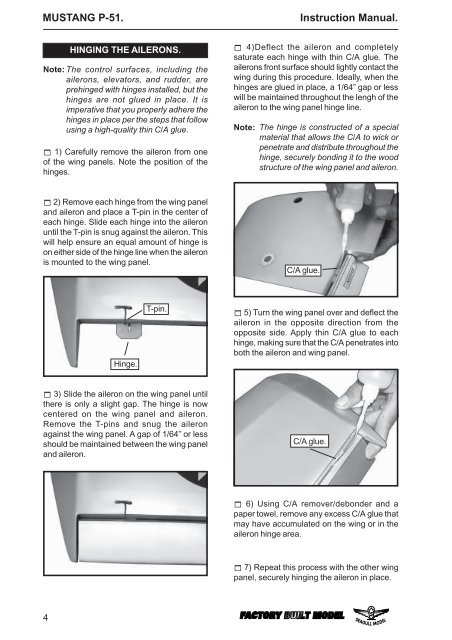
! 4)Deflect the aileron and completely<br />
saturate each hinge with thin C/A glue. The<br />
ailerons front surface should lightly contact the<br />
wing during this procedure. Ideally, when the<br />
hinges are glued in place, a 1/64” gap or less<br />
will be maintained throughout the lengh of the<br />
aileron to the wing panel hinge line.<br />
Note:<br />
The hinge is constructed of a special<br />
material that allows the C/A to wick or<br />
penetrate and distribute throughout the<br />
hinge, securely bonding it to the wood<br />
structure of the wing panel and aileron.<br />
! 2) Remove each hinge from the wing panel<br />
and aileron and place a T-pin in the center of<br />
each hinge. Slide each hinge into the aileron<br />
until the T-pin is snug against the aileron. This<br />
will help ensure an equal amount of hinge is<br />
on either side of the hinge line when the aileron<br />
is mounted to the wing panel.<br />
C/A glue.<br />
Hinge.<br />
T-pin.<br />
! 5) Turn the wing panel over and deflect the<br />
aileron in the opposite direction from the<br />
opposite side. Apply thin C/A glue to each<br />
hinge, making sure that the C/A penetrates into<br />
both the aileron and wing panel.<br />
! 3) Slide the aileron on the wing panel until<br />
there is only a slight gap. The hinge is now<br />
centered on the wing panel and aileron.<br />
Remove the T-pins and snug the aileron<br />
against the wing panel. A gap of 1/64” or less<br />
should be maintained between the wing panel<br />
and aileron.<br />
C/A glue.<br />
! 6) Using C/A remover/debonder and a<br />
paper towel, remove any excess C/A glue that<br />
may have accumulated on the wing or in the<br />
aileron hinge area.<br />
! 7) Repeat this process with the other wing<br />
panel, securely hinging the aileron in place.<br />
4


