Building instructions Pober Pixie - aero-naut Modellbau
Building instructions Pober Pixie - aero-naut Modellbau
Building instructions Pober Pixie - aero-naut Modellbau
You also want an ePaper? Increase the reach of your titles
YUMPU automatically turns print PDFs into web optimized ePapers that Google loves.
<strong>Pober</strong> <strong>Pixie</strong><br />
Dangers and hazards<br />
Model flying, especially under radio control, is a fascinating pastime.<br />
When you are operating your model we recommend that you make a point of observing the<br />
following basic rules, to avoid annoying or injuring other model flyers and anybody else.<br />
When you are operating a model aircraft you bear sole responsibility for your behaviour and for<br />
any consequences of your behaviour. For this reason it is essential that you take out a private<br />
third-party insurance policy or a special model flying policy. Ask your local model shop for details,<br />
or contact your regional or national model flying association (BMFA in U.K.). You may need to<br />
register your radio control system (varies from country to country) before using it. Once again, your<br />
local model shop will gladly give you information on this.<br />
Build your model carefully, checking every procedure, and be sure that everything is safely<br />
secured. Check that the entire model is safe to fly before each flight.<br />
Only fly your model at an approved location, e.g. a model flying site, at which your activity will not<br />
cause a nuisance or hazard to other modellers or anybody else in the vicinity. Gliders and electricpowered<br />
models are far less critical in these respects.<br />
Glow motors should only be operated with the recommended silencer fitted. Read the safety<br />
recommendations supplied by the motor manufacturer.<br />
Never fly directly towards or over spectators, and don’t be tempted to carry out flashy, high-risk<br />
manoeuvres.<br />
Don’t switch on your transmitter until you have ensured that no other radio control system in the<br />
vicinity is operating on the same frequency.<br />
We hope you have many hours of fun and pleasure with your <strong>Pober</strong> <strong>Pixie</strong>. Happy landings!<br />
<strong>aero</strong>-<strong>naut</strong> <strong>Modellbau</strong><br />
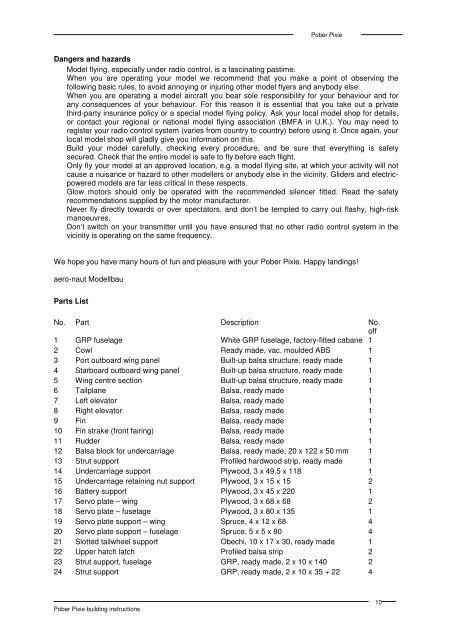
Parts List<br />
No. Part Description No.<br />
off<br />
1 GRP fuselage White GRP fuselage, factory-fitted cabane 1<br />
2 Cowl Ready made, vac. moulded ABS 1<br />
3 Port outboard wing panel Built-up balsa structure, ready made 1<br />
4 Starboard outboard wing panel Built-up balsa structure, ready made 1<br />
5 Wing centre section Built-up balsa structure, ready made 1<br />
6 Tailplane Balsa, ready made 1<br />
7 Left elevator Balsa, ready made 1<br />
8 Right elevator Balsa, ready made 1<br />
9 Fin Balsa, ready made 1<br />
10 Fin strake (front fairing) Balsa, ready made 1<br />
11 Rudder Balsa, ready made 1<br />
12 Balsa block for undercarriage Balsa, ready made, 20 x 122 x 50 mm 1<br />
13 Strut support Profiled hardwood strip, ready made 1<br />
14 Undercarriage support Plywood, 3 x 49.5 x 118 1<br />
15 Undercarriage retaining nut support Plywood, 3 x 15 x 15 2<br />
16 Battery support Plywood, 3 x 45 x 220 1<br />
17 Servo plate – wing Plywood, 3 x 68 x 68 2<br />
18 Servo plate – fuselage Plywood, 3 x 80 x 135 1<br />
19 Servo plate support – wing Spruce, 4 x 12 x 68 4<br />
20 Servo plate support – fuselage Spruce, 5 x 5 x 80 4<br />
21 Slotted tailwheel support Obechi, 10 x 17 x 30, ready made 1<br />
22 Upper hatch latch Profiled balsa strip 2<br />
23 Strut support, fuselage GRP, ready made, 2 x 10 x 140 2<br />
24 Strut support GRP, ready made, 2 x 10 x 35 + 22 4<br />
<strong>Pober</strong> <strong>Pixie</strong> building <strong>instructions</strong><br />
10


