Corner Store POS Installation Guide - POS of America
Corner Store POS Installation Guide - POS of America
Corner Store POS Installation Guide - POS of America

Create successful ePaper yourself
Turn your PDF publications into a flip-book with our unique Google optimized e-Paper software.
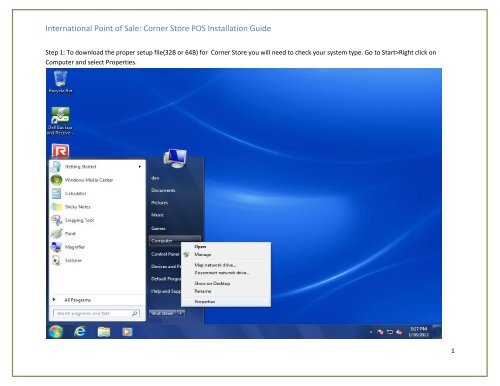
International Point <strong>of</strong> Sale: <strong>Corner</strong> <strong>Store</strong> <strong>POS</strong> <strong>Installation</strong> <strong>Guide</strong><br />
Step 1: To download the proper setup file(32B or 64B) for <strong>Corner</strong> <strong>Store</strong> you will need to check your system type. Go to Start>Right click on<br />
Computer and select Properties.<br />
1
International Point <strong>of</strong> Sale: <strong>Corner</strong> <strong>Store</strong> <strong>POS</strong> <strong>Installation</strong> <strong>Guide</strong><br />
Step 2: You can locate the type <strong>of</strong> Operating System under System Type.<br />
2
International Point <strong>of</strong> Sale: <strong>Corner</strong> <strong>Store</strong> <strong>POS</strong> <strong>Installation</strong> <strong>Guide</strong><br />
Step 3: Now you can choose the correct file for your system type you can download it from our website i.e. www.cornerstorepos.com<br />
3
International Point <strong>of</strong> Sale: <strong>Corner</strong> <strong>Store</strong> <strong>POS</strong> <strong>Installation</strong> <strong>Guide</strong><br />
Step 4: Select the file and click Save As<br />
4
International Point <strong>of</strong> Sale: <strong>Corner</strong> <strong>Store</strong> <strong>POS</strong> <strong>Installation</strong> <strong>Guide</strong><br />
Step 5: Click on Desktop located on the left hand side to easily locate it once is has been installed and then click on Save<br />
5
International Point <strong>of</strong> Sale: <strong>Corner</strong> <strong>Store</strong> <strong>POS</strong> <strong>Installation</strong> <strong>Guide</strong><br />
Step 6: The file will begin to save onto your Desktop<br />
6
International Point <strong>of</strong> Sale: <strong>Corner</strong> <strong>Store</strong> <strong>POS</strong> <strong>Installation</strong> <strong>Guide</strong><br />
Step 7: Click Run<br />
7
International Point <strong>of</strong> Sale: <strong>Corner</strong> <strong>Store</strong> <strong>POS</strong> <strong>Installation</strong> <strong>Guide</strong><br />
Step 8: When you begin installation for the first time, a list <strong>of</strong> pre-requisites will appear notifying what you may need to download before<br />
installing <strong>Corner</strong> <strong>Store</strong> s<strong>of</strong>tware. Please click on Install. Once installations <strong>of</strong> other programs are complete, you will have to restart your<br />
computer. A message dialog box will appear indicating whether your installation was successful or not.<br />
8
International Point <strong>of</strong> Sale: <strong>Corner</strong> <strong>Store</strong> <strong>POS</strong> <strong>Installation</strong> <strong>Guide</strong><br />
Step 9: Click on Next and begin installing <strong>Corner</strong> <strong>Store</strong> s<strong>of</strong>tware. Follow each prompt as it appears.<br />
9
International Point <strong>of</strong> Sale: <strong>Corner</strong> <strong>Store</strong> <strong>POS</strong> <strong>Installation</strong> <strong>Guide</strong><br />
Step 10: After successful installation <strong>of</strong> <strong>Corner</strong> <strong>Store</strong> you will find the <strong>Corner</strong> <strong>Store</strong> icon apprear on your Desktop. Right click on the <strong>Corner</strong> <strong>Store</strong><br />
icon on and select Properties.<br />
10
International Point <strong>of</strong> Sale: <strong>Corner</strong> <strong>Store</strong> <strong>POS</strong> <strong>Installation</strong> <strong>Guide</strong><br />
Step 11: In the Properties Window, click on the Compatibility tab. Please check Run this program as an administrator and click on Apply.<br />
11
International Point <strong>of</strong> Sale: <strong>Corner</strong> <strong>Store</strong> <strong>POS</strong> <strong>Installation</strong> <strong>Guide</strong><br />
Step 12: Click on Change setting for all users, select Run this program as an administrator and click OK.<br />
12
International Point <strong>of</strong> Sale: <strong>Corner</strong> <strong>Store</strong> <strong>POS</strong> <strong>Installation</strong> <strong>Guide</strong><br />
Step 13: Click Ok two times and then click on the <strong>Corner</strong> <strong>Store</strong> icon.<br />
13
International Point <strong>of</strong> Sale: <strong>Corner</strong> <strong>Store</strong> <strong>POS</strong> <strong>Installation</strong> <strong>Guide</strong><br />
Step 14: You will receive this error message if you haven’t installed <strong>POS</strong> For.NET required for <strong>Corner</strong> <strong>Store</strong>.<br />
14
International Point <strong>of</strong> Sale: <strong>Corner</strong> <strong>Store</strong> <strong>POS</strong> <strong>Installation</strong> <strong>Guide</strong><br />
Step 15: You can download <strong>POS</strong>For.NET from our website i.e. www.cornerstorepos.com. Select the file and click Run.<br />
15
International Point <strong>of</strong> Sale: <strong>Corner</strong> <strong>Store</strong> <strong>POS</strong> <strong>Installation</strong> <strong>Guide</strong><br />
Step 18: For your convenience click on Browse and change the default location.<br />
16
International Point <strong>of</strong> Sale: <strong>Corner</strong> <strong>Store</strong> <strong>POS</strong> <strong>Installation</strong> <strong>Guide</strong><br />
Step 19: You can create a <strong>Corner</strong> <strong>Store</strong> folder on the Main Screen and select default location as <strong>Corner</strong> <strong>Store</strong> folder.<br />
17
International Point <strong>of</strong> Sale: <strong>Corner</strong> <strong>Store</strong> <strong>POS</strong> <strong>Installation</strong> <strong>Guide</strong><br />
Step 20: After selecting the location click on Unzip and close.<br />
18
International Point <strong>of</strong> Sale: <strong>Corner</strong> <strong>Store</strong> <strong>POS</strong> <strong>Installation</strong> <strong>Guide</strong><br />
Step 21: Go to the proper location you have selected and click on setup.<br />
19
International Point <strong>of</strong> Sale: <strong>Corner</strong> <strong>Store</strong> <strong>POS</strong> <strong>Installation</strong> <strong>Guide</strong><br />
Step 22: Enter User name and Organization and select next.<br />
20
International Point <strong>of</strong> Sale: <strong>Corner</strong> <strong>Store</strong> <strong>POS</strong> <strong>Installation</strong> <strong>Guide</strong><br />
Step 23: Select Typical and then Next.<br />
21
International Point <strong>of</strong> Sale: <strong>Corner</strong> <strong>Store</strong> <strong>POS</strong> <strong>Installation</strong> <strong>Guide</strong><br />
Step 24: Select Install and then Finish.<br />
22