Marmitek IP Camera series advanced installation guide
Marmitek IP Camera series advanced installation guide
Marmitek IP Camera series advanced installation guide

You also want an ePaper? Increase the reach of your titles
YUMPU automatically turns print PDFs into web optimized ePapers that Google loves.
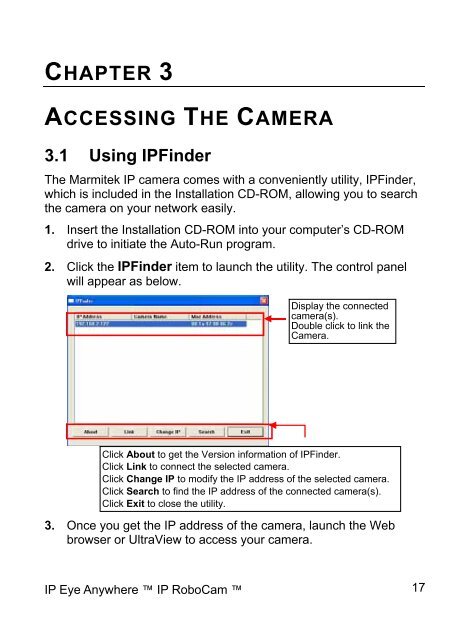
CHAPTER 3<br />
ACCESSING THE CAMERA<br />
3.1 Using <strong>IP</strong>Finder<br />
The <strong>Marmitek</strong> <strong>IP</strong> camera comes with a conveniently utility, <strong>IP</strong>Finder,<br />
which is included in the Installation CD-ROM, allowing you to search<br />
the camera on your network easily.<br />
1. Insert the Installation CD-ROM into your computer’s CD-ROM<br />
drive to initiate the Auto-Run program.<br />
2. Click the <strong>IP</strong>Finder item to launch the utility. The control panel<br />
will appear as below.<br />
Display the connected<br />
camera(s).<br />
Double click to link the<br />
<strong>Camera</strong>.<br />
Click About to get the Version information of <strong>IP</strong>Finder.<br />
Click Link to connect the selected camera.<br />
Click Change <strong>IP</strong> to modify the <strong>IP</strong> address of the selected camera.<br />
Click Search to find the <strong>IP</strong> address of the connected camera(s).<br />
Click Exit to close the utility.<br />
3. Once you get the <strong>IP</strong> address of the camera, launch the Web<br />
browser or UltraView to access your camera.<br />
<strong>IP</strong> Eye Anywhere <strong>IP</strong> RoboCam 17