Configuration - Knick
Configuration - Knick
Configuration - Knick

Create successful ePaper yourself
Turn your PDF publications into a flip-book with our unique Google optimized e-Paper software.
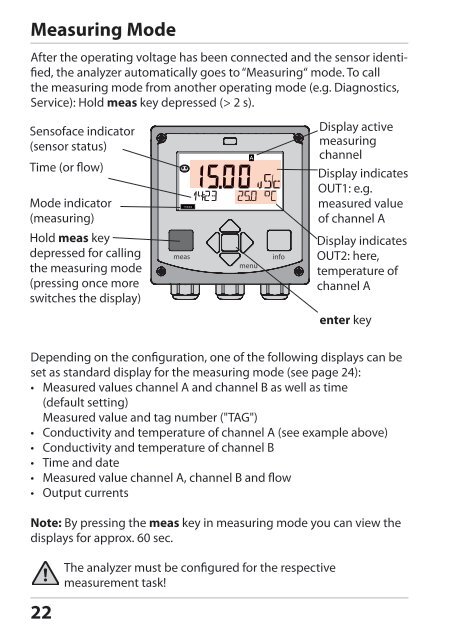
Measuring Mode<br />
After the operating voltage has been connected and the sensor identified,<br />
the analyzer automatically goes to “Measuring“ mode. To call<br />
the measuring mode from another operating mode (e.g. Diagnostics,<br />
Service): Hold meas key depressed (> 2 s).<br />
Sensoface indicator<br />
(sensor status)<br />
Time (or flow)<br />
Mode indicator<br />
(measuring)<br />
Hold meas key<br />
depressed for calling<br />
the measuring mode<br />
(pressing once more<br />
switches the display)<br />
Display active<br />
measuring<br />
channel<br />
Display indicates<br />
OUT1: e.g.<br />
measured value<br />
of channel A<br />
Display indicates<br />
OUT2: here,<br />
temperature of<br />
channel A<br />
enter key<br />
Depending on the configuration, one of the following displays can be<br />
set as standard display for the measuring mode (see page 24):<br />
• Measured values channel A and channel B as well as time<br />
(default setting)<br />
Measured value and tag number ("TAG")<br />
• Conductivity and temperature of channel A (see example above)<br />
• Conductivity and temperature of channel B<br />
• Time and date<br />
• Measured value channel A, channel B and flow<br />
• Output currents<br />
Note: By pressing the meas key in measuring mode you can view the<br />
displays for approx. 60 sec.<br />
22<br />
The analyzer must be configured for the respective<br />
measurement task!