

Wire Harness Installation Instructions - Painless Performance
Wire Harness Installation Instructions - Painless Performance
Wire Harness Installation Instructions - Painless Performance

You also want an ePaper? Increase the reach of your titles
YUMPU automatically turns print PDFs into web optimized ePapers that Google loves.
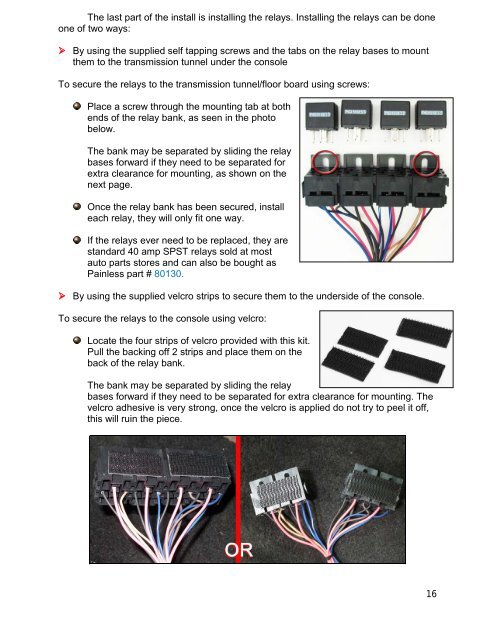
The last part of the install is installing the relays. Installing the relays can be done<br />
one of two ways:<br />
‣ By using the supplied self tapping screws and the tabs on the relay bases to mount<br />
them to the transmission tunnel under the console<br />
To secure the relays to the transmission tunnel/floor board using screws:<br />
Place a screw through the mounting tab at both<br />
ends of the relay bank, as seen in the photo<br />
below.<br />
The bank may be separated by sliding the relay<br />
bases forward if they need to be separated for<br />
extra clearance for mounting, as shown on the<br />
next page.<br />
Once the relay bank has been secured, install<br />
each relay, they will only fit one way.<br />
If the relays ever need to be replaced, they are<br />
standard 40 amp SPST relays sold at most<br />
auto parts stores and can also be bought as<br />
<strong>Painless</strong> part # 80130.<br />
‣ By using the supplied velcro strips to secure them to the underside of the console.<br />
To secure the relays to the console using velcro:<br />
Locate the four strips of velcro provided with this kit.<br />
Pull the backing off 2 strips and place them on the<br />
back of the relay bank.<br />
The bank may be separated by sliding the relay<br />
bases forward if they need to be separated for extra clearance for mounting. The<br />
velcro adhesive is very strong, once the velcro is applied do not try to peel it off,<br />
this will ruin the piece.<br />
16


