UP LS2 LS3 L99 w/4L65E 4L70E 4L80E 4L85E Fuel Injection ...
UP LS2 LS3 L99 w/4L65E 4L70E 4L80E 4L85E Fuel Injection ...
UP LS2 LS3 L99 w/4L65E 4L70E 4L80E 4L85E Fuel Injection ...
You also want an ePaper? Increase the reach of your titles
YUMPU automatically turns print PDFs into web optimized ePapers that Google loves.
Wire Harness InstallationManual #90574For Installing:Part # 605242006-<strong>UP</strong> Gen IV <strong>LS2</strong>/<strong>LS3</strong>/<strong>L99</strong> EngineWith Auto Trans. <strong>4L65E</strong>/<strong>4L70E</strong>/<strong>4L80E</strong>/<strong>4L85E</strong>Perfect Performance Products, LLCPainless Performance Products Division2501 Ludelle StreetFort Worth, TX 76105-1036800-423-9696 phone – 817-244-4024 faxWeb Site: www.painlessperformance.comE-Mail: painless@painlessperformance.com
We have attempted to provide you with as accurate instructions aspossible, and are always concerned about corrections or improvementsthat can be made. If you have any questions concerning the installation ofthis harness call the Painless Performance Products' tech line at 1-800-423-9696. Calls are answered from 8am to 5pm central time, Monday thruFriday, except holidays. Or, e-mail us at tech@painlessperformance.com.We sincerely appreciate your business.Perfect Performance Products, LLC shall in no event be liable in contractor tort (including negligence) for special, indirect, incidental, orconsequential damages, such as but not limited to, loss of propertydamage, or any other damages, costs or expenses which might be claimedas the result of the use or failure of the goods sold hereby, except only thecost of repair or replacement.CAUTION: PLEASE DISCONNECT THE POWER FROM YOURVEHICLE BY REMOVING THE NEGATIVE AND POSITIVE BATTERYCABLES FROM THE BATTERY. THE BATTERY IS NOT TO BECONNECTED UNTILL AFTER THE PAINLESS FUEL INJECTIONHARNESS HAS BEEN INSTALLED.‣ A full color copy of these instructions can be found athttp://www.painlessperformance.com/InfoSearch/manuals.php‣ Painless Performance Products recommends you, the installer,read this installation manual from front to back before installingthis harness. Due to the variables involved with your particularinstallation, reading this manual will give you considerable insighton the proper installation of this harness. Please note the pictureswithin this manual are for reference only. They may not be exactrepresentations of your particular engine or its components.‣ In the event that there are unused or unconnected wires, the endsof all unused wires will need to be terminated with an insulatedterminal or taped. Doing so will prevent the wires from shortingand causing harness failure or fire.December 2010 Copyright ©By Perfect Performance Products, LLC1
TABLE OF CONTENTSINTRODUCTION ….……………………………………………..……..……..……………3KIT CONTENTS………………………………………………………….……….……… …3PCM BACKGROUND..…………………………………………..…..…...…..…………….3NON-ELECTRICAL COMPONENT TIPS……………………………………………..…4TOOLS NEEDED……………………………………………………….……..…..…….. …6REQUIRED FUEL INJECTION PARTS…………………………………………….…....9GROUNDING THE VEHICLE…………………………………………………………….10HARNESS LAYOUT DRAWING………………………………………………….……...11ECM & TCM MOUNTING………………………………………………………….……...13FUSE BLOCK MOUNTING ………..…….…………………………..……..……..……..14FUEL INJECTION HARNESS ROUTING…………..……..…………………………...16ENGINE CONNECTIONS………..……………………………………..…………..….. .18COOLING FAN CONNECTIONS………………………………………………….…….28TRANSMISSION CONNECTIONS……………………………………………………...30OXYGEN SENSOR CONNECTIONS…………………………………………………..32REAR OF VEHICLE CONNCTIONS…………………………………………………...32PASSENGER COMPARTMENT CONNECTIONS…………………………..…..….. 33ACCELERATOR PEDAL CONNECTIONS..…………………………………….…... 34PRESTART CHECK-<strong>UP</strong>S………………………………………………………………37FUSEBLOCK TEMPLATE……………………………………………………………...382
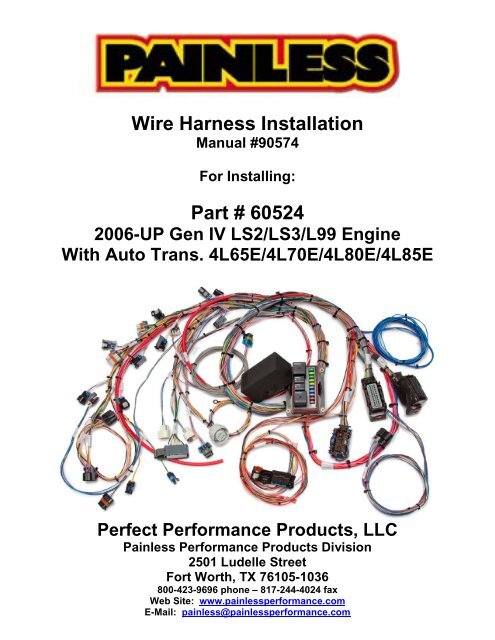
Introduction:This stand-a-lone fuel injection harness operates any 2006-<strong>UP</strong> Gen IV <strong>LS2</strong>/<strong>LS3</strong>/<strong>L99</strong>engine with 4L65/70E or 4L80/85E transmissions. <strong>Fuel</strong> injection/transmission wires arecolor coded as a 2007-2009 Chevrolet full size truck. With this harness fitting such awide range of vehicles, these instructions should be considered general installationprocedures. Please do not attempt to modify this Painless harness to function as yourfactory harness did. We have developed this harness to function as this manualinstructs you to connect it.Contents of this Painless wire harness kit:Make sure that you have everything you’re intended to have in this kit. If you find thatanything is missing or damaged, please contact the dealer where you obtained the kit orPainless Performance at (800) 423-9696.This Painless Wire Harness Kit should contain the following:• One fuel injection wire harness that looks like the front page picture.• A large parts bags containing heat shrink, 4 inch zip ties, 7 inch zip ties, rubberalternator wire boot, a rubber grommet, terminals, and a 40 Amp circuit breaker.• This installation manual.• Warranty card. Please fill this out and send it in.Things to know about the Delphi Engine Control Module (ECM) andTransmission Control Module (TCM) utilized with this Painlessharness and why you should send them to Painless to be flashed witha proper base calibration.• The ECM & TCM required for this harness was factory installed in many differentmakes and models of General Motors vehicles. Both V6 and V8 engines can beoperated by these controllers. When procuring an ECM & TCM from a salvageyard, for use with this harness, be sure to specify it be from a 2007-2009Chevrolet V8 truck/suv. If you have an ECM & TCM but do not know for a factwhat the calibration is in it or need the calibration modified please visit ourwebsite www.painlessperformance.com and sign up for our ECM re-flashprogram. We can program your ECM and TCM with the correct base calibrationsfor your specific application of this harness.• The factory calibration on an ECM & TCM from a Chevrolet truck will not properlyoperate the engine/transmission without several modifications.o Pass-Key anti-theft system must be turned off or otherwise the engine willcontinuously start for two seconds and then die, when cranked.o Factory installed emission devices include: fuel tank pressure sensor, tankvent solenoid, tank purge solenoid, air pump, air pump solenoid, andexhaust gas recirculation solenoid. The calibration installed at the GMfactory onto your ECM tells it to look for all of these emissionscomponents. This Painless harness does not include any supportingwiring or connectors for these.3
o Gear ratios and tire diameters are most likely different when comparingthose from a late model truck and your project vehicle.o <strong>Fuel</strong>, spark, idle and shift strategies need to be calibrated. Painless canprovide a base calibration for these in order to get your vehicle up andrunning. Optimal fuel economy and power will require the vehicle to betuned by a professional tuner or do it yourself with any number ofaftermarket software available to the public.Non-electrical parts and other things you should consider whentransplanting a Gen IV engine and transmission include:• If your engine has not ran for several months or more you will probablyexperience the joy of clogged injectors when you go to fire it up for the first time.Do yourself a favor and have the injectors cleaned, or purchase new fuelinjectors. If you do not, your engine will probably not start due to clogged fuelinjectors.• <strong>Fuel</strong> system requirements include a high pressure, 56-60 PSI, fuel pump. Thefuel feed line to fuel rail must be at least -6AN or 3/8” in size for stock engine,400-450HP, setups. If your engine’s output is more than 450HP you should use -8AN or ½” fuel rail feed line. Walbro manufactures a wide variety of highpressure fuel pumps and installation kits. They have many internet distributorsincluding www.aztpi.com.If your vehicle’s fuel tank is one with the early small 1 & 13/16” hole sending unityou have several options of how to upgrade it. One option is to modify thesending unit yourself by adding a fuel return line. Another option is to replace thesending unit with an aftermarket one from a company such aswww.robbmcperformance.com. They offer drop in units with a variety of tubesizes and adapter fittings. The other option is to have a company such aswww.rockvalleyantiqueautoparts.com cut out the old flange and weld in a largeflange from a later model 1984 & up GM vehicle. The larger flange will allow foran in tank mounted fuel pump.Gen IV engines have dead headed fuel rails. They require 58 pounds of fuelpressure. GF-822 is a Delco return type fuel filter/regulator that can be plumbedin between the fuel pump and fuel rail. It will filter the fuel and maintain 58 PSI atthe fuel rail. Another option is to mount an external bypass regulator such as onefrom Aeromotive. Just be sure to purchase a regulator that can handle 58 PSIand the amount of fuel volume that you need.• Gen IV engine cooling systems have some specific requirements. First, thelower radiator hose connects to the water neck with the thermostat behind it. Iflooking at the front of the engine it is the water neck to the lower left of the waterpump. The upper radiator hose connects to the water neck at the top of thewater pump. Second, the factory coolant thermostat only starts to open at 195 o Fand is fully open at 210 o F. Aftermarket thermostats are available that will open at4
a lower temperature. Third, these engines incorporate steam tubes that areplumbed into the front of each head. They are tied together and then plumbed tothe radiator. Do not plug off this steam tube, it must be connected to either theupper radiator hose or to the upper third of the radiator in order to bleed off anysteam that accumulates in the engine heads.Companies such as Afco www.afabcorp.com manufacture direct bolt in radiatorsthat are specifically designed for LSx engine transplants. These are idealespecially since the coolant inlet and outlet are both on the passenger side of theradiator. By moving the upper radiator inlet to the passenger side the driver sideis opened up to allow a fresh air intake elbow to be routed there.• Coolant temperature and oil pressure gauge senders can easily be connected toany Gen IV engine. In both engine heads are threaded coolant ports with Metric12 x 1.5 threads. The coolant port on the driver side head is utilized by thecoolant temperature sensor needed for the PCM. The port on the passengerhead usually has a plug in it that can be removed and a temperature sender for agauge can be inserted. Most aftermarket gauge manufacturers offer adapters toadapt their gauge sender so you can thread it into this coolant port.There are two places that oil pressure senders may be connected to theseengines. Behind the intake manifold is a threaded port, Metric 16 x 1.5 threads.Depending on what vehicle your engine was donated from, this port mightalready have a 0-5 Volt oil pressure sensor in it. This Painless harness doeshave connections for this sensor but you may choose to remove it and with anadapter, screw in your oil pressure gauge sender. Another spot that is commonfor oil pressure senders is just above the oil filter. Here you will find an aluminumcap with two hex head, 8mm bolts holding it to the oil pan. You can remove thiscap, tap it to the threads that match your oil pressure sender and then reinstall it.Just keep in mind that if you plan to use headers this location for a sender maynot be ideal. Heat can kill a sender quick.• Automatic transmissions require external fluid coolers. The ports on the side ofthe transmission usually have quick-connect fittings installed. Most local autoparts suppliers will offer fittings that adapt these ports to pipe flare fittings. If youplan to bend your own hard lines this is your best bet. Or, on a <strong>4L65E</strong>, you canalso screw in 3/8” NPT fittings into these ports. Make sure to use Teflon tape onthe threads for a good seal. Fittings are available from many online retailers oryour local hydraulic hose shop that are male 3/8” NPT to male -6AN or whateveryour application may need. If you can’t find what you need then you can alwaysweld steel -6AN buds on the ends of the OEM cooling line fittings.Shifter detents are another thing to consider when transplanting a <strong>4L65E</strong>/<strong>4L85E</strong>into a vehicle that was originally manufactured with 2 or 3 speed transmissions.Companies such as Shiftworks www.shiftworks.com manufacture shifterconversion kits to upgrade your factory shifter to operate your late modeltransmission. Another option is to completely replace the shifter with anaftermarket one such as Lokar www.lokar.com part # FMS64L60EEM.• Engine accessory and frame clearance always seems to be an issue that comesup when transplanting a Gen IV engine into any early model vehicle. Usually the5
alternator and power steering pumps do not have any clearance issuesassociated with them. The factory Gen IV A/C compressor mounts to thepassenger lower side of the engine. In this location, it will not clear most GMframes. You will either have to notch the frame to create clearance or move theA/C compressor. Companies such as KWIK Performance www.kwikperf.comoffer relocation brackets that move the compressor to the upper passenger sideof the engine. Moving the compressor to this location works well with mosttransplants. These kits utilize a Sanden style compressor.• Drive shaft length will have to be modified if you are upgrading to a <strong>4L65E</strong>/<strong>4L85E</strong>from most 2 & 3 speed automatics or manuals. You should also consider havingthe entire tube upgraded to a thicker wall material since you are likely to exceedthe handling capabilities of the original tube.Tools Needed:In addition to regular hand tools such as ratchets, sockets, extensions, screw drivers,flash light or drop light, you will need the following tools:Wire Crimping and Stripping Tools:One style of hand crimper shown below can be purchased from just about any localelectrical supply shop, home improvement store or can also be purchased online. Youwill need this style of crimper to crimp the heat shrinkable, insulated terminals includedin the small parts bubble pack.A good set of wire strippers are required to strip wire properly. Shown below are a pairof strippers manufactured by Klein tools and that are available from just about any localelectrical supply shop, home improvement store or can be purchase online. This styleof wire stripper is ideal for this harness install because of its ability to properly strip wiregauges 10awg to 20awg.6
Volt/Ohm Meter:A Volt/Ohm meter is always a good tool tohave on hand when installing any type ofelectrical components into any vehicle. Mostbasic units provide the two functions requiredto diagnose electrical issues seen during aharness install. These two functions are theability to read DC Voltage and electricalcontinuity or Ohms. They can be purchasedfrom any home improvement store, localhardware store and electrical supply shopand online.Electric Drill, Bits and Hole Saws:Needed if you plan to mount the ECM, TCM and fuse block inside the vehicle’spassenger compartment and also useful to drill mounting holes for these components tobe bolted down.Heat Gun:Very useful to shrink the heat-shrink used on the alternator charge wire and the heatshrinkableterminals for the electric fan and crank signal wires.7
Disconnect battery cables from thebattery and then unplug the ECM, TCMand Alternator before any welding isdone on the vehicle. If you don’t, youwill cause permanent damage to thesecomponents.8
Parts required for installation of this harness:The <strong>LS2</strong>/<strong>LS3</strong>/<strong>L99</strong> engine and <strong>4L65E</strong>/<strong>4L70E</strong>/<strong>4L80E</strong>/<strong>4L85E</strong> transmission section of thewire harness requires the following parts for proper installation and operation. Factoryinstalled engine sensors and components should be perfect matches for this harness.Do not purchase the parts listed below unless you are missing it or need to replace afaulty one.Part DescriptionPart NumberEngine2006-2010 <strong>LS2</strong>/<strong>LS3</strong>/<strong>L99</strong>Transmission2007-<strong>UP</strong> <strong>4L65E</strong>/<strong>4L70E</strong>/<strong>4L80E</strong>/<strong>4L85E</strong>2007 ECM (Engine Control Module) 12597121 or Equivalent2008 ECM 12612384 or Equivalent2009 - 2010 ECM 12625455 or EquivalentTCM (Transmission Control Module) 24234503 or Equivalent<strong>Fuel</strong> InjectorsUSCAR Connection TypeIgnition Coils12573190 or EquivalentAccelerator Pedal *See note on page 34* 25835421 or EquivalentEngine Coolant Temperature Sensor 12608814 or EquivalentMass Air Flow Sensor15865791 or EquivalentCam Position Sensor12591720 or EquivalentCrank Position Sensor12585546 or EquivalentKnock Sensor (2 Required)12570125 or EquivalentOxygen Sensor12581966 or EquivalentVehicle Speed Sensor12376520 or EquivalentInput Shaft Speed Sensor (4L80-85E Only) Factory Installed or EquivalentManifold Absolute Pressure Sensor 12591290 or EquivalentOil Pressure Sensor (Not Required) 12573107 or EquivalentPRNDL Switch24221125 or Equivalent9
Alternators and Charge Wires:Built into this harness is a red 4 gauge alternator charge wire with an Amperage handlerating of 160Amp. The OEM alternators on Gen. IV engines are rated for 145Amp.What is the output rating of the alternator installed to your engine? If it is more than160Amp then you must add an additional charge wire from the alternator to battery.NOTE: Although it is not included in this wiring kit, you should install a fuse or manualresettable circuit breaker between the (+) battery cable and any connections to thisalternator charge wire, your chassis harness or any other wire connected to the battery(+) post or cable. There are many online retailers that sell high Amp fuses and circuitbreakers. See page 24 for more details.Grounding your vehicle:A properly grounded vehicle will always perform more reliably when compared to onethat is lacking enough ground circuits or just doesn’t have the required electrical currenthandling capabilities. Here is a check list to use when designing the ground circuits foryour vehicle.Engine/Transmission to Battery and/or Frame Grounding: The Amperage ratings in the table below represent constant current handling.Engine cranking introduces a large Amperage requirement from the battery. Theground strap connected between the engine-frame or engine-battery must belarge enough to handle this amperage spike. Basically, this means your engineground strap should be no smaller than 1 gauge and too big of a ground strapnever hurt any vehicle so size accordingly.SGX Cable Size (AWG) Current Handling (Amperage)1 2450 28500 330000 3850000 445Frame to Battery and Body Grounding: Ground straps must be installed between the frame, body and battery. Theseshould be sized according to what your vehicle’s electrical accessoriesAmperage requirements are. Figure up the Amperage use of your lights, electricfan(s), horn(s), wipers, A/C & heat blower motor, and any other accessory boltedto your vehicle and you might be surprised to see how much Amperage thesecomponents require to operate. Simple to understand yet easy to forget is that paint and rubber do not conductelectricity. If a radiator support is mounted on rubber bushings it is a good ideato connect a ground strap to it from the frame or (-) battery post. Don’t rely onthe painted fenders being bolted to it for a ground source.10
Pre-Installation and Harness layout:Remove the harness from the package box. Find a clean area on the floor or a workbench to unroll the harness onto. Take a look at how the harness is designed intosections. Below you see a simple line drawing of this harness that includes connectorlocation. Now is a good time to get familiar with the harness and where each connectoris located so your installation goes smoothly.11
Electronics and Heat Don’t Get Along:Just as the heading above states, it is true, electronic components and heat does notget along. Heat always wins by fatality of the component. Now in the case of theEngine Control Module (ECM), Transmission Control Module (TCM), the fuse block andall the wire contained in this harness you can think of them as heat resistant. They arein fact all manufactured of automotive grade materials which are rated for environmentswith temperatures up to 257˚ Fahrenheit. Anything above this and their reliableoperation cannot be guaranteed. So, don’t mount, route, attach or connect any part ofthis harness to the exhaust pipes of your vehicle. Exhaust pipe, which can reach atemperature of 1500˚ Fahrenheit, is unforgiving to anything touching or mounted aroundit.For added protection from heat and abrasion damage to this harness we suggest youcover it in a high quality wire loom. PowerBraid is the standard for high quality wireloom and is a Painless Performance branded product. See our website for details onpart number 70921. This fuel injection PowerBraid kit includes the proper amount ofwire loom to cover this fuel injection harness. PowerBraid, unlike the cheap convolutedtubing sold by most parts stores, is rated to resist heat damage up to 257˚ Fahrenheit.It is also abrasion, cut, chemical and extreme cold brittleness resistant.Where To Mount the ECM, TCM and Fuse Block:You are limited to 4 feet of harness as measured from the center/back of the intakemanifold to where the ECM connectors are located on the harness. Use a tapemeasure to figure out where you can mount the ECM. The TCM connector is wired witha 1 foot length on it as measured from the harness breakout it shares with the ECM andfuse block. So the TCM can be mounted on any side of the ECM or on top of the ECMwith a custom bracket of some sort. Now look at the fuse block. It is wired with a 2 footlength on it as measured from the same main harness break out. So once again youcan mount it on any side of the ECM.NOTE: Mount the fuse block in a location of easy access. You will at one point needaccess to the fuse block to replace a blown fuse.12
Mounting the Engine and Transmission Controllers:Both controllers have four mounting holes cast into their aluminum housings. Use theseholes as a template to create your own custom mounting solution. As you can see inthe picture below we have built a simple metal bracket to mount these components ontoan inner fender well. When bolting them down to their mounting point, make sure youdon’t over torque the bolts. Both of the cases these components are built into are castaluminum which is easy to break if you are rough with it.NOTE: Looking at the picture above you see how the connectors plug into the ECMand TCM. It is important that you leave room for these connectors when deciding onyour mounting solution.NOTE: If you mount these components inside the passenger compartment of yourvehicle you will then need to feed the fuel injection and transmission sections of the wireharness through the fire wall. Find a suitable place to drill a 1 5/8” hole in the fire wall.Use a hole-saw and make the hole. Take a round metal file to remove the sharpnessfrom the metal edges. Inside the parts kit you will find a rubber grommet to seal thishole around the harness.13
Mounting the Fuse Block:This fuse block is weather proof. It can be mounted under the hood or in the passengercompartment of your vehicle. The parts bag that came with this harness includes 4black screws and a black metal bracket. You can either use the bracket to mount thefuse block or use the template on the back page of this manual to cut a hole in amounting surface so that the face of the fuse block protrudes through the front of it.14
Use the four black machine screws to mount the fuse block to the fuse block mountingbracket. Then use your choice of mounting screws to secure the bracket to it intendedmounting point in your vehicle. Most people use self tap screws or machine threadscrews.15
Harness Routing:Now that the ECM, TCM and fuse block are mounted you can move onto routing theharness over to the engine and transmission. If you have mounted these componentsin the passenger compartment you now need to feed the engine and transmissionsections of the harness out through the hole you drilled in the fire wall. Before doing sotake some tape and cover the edges of the hole with it. This lessens the chance ofchafing the wires in the harness.As you can see in the picture below we chose to push the transmission connectorthrough the hole first. We did this because it is the large connector on the harness andit would have been difficult to push through if we had the body of the harness taking upmost of the area in the hole. So, just take your time on this step, don’t pull hard on anyconnector and do not for any reason use a screw driver to force the connectors throughthe hole. Once you have this done then install the rubber grommet from the parts kitinto the hole and around the harness. Weather-strip adhesive can be applied to thegroove in the grommet that cradles the fire wall. It will help secure the grommet inplace.If you chose to mount the ECM, TCM and fuse block in the engine compartment thenjust route the engine and transmission sections of the harness over towards the centerbackof the intake manifold.16
The harness has two legs of connectors that run down each side of the fuel rail. Look atthe harness to locate the leg that includes the driver side coil connector along with the 4gauge red charge wire. This leg is to be routed along the fuel rail of the driver side ofthe engine. Do the same for the other leg of the harness for the passenger side.17
Making the Harness Connections:At the harness breakout now located at the center-back of the intake manifold you willfind two black/white wires with ring terminals on them. These are the ground wires forthis harness. They need to be grounded to opposite side heads of the engine. Do thisby using 10 x 1.5mm bolts and lock washers.18
Now work your way down the drive side fuel rail and connect the fuel injectorconnectors to their corresponding fuel injector. From the front of the engine theinjectors are numbered as 1, 3, 5, and 7. Then plug in the driver side coil connector intothe coil near plug sub-harness.Route the coolant temperature sensor connector to the sensor located right in front of#1 cylinder exhaust port. Plug it in to the sensor.19
In the parts kit you should find several 4 gauge crimp on terminals and a length of redwater proof heat shrink. Find the appropriate terminal that fits the threaded charge poston the back of the alternator. Cut the red heat shrink into two pieces approximately 1.5”long. Slip one of them onto the 4 gauge wire. Route the 4 gauge red wire over to thethreaded post and cut it to length. Strip 3/8”-1/2” of insulation from the end of the wire.Crimp the terminal you picked out from the parts kit onto the wire by using either batterycable crimpers or some good channel locks. Make sure you get a really good crimphere. The last thing you want is a loose crimp on a very high Amp circuit such as analternator charge wire. Now, slip the heat shrink down to the end of the wire but notcovering the ring eyelet. Use a heat gun to shrink the tubing onto the wire. Excess gluewill protrude from either end of the heat shrink as it reduces in size. Once shrunk let itcool and then remove any excess glue by peeling it away with your fingers.Next, take the four pin alternatorconnector and plug it into thealternator.20
Route the cam position sensor connector down the front of the engine and over to thecam position sensor. If your engine has variable valve timing (<strong>L99</strong> only) you will findthis connector has five pins. The Painless harness has a pigtail plugged into the matingconnector for this 5 pin connector. Unplug the pigtail and plug the Painless harness fivepin connector into your cam position/cam phazer connector.If your engine does not have variable valve timing (<strong>LS2</strong>, <strong>LS3</strong>) you will find this connectorhas three pins. The Painless harness has an adapter pigtail plugged into it that adaptsthe harness to match up to the three pin cam position sensor connector on your engine.Plug the three pin connector on the end of this pigtail directly into the cam positionsensor connector on your engine.21
On the driver side of the engine block you will find a black, two pin knock sensor. Fromthe main break out of the Painless harness located at the center-back of intake manifoldfind the two wire mating connector for this knock sensor. It is labeled DRVR KNOCKand has a grey and blue wire in it. Plug this connector into the driver side knock sensor.Make sure to route the wires so when you install the exhaust headers or manifolds itdoes not come in contact with them.22
Move over to the passenger side of the engine. Here you will find a grey three pinconnector labeled CKP. Plug this connector into your engine crank position sensorlocated right above where the starter bolts to the engine.Next you will need to plug in the passenger side knock sensor. This harness has awhite two pin connector labeled PASS KNOCK that is designated for this sensor.23
NOTE: Don’t forget about the inline fuse or circuit breaker that should be installedbetween the battery positive cable and the red 4 gauge charge wire you are about toconnect in this next step. Without this protection, should the charge wire short toground, your vehicle could possibly deconstruct itself through the use of fire.With the starter installed to the engine, route the 4 gauge red wire to the high Amp fuseor circuit breaker. As you can see in the diagram below you will then have to route a 4gauge wire from the other side of the circuit breaker or fuse over to the battery terminalon the starter or directly to the positive post on the battery. This jumper wire andterminals are not included in this wiring kit. You will need to visit your local auto partsstore to purchase them.Then route the 14 gauge purple wire to the start/crank terminal on the starter. Makesure your routing strategy takes into consideration any clearance required between itand your headers. See the diagram below for more information.24
Move back up to the top of the engine. Route the large harness breakout that includesthe passenger side injectors, coils, throttle body, m.a.p. sensor and m.a.f. sensorconnectors down the fuel rail. Plug the injector connectors into their mating injector.The injector connectors are numbered and broke out where they should easily fall rightinto place.Next plug in the passenger side coils connector into the coil sub harness.25
Route the throttle body connector over to the throttle body. Plug it in as shown below.Route the m.a.p. sensor connector up to the m.a.p. sensor, which is located front andcenter top of the intake manifold. Plug it in as shown here.26
If you have the factory installed fresh air intake from the donor vehicle you should havethen also gotten the mass air flow sensor. It should look something like what is shownbelow. Route the m.a.f. connector over to the m.a.f. sensor and plug it in.If your vehicle requires a custom fresh air intake system then you must mount the massair flow sensor between the air filterand throttle body. Shown here is aCorvette mass air flow sensor part#15865791. This sensor hasmounting holes and can be easilyinserted into a custom fresh air intakesystem.Note: Mass air flow sensors arecalibrated to operate in a factory freshair intake system. Building a customtubing assembly will require you tohave your ECM programmed in orderto compensate for changes in air flow.See your local dyno tuner or purchasesome aftermarket software such asHP Tuners for help with this.27
Electric Cooling Fans:This 60524 harness provides two wires to operate a single or dual electric cooling fanset up. These wires originate from the same harness break out as the fuse block, TCMand ECM connectors do. Connect them as described below.12 Gauge Blue Wire: This wire is relayed but NOT FUSED at the fuse block. It isprovided power through a 40 Amp relay which sources power through the main chargewire splice that also provides power to the entire fuse block. This relay is activated bythe ECM. In the parts kit is a 40 Amp circuit breaker, a red cover, two ring terminalsand two self tapping mounting screws. Find a suitable mounting place for the circuitbreaker. Route the 12 gauge cooling fan wire to the copper colored BAT terminal of thecircuit breaker. Cut and strip the wire ¼”. Crimp one of the yellow #10 ring terminals tothe wire, shrink the heat shrink and then install it to the circuit breaker. Take the extralength of 12 gauge blue wire you cut and install the other yellow #10 ring terminal to it.Install this length of wire to the other side of the circuit breaker. Route the other side ofthis wire to the positive (+) wire from your cooling fan. See diagram below forexplanation.28
20 Gauge Blue/White Wire: This wire is to be connected to a second cooling fanrelay if your vehicle utilizes two cooling fans. This wire is only to be connected to theactivation terminal which controls the coil of a relay. It grounds the relay to turn it on.See diagram below for explanation. This harness only supplies the activation wire forthe relay. Painless offers a simple relay kit #30101 which would provide the relay,circuit breaker, terminals and wire as shown in the below diagram.29
Transmission Connections:Depending on whether your transmission is a <strong>4L65E</strong>, <strong>4L70E</strong>, <strong>4L80E</strong> or <strong>4L85E</strong> then thesolenoid pack connector is located on the passenger or driver side of the transmission.4L65-70E has it located on the passenger side and the 4L80-85E is on the driver side.Locate the connector on your transmission and plug the corresponding harnessconnector into it. The 4L65-70E vehicle speed sensor is located in the tail shafthousing of the transmission. Locate the vehicle speed sensor in your transmission andplug the corresponding connector labeled VSS into it. If you have a 4L80-85E see notebelow.Note: Converting the 4L65-70E Transmission Connector to a <strong>4L80E</strong>-<strong>4L85E</strong>Connector. All harnesses have the transmission connector pre terminated to allow useof the <strong>4L65E</strong>/<strong>4L70E</strong> transmission. In applications where a <strong>4L80E</strong>-<strong>4L85E</strong> is to be usedfollow this procedure to change your transmission connector to ensure all functions ofthe transmission work properly.• With the terminal end of the connector and the arrow on top pointing towardsyou, carefully remove the white retaining lock located in the center of theconnector.• Locate the white wire located in terminal location S. Using a paper clip or smallscrewdriver, gently lift the locking tab inside the connector and pull the wire fromits location.• Now locate the brown wire located in terminal location U. Using the samemethod, remove the brown wire from its location• Gently insert the brown wire into terminal location S.• The white wire has no function with the <strong>4L80E</strong> transmission; it needs to be tapedup and stowed in the harness in case a <strong>4L65E</strong> is ever to be used.30
<strong>4L80E</strong> and <strong>4L85E</strong> transmissions have a vehicle speed sensor and also an input speedsensor located on the driver side of the transmission. Below is a picture of a <strong>4L80E</strong>transmission for reference. Plug in the VSS and <strong>4L80E</strong> ISS connectors into theircorresponding component.31
Oxygen Sensors:This harness utilizes the twoprimary heated oxygen sensors.You must install into yourexhaust pipe and plug in theseoxygen sensors to the harness.The connectors on this harnessare labeled DRVR O2 and PASSO2. See the picture to the rightto identify you have the correctoxygen sensors to mate to thisharness.Always install oxygen sensors asclose to the engine as possible. Most aftermarket headers comewith oxygen sensor bungs already welded into the headercollectors.Always clock the oxygen sensors between ten O’clock and twoO’clock in the exhaust pipes or header collectors. If you needbungs to weld into the exhaust, Painless offers part number60406, which is pictured to the right.Rear of Vehicle Connections:Off of the main harness breakout you will find open ended wires for the fuel pump andthe reverse lights. Connect these wires as described below.<strong>Fuel</strong> Pump: This wire connects to one of the small 30 Amp relays in the fuse block. Itis fused through a 15 Amp fuse. Most fuel pumps require a maximum of 15 Amps tooperate. If your fuel pump requires more Amperage feel free to insert up to a 25 Ampfuse in this fuse slot. See fuse block diagram at end of manual for fuse location.Route this fuel pump wire to your fuel pump and connect to the positive (+) terminal ofthe pump. In the parts kit you will find two terminals with #6 rings on them. Theseshould fit most aftermarket fuel pumps. Use them to make the connections to the (+)and (-) posts on the fuel pump. Make sure to shrink the heat shrink on the terminalsonce you have crimped them to the wires. You will also find a #10 ring terminal in theparts kit that you can use to connect the other side or your fuel pump ground wire to thechassis or body.Reverse Lights: This wire should be routed out to the reverse lights on yourvehicle. Since you have installed a PRNDL switch that has an internal reverse switchyou no longer need a column mounted or floor shifter mounted one. With thetransmission shifted into reverse and with the ignition key on this wire will provide the 12Volts needed to operate the reverse lights. You will find a blue heat shrinkable buttsplice in the parts kit that you can use to make this connection.32
Passenger Compartment Connections:Ign. Switch Crank: This 14 gauge purple wire connects to the crank terminal ofyour ignition switch. It originates at the PRNDL switch mounted on the transmission. Ifthe vehicle is in park or neutral and the ignition switch is in the crank position, 12 Voltswill travel from the ignition switch, down this wire to the PRNDL switch, back out of thePRNDL switch on the purple wire that leads to the starter solenoid.Fuse Block Ignition: There are two wires with this section label wrapped aroundthem.• Pink- This 20 gauge wire connects to an ignition/crank 12 Volt source. Makesure where you connect this wire has 12Volts with the ignition switch in the runand crank positions. With 12Volts applied to it this wire turns on this fuel injectionharness. Use one of the blue Posi-Taps in the parts kit to make this connection.• Lt. Green- This 18 gauge wire connects to the reverse light fuse of your chassisharness’ fuse block. This wire provides 12 Volts to the part of the PRNDL switchthat controls the reverse lights of the vehicle. Use one of the blue Posi-Taps inthe parts kit to make this connection.Brake Switch: This 20 gauge Light Blue/White must be connected to your brakeswitch. It must see 12Volts when the brake is applied.VSS Output: This 20 gauge Yellow/Black wire connects to your electricspeedometer’s signal input terminal. This wire originates from the ECM which transmitsa signal relative to vehicle speed that can be read by most aftermarket electricspeedometers. See the installation manual for your speedometer for instruction on howto calibrate it according to the ECM’s signal.DLC: This OBD-II connector is your link to what the ECM, TCM, engine andtransmission are doing. It is a good idea to mount the connector in an easily accessiblelocation such as the glove box, console or under the dash. You can use the bracketalready zip tied to the connector or build your own mounting solution.MIL: This check engine light is OBD-II compliant. Mount the light somewhere in thedash so that you can easily seeit. The ECM will command thislight on if it sees an operationalproblem with the engine ortransmission.33
Accelerator pedal: Pictured below is the OEM accelerator pedal from a 2006-2010Chevrolet Corvette. This is the part number listed in the part list on page 9. As you cansee the pedal is made from steel. You should also notice the foot pad is offset to thewrong side of the mounting flange. If you were to try to mount this pedal into just aboutany hot rod you would find that the mounting flange would need to be mounted rightwhere the steering column pokes through the fire wall.The pictures on the next page show a custom built bracket designed to offset the mountpoints on the accelerator pedal and the OEM mounting points on this 1978 Camaro thatreceived a <strong>LS3</strong> engine with this harness. Notice that we had to build a custommounting bracket in order for the foot pad to line up with the brake pedal.Another alternative to the OEM Corvette pedal is to purchase an accelerator pedal froman aftermarket company such as Lokar. They manufacture custom accelerator pedalswith the hot rod look to them.34
Prestart-up Checks:1. Now that you have finished installing this fuel injection harness it is time to goback and double check you have all components plugged in and secured with tiewraps. Again, be sure the harness does not touch or get too close to anyheader/manifold or exhaust piping.2. If the vehicle has sat for any extended period of time please make sure that youpurge the old fuel out of the fuel lines and the fuel tank. Start your engine withnew fuel, preferably 92 Octane.3. If you have assembled a new fuel system for this vehicle make sure you purgethe fuel lines of any dirt before you connect it up to the fuel rail. It doesn’t takemuch dirt to clog up your injectors.4. With the fresh air intake tubing removed from the throttle body, key the ignitionswitch on. Depress the accelerator pedal and make sure the throttle reactsaccordingly to the pedal movement. Make sure you get wide open throttle whenthe pedal is fully depressed.5. <strong>Fuel</strong>a. Bleed the air out of the fuel rail by purging it through the Shrader valve.Be careful and safe when doing this. FUEL = FIRE if you are not!b. Thread a fuel pressure gauge onto the same valve or to your fuel pressureregulator. Key the ignition on a few times and make sure you haveapproximately 58 PSI of fuel pressure.6. Aira. Check that you have not left any shop rags in the fresh air intake tubing.a. Check that the clamps holding the tubing together is tight.b. Make sure you have a clean air cleaner installed into this tubing.7. Sparka. Check that you have properly gapped spark plugs and that each cylinderhas a spark plug.b. Check that you have the coil to plug wires installed.c. Make sure the coil sub harnesses are correctly plugged into each coil. Ifyou have for some reason removed these sub harnesses from yourengine make sure you reinstall it exactly how the OEM factory hadoriginally installed it.Now you can install your battery cables and start the vehicle. If you have any issuesshow up while trying to start the vehicle please call our tech line at 1-800-423-9696 oremail us at tech@painlessperformance.com.36
Fuse block through hole template:Cut this template out and use it to mark where your cuts are made in order to throughholemount the fuse block. The template is to scale. After marking your material to becut make sure to cut the line or even 1/16” over the line on the outside of the shadedarea. Otherwise you may need to file to fit the fuse block in the cut hole.37


