

Wire Harness Installation Instructions - Painless Performance
Wire Harness Installation Instructions - Painless Performance
Wire Harness Installation Instructions - Painless Performance

Create successful ePaper yourself
Turn your PDF publications into a flip-book with our unique Google optimized e-Paper software.
If you have any questions concerning the installation of this harness or having trouble in general, feel free<br />
to call <strong>Painless</strong> <strong>Performance</strong> Products' tech line at 1-800-423-9696. Calls are answered from 8am to 5pm<br />
central time, Monday thru Thursday and 8am-4:30pm Friday, except holidays.<br />
We have attempted to provide you with as accurate instructions as possible, and are always concerned<br />
about corrections or improvements that can be made. If you have found any errors or omissions, or if you<br />
simply have comments or suggestions concerning these instructions, please write us at the address<br />
above, send us a fax at (817) 244-4024 or e-mail us at painless@painlessperformance.com. We sincerely<br />
appreciate your business.<br />
Perfect <strong>Performance</strong> Products, LLC shall in no event be liable in contract or tort (including negligence)<br />
for special, indirect, incidental, or consequential damages, such as but not limited to, loss of property<br />
damage, or any other damages, costs or expenses which might be claimed as the result of the use or<br />
failure of the goods sold hereby, except only the cost of repair or replacement.<br />
Before any installation takes place disconnect the battery<br />
Preparation<br />
Examine all the parts included with the kit. They are (as seen on the front cover):<br />
• Driver Door <strong>Harness</strong><br />
• Passenger Door <strong>Harness</strong><br />
• Main harness, this will have relay bases pre-installed on it<br />
Bag kit containing:<br />
4 relays, 4 self tapping screws, strips of velcro, 2 large 8 pin<br />
connectors and terminals position locks, 2 white connectors and 4<br />
larger un-insulated terminals, umbrella zip ties and small 4” zip ties<br />
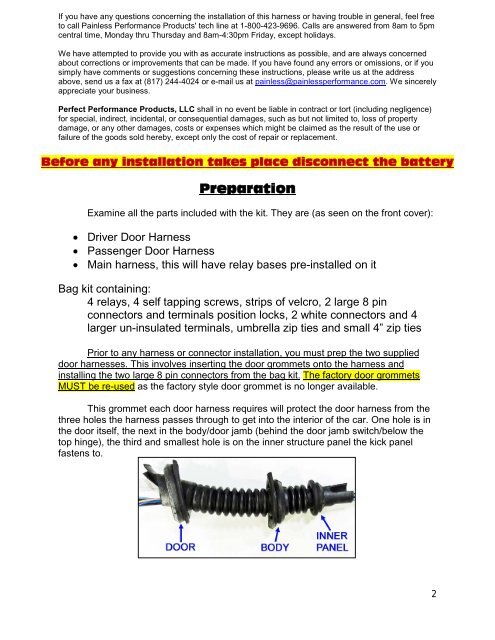
Prior to any harness or connector installation, you must prep the two supplied<br />
door harnesses. This involves inserting the door grommets onto the harness and<br />
installing the two large 8 pin connectors from the bag kit. The factory door grommets<br />
MUST be re-used as the factory style door grommet is no longer available.<br />
This grommet each door harness requires will protect the door harness from the<br />
three holes the harness passes through to get into the interior of the car. One hole is in<br />
the door itself, the next in the body/door jamb (behind the door jamb switch/below the<br />
top hinge), the third and smallest hole is on the inner structure panel the kick panel<br />
fastens to.<br />
2


