7800 series relay modules - Greenheck
7800 series relay modules - Greenheck
7800 series relay modules - Greenheck

Create successful ePaper yourself
Turn your PDF publications into a flip-book with our unique Google optimized e-Paper software.
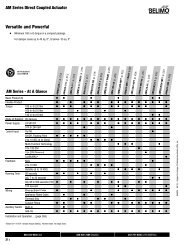
RM7895A,B,C,D/EC7895A,C; RM7896A,B,C,D <strong>7800</strong> SERIES RELAY MODULES<br />
Test<br />
No.<br />
Relay<br />
Module<br />
Model<br />
Table 6. Static Checkout.<br />
Test<br />
Jumpers Voltmeter Normal Operation<br />
If Operation is Abnormal, Check<br />
Items Listed Below<br />
1 All None 5-L2 Line voltage at terminal 5. 1. Master switch.<br />
2. Power connected to master switch.<br />
3. Overload protection (fuse, circuit<br />
breaker, etc.) has not opened<br />
power line.<br />
2 All None 6-L2 Line voltage at terminal 6. 1. Limits.<br />
2. Burner controller.<br />
3 All 4-5 7-L2 1. Burner motor (fan or blower)<br />
starts.<br />
2. Line voltage at terminal 7<br />
within 10 seconds.<br />
4 All 5-10 — 1. Ignition spark (if ignition<br />
transformer is connected to<br />
terminal 10).<br />
1. Burner motor circuit.<br />
a. Manual switch of burner motor.<br />
b. Burner motor power supply,<br />
overload protection and<br />
starter.<br />
c. Burner motor.<br />
1. Watch for spark or listen for buzz.<br />
a. Ignition electrodes are clean.<br />
b. Ignition transformer is okay.<br />
5 All 5-8 — 1. Ignition spark (if ignition<br />
transformer is connected to<br />
terminal 8).<br />
2. Automatic pilot valve opens (if<br />
connected to terminal 8).<br />
1. Watch for spark or listen for buzz.<br />
2. Listen for click or feel head of valve<br />
for activation.<br />
a. Actuator if used.<br />
b. Pilot valve.<br />
NOTE: Refer to wiring diagram of<br />
system being tested.<br />
6 All 5-9 — Automatic fuel valve(s) open(s).<br />
If using direct spark ignition, check<br />
first stage fuel valve(s) instead of<br />
pilot valve.<br />
7 EC7895CR<br />
M7895C,D,<br />
RM7896C,D<br />
5-21 — Automatic second stage main fuel<br />
valve(s) opens.<br />
Same as test 5. If using direct spark<br />
ignition, check first stage fuel valve(s)<br />
instead of pilot valve.<br />
1. Listen for and observe operation of<br />
second stage main fuel valve(s)<br />
and actuator(s).<br />
2. Valve(s) and actuator(s).<br />
8 All 5-3 — Alarm (if used) turns on. 1. Alarm.<br />
Final All<br />
CAUTION<br />
Equipment Damage Hazard.<br />
Can cause equipment damage.<br />
After completing these tests, open master switch and remove all test jumpers from subbase<br />
terminals. Also remove bypass jumpers, if used, from low fuel pressure limits.<br />
Mounting RM7895A,B,C,D/EC7895A,C;<br />
RM7896A,B,C,D Relay Module<br />
1. Mount the RM7895A,B,C,D/EC7895A,C;<br />
RM7896A,B,C,D vertically on the Q<strong>7800</strong> Subbase or<br />
mount horizontally with the knife blade terminals<br />
pointing down. When mounted on the Q<strong>7800</strong>A, the<br />
RM7895A,B,C,D/EC7895A,C; RM7896A,B,C,D must<br />
be in an electrical enclosure.<br />
2. When mounting in an electrical enclosure, provide<br />
adequate clearance for servicing, installation and<br />
removal of the RM7895A,B,C,D/EC7895A,C;<br />
RM7896A,B,C,D, KDM, flame amplifier, flame amplifier<br />
signal voltage probes, electrical signal voltage probes<br />
and electrical connections.<br />
a. Allow an additional two inches (51 mm) below the<br />
RM7895A,B,C,D/EC7895A,C; RM7896A,B,C,D<br />
for the flame amplifier mounting.<br />
b. Allow an optional three-inch (76 mm) minimum on<br />
both sides of the RM7895A,B,C,D/EC7895A,C;<br />
RM7896A,B,C,D for electrical signal voltage<br />
probes.<br />
3. Make sure no subbase wiring is projecting beyond the<br />
terminal blocks. Tuck in wiring against the back of the<br />
subbase so it does not interfere with the knife blade<br />
terminals or bifurcated contacts.<br />
IMPORTANT<br />
The RM7895A,B,C,D/EC7895A,C; RM7896A,B,C,D<br />
must be installed with a plug-in motion rather than a<br />
hinge action.<br />
9 66-1090—2