

DMC-S2PU DMC-S2EB DMC-S2EE DMC-S2EF DMC ... - Panasonic
DMC-S2PU DMC-S2EB DMC-S2EE DMC-S2EF DMC ... - Panasonic
DMC-S2PU DMC-S2EB DMC-S2EE DMC-S2EF DMC ... - Panasonic

You also want an ePaper? Increase the reach of your titles
YUMPU automatically turns print PDFs into web optimized ePapers that Google loves.
9 Measurements and Adjustments<br />
9.1. Introduction<br />
When servicing this unit, make sure to perform the adjustments necessary based on the part(s) replaced.<br />
Before disassembling the unit, it is recommended to back up the camera data stored in flash-rom as a data file.<br />
IMPORTANT NOTICE (After replacing the MAIN P.C.B.)<br />
After replacing the MAIN P.C.B., it is necessary to use the “DIAS” software to allow the release of adjustment flag(s).<br />
The Adjustment software “DIAS” is available at “TSN Website”. To download, click on “Support Information from NWBG/VDBG-<br />
AVC”.<br />
*DIAS (DSC Integrated Assist Software)<br />
9.2. Before Disassembling the unit<br />
9.2.1. Initial Setting Release<br />
The cameras specification are initially set in accordance with model suffix (such as EB, EG, GK, GC, and so on.).<br />
Unless the initial setting is not released, an automatic alignment software in the camera is not able to be executed when the alignment<br />
is carried out.<br />
Note:<br />
The initial setting should be again done after completing the alignment. Otherwise, the camera may not work properly.<br />
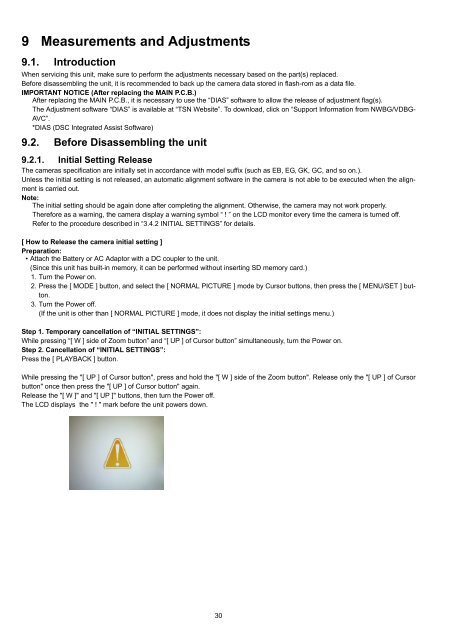
Therefore as a warning, the camera display a warning symbol “ ! ” on the LCD monitor every time the camera is turned off.<br />
Refer to the procedure described in “3.4.2 INITIAL SETTINGS” for details.<br />
[ How to Release the camera initial setting ]<br />
Preparation:<br />
• Attach the Battery or AC Adaptor with a DC coupler to the unit.<br />
(Since this unit has built-in memory, it can be performed without inserting SD memory card.)<br />
1. Turn the Power on.<br />
2. Press the [ MODE ] button, and select the [ NORMAL PICTURE ] mode by Cursor buttons, then press the [ MENU/SET ] button.<br />
3. Turn the Power off.<br />
(If the unit is other than [ NORMAL PICTURE ] mode, it does not display the initial settings menu.)<br />
Step 1. Temporary cancellation of “INITIAL SETTINGS”:<br />
While pressing “[ W ] side of Zoom button” and “[ UP ] of Cursor button” simultaneously, turn the Power on.<br />
Step 2. Cancellation of “INITIAL SETTINGS”:<br />
Press the [ PLAYBACK ] button.<br />
While pressing the "[ UP ] of Cursor button", press and hold the "[ W ] side of the Zoom button". Release only the "[ UP ] of Cursor<br />
button" once then press the "[ UP ] of Cursor button" again.<br />
Release the "[ W ]" and "[ UP ]" buttons, then turn the Power off.<br />
The LCD displays the " ! " mark before the unit powers down.<br />
30


