6166 BirdXpeller Pro - Smarthome
6166 BirdXpeller Pro - Smarthome
6166 BirdXpeller Pro - Smarthome
Create successful ePaper yourself
Turn your PDF publications into a flip-book with our unique Google optimized e-Paper software.
PROGRAMMING EXAMPLE<br />
TROUBLESHOOTING<br />
Digital Bird Repeller<br />
Bird Recording Switches: Results<br />
1, 3, 5 and 6 to “ON” position Plays Birds 1, 3, 5 & 6<br />
PROBLEM<br />
SOLUTION<br />
Mode Switches<br />
1 = “OFF” position<br />
2 = “ON” position (Medium), every 1 to 4 minutes<br />
3 = “ON” position<br />
4 = “OFF” position Operates during daylight hours only<br />
5 = “ON” position In random, non-sequential order<br />
VOLUME CONTROL<br />
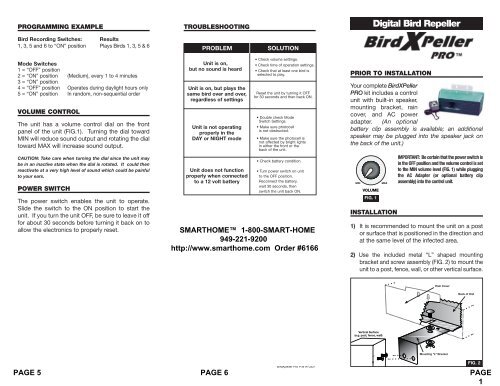
The unit has a volume control dial on the front<br />
panel of the unit (FIG.1). Turning the dial toward<br />
MIN will reduce sound output and rotating the dial<br />
toward MAX will increase sound output.<br />
CAUTION: Take care when turning the dial since the unit may<br />
be in an inactive state when the dial is rotated. It could then<br />
reactivate at a very high level of sound which could be painful<br />
to your ears.<br />
POWER SWITCH<br />
The power switch enables the unit to operate.<br />
Slide the switch to the ON position to start the<br />
unit. If you turn the unit OFF, be sure to leave it off<br />
for about 30 seconds before turning it back on to<br />
allow the electronics to properly reset.<br />
Unit is on,<br />
but no sound is heard<br />
Unit is on, but plays the<br />
same bird over and over,<br />
regardless of settings<br />
Unit is not operating<br />
properly in the<br />
DAY or NIGHT mode<br />
Unit does not function<br />
properly when connected<br />
to a 12 volt battery<br />
• Check volume settings.<br />
• Check time of operation settings.<br />
• Check that at least one bird is<br />
selected to play.<br />
Reset the unit by turning it OFF<br />
for 30 seconds and then back ON.<br />
• Double check Mode<br />
Switch Settings.<br />
• Make sure photocell<br />
is not obstructed.<br />
• Make sure the photocell is<br />
not affected by bright lights<br />
in either the front or the<br />
back of the unit.<br />
• Check battery condition.<br />
• Turn power switch on unit<br />
to the OFF position.<br />
Reconnect the battery,<br />
wait 30 seconds, then<br />
switch the unit back ON.<br />
WARRANTY AND RETURNS<br />
THIS BIRDXPELLER PRO UNIT IS GUARANTEED AGAINST DEFECTS IN<br />
MATERIAL AND WORKMANSHIP FOR SIX MONTHS FROM DATE OF<br />
PURCHASE. BIRD-X WILL REPLACE OR REPAIR PROVIDED DEFECT<br />
OCCURS UNDER NORMAL USE. UNITS ALSO CARRY A 30-DAY<br />
PERFORMANCE GUARANTEE. IF USER IS NOT SATISFIED WITH THE<br />
RESULTS, UNIT MAY BE RETURNED WITHIN 30 DAYS FOR CREDIT LESS A<br />
15% HANDLING AND RESTOCKING CHARGE. RETURNS ACCEPTED ONLY<br />
WITH AUTHORIZATION FROM OUR CHICAGO OFFICE.<br />
PRIOR TO INSTALLATION<br />
Your complete BirdXPeller<br />
PRO kit includes a control<br />
unit with built-in speaker,<br />
mounting bracket, rain<br />
cover, and AC power<br />
adapter. (An optional<br />
battery clip assembly is available; an additional<br />
speaker may be plugged into the speaker jack on<br />
the back of the unit.)<br />
MIN<br />
VOLUME<br />
FIG. 1<br />
MAX<br />
INSTALLATION<br />
IMPORTANT: Be certain that the power switch is<br />
in the OFF position and the volume control is set<br />
to the MIN volume level (FIG. 1) while plugging<br />
the AC Adapter (or optional battery clip<br />
assembly) into the control unit.<br />
1) It is recommended to mount the unit on a post<br />
or surface that is positioned in the direction and<br />
at the same level of the infected area.<br />
2) Use the included metal “L” shaped mounting<br />
bracket and screw assembly (FIG. 2) to mount the<br />
unit to a post, fence, wall, or other vertical surface.<br />
Rain Cover<br />
Back of Unit<br />
300 North Elizabeth Street • Chicago, IL 60607<br />
ph. (312) 226-2473 • fax (312) 226-2480<br />
Toll Free US & Canada 800-662-5021<br />
www.bird-x.com<br />
EPA Establishment Number 62617-OR-001<br />
Pest Control <strong>Pro</strong>ducts Act #23587<br />
Vertical Surface<br />
(e.g. post, fence, wall)<br />
Mounting "L" Bracket<br />
<strong>BirdXpeller</strong> <strong>Pro</strong> P/N #10321<br />
FIG. 2
IMPORTANT: Mount the unit with the enclosed metal “L” shaped<br />
mounting bracket. DO NOT mount the unit by the tab on the rain cover.<br />
3) Set the Recording Switches, Mode Setting<br />
Switches, Time-Off Switches, Time of<br />
Operation Switches, and Random Operation<br />
Switch to the desired settings. (See<br />
“PROGRAMMING YOUR BIRDXPELLER” for<br />
details on how to program your bird repeller).<br />
4) Plug the AC power adapter into any standard<br />
electrical outlet. Or attach the optional battery<br />
clip assembly to a 12V battery. The other end of<br />
the cable should already be plugged into the<br />
power jack located above POWER on the back<br />
of the control unit.<br />
5) Make sure the volume setting is set to MIN (all<br />
the way counterclockwise).<br />
6) Slide the power switch to the ON position. The<br />
unit may take a few seconds before starting.<br />
7) Adjust the volume to the desired level.<br />
8) Always replace the translucent rain cover<br />
before fitting the mounting bracket holes over<br />
the two previously positioned screws.<br />
PROGRAMMING YOUR BIRDXPELLER<br />
Switch<br />
Array<br />
#1<br />
Switch<br />
Array<br />
#2<br />
FIG. 3<br />
1 2 3 4 5 6 7 8 1 2 3 4 5<br />
Bird<br />
Recording<br />
Switches<br />
(1-8)<br />
Mode<br />
Setting<br />
Switches<br />
(1-5)<br />
To program your<br />
BIRDXPELLER unit<br />
you will need a small<br />
screwdriver, toothpick,<br />
or other pointed, rigid<br />
object to toggle the<br />
switches in the switch<br />
array (FIG. 3). The<br />
switch array is the<br />
switch bank located<br />
on the back of the<br />
unit, to the left side<br />
(under the translucent<br />
plastic plug). A switch is ON if the switch is<br />
pressed down on the right-hand side. The<br />
switch is OFF if the left side is pressed down.<br />
BIRD RECORDING SETTING SWITCHES<br />
The Bird Recording Switches are the first eight<br />
switches (FIG. 4) in Switch Array #1. Each switch<br />
has a recording number to the right of it that<br />
corresponds with the bird descriptions listed on<br />
the foil label inside the unit.<br />
MODE SETTING SWITCHES<br />
Switch<br />
Array<br />
#2<br />
The Mode Setting Switches are the<br />
last five switches (FIG. 3) in Switch<br />
Array #2. These set the various<br />
modes of operation: such as the<br />
amount of time between playing bird distress<br />
calls, when the unit will operate (day only, night<br />
only, or 24-hours), and whether the unit will<br />
operate in the random mode or normal mode.<br />
Switch Mode or Function<br />
1 Sets the Time-Off Period<br />
2 Sets the Time-Off Period<br />
3 Sets the Time the unit plays<br />
4 Sets the Time the unit plays<br />
5 Turns Random Mode On or Off<br />
TIME-OFF SWITCHES<br />
Switch<br />
Array<br />
#2<br />
Switch<br />
Array<br />
#1<br />
7 8 1 2 3 4 5<br />
1 2 3 4 5<br />
1 2 3 4 5 6 7 8<br />
Time-Off<br />
Switches<br />
1 Pigeon I<br />
2 Pigeon II/Bird Predator<br />
3 Starling/Pigeon III<br />
4 Sparrow<br />
5 Gull I<br />
6 Gull II<br />
7 Woodpecker I<br />
8 Predator FIG. 4<br />
The two Time-Off Switches<br />
are located just below the<br />
Recording Switches (1-8) in<br />
the switch array. The unit<br />
will delay a number of seconds or minutes<br />
between recorded sounds when the unit is set to<br />
one of the various Time-Off Modes. Please note<br />
that the unit will play all of the selected recordings<br />
(either sequentially or non-sequentially,<br />
depending on the Random Mode), then it will go<br />
into a delay. The time the unit stays off depends<br />
on the Time-Off and the Random Mode Settings.<br />
If the unit is operating in Random Mode, the unit<br />
will delay anywhere from the minimum value to<br />
the maximum value for that Time-Off setting. If<br />
the unit is not in Random Mode, it will delay only<br />
the minimum value.<br />
To set the Time-Off period (or delay interval), use<br />
the following settings on switches 1 and 2 in the<br />
Mode Function Settings.<br />
Switch 1 Switch 2 Time Off Period<br />
ON OFF Short (17-50 sec.)<br />
OFF ON Medium (1-4 min.)<br />
ON ON Long (5-10 min.)<br />
OFF OFF X Long (10-30 min.)<br />
TIME OF OPERATION SWITCHES<br />
Switch<br />
Array<br />
#2<br />
1 2 3 4 5<br />
The two Time of Operation<br />
switches are located just<br />
under the Time-Off<br />
Switches in the switch<br />
array. The unit will operate day only, night only, or<br />
continuously (24-hours). However, the photocell<br />
that senses the sunlight is susceptible to bright<br />
lights. Take care not to have bright lights shining<br />
towards the unit since this can prevent the unit<br />
from operating properly. To set the time period<br />
for the unit to operate set switches 3 and 4 in the<br />
Mode Function settings to the following:<br />
Switch 3 Switch 4 Mode<br />
ON OFF Day Only<br />
OFF ON 24-Hour<br />
ON ON Night Only<br />
OFF OFF also Night Only<br />
RANDOM OPERATION SWITCH<br />
Switch<br />
Array<br />
#2<br />
8 1 2 3 4 5<br />
The Random Operation<br />
Switch is the bottom switch<br />
in the switch array. The unit<br />
will randomly play the<br />
selected recordings in non-sequential order when<br />
operating in Random Mode. When the unit is not<br />
operating in the Random Mode, the unit will play<br />
the selected recordings in a sequential order. The<br />
Random Mode is recommended to keep birds<br />
from adapting to a preset pattern of sounds. To<br />
operate the unit in Random Mode, set switch 5 as<br />
follows:<br />
Switch 5<br />
ON<br />
OFF<br />
Time of<br />
Operation<br />
Switches<br />
Random<br />
Switch<br />
Mode<br />
Random mode ON<br />
Random mode OFF


