USER MANUAL - KOUKAAM a.s.
USER MANUAL - KOUKAAM a.s.
USER MANUAL - KOUKAAM a.s.

You also want an ePaper? Increase the reach of your titles
YUMPU automatically turns print PDFs into web optimized ePapers that Google loves.
<strong>USER</strong> <strong>MANUAL</strong><br />
AXIS M3007–P
About this Document<br />
This manual is intended for administrators and users of the AXIS<br />
M3007–P Fixed Dome Network Camera, and is applicable to firmware<br />
5.4 and later. It includes instructions for using and managing the<br />
product on your network. Previous experience of networking will be of<br />
use when using this product. Some knowledge of UNIX or Linux-based<br />
systems may also be beneficial, for developing shell scripts and<br />
applications. Later versions of this document will be posted to the Axis<br />
website, as required. See also the product’s online help, available via<br />
the web-based interface.<br />
Legal Considerations<br />
Video surveillance can be regulated by laws that vary from country to<br />
country. Check the laws in your local region before using this product<br />
for surveillance purposes.<br />
This product includes one (1) H.264 decoder license. To purchase<br />
further licenses, contact your reseller.<br />
Liability<br />
Every care has been taken in the preparation of this document. Please<br />
inform your local Axis office of any inaccuracies or omissions. Axis<br />
Communications AB cannot be held responsible for any technical or<br />
typographical errors and reserves the right to make changes to the<br />
product and manuals without prior notice. Axis Communications AB<br />
makes no warranty of any kind with regard to the material contained<br />
within this document, including, but not limited to, the implied<br />
warranties of merchantability and fitness for a particular purpose. Axis<br />
Communications AB shall not be liable nor responsible for incidental or<br />
consequential damages in connection with the furnishing, performance<br />
or use of this material. This product is only to be used for its intended<br />
purpose.<br />
Intellectual Property Rights<br />
Axis AB has intellectual property rights relating to technology embodied<br />
in the product described in this document. In particular, and without<br />
limitation, these intellectual property rights may include one or more<br />
of the patents listed at http://www.axis.com/patent.htm and one or<br />
more additional patents or pending patent applications in the US and<br />
other countries.<br />
This product contains licensed third-party software. See the menu item<br />
“About” in the product’s user interface for more information.<br />
This product contains source code copyright Apple Computer,<br />
Inc., under the terms of Apple Public Source License 2.0 (see<br />
http://www.opensource.apple.com/apsl). The source code is available<br />
from http://developer.apple.com/darwin/projects/bonjour/<br />
Equipment Modifications<br />
This equipment must be installed and used in strict accordance with the<br />
instructions given in the user documentation. This equipment contains<br />
no user-serviceable components. Unauthorized equipment changes or<br />
modifications will invalidate all applicable regulatory certifications<br />
and approvals.<br />
Trademark Acknowledgments<br />
AXIS COMMUNICATIONS, AXIS, ETRAX, ARTPEC and VAPIX are<br />
registered trademarks or trademark applications of Axis AB in various<br />
jurisdictions. All other company names and products are trademarks or<br />
registered trademarks of their respective companies.<br />
Apple, Boa, Apache, Bonjour, Ethernet, Internet Explorer, Linux,<br />
Microsoft, Mozilla, Real, SMPTE, QuickTime, UNIX, Windows, Windows<br />
Vista and WWW are registered trademarks of the respective holders.<br />
Java and all Java-based trademarks and logos are trademarks or<br />
registered trademarks of Oracle and/or its affiliates. UPnP TM is a<br />
certification mark of the UPnP TM Implementers Corporation.<br />
SD, SDHC and SDXC are trademarks or registered trademarks of SD-3C,<br />
LLC in the United States, other countries or both. Also, miniSD, microSD,<br />
miniSDHC, microSDHC, microSDXC are all trademarks or registered<br />
trademarks of SD-3C, LLC in the United States, other countries or both.<br />
USA<br />
This equipment has been tested using a shielded network cable (STP)<br />
and found to comply with the limits for a Class B digital device,<br />
pursuant to part 15 of the FCC Rules. These limits are designed<br />
to provide reasonable protection against harmful interference in a<br />
residential installation. This equipment generates, uses and can radiate<br />
radio frequency energy and, if not installed and used in accordance<br />
with the instructions, may cause harmful interference to radio<br />
communications. However, there is no guarantee that interference<br />
will not occur in a particular installation. If this equipment does<br />
cause harmful interference to radio or television reception, which<br />
can be determined by turning the equipment off and on, the user is<br />
encouraged to try to correct the interference by one or more of the<br />
following measures:<br />
• Reorient or relocate the receiving antenna.<br />
• Increase the separation between the equipment and receiver.<br />
• Connect the equipment into an outlet on a circuit different from<br />
that to which the receiver is connected.<br />
• Consult the dealer or an experienced radio/TV technician for help.<br />
Canada<br />
This Class B digital apparatus complies with Canadian ICES-003.<br />
Europe<br />
This digital equipment fulfills the requirements for RF emission<br />
according to the Class B limit of EN 55022.<br />
This product fulfills the requirements for immunity according<br />
to EN 61000-6-1 residential, commercial and light-industrial<br />
environments.<br />
This product fulfills the requirements for immunity according to<br />
EN 61000-6-2 industrial environments.<br />
This product fulfills the requirements for immunity according to<br />
EN 55024 office and commercial environments<br />
Australia/New Zealand<br />
This digital equipment fulfills the requirements for RF emission<br />
according to the Class B limit of AS/NZS CISPR 22.<br />
Japan<br />
この 装 置 は、クラスB 情 報 技 術 装 置 です。この 装 置 は、 家 庭<br />
環 境 で 使 用 することを 目 的 としていますが、この 装 置 がラジ<br />
オやテレビジョン 受 信 機 に 近 接 して 使 用 されると、 受 信 障<br />
害 を 引 き 起 こすことがあります。 取 扱 説 明 書 に 従 って 正 し<br />
い 取 り 扱 いをして 下 さい。<br />
Korea<br />
이 기기는 가정용(B급) 전자파적합기기로서 주로 가정에<br />
서 사용하는 것을 목적으로 하며, 모든 지역에서 사용<br />
할 수 있습니다.<br />
This product complies with IEC/EN/UL 60950-1, Safety of Information<br />
Technology Equipment.<br />
The power supply used with this product shall fulfill the requirements<br />
for Safety Extra Low Voltage (SELV) and Limited Power Source (LPS)<br />
according to IEC/EN/UL 60950-1.<br />
Support<br />
Should you require any technical assistance, please contact your Axis<br />
reseller. If your questions cannot be answered immediately, your<br />
reseller will forward your queries through the appropriate channels to<br />
ensure a rapid response. If you are connected to the Internet, you can:<br />
• download user documentation and software updates<br />
• find answers to resolved problems in the FAQ database. Search<br />
by product, category, or phrase<br />
• report problems to Axis support staff by logging in to your private<br />
support area<br />
• chat with Axis support staff (selected countries only)<br />
• visit Axis Support at www.axis.com/techsup/<br />
Learn More!<br />
Visit Axis learning center www.axis.com/academy/ for useful trainings,<br />
webinars, tutorials and guides.
AXIS M3007–P<br />
Table of Contents<br />
Hardware Overview . . . . . . . . . . . . . . . . . . . . . . . . . . . . . . . . . . . . . . . . . . 4<br />
Connectors . . . . . . . . . . . . . . . . . . . . . . . . . . . . . . . . . . . . . . . . . . . . . . . . . . . . 4<br />
LED Indicators . . . . . . . . . . . . . . . . . . . . . . . . . . . . . . . . . . . . . . . . . . . . . . . . . . 5<br />
Accessing the Product . . . . . . . . . . . . . . . . . . . . . . . . . . . . . . . . . . . . . . . 6<br />
Access from a Browser . . . . . . . . . . . . . . . . . . . . . . . . . . . . . . . . . . . . . . . . . . . 6<br />
Access from the Internet . . . . . . . . . . . . . . . . . . . . . . . . . . . . . . . . . . . . . . . . . . 7<br />
Set the Root Password . . . . . . . . . . . . . . . . . . . . . . . . . . . . . . . . . . . . . . . . . . . 7<br />
The Live View Page . . . . . . . . . . . . . . . . . . . . . . . . . . . . . . . . . . . . . . . . . . . . . . 8<br />
Media Streams . . . . . . . . . . . . . . . . . . . . . . . . . . . . . . . . . . . . . . . . . . . . . 11<br />
How to Stream H.264 . . . . . . . . . . . . . . . . . . . . . . . . . . . . . . . . . . . . . . . . . . . . 11<br />
MJPEG . . . . . . . . . . . . . . . . . . . . . . . . . . . . . . . . . . . . . . . . . . . . . . . . . . . . . . . . 11<br />
AXIS Media Control (AMC) . . . . . . . . . . . . . . . . . . . . . . . . . . . . . . . . . . . . . . . . 11<br />
Alternative Methods of Accessing the Video Stream . . . . . . . . . . . . . . . . . . . . 12<br />
Accessing Audio Streams . . . . . . . . . . . . . . . . . . . . . . . . . . . . . . . . . . . . . . . . . 13<br />
Setting Up the Product . . . . . . . . . . . . . . . . . . . . . . . . . . . . . . . . . . . . . . 14<br />
Basic Setup . . . . . . . . . . . . . . . . . . . . . . . . . . . . . . . . . . . . . . . . . . . . . . . . . . . . 14<br />
Video . . . . . . . . . . . . . . . . . . . . . . . . . . . . . . . . . . . . . . . . . . . . . . . . . . . . . . . . . 15<br />
Video Stream . . . . . . . . . . . . . . . . . . . . . . . . . . . . . . . . . . . . . . . . . . . . . . . . . . . 15<br />
Stream Profiles . . . . . . . . . . . . . . . . . . . . . . . . . . . . . . . . . . . . . . . . . . . . . . . . . 19<br />
Camera Settings . . . . . . . . . . . . . . . . . . . . . . . . . . . . . . . . . . . . . . . . . . . . . . . . 19<br />
View areas . . . . . . . . . . . . . . . . . . . . . . . . . . . . . . . . . . . . . . . . . . . . . . . . . . . . . 21<br />
Overlay . . . . . . . . . . . . . . . . . . . . . . . . . . . . . . . . . . . . . . . . . . . . . . . . . . . . . . . . 21<br />
Privacy Mask . . . . . . . . . . . . . . . . . . . . . . . . . . . . . . . . . . . . . . . . . . . . . . . . . . . 22<br />
Live View Config . . . . . . . . . . . . . . . . . . . . . . . . . . . . . . . . . . . . . . . . . . . . 24<br />
PTZ (Pan Tilt Zoom) . . . . . . . . . . . . . . . . . . . . . . . . . . . . . . . . . . . . . . . . . 26<br />
Preset Positions . . . . . . . . . . . . . . . . . . . . . . . . . . . . . . . . . . . . . . . . . . . . . . . . . 26<br />
Guard Tour . . . . . . . . . . . . . . . . . . . . . . . . . . . . . . . . . . . . . . . . . . . . . . . . . . . . . 27<br />
Advanced . . . . . . . . . . . . . . . . . . . . . . . . . . . . . . . . . . . . . . . . . . . . . . . . . . . . . . 27<br />
Detectors . . . . . . . . . . . . . . . . . . . . . . . . . . . . . . . . . . . . . . . . . . . . . . . . . . 28<br />
Camera Tampering . . . . . . . . . . . . . . . . . . . . . . . . . . . . . . . . . . . . . . . . . . . . . . 28<br />
Motion Detection . . . . . . . . . . . . . . . . . . . . . . . . . . . . . . . . . . . . . . . . . . . . . . . 28<br />
Applications . . . . . . . . . . . . . . . . . . . . . . . . . . . . . . . . . . . . . . . . . . . . . . . 31<br />
Events . . . . . . . . . . . . . . . . . . . . . . . . . . . . . . . . . . . . . . . . . . . . . . . . . . . . 32<br />
Setting Up an Action Rule . . . . . . . . . . . . . . . . . . . . . . . . . . . . . . . . . . . . . . . . 33<br />
Recipients . . . . . . . . . . . . . . . . . . . . . . . . . . . . . . . . . . . . . . . . . . . . . . . . . . . . . 33<br />
Schedules . . . . . . . . . . . . . . . . . . . . . . . . . . . . . . . . . . . . . . . . . . . . . . . . . . . . . . 34<br />
Recurrences . . . . . . . . . . . . . . . . . . . . . . . . . . . . . . . . . . . . . . . . . . . . . . . . . . . . 34<br />
Recordings . . . . . . . . . . . . . . . . . . . . . . . . . . . . . . . . . . . . . . . . . . . . . . . . . 36<br />
Recording List . . . . . . . . . . . . . . . . . . . . . . . . . . . . . . . . . . . . . . . . . . . . . . . . . . 36<br />
Continuous Recording . . . . . . . . . . . . . . . . . . . . . . . . . . . . . . . . . . . . . . . . . . . . 36<br />
Languages . . . . . . . . . . . . . . . . . . . . . . . . . . . . . . . . . . . . . . . . . . . . . . . . . 38<br />
System Options . . . . . . . . . . . . . . . . . . . . . . . . . . . . . . . . . . . . . . . . . . . . . 39<br />
Security . . . . . . . . . . . . . . . . . . . . . . . . . . . . . . . . . . . . . . . . . . . . . . . . . . . . . . . 39<br />
Date & Time . . . . . . . . . . . . . . . . . . . . . . . . . . . . . . . . . . . . . . . . . . . . . . . . . . . . 42<br />
Network . . . . . . . . . . . . . . . . . . . . . . . . . . . . . . . . . . . . . . . . . . . . . . . . . . . . . . . 42<br />
Storage . . . . . . . . . . . . . . . . . . . . . . . . . . . . . . . . . . . . . . . . . . . . . . . . . . . . . . . 47<br />
Maintenance . . . . . . . . . . . . . . . . . . . . . . . . . . . . . . . . . . . . . . . . . . . . . . . . . . . 48<br />
Support . . . . . . . . . . . . . . . . . . . . . . . . . . . . . . . . . . . . . . . . . . . . . . . . . . . . . . . 49<br />
Advanced . . . . . . . . . . . . . . . . . . . . . . . . . . . . . . . . . . . . . . . . . . . . . . . . . . . . . . 50<br />
Reset to Factory Default Settings . . . . . . . . . . . . . . . . . . . . . . . . . . . . . . . . . . . 50<br />
Troubleshooting . . . . . . . . . . . . . . . . . . . . . . . . . . . . . . . . . . . . . . . . . . . . 51<br />
Checking the Firmware . . . . . . . . . . . . . . . . . . . . . . . . . . . . . . . . . . . . . . . . . . . 51<br />
Upgrading the Firmware . . . . . . . . . . . . . . . . . . . . . . . . . . . . . . . . . . . . . . . . . . 51<br />
Symptoms, Possible Causes and Remedial Actions . . . . . . . . . . . . . . . . . . . . . 51<br />
Technical Specifications . . . . . . . . . . . . . . . . . . . . . . . . . . . . . . . . . . . . . . 54<br />
Performance Considerations . . . . . . . . . . . . . . . . . . . . . . . . . . . . . . . . . . . . . . . 56<br />
3
AXIS M3007–P<br />
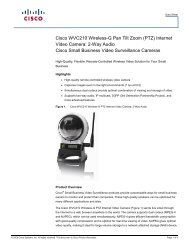
Hardware Overview<br />
Hardware Overview<br />
1<br />
2<br />
3<br />
3<br />
4<br />
PoE IEEE 802.3af<br />
Class 2<br />
5<br />
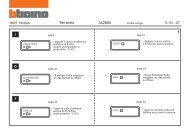
1. Cover<br />
2. Control button<br />
3. Status LED<br />
4. microSD Card slot<br />
5. Network conector (PoE – comes attached with product)<br />
Connectors<br />
For technical specifications, see page 54.<br />
Network connector - RJ-45 Ethernet connector. Supports Power over Ethernet (PoE).<br />
NOTICE<br />
The product shall be connected using a shielded network cable (STP). All cables connecting the product to the network<br />
switch shall be shielded (STP) and intended for their specific use. Make sure that the network switch is properly grounded.<br />
See for regulatory requirements.<br />
4
AXIS M3007–P<br />
Hardware Overview<br />
SD card slot - A standard or high-capacity microSD card (not included) can be used for local recording with removable storage.<br />
NOTICE<br />
To prevent corruption of recordings, the SD card should be unmounted before removal. To unmount, go to Setup > System<br />
Options > Storage > SD Card and click Unmount.<br />
Control button - The control button is used for:<br />
• Connecting to an AXIS Video Hosting System service. See page 43. To connect, press and hold the button for<br />
about 1 second until the Status LED flashes green.<br />
• Connecting to AXIS Internet Dynamic DNS Service. See page 44. To connect, press and hold the button for<br />
about 3 seconds.<br />
• Resetting the product to factory default settings. See page 50.<br />
LED Indicators<br />
Color<br />
Unlit<br />
Amber<br />
Amber/red<br />
Red<br />
Green<br />
Indication<br />
Connection and normal operation<br />
Steady during startup. Flashes during firmware upgrade.<br />
Flashes amber/red if network connection is unavailable or lost.<br />
Flashes red for firmware upgrade failure.<br />
Shows steady green for 10 seconds for normal operation after restart.<br />
Note<br />
• The Status LED can be configured to flash while an event is active.<br />
• The Status LED can be configured to flash for identifying the unit. Go to Setup > System Options > Maintenance .<br />
5
AXIS M3007–P<br />
Accessing the Product<br />
Accessing the Product<br />
To install the Axis product, refer to the Installation Guide supplied with the product.<br />
The product can be used with most operating systems and browsers. The recommended browsers are Internet Explorer with Windows,<br />
Safari with Macintosh and Firefox with other operating systems. See Technical Specifications, on page 54. To view streaming video in<br />
Internet Explorer, allow installation of AXIS Media Control (AMC) when prompted.<br />
The Axis product includes one (1) H.264 decoder license for viewing video streams. The license is automatically installed with AMC.<br />
The administrator can disable the installation of the decoders, to prevent installation of unlicensed copies.<br />
Note<br />
• QuickTime TM is also supported for viewing H.264 streams.<br />
• If your computer restricts the use of additional software components, the product can be configured to use a Java applet<br />
for viewing Motion JPEG.<br />
Access from a Browser<br />
1. Start a browser (Internet Explorer, Firefox, Safari).<br />
2. Enter the IP address or host name of the Axis product in the browser’s Location/Address field. To access the product from a<br />
Macintosh computer (Mac OS X), click on the Bonjour tab and select the product from the drop-down list.<br />
If you do not know the IP address, use AXIS IP Utility to locate the product on the network. For information about how to<br />
discover and assign an IP address, see the Installation and Management Software CD or the document Assign an IP Address<br />
and Access the Video Stream on Axis Support web at www.axis.com/techsup<br />
3. Enter your user name and password. If this is the first time the product is accessed, the root password must first be<br />
configured. For instructions, see Set the Root Password, on page 7 .<br />
4. The product’s Live View page appears in your browser.<br />
Note<br />
The controls and layout of the Live View page may have been customized to meet specific installation requirements and<br />
user preferences. Consequently, some of the examples and functions featured here may differ from those displayed in<br />
your own Live View page.<br />
6
AXIS M3007–P<br />
Accessing the Product<br />
Access from the Internet<br />
Once connected, the Axis product is accessible on your local network (LAN). To access the product from the Internet you must<br />
configure your network router to allow incoming data traffic to the product. To do this, enable the NAT-traversal feature, which<br />
will attempt to automatically configure the router to allow access to the product. This is enabled from Setup > System Options ><br />
Network > TCP/IP Advanced.<br />
For more information, please see NAT traversal (port mapping) for IPv4, on page 45. See also AXIS Internet Dynamic DNS Service at<br />
www.axiscam.net For Technical notes on this and other topics, visit the Axis Support web at www.axis.com/techsup<br />
Set the Root Password<br />
To gain access to the Axis product, you must set the password for the default administrator user root. This is done in the Configure<br />
Root Password dialog, which appears when the product is accessed for the first time.<br />
To prevent network eavesdropping, the root password can be set via an encrypted HTTPS connection, which requires an HTTPS<br />
certificate. HTTPS (Hypertext Transfer Protocol over SSL) is a protocol used to encrypt traffic between web browsers and servers. The<br />
HTTPS certificate ensures encrypted exchange of information. See HTTPS, on page 45.<br />
The default administrator user name root is permanent and cannot be deleted. If the password for root is lost, the product must be<br />
reset to the factory default settings. See Reset to Factory Default Settings, on page 50.<br />
To set the password via a standard HTTP connection, enter it directly in the first dialog.<br />
To set the password via an encrypted HTTPS connection, follow these steps:<br />
1. Click Create self-signed certificate.<br />
2. Provide the requested information and click OK. The certificate is created and the password can now be set securely. All<br />
traffic to and from the product is encrypted from this point on.<br />
3. Enter a password and then re-enter to confirm the spelling. Click OK. The password has now been configured.<br />
7
AXIS M3007–P<br />
Accessing the Product<br />
Select Camera Mode<br />
This product can be used either with downloadable intelligent video applications (see Applications, on page 31) or with multiple view<br />
modes (see View modes, on page 16). The first time the product is accessed the Camera Mode dialog prompts you to choose between<br />
the two options. If the ‘Multiple view modes’ option is selected make sure to select the correct camera orientation. Select Ceiling,<br />
Wall or Desktop depending on how the Axis product is installed. The settings for the product will differ depending on the orientation<br />
chosen. To change the orientation, click Restore from Setup System Options Maintenance in the product’s web page and select the<br />
orientation again. Restoring will reset all except IP parameters to the original factory settings.<br />
Set Power Line Frequency<br />
Power line frequency is set the first time the Axis product is accessed and can only be changed from Plain Config (see page 50)<br />
or by resetting the product to factory default.<br />
Note<br />
Power line frequency is different in different geographic regions. In the Americas, 60 Hz is usually used; most other parts of<br />
the world use 50 Hz. Local variations may apply, always check with the local authorities.<br />
The Live View Page<br />
The controls and layout of the Live View page may have been customized to meet specific installation requirements and user<br />
preferences. Consequently, some of the examples and functions featured here may differ from those displayed in your own Live View<br />
page. The following provides an overview of each available control.<br />
8
AXIS M3007–P<br />
Accessing the Product<br />
Controls on the Live View Page<br />
Click View size to scale the image down to 800 pixels wide or to full scale. Only available in MJPEG.<br />
Select a stream profile for the Live View page from the Stream Profile drop-down list. For information about how<br />
to configure stream profiles, see page 19.<br />
The Manual Trigger button is used to trigger an action rule from the Live View page. For information about how to<br />
configure and enable the button, see Manual Trigger, on page 9 .<br />
Click Snapshot to save a snapshot of the video image. Right-click the video image to save it in JPEG format on your<br />
computer. This button is primarily intended for use when the AXIS Media Control viewer toolbar is not available.<br />
Enable this button from Live View Config > Action Buttons.<br />
Manual Trigger<br />
The Manual Trigger is used to trigger an action rule from the Live View page. The manual trigger can for example be used to<br />
validate actions during product installation and configuration.<br />
To configure the manual trigger:<br />
1. Go to Setup > Events.<br />
2. Click Add to add a new action rule.<br />
3. From the Trigger drop-down list, select Input Signal.<br />
4. From the second drop-down list, select Manual Trigger.<br />
5. Select the desired action and configure the other settings as required.<br />
For more information about action rules, see Events, on page 32.<br />
To show the manual trigger buttons in the Live View page:<br />
1. Go to Setup > Live View Layout.<br />
2. Under Action Buttons, select Show manual trigger button.<br />
AXIS Media Control viewer toolbar<br />
The AXIS Media Control viewer toolbar is available in Internet Explorer only. See AXIS Media Control (AMC), on page 11 for more<br />
information. The toolbar displays the following buttons:<br />
The Play button connects to the Axis product and starts playing a media stream.<br />
The Stop button stops the media stream.<br />
The Snapshot button takes a snapshot of the video image. The location where the image is saved can be specified<br />
in the AMC Control Panel.<br />
9
AXIS M3007–P<br />
Accessing the Product<br />
Click the View Full Screen button and the video image will fill the entire screen. Press ESC (Escape) on the computer<br />
keyboard to cancel full screen view.<br />
The Record button is used to record the current video stream. The location where the recording is saved can be specified in<br />
the AMC Control Panel. Enable this button from Live View Config > Viewer Settings.<br />
PTZ Controls<br />
The Live View page also displays Pan/Tilt/Zoom (PTZ) controls. The administrator can enable/disable controls for specified users under<br />
System Options > Security > Users.<br />
Note<br />
PTZ controls are only available for view areas, which are visible when the Multiple View Modes option has been selected. See<br />
Select Camera Mode, on page 8 .<br />
Click the Emulate joystick mode button and click in the image to move the camera view in the direction of the<br />
mouse pointer.<br />
Click the Center mode button and click in the image to center the camera view on that position. The center mode<br />
button could also be used to zoom in on a specific area. Click in the image and drag to draw a rectangle surrounding<br />
the area to be magnified. To zoom out, rotate the mouse wheel.<br />
Click the Ctrl panel button to open the PTZ control panel which provides additional PTZ controls.<br />
User-defined buttons can also appear in the Control panel. See Controls, on page 27.<br />
Click the Home button to go to the Home preset position. See Preset Positions, on page 26.<br />
Click the Overview map button to hide or view the overview map. See Overview Map, on page 26.<br />
Pan and Tilt bars – Use the arrows to pan and tilt the camera view, or click on a position on the bar to steer the<br />
camera view to that position.<br />
Zoom bar – Use the arrows to zoom in and out, or click on a position on the bar to zoom to that position.<br />
The PTZ controls can be disabled under PTZ > Advanced > Controls, see Controls, on page 27.<br />
10
AXIS M3007–P<br />
Media Streams<br />
Media Streams<br />
The Axis product provides several video stream formats. Your requirements and the properties of your network will determine the<br />
type you use.<br />
The Live View page in the product provides access to H.264 and Motion JPEG video streams, and to the list of available stream profiles.<br />
Other applications and clients can access video streams directly, without going via the Live View page.<br />
How to Stream H.264<br />
The video compression standard H.264 makes good use of bandwidth, and can provide high quality video streams at less than 1 Mbit/s.<br />
Deciding which combination of protocols and methods to use depends on your viewing requirements, and on the properties of<br />
your network. The available options in AXIS Media Control are:<br />
Unicast RTP<br />
RTP over RTSP<br />
RTP over RTSP over HTTP<br />
Multicast RTP<br />
This unicast method (RTP over UDP) is used<br />
for live unicast video, especially when it is<br />
important to always have an up-to-date video<br />
stream, even if some images are dropped.<br />
This unicast method (RTP tunneled over RTSP)<br />
is useful as it is relatively simple to configure<br />
firewalls to allow RTSP traffic.<br />
This unicast method can be used to traverse<br />
firewalls. Firewalls are commonly configured to<br />
allow the HTTP protocol, thus allowing RTP to<br />
be tunneled.<br />
Unicasting is used for video-on-demand<br />
transmission so that there is no video traffic<br />
on the network until a client connects and<br />
requests the stream.<br />
Note that there are a maximum of 20<br />
simultaneous unicast connections.<br />
This method (RTP over UDP) should be used for live multicast video. The video stream is always<br />
up-to-date, even if some images are dropped.<br />
Multicasting provides the most efficient usage of bandwidth when there are large numbers of<br />
clients viewing simultaneously. A multicast cannot however, pass a network router unless the<br />
router is configured to allow this. It is not possible to multicast over the Internet, for example.<br />
Note also that all multicast viewers count as one unicast viewer in the maximum total of 20<br />
simultaneous connections.<br />
AXIS Media Control negotiates with the Axis product to determine the transport protocol to use. The order of priority, listed in the<br />
AMC Control Panel, can be changed and the options disabled, to suit specific requirements.<br />
Note<br />
H.264 is licensed technology. The Axis product includes one H.264 viewing client license. Installing additional unlicensed<br />
copies of the client is prohibited. To purchase additional licenses, contact your Axis reseller.<br />
MJPEG<br />
This format uses standard JPEG still images for the video stream. These images are then displayed and updated at a rate sufficient<br />
to create a stream that shows constantly updated motion.<br />
The Motion JPEG stream uses considerable amounts of bandwidth, but provides excellent image quality and access to every image<br />
contained in the stream. The recommended method of accessing Motion JPEG live video from the Axis product is to use the AXIS<br />
Media Control in Internet Explorer in Windows.<br />
AXIS Media Control (AMC)<br />
AXIS Media Control (AMC) in Internet Explorer in Windows is the recommended method of accessing live video from the Axis product.<br />
11
AXIS M3007–P<br />
Media Streams<br />
The AMC Control Panel can be used to configure various video settings. Please see the AXIS Media Control User’s Manual for more<br />
information.<br />
The AMC Control Panel is automatically installed on first use, after which it can be configured. Open the AMC Control Panel from:<br />
• Windows Control Panel (from the Start menu)<br />
• Alternatively, right-click the video image in Internet Explorer and click Settings.<br />
Alternative Methods of Accessing the Video Stream<br />
You can also access video and images from the Axis product in the following ways:<br />
• Motion JPEG server push (if supported by the client, Firefox, for example). This option maintains an open HTTP connection<br />
to the browser and sends data as and when required, for as long as required.<br />
• Still JPEG images in a browser. Enter the path http:///axis-cgi/jpg/image.cgi<br />
• Windows Media Player. This requires AXIS Media Control and the H.264 decoder to be installed. The following paths<br />
can be used:<br />
- Unicast via RTP: axrtpu:///axis-media/media.amp<br />
- Unicast via RTSP: axrtsp:///axis-media/media.amp<br />
- Unicast via RTSP, tunneled via HTTP: axrtsphttp:///axis-media/media.amp<br />
- Multicast: axrtpm:///axis-media/media.amp<br />
• QuickTime TM . The following paths can be used:<br />
- rtsp:///axis-media/media.amp<br />
- rtsp:///axis-media/media.3gp<br />
12
AXIS M3007–P<br />
Media Streams<br />
Note<br />
• = IP addess<br />
• The Axis product supports QuickTime 6.5.1 and later.<br />
• QuickTime adds latency to the video stream.<br />
• It may be possible to use other players to view the H.264 stream using the paths above, although Axis does not guarantee<br />
this.<br />
Accessing Audio Streams<br />
The Live View page provides access to audio through AXIS Media Control; in addition audio can be accessed in the following ways:<br />
• VAPIX® Application Programming Interface (API) For more information, visit www.axis.com/developer<br />
• Windows Media Player supports simplex audio. The following paths can be used:<br />
- Unicast via RTP: axrtpu:///axis-media/media.amp<br />
- Unicast via RTSP: axrtsp:///axis-media/media.amp<br />
- Unicast via RTSP, tunneled via HTTP: axrtsphttp:///axis-media/media.amp<br />
- Multicast: axrtpm:///axis-media/media.amp<br />
• QuickTime TM supports G.711 and AAC audio encoding. The following paths can be used:<br />
- rtsp:///axis-media/media.amp<br />
- rtsp:///axis-media/media.3gp<br />
• The Java applet supports simplex audio with G.711 encoding.<br />
13
AXIS M3007–P<br />
Setting Up the Product<br />
Setting Up the Product<br />
The Axis product can be configured by users with administrator or operator rights. To open the product’s Setup pages, click Setup in<br />
the top right-hand corner of the Live View page.<br />
• Administrators have unrestricted access to all settings.<br />
• Operators have access to all settings except System Options<br />
See also the online help .<br />
Basic Setup<br />
Basic Setup provides shortcuts to the settings that should be made before using the Axis product:<br />
1. Users. See page 39.<br />
2. TCP/IP. See page 42.<br />
3. Date & Time. See page 42.<br />
4. Video Stream. See page 15.<br />
The Basic Setup menu can be disabled from System Options > Security > Users.<br />
14
AXIS M3007–P<br />
Setting Up the Product<br />
Video<br />
It is possible to configure the following video features in your Axis product:<br />
• Video stream. See page 15.<br />
• Stream profiles. See page 19.<br />
• Camera settings. See page 19.<br />
• View areas. See page 21<br />
• Overlay image. See page 21.<br />
• Privacy mask. See page 22.<br />
Video Stream<br />
You can define the following video stream settings from Video > Video Stream:<br />
• Image. See page 18.<br />
• Direction. See page 18.<br />
• H.264. See page 19.<br />
• MJPEG. See page 19.<br />
Pixel Counter<br />
The pixel counter shows the number of pixels in an area of the image. The pixel counter is useful in situations where there is a<br />
requirement that the image is a certain size, for example in face recognition.<br />
The pixel counter can be accessed from:<br />
• Video > Video Stream. Under Preview, click Open and select the Show pixel counter option to enable the rectangle<br />
in the image. Use the mouse to move and resize the rectangle, or enter the number of pixels in the Width and Height<br />
fields and click Apply.<br />
15
AXIS M3007–P<br />
Setting Up the Product<br />
• The Live View page in Internet Explorer in Windows. Right-click in the image and select Pixel counter. Use the mouse<br />
to move and resize the rectangle.<br />
View modes<br />
A view mode is one of the possible views for this Axis product and can be accessed from the Source drop-down list in the product’s<br />
Live View page. If the product has not been configured for multiple view modes (see Select Camera Mode, on page 8 ), only the<br />
Overview mode is available.<br />
There are five types of view modes:<br />
• Overview. See page 16.<br />
• Panorama. See page 16.<br />
• Double Panorama. See page 17.<br />
• Quad View. See page 17.<br />
• View areas. See page 21.<br />
Overview<br />
This is an overview of the entire area under surveillence. Define the settings for this view from Setup > Video > Video Stream.<br />
See Video Stream, on page 15.<br />
Panorama<br />
This offers a 180 degree view. Define the settings for this view from Setup > Video > Video Stream > Panorama. See Video Stream, on<br />
page 15. This view is only available if the product has been configured for multiple view modes (see Select Camera Mode, on page 8 ).<br />
16
AXIS M3007–P<br />
Setting Up the Product<br />
Double Panorama<br />
In this view there are two 180 degree panoramic views. To define the settings for this view go to Setup > Video > Video Stream ><br />
Double Pan.... See Video Stream, on page 15. This view is not available during wall installation. This view is only available if the<br />
product has been configured for multiple view modes (see Select Camera Mode, on page 8 ).<br />
Quad View<br />
A quad view is four views on a single screen where each image takes up a quarter of the display area. To define the settings for<br />
this view go to Setup > Video > Video Stream > Quad View. See Video Stream, on page 15. This view is not available during wall<br />
installation. This view is only available if the product has been configured for multiple view modes (see Select Camera Mode,<br />
on page 8 ).<br />
17
AXIS M3007–P<br />
Setting Up the Product<br />
Image<br />
The default image settings can be configured under Video> Video Stream. Select the Image tab.<br />
The following settings are available:<br />
• Resolution. Select the default resolution.<br />
• Compression. The compression level affects the image quality, bandwidth and file size of saved images; the lower the<br />
compression, the higher the image quality with higher bandwidth requirements and larger file sizes.<br />
• Rotate image. If required, the image can be rotated.<br />
• Mirror. If required, the image can be mirrored.<br />
• Maximum frame rate. To avoid bandwidth problems, the frame rate allowed to each viewer can be Limited to a fixed<br />
amount. Alternatively, the frame rate can be set as Unlimited, which means the Axis product always delivers the highest<br />
frame rate possible under the current conditions.<br />
• Overlay settings. See Overlay, on page 21.<br />
Click Save to apply the new settings.<br />
Direction<br />
In some view modes listed under Setup > Video > Video Stream, the camera can be steered to point at the desired direction by<br />
adjusting the Pan and Tilt controls. To do this select the Direction tab from the Video Stream Settings page.<br />
This option is only available for the following view modes:<br />
• Panorama<br />
• Double Panorama<br />
• Quad View<br />
18
AXIS M3007–P<br />
Setting Up the Product<br />
H.264<br />
H.264, also known as MPEG-4 Part 10/AVC, is a video compression standard that provides high quality video streams at low bit rates.<br />
An H.264 video stream consists of different types of frames such as I-frames and P-frames. An I-frame is a complete image whereas<br />
P-frames only contain the differences from previous frames.<br />
The GOV length is the number of frames between two consecutive I-frames. Increasing the GOV length may save considerably on<br />
bandwidth requirements in some cases, but may also have an adverse affect on image quality.<br />
The Axis product supports two H.264 profiles. The Main profile provides higher compression than the Baseline profile with the same<br />
video quality, but requires more processing power to decode.<br />
The bit rate can be set as Variable Bit Rate (VBR) or Constant Bit Rate (CBR). VBR adjusts the bit rate according to the image<br />
complexity, using up more bandwidth for increased activity in the image, and less for lower image activity. CBR allows you to set a<br />
fixed Target bit rate that consumes a predictable amount of bandwidth. As the bit rate would usually need to increase for increased<br />
image activity, but in this case cannot, frame rate and image quality are affected negatively. To partly compensate for this, it is<br />
possible to prioritize either frame rate or image quality. Not setting a priority means that frame rate and image quality are equally<br />
affected. You must save your settings before they can take effect.<br />
The current bit rate can be set to appear as text overlay. To do this, select the Include text check box option under Overlay<br />
Settings and enter the modifier #b in the field.<br />
MJPEG<br />
Sometimes the image size is large due to low light or complex scenery. Adjusting the maximum frame size helps to control the<br />
bandwidth and storage used by the Motion JPEG video stream in these situations. Setting the frame size to the Default setting<br />
provides consistently good image quality at the expense of increased bandwidth and storage usage in low light. Limiting the frame<br />
size optimizes bandwidth and storage usage, but may give poor image quality. To prevent increased bandwidth and storage usage,<br />
the maximum frame size should be set to an optimal value.<br />
Stream Profiles<br />
A stream profile is a set of predefined stream settings including resolution, compression, frame rate and overlay settings. Stream<br />
profiles can be used:<br />
• When setting up recording using action rules. See Events, on page 32.<br />
• When setting up continuous recording. See Continuous Recording, on page 36.<br />
• In the Live View page – select the stream profile from the Stream profile drop-down list.<br />
For quick setup, use one of the predefined stream profiles. Each predefined profile has a descriptive name, indicating its purpose. If<br />
required, the predefined stream profiles can be modified and new customized stream profiles can be created.<br />
To create a new profile or modify an existing profile, go to Setup > Video > Stream Profiles.<br />
To select a default stream profile for the Live View page, go to Setup > Live View Config.<br />
Camera Settings<br />
The Video > Camera Settings page provides access to advanced image settings for the Axis product.<br />
Image Appearance<br />
Increasing the Color level increases the color saturation. The value 100 gives maximum color saturation. The value 0 gives a<br />
black and white image.<br />
The image Brightness can be adjusted in the range 0–100, where a higher value produces a brighter image.<br />
Increasing the Sharpness can increase bandwidth usage. A sharper image might increase image noise especially in low light<br />
conditions. A lower setting reduces image noise, but the whole image will appear less sharp.<br />
19
AXIS M3007–P<br />
Setting Up the Product<br />
The Contrast changes the relative difference between light and dark. It can be adjusted using the slidebar.<br />
White Balance<br />
White balance is used to make colors in the image appear the same regardless of the color temperature of the light source. The Axis<br />
product can be set to automatically identify the light source and compensate for its color. Alternatively, select the type of light<br />
source from the drop-down list. For a description of each available setting, see the online help .<br />
The white balance window is enabled for the Automatic and Automatic outdoor options that appear in the White balance drop-down<br />
list. Select one of the options from the drop-down list to set the white balance window properties. Select Automatic to use the<br />
default settings for the Automatic and Automatic outdoor options (in the White balance drop-down list). Select Custom to manually<br />
set a reference window for white balance in the view area.<br />
Wide Dynamic Range<br />
Wide dynamic range (Dynamic Contrast) can improve the exposure when there is a considerable contrast between light and dark<br />
areas in the image. Enable WDR in intense backlight conditions. Disable WDR in low light conditions for optimal exposure.<br />
Note<br />
This setting is only possible when using automatic exposure control.<br />
Exposure Settings<br />
Configure the exposure settings to suit the image quality requirements in relation to lighting, frame rate and bandwidth<br />
considerations.<br />
Exposure value - Click in the bar to fine-tune the exposure.<br />
Exposure control - These settings is used to adapt to the amount of light used. Automatic is the default settings can be used in most<br />
situations. The shutter speed is automatically set to produce optimum image quality. Flicker-free 50 or 60 Hz is used to remove<br />
flicker which can be caused by fluorescent and other light sources. The Hold current option locks the current exposure settings.<br />
Enable Backlight compensation - Enable this option if a bright spot of light, for example a light bulb, causes other areas in<br />
the image to appear too dark.<br />
Exposure zones - This settings determines which part of the image is used to calculate the exposure. For most situations, the Auto<br />
setting can be used. For particular requirement, select a predefined area.<br />
Shutter & Gain<br />
The shutter and gain settings affect the amount of motion blur and noise in the image. To adapt to different lighting, available<br />
storage space and bandwidth, it is often necessary to prioritize either low motion blur or low noise. The Axis product allows<br />
using different prioritization in normal light and in low light.<br />
Shutter speed is related to the amount of time the shutter is opened and is measured in seconds (s). A slow shutter speed allows<br />
more light to reach the sensor and can help produce a brighter image in low light situations. On the other hand, a slow shutter<br />
speed can cause moving objects to appear blurry.<br />
Set Shutter to<br />
• Auto to set the shutter speed automatically. If required, use Max shutter to limit the shutter speed to prevent the frame<br />
rate from being reduced. For example, to get 30 fps, set Max shutter to 1/30.<br />
• Fixed to use a fixed shutter speed.<br />
Gain, measured in decibel (dB), is the amount of amplification applied to the image. A high gain may provide a better image in low<br />
light situations but will increase the amount of image noise.<br />
Set Gain to<br />
• Auto to set the gain automatically. If required, use Max gain to limit the applied gain.<br />
20
AXIS M3007–P<br />
Setting Up the Product<br />
• Fixed to use a fixed gain.<br />
When Shutter and Gain are both set to Auto, it is possible to set the Priority between low motion blur and low noise manually and to<br />
use a different Priority in Normal Light and in Low Light.<br />
Example<br />
Consider an area where people or vehicles move during the day, but where there should be no movements during night. To be able to,<br />
for example, recognize faces or license plates, move the normal light priority slider toward low motion blur. At nighttime, motion<br />
detection is more important than identification. Motion blur is acceptable and since low light can cause a lot of noise, move<br />
the low light priority slider toward low noise.<br />
Example<br />
If storage space or bandwidth is limited, try using a lower gain. This will reduce image noise and produce smaller image files.<br />
View areas<br />
View areas are only available if the product has been configured for multiple view modes (see Select Camera Mode, on page 8 ).<br />
A view area is a cropped part of the full view. It is treated as a video source in Live View and has its own video stream and PTZ<br />
settings. See PTZ (Pan Tilt Zoom), on page 26. To set up a view area go to Video > View Areas. Here you can define the name and<br />
resolution for a view area, set up a Home position and lock to this position if desired.<br />
To define the video stream settings for each view area click on the respective view area from Setup > Video > Video Stream.<br />
See page 15.<br />
You can select a view area that you have set up from the Source drop-down list in the Live View page. Use the Pan, Tilt, Zoom<br />
sliders, or click on the overview map at the bottom right to zero in on an area. The current position is indicated in the overview<br />
map by a green circle.<br />
Overlay<br />
Overlays are used to provide extra information, for example for forensic video analysis or during product installation and<br />
configuration. Overlays are superimposed over the video stream.<br />
An overlay text can display the current date and time, or a text string. When using a text string, modifiers can be used to display<br />
information such as the current bit rate or the current frame rate. For information about available modifiers, see File Naming &<br />
Date/Time Formats in the online help .<br />
To enable overlays:<br />
1. Go to Video > Video Stream and select the Image tab.<br />
2. To include an overlay image, select Include overlay image at the coordinates. The overlay image must first be uploaded to<br />
the Axis product, see Overlay Image.<br />
3. To include date and time, select Include date and Include time.<br />
4. To include a text string, select Include text and enter the text in the field. Modifiers can be used, see File Naming &<br />
Date/Time Formats in the online help .<br />
5. Define text overlay characteristics in the relevant fields.<br />
6. Click Save.<br />
To modify the date and time format, go to System Options > Date & Time. See Date & Time, on page 42.<br />
Overlay Image<br />
An overlay image is a static image superimposed over the video stream. The image, for example company logo, is used to provide<br />
extra information or to mask a part of the image.<br />
21
AXIS M3007–P<br />
Setting Up the Product<br />
To use an overlay image, the image must first be uploaded to the Axis product:<br />
1. Go to Video > Overlay Image.<br />
2. Click Browse and browse to the file.<br />
3. Click Upload.<br />
4. Select the image to use from the Use overlay image list.<br />
5. Click Save.<br />
To display the overlay image:<br />
1. Go to Video > Video Stream and select the Image tab.<br />
2. Under Overlay Settings, select Include overlay image at the coordinates and enter the X and Y coordinates.<br />
3. Click Save.<br />
For information about supported image formats, see the online help .<br />
Using Overlay Text in an Action Rule<br />
Action rules, see page 32, can display an overlay text when the rule is triggered. The text can be used to provide information for<br />
forensic video analysis, notify surveillance operators or validate triggers and actions during product installation and configuration.<br />
To display overlay text when an action rule is triggered, the modifier #D should be used as described below. When the rule is<br />
triggered, #D will be replaced by the text specified in the action rule.<br />
Start by enabling overlay text in the video stream:<br />
1. Go to Video > Video Stream and select the Image tab.<br />
2. Under Overlay Settings, select Include text.<br />
3. Enter the modifier #D and, optionally, additional text which will be displayed also when the action rule is not active.<br />
Create the action rule:<br />
1. Go to Events > Action Rules<br />
2. Click Add to create a new rule.<br />
3. Select a Trigger and, optionally, a Schedule and Additional conditions. See the online help for details.<br />
4. From the Actions list, select Overlay Text<br />
5. Enter the text to display in the Text field. This is the text that #D will be replaced by.<br />
6. Specify the Duration. The text can be displayed while the rule is active or for a fixed number of seconds.<br />
Example<br />
To display the text “Motion detected” when motion is detected, enter #D in the Include text field and enter “Motion detected” in<br />
the Text field when setting up the action rule.<br />
Privacy Mask<br />
A privacy mask is an area of solid color that prohibits users from viewing parts of the monitored area. Privacy masks cannot be<br />
bypassed via the VAPIX® Application Programming Interface (API).<br />
The Privacy Mask List (Video > Privacy Mask) shows all the masks that are currently configured in the Axis product and indicates<br />
if they are enabled.<br />
22
AXIS M3007–P<br />
Setting Up the Product<br />
You can add a new mask, re-size the mask with the mouse, choose a color for the mask, and give the mask a name.<br />
For more information, see the online help<br />
Important<br />
Adding many privacy masks may affect the product’s performance.<br />
Note<br />
Privacy masks in view modes other than the Overview mode may appear warped.<br />
23
AXIS M3007–P<br />
Live View Config<br />
Live View Config<br />
You can customize the Live View page and alter it to suit your requirements. It is possible to define the following features of<br />
the Live View page.<br />
• Stream Profile. See page 19.<br />
• Default Viewer for Browser. See page 24.<br />
• Viewer Settings. See page 25.<br />
• Action Buttons. These are the buttons described in Controls on the Live View Page, on page 9 .<br />
• User Defined Links. See page 25.<br />
Default Viewer for Browsers<br />
From Live View Config > Default Viewer select the default method for viewing video images in your browser. The product attempts<br />
to show the video images in the selected video format and viewer. If this is not possible, the product overrides the settings and<br />
selects the best available combination.<br />
24
AXIS M3007–P<br />
Live View Config<br />
Browser Viewer Description<br />
Windows Internet Explorer<br />
Other browsers<br />
AMC<br />
QuickTime<br />
Java applet<br />
Still image<br />
Server Push<br />
QuickTime<br />
Java applet<br />
Still image<br />
Recommended viewer in Internet Explorer (H.264/Motion JPEG).<br />
H.264.<br />
A slower imaging alternative to AMC (Motion JPEG). Requires one of the<br />
following installed on the client:<br />
• JVM (J2SE) 1.4.2 or higher.<br />
• JRE (J2SE) 5.0 or higher.<br />
Displays still images only. Click the Refresh button in your browser to view a<br />
new image.<br />
Recommended viewer for other browsers (Motion JPEG).<br />
H.264.<br />
A slower imaging alternative to Server Push (Motion JPEG only).<br />
Displays still images only. Click the Refresh button in your browser to view a<br />
new image.<br />
For more information, please see the online help .<br />
Viewer Settings<br />
To configure options for the viewer, go to Live View Config > Viewer Settings.<br />
• Select Show viewer toolbar to display the AXIS Media Control (AMC) or the QuickTime viewer toolbar under the video<br />
image in your browser.<br />
• H.264 decoder installation. The administrator can disable installation of the H.264 decoder included with AXIS Media<br />
Control. This is used to prevent installation of unlicensed copies. Further decoder licenses can be purchased from your<br />
Axis reseller.<br />
• Select Show crosshair in PTZ joystick mode to enable a cross that will indicate the center of the image in PTZ joystick<br />
mode.<br />
• Select Use PTZ joystick mode as default to enable joystick mode. The mode can be changed temporarily from the<br />
PTZ control panel.<br />
• Select Enable recording button to enable recording from the Live View page. This button is available when using the<br />
AMC viewer. The recordings are saved to the location specified in the AMC Control Panel. See AXIS Media Control<br />
(AMC), on page 11.<br />
User Defined Links<br />
To display user-defined links in the Live View page, select the Show custom link option, give the link a name and then enter the URL<br />
to link to. When defining a web link do not remove the 'http://' from the URL address. Custom links can be used to run scripts or<br />
activate external devices connected to the product, or they can link to a web page. Custom links defined as cgi links will run the<br />
script in the background, in a hidden frame. Defining the link as a web link will open the link in a new window.<br />
25
AXIS M3007–P<br />
PTZ (Pan Tilt Zoom)<br />
PTZ (Pan Tilt Zoom)<br />
PTZ controls are only available for view areas.<br />
Preset Positions<br />
A preset position is a predefined view that can be used to quickly steer the camera to a specific location. Preset positions can<br />
be accessed in several ways:<br />
• By selecting the preset from the Source drop-down list in the Live View Page.<br />
• When setting up action rules. See page 32.<br />
• When setting up Guard Tour. See page 27.<br />
To add a preset position:<br />
1. Go to PTZ > Preset Positions.<br />
2. Use the pan, tilt and zoom controls to steer the camera view to the desired position.<br />
3. Enter a descriptive name in the Current position field.<br />
The product can be configured to return to the Home position when the PTZ functionality has been inactive for a specified length<br />
of time. Enter the length of time in the field and click Save. Set the time to zero to prevent the product from automatically<br />
returning to the Home position.<br />
To include the preset position name in the overlay text, go to Video, select Include overlay text and enter the modifier #P in the field.<br />
For more information about modifiers, see File Naming & Date/Time Formats in the online help .<br />
Overview Map<br />
An overview map allows us to view the overview image while panning and tilting within a view area. Click within the overview map<br />
to quickly steer the camera view to a new position. The current position is indicated by a green circle. All view areas display an<br />
overview map at the bottom right corner.<br />
26
AXIS M3007–P<br />
PTZ (Pan Tilt Zoom)<br />
Guard Tour<br />
A guard tour displays the video stream from different preset positions, one-by-one, in a predetermined order or at random and for<br />
configurable time periods. The enabled guard tour will keep running after the user has logged off or closed the browser.<br />
To add a guard tour:<br />
1. Go to PTZ > Guard Tour and click Add.<br />
2. Enter a descriptive name.<br />
3. Specify the pause length between runs.<br />
4. Select an available preset position and click Apply.<br />
5. Specify the View Time in seconds or minutes.<br />
6. Specify the View Order or select the Random view order option.<br />
7. Click Save.<br />
To modify or remove guard tours, go to PTZ > Guard Tour, select the guard tour in the Guard Tour List and click Modify/Remove.<br />
For more information see the online help .<br />
Advanced<br />
Controls<br />
Panel Shortcut Command Buttons can be configured to provide direct access to commands issued via the VAPIX® Application<br />
Programming Interface. The buttons will be displayed in the PTZ control panel, which is available in the Live View page through<br />
the Ctrl panel button, see page 10.<br />
Note<br />
Disabling PTZ controls will not affect preset positions. For example, if the tilt control is disabled, the product can still move to<br />
preset positions that require a tilt movement.<br />
27
AXIS M3007–P<br />
Detectors<br />
Detectors<br />
Camera Tampering<br />
Camera Tampering can generate an alarm whenever the camera is repositioned, or when the lens is covered, sprayed or severely<br />
defocused. To send an alarm, for example an email, an action rule must be set up.<br />
To configure tampering:<br />
1. Go to Detectors > Camera Tampering.<br />
2. Set the Minimum duration, that is, the time that must elapse before an alarm is generated. This can help prevent<br />
false alarms for known conditions that affect the image.<br />
3. Select Alarm for dark images if an alarm should be generated if lights are dimmed or turned off, or if the lens is sprayed,<br />
covered, or rendered severely out of focus.<br />
4. Click Save.<br />
To configure the product to send an alarm when tampering occurs:<br />
1. Go to Events > Action Rules.<br />
2. Click Add to set up a new action rule.<br />
3. Enter a Name for the action rule.<br />
4. Under Condition, select Detectors from the Trigger list.<br />
5. Select Tampering from the list of detectors.<br />
6. Optionally, select a schedule and set additional conditions.<br />
7. Select the action. To send an email, select Send Notification and select a Recipient from the list of defined recipients.<br />
Note<br />
The While the rule is active option under Duration cannot be used with camera tampering, since camera tampering does not<br />
have a duration and once it has been triggered it will not automatically return to its untriggered state.<br />
For more information on actions rules, see Events, on page 32.<br />
Motion Detection<br />
Motion detection is used to generate an alarm whenever movement starts or stops in the camera view.<br />
Motion detection is configured by defining up to 10 Include and Exclude windows:<br />
• Include windows — define areas where motion should be detected<br />
• Exclude windows — define areas within an Include window that should be ignored (areas outside Include windows<br />
are automatically ignored).<br />
For instructions, see Set Up Motion Detection Windows, on page 29.<br />
To control the number of motion detection alarms, the parameters Object Size, History and Sensitivity can be adjusted. See<br />
Motion Detection Parameters, on page 29.<br />
Once motion detection windows are configured, the Axis product can be configured to perform actions when motion is detected.<br />
Possible actions include uploading images and start recording. For more information, see Setting Up an Action Rule, on page 33.<br />
28
AXIS M3007–P<br />
Detectors<br />
Note<br />
Using the motion detection feature may decrease the product’s overall performance.<br />
Set Up Motion Detection Windows<br />
To set up a motion detection Include Window, follow these instructions:<br />
1. Go to Detectors > Motion Detection.<br />
2. Select the Configure Included Windows option and click New. Select the new window in the list of windows and<br />
enter a descriptive name.<br />
3. Adjust the size (drag the bottom right-hand corner) and the position (click on the text at the top and drag to the desired<br />
position) of the window.<br />
4. Adjust the Object Size, History and Sensitivity profile sliders (see Motion Detection Parameters for details). Any detected<br />
motion within an active window is indicated by red peaks in the Activity window.<br />
5. Click Save.<br />
To exclude parts of the include window, select the Configure Excluded Windows and position the exclude window within the<br />
include window.<br />
To delete an include or exclude window, select the window in the list of windows and click Del.<br />
Motion Detection Parameters<br />
The parameters controlling motion detection are described in the table below:<br />
Parameter Object Size History Sensitivity<br />
Description<br />
High level (100%)<br />
Medium level (50%)<br />
Object size relative to window<br />
size.<br />
Only very large objects trigger<br />
motion detection.<br />
Object memory length.<br />
An object that appears in<br />
the window triggers motion<br />
detection for a long time<br />
before it is considered as<br />
non-moving.<br />
Difference in luminance<br />
between background and<br />
object.<br />
Ordinary colored objects on<br />
ordinary backgrounds trigger<br />
motion detection.<br />
A large difference in luminance<br />
is required to trigger motion<br />
detection.<br />
29
AXIS M3007–P<br />
Detectors<br />
Low level (0%)<br />
Even very small objects trigger<br />
motion detection.<br />
An object that appears in<br />
the window triggers motion<br />
detection only for a very short<br />
time before it is considered as<br />
non-moving.<br />
Recommended values 5–15% 60–90% 75–95%<br />
Default values 15% 90% 90%<br />
Only very bright objects on<br />
a dark background trigger<br />
motion detection.<br />
Note<br />
• To trigger on small objects or movements, use several small motion detection windows rather than one large window<br />
and select a low object size.<br />
• To avoid triggering on small objects, select a high object size.<br />
• If no objects should appear in the Include Window, select a high history level. This will cause motion detection to trigger as<br />
long as the object is present in the window.<br />
• To only detect flashing light, select a low sensitivity. In other cases high sensitivity is recommended.<br />
30
AXIS M3007–P<br />
Applications<br />
Applications<br />
Third party applications can be uploaded to and installed on the Axis product. Applications add functionality to the product, for<br />
example video analytics and intelligent video capabilities such as recognition, tracking, detection and counting. For information<br />
about available applications, downloads, trials and licenses, go to www.axis.com/applications<br />
Note<br />
• It is recommended to run one application at a time.<br />
• Avoid running applications when the built-in motion detection is active.<br />
• Applications are not available while using multiple view modes. For more information, see Select Camera Mode, on page 8 .<br />
31
AXIS M3007–P<br />
Events<br />
Events<br />
The Axis product can be configured to perform actions when different events occur, for example, start a recording when motion is<br />
detected. The set of conditions that defines how and when the action is triggered is called an Action Rule.<br />
Available Action Rule triggers and conditions include:<br />
• Applications — use installed applications to trigger the rule, see Applications, on page 31.<br />
• Detectors<br />
• Hardware<br />
• Input Signal<br />
• PTZ<br />
• Storage<br />
• System<br />
• Time<br />
Available actions include:<br />
• PTZ Control<br />
- Day/Night Mode — trigger the rule when the product switches between day mode (IR cut filter on) and night<br />
mode (IR cut filter off). This can for example be used to control an external infrared (IR) light connected<br />
to an output port.<br />
- Motion Detection — trigger the rule when motion is detected, see Motion Detection, on page 28.<br />
- Tampering — trigger the rule when tampering is detected, see Camera Tampering, on page 28.<br />
- Network — trigger the rule if network connection is lost or restored. This can for example be used to start<br />
recording to the SD card.<br />
- Manual Trigger — trigger the rule using the Manual Trigger button in the Live View page, see Controls on<br />
the Live View Page, on page 9 . This can for example be used to validate actions during product installation<br />
and configuration.<br />
- Moving — trigger the rule when the camera view moves due to a PTZ operation. This can for example be used<br />
as an additional condition to prevent an action rule triggered by motion detection to record video while the<br />
camera view moves due to a PTZ operation.<br />
- Preset Reached — trigger the rule when the camera stops at a preset position. This can be for example be used<br />
with the Send Images action to upload images from the preset position.<br />
- Available — trigger the rule when the storage device is unmounted or removed. This can for example be<br />
used to send maintenance notifications.<br />
- Full — trigger the rule when the storage device is full. Under normal operation, the oldest recordings will be<br />
overwritten to prevent the storage device from becoming full.<br />
- Locked — trigger the rule if the storage device is locked (write protected).<br />
- System Initializing — trigger the rule when the product is being started. This can for example be used to send a<br />
notification when the product restarts.<br />
- Recurrence — trigger the rule periodically, see Recurrences, on page 34. This can for example be used to upload<br />
an image every 5 minutes.<br />
- Use Schedule — trigger the rule according to the selected schedule, see Schedules, on page 34.<br />
32
AXIS M3007–P<br />
Events<br />
- Preset Position — go to a preset position.<br />
- Guard Tour — start a guard tour, see Guard Tour, on page 27.<br />
• Record Video — record video to a selected storage.<br />
• Send Images — send images to a recipient.<br />
• Send Notifications — send a notification message to a recipient.<br />
• Status LED — flash the LED indicator. This can for example be used to validate triggers such as motion detection during<br />
product installation and configuration.<br />
Setting Up an Action Rule<br />
An action rule defines the conditions that must be met for the product to perform an action, for example record video or send email<br />
notifications. If multiple conditions are defined, all must be met to trigger the action.<br />
The following example describes how to set up an action rule to record video to a network share if there is movement in the<br />
camera’s field of view.<br />
Set up motion detection and add a network share:<br />
1. Go to Detectors > Motion Detection and configure a motion detection window, see page 29<br />
2. Go to System Options > Storage and set up the network share, see page 48.<br />
Set up the action rule:<br />
1. Go to Events > Action Rules and click Add.<br />
2. Select Enable rule and enter a descriptive name for the rule.<br />
3. Select Detectors from the Trigger drop-down list.<br />
4. Select Motion Detection from the drop-down list. Select the motion detection window to use.<br />
5. Optionally, select a Schedule and Additional conditions, see below.<br />
6. Under Actions, select Record Video from the Type drop-down list.<br />
7. Select a Stream profile and configure the Duration settings as described below.<br />
8. Select Network Share from the Storage drop-down list.<br />
To add additional criteria, select the Additional conditions option and add additional triggers. To prevent an action from being<br />
triggered repeatedly, a Wait at least time can be set. Enter the time in hours, minutes and seconds, during which the trigger<br />
should be ignored before the action rule can be activated again.<br />
The recording Duration of some actions can be set to include time immediately before and after the event. Select Pre-trigger time<br />
and/or Post-trigger time and enter the number of seconds. When While the rule is active is enabled and the action is triggered<br />
again during the post-trigger time, the recording time will be extended with another post-trigger time period.<br />
For more information, see the online help .<br />
Recipients<br />
Recipients receive media files and notification messages. The following recipients are available:<br />
33
AXIS M3007–P<br />
Events<br />
Recipient<br />
Email<br />
FTP<br />
HTTP<br />
Network Share<br />
TCP<br />
Use with action<br />
Send Images<br />
Send Notification<br />
Send Images<br />
Send Images<br />
Send Notification<br />
Send Images<br />
Send Notification<br />
Note<br />
A network share can also be used as a storage device for recorded video. Go to System Options > Storage to configure a<br />
network share before setting up a continuous recording or an action rule to record video. See Storage, on page 47 for more<br />
information about storage devices.<br />
To add a recipient:<br />
1. Go to Events > Recipients and click Add.<br />
2. Enter a descriptive name.<br />
3. Select a recipient Type.<br />
4. Enter the information needed for the recipient type.<br />
5. Click Test to test the connection to the recipient.<br />
6. Click OK.<br />
Schedules<br />
Schedules can be used as action rule triggers or as additional conditions, for example to record video if motion is detected outside<br />
office hours. Use one of the predefined schedules or create a new schedule as described below.<br />
To create a new schedule:<br />
1. Go to Events > Schedules and click Add.<br />
2. Enter a descriptive name and the information needed for a daily, weekly, monthly or yearly schedule.<br />
3. Click OK.<br />
To use the schedule in an Action Rule, select the schedule from the Schedule drop-down list in the Action Rule Setup page.<br />
Recurrences<br />
Recurrences are used to trigger Action Rules repeatedly, for example every 5 minutes or every hour.<br />
To set up a recurrence:<br />
1. Go to Events > Recurrences and click Add.<br />
2. Enter a descriptive name and recurrence pattern.<br />
3. Click OK.<br />
34
AXIS M3007–P<br />
Events<br />
To use the recurrence in an Action Rule, first select Time from the Trigger drop-down list in the Action Rule Setup page and<br />
then select the recurrence from the second drop-down list.<br />
To modify or remove recurrences, select the recurrence in the Recurrences List and click Modify or Remove.<br />
35
AXIS M3007–P<br />
Recordings<br />
Recordings<br />
The Axis product can be configured to record video continuously or according to an action rule:<br />
• To start a continuous recording, see page 36.<br />
• To set up action rules, see page 33.<br />
• To access recordings, see Recording List, on page 36.<br />
• To configure camera controlled storage, see Storage, on page 47.<br />
Recording List<br />
Recorded videos are listed on the Recordings > List page. The list shows each recording’s start date and time, duration and the<br />
event that triggered the recording.<br />
To play or download a recording, follow these steps:<br />
1. Go to Recordings > List.<br />
2. Use the filter to narrow the list of recordings. Enter the desired filter criteria and click Filter. Some filters may take<br />
a long time to complete.<br />
3. Select the recording.<br />
4. Click Play to play the recording, or click Download to download the recording.<br />
Multiple recordings can be downloaded at the same time. Select the recordings and click Download. The downloaded file is a zip file<br />
containing a minimum of three files, of which the Matroska (mkv) files are the actual recordings. The recordings are time-stamped<br />
with the date and time they were downloaded (that is, not the date the recordings were made).<br />
Note<br />
To play recordings in Windows Media Player, AXIS Matroska File Splitter must be installed. AXIS Matroska File Splitter<br />
can be downloaded from www.axis.com/techsup/software<br />
For detailed recording and video information, select a recording and click Properties.<br />
To remove a recording, select the recording and click Remove.<br />
Continuous Recording<br />
The Axis product can be configured to continuously save video to a storage device. See Storage, on page 47 for more information<br />
about storage devices. To prevent the disk from becoming full, it is recommended to configure the disk to automatically remove old<br />
recordings. If a new stream profile is selected while a recording is ongoing, the recording will be stopped and saved in the recording<br />
list and a new recording with the new stream profile will start. All previous continuous recordings will remain in the recording list<br />
until they are removed manually or through automatic removal of old recordings.<br />
You can start a continuous recording for any of the view modes. See View modes, on page 16.<br />
To start a continuous recording, follow these steps:<br />
1. Go to Recordings > Continuous.<br />
2. Select Enabled.<br />
3. Select type of storage device from the Disk list.<br />
4. Select a Stream profile to use for continuous recordings.<br />
36
AXIS M3007–P<br />
Recordings<br />
5. Click Save to save and start the recording.<br />
37
AXIS M3007–P<br />
Languages<br />
Languages<br />
Multiple languages can be installed in the Axis product. All web pages including the online help will be displayed in the selected<br />
language. To switch languages, go to Setup > Languages and first upload the new language file. Browse and locate the file and click<br />
the Upload Language button. Select the new language from the list and click Save.<br />
Note<br />
• Resetting the product to factory default settings will erase any uploaded language file and reset the product language to<br />
English.<br />
• Clicking the Restore button on the Maintenance page will not affect the language.<br />
• A firmware upgrade will not affect the language used. However if you have uploaded a new language to the product and<br />
later upgrade the firmware, it may happen that the translation no longer matches the product's web pages. In this case,<br />
upload an updated language file.<br />
• A language already installed in the product will be replaced when a current or a later version of the language file is uploaded.<br />
38
AXIS M3007–P<br />
System Options<br />
System Options<br />
Security<br />
Users<br />
User access control is enabled by default and can be configured under System Options > Security > Users. An administrator can<br />
set up other users by giving them user names and passwords. It is also possible to allow anonymous viewer login, which means<br />
that anybody may access the Live View page.<br />
The user list displays authorized users and user groups (access levels):<br />
Viewer - Access to the Live View page<br />
Operator - Access to the Live View page and to all settings except System Options<br />
Administrator - Unrestricted access to all settings; can add, modify and remove other users.<br />
Under HTTP/RTSP Password Settings, select the type of password to allow. You may need to allow unencrypted passwords if there<br />
are viewing clients that do not support encryption, or if you upgraded the firmware and existing clients support encryption but need<br />
to log in again and be configured to use this functionality.<br />
Under User Settings, select the Enable anonymous viewer login option to allow anonymous users access to the Live View page.<br />
Deselect the Enable Basic Setup option to hide the Basic Setup menu. Basic Setup provides quick access to settings that should be<br />
made before using the Axis product.<br />
ONVIF<br />
ONVIF (Open Network Video Interface Forum) is a global interface standard that makes it easier for end users, integrators, consultants,<br />
and manufacturers to take advantage of the possibilities offered by network video technology. ONVIF enables interoperablity between<br />
different vendor products, increased flexibility, reduced cost and future-proof systems.<br />
By creating a user you automatically enable ONVIF communication. Use the user name and password with all ONVIF communication<br />
with the product. For more information see www.onvif.org<br />
IP Address Filter<br />
IP address filtering is enabled on the System Options > Security > IP Address Filter page. Once enabled, the listed IP address are<br />
allowed or denied access to the Axis product. Select Allow or Deny from the list and click Apply to enable IP address filtering.<br />
The administrator can add up to 256 IP address entries to the list (a single entry can contain multiple IP addresses).<br />
HTTPS<br />
The Axis product supports encrypted browsing using HTTPS. This is configured on the System Options > Security > HTTPS page.<br />
A self-signed certificate can be used until a Certificate Authority-issued certificate has been obtained. Click Create self-signed<br />
certificate to install a self-signed certificate. Although self-signed certificates are free and offer some protection, true security is only<br />
implemented after the installation of a signed certificate issued by a Certificate Authority.<br />
To obtain a signed certificate from an issuing Certificate Authority, click Create Certificate Request. When the signed certificate<br />
is returned, click Install signed certificate to import the certificate. The properties of any certificate request currently resident in<br />
the product or installed can be viewed by clicking Properties.<br />
To enable HTTPS in the Axis product, the HTTPS Connection Policy must be set for each user group.<br />
For more information, see the online help .<br />
39
AXIS M3007–P<br />
System Options<br />
HTTPS<br />
HTTPS (HyperText Transfer Protocol over Secure Socket Layer, or HTTP over SSL) is a web protocol providing encrypted browsing.<br />
HTTPS can also be used by users and clients to verify that the correct device is being accessed. The security level provided by<br />
HTTPS is considered adequate for most commercial exchanges.<br />
The Axis product can be configured to require HTTPS when users from different user groups (administrator, operator, viewer) connect.<br />
To use HTTPS, an HTTPS certificate must first be installed. Go to System Options > Security > Certificates to install and manage<br />
certificates. See Certificates, on page 41.<br />
To enable HTTPS on the Axis product:<br />
1. Go to System Options > Security > HTTPS<br />
2. Select an HTTPS certificate from the list of installed certificates.<br />
3. Optionally, click Ciphers and select the encryption algorithms to use for SSL.<br />
4. Set the HTTPS Connection Policy for the different user groups.<br />
5. Click Save to enable the settings.<br />
To access the Axis product via the desired protocol, enter https:// or http:// in the address field in a browser.<br />
The HTTPS port can be changed on the System Options > Network > TCP/IP > Advanced page.<br />
IEEE 802.1X<br />
IEEE 802.1X is a standard for port-based Network Admission Control providing secure authentication of wired and wireless network<br />
devices. IEEE 802.1X is based on EAP (Extensible Authentication Protocol).<br />
To access a network protected by IEEE 802.1X, devices must authenticate themselves. The authentication is performed by a<br />
third-party entity called an authentication server, typically a RADIUS server, examples of which are FreeRADIUS and Microsoft<br />
Internet Authentication Service.<br />
In Axis' implementation, the network device and the authentication server authenticate themselves with the help of digital<br />
certificates using EAP-TLS (Extensible Authentication Protocol - Transport Layer Security). The certificates are provided by an<br />
Certification Authority (CA). You need:<br />
• a CA certificate to validate the identity of the authentication server<br />
• a CA-signed client certificate and a private key to authenticate the network device.<br />
To allow the network device to access a network protected by IEEE 802.1X:<br />
1. Obtain a CA certificate, a client certificate and a client private key (contact your network administrator).<br />
2. Go to Setup > System Options > Security > IEEE 802.1X and upload the CA certificate, the client certificate and the<br />
client private key.<br />
3. Under Settings, select the EAPOL version, provide your EAP identity and private key password.<br />
4. Check the box to enable IEEE 802.1X and click Save.<br />
40
AXIS M3007–P<br />
System Options<br />
Certificates<br />
CA Certificate<br />
Client certificate<br />
Client private key<br />
The CA certificate is used to validate the identity of the authentication server. Enter the path to<br />
the certificate directly, or locate the file using the Browse button. Then click Upload. To remove<br />
a certificate, click Remove.<br />
The client certificate and private key are used to authenticate the network device. They can be<br />
uploaded as separate files or in one combined file (e.g. a PFX file or a PEM file). Use the Client<br />
private key field if uploading one combined file. For each file, enter the path to the file, or locate the<br />
file using the Browse button. Then click Upload. To remove a file, click Remove.<br />
Settings<br />
EAPOL version<br />
EAP identity<br />
Private key password<br />
Enable IEEE 802.1X<br />
Select the EAPOL version (1 or 2) as used in your network switch.<br />
Enter the user identity (maximum 16 characters) associated with your certificate.<br />
Enter the password (maximum 16 characters) for the private key.<br />
Check the box to enable the IEEE 802.1X protocol.<br />
Certificates<br />
Certificates are used to authenticate devices on a network. Typical applications include encrypted web browsing (HTTPS), network<br />
protection via IEEE 802.1X and secure upload of images and notification messages for example via email. Two types of certificates<br />
can be used with the Axis product:<br />
Server/Client certificates - to authenticate the Axis product<br />
CA certificates - to authenticate peer certificates, for example the certificate of an authentication server in case the Axis product is<br />
connected to an IEEE 802.1X protected network.<br />
Note<br />
Installed certificates, except preinstalled CA certificates, will be deleted if the product is reset to factory default. Preinstalled<br />
CA certificates that have been deleted will be reinstalled.<br />
A Server/Client certificate can be self-signed or issued by a Certificate Authority (CA). A self-signed certificate offers limited<br />
protection and can be used before a CA-issued certificate has been obtained.<br />
To install a self-signed certificate:<br />
1. Go to System Options > Security > Certificates.<br />
2. Click Create self-signed certificate and provide the requested information.<br />
To create and install a CA-signed certificate:<br />
1. Create a self-signed certificate as described above.<br />
2. Go to System Options > Security > Certificates.<br />
3. Click Create certificate signing request and provide the requested information.<br />
4. Copy the PEM-formatted request and send to the CA of your choice.<br />
5. When the signed certificate is returned, click Install certificate and upload the certificate.<br />
Server/Client certificates can be installed as Certificate from signing request or as Certificate and private key. Select Certificate<br />
and private key if the private key is to be upload as a separate file or if the certificate is in PKCS#12 format.<br />
The Axis product is shipped with several preinstalled CA certificates. If required, additional CA certificates can be installed:<br />
1. Go to System Options > Security > Certificates<br />
41
AXIS M3007–P<br />
System Options<br />
2. Click Install certificate and upload the certificate.<br />
Date & Time<br />
The Axis product’s date and time settings are configured under System Options > Date & Time.<br />
Current Server Time displays the current date and time (24h clock). The time can be displayed in 12h clock in the text overlay (see<br />
below).<br />
To change the date and time settings, select the preferred Time mode under New Server Time:<br />
• Synchronize with computer time sets date and time according to the computer’s clock. With this option, date and<br />
time are set once and will not be updated automatically.<br />
• Synchronize with NTP Server obtains date and time from an NTP server. With this option, date and time settings are<br />
updated continuously. For information on NTP settings, see NTP Configuration, on page 44.<br />
If using a host name for the NTP server, a DNS server must be configured. See DNS Configuration, on page 44.<br />
• Set manually allows you to manually set date and time.<br />
If using an NTP server, select your Time zone from the drop-down list. If required, check Automatically adjust for daylight saving<br />
time changes.<br />
The Date & Time Format Used in Images is the date and time format displayed as a text overlay in the video stream. Use the<br />
predefined formats or see File Naming & Date/Time Formats in the online help for information on how to create custom date and<br />
time formats. To include date and time in the overlay text, go to Video and select Include date and Include time.<br />
Network<br />
Basic TCP/IP Settings<br />
The Axis product supports IP version 4 and IP version 6. Both versions can be enabled simultaneously, and at least one version<br />
must always be enabled.<br />
IPv4 Address Configuration<br />
By default, the Axis product is set to use IPv4 (IP version 4) and to obtain the IP address automatically via DHCP. The IPv4 settings are<br />
configured under System Options > Network > TCP/IP > Basic.<br />
DHCP (Dynamic Host Configuration Protocol) allows network administrators to centrally manage and automate the assignment of<br />
IP addresses. DHCP should only be enabled if using dynamic IP address notification, or if the DHCP can update a DNS server. It is<br />
then possible to access the Axis product by name (host name).<br />
If DHCP is enabled and the product cannot be accessed, run AXIS IP Utility to search the network for connected Axis products, or reset<br />
the product to the factory default settings (see page 50) and then perform the installation again.<br />
To use a static IP address, check Use the following IP address and specify the IP address, subnet mask and default router.<br />
IPv6 Address Configuration<br />
If IPv6 (IP version 6) is enabled, the Axis product will receive an IP address according to the configuration in the network router.<br />
To enable IPv6, go to System Options > Network > TCP/IP > Basic. Other settings for IPv6 should be configured in the network router.<br />
ARP/Ping<br />
The product’s IP address can be assigned using ARP and Ping. For instructions, see Assign IP Address using ARP/Ping, on page 43.<br />
42
AXIS M3007–P<br />
System Options<br />
The ARP/Ping service is enabled by default but is automatically disabled two minutes after the product is started, or as soon as an IP<br />
address is assigned. To re-assign IP address using ARP/Ping, the product must be restarted to enable ARP/Ping for an additional<br />
two minutes.<br />
To disable the service, go to System Options > Network > TCP/IP > Basic and clear the option Enable ARP/Ping setting of IP address.<br />
Pinging the product is still possible when the service is disabled.<br />
Assign IP Address using ARP/Ping<br />
The product's IP address can be assigned using ARP/Ping. The command must be issued within 2 minutes of connecting power.<br />
1. Acquire a free static IP address on the same network segment as the computer.<br />
2. Locate the serial number (S/N) on the product label.<br />
3. Open a command prompt and enter the following commands:<br />
Linux/Unix syntax<br />
arp -s temp<br />
ping -s 408 <br />
Linux/Unix example<br />
arp -s 192.168.0.125 00:40:8c:18:10:00 temp<br />
ping -s 408 408 192.168.0.125<br />
Windows syntax (this may require that you run the command prompt as an administrator)<br />
arp -s <br />
ping -l 408 -t <br />
Windows example (this may require that you run the command prompt as an administrator)<br />
arp -s 192.168.0.125 00-40-8c-18-10-00<br />
ping -l 408 -t 192.168.0.125<br />
4. Check that the network cable is connected to the Axis product and then restart the product by disconnecting and<br />
reconnecting power.<br />
5. Close the command prompt when the product responds with Reply from 192.168.0.125:... or similar.<br />
6. Open a browser and type http:// in the Location/Address field.<br />
For other methods of assigning the IP address, see the Installation and Management Software CD or the document Assign an IP<br />
Address and Access the Video Stream on Axis Support web at www.axis.com/techsup<br />
Note<br />
• To open a command prompt in Windows, open the Start menu and type cmd in the Run/Search field.<br />
• To use the ARP command in Windows 7/Windows Vista, right-click the command prompt icon and select Run as<br />
administrator.<br />
• To open a command prompt in Mac OS X, open the Terminal utility from Application > Utilities.<br />
AXIS Video Hosting System (AVHS)<br />
AVHS used in conjunction with an AVHS service, provides easy and secure Internet access to live and recorded video accessible from<br />
any location. For more information and help to find a local AVHS Service Provider go to www.axis.com/hosting<br />
AVHS is enabled by default. The settings are configured under System Options > Network > TCP IP > Basic.<br />
43
AXIS M3007–P<br />
System Options<br />
One-click enabled - Press the product’s control button (see Hardware Overview, on page 4 ) to connect to an AVHS service over the<br />
Internet. Once registered, Always will be enabled and the Axis product stays connected to the AVHS service. If the product is not<br />
registered within 24 hours from when the button is pressed, the product will disconnect from the AVHS service.<br />
Always - The Axis product will constantly attempt to connect to the AVHS service over the Internet. Once registered the product will<br />
stay connected to the service. This option can be used when the product is already installed and it is not convenient to use the<br />
one-click installation.<br />
AXIS Internet Dynamic DNS Service<br />
AXIS Internet Dynamic DNS Service assigns a host name for easy access to the product. For more information, see www.axiscam.net<br />
To register the Axis product with AXIS Internet Dynamic DNS Service, go to System Options > Network > TCP/IP > Basic. Under<br />
Services, click the AXIS Internet Dynamic DNS Service Settings button (requires access to the Internet). The domain name currently<br />
registered at AXIS Internet Dynamic DNS service for the product can at any time be removed.<br />
Advanced TCP/IP Settings<br />
DNS Configuration<br />
DNS (Domain Name Service) provides the translation of host names to IP addresses. The DNS settings are configured under System<br />
Options > Network > TCP/IP > Advanced.<br />
Select Obtain DNS server address via DHCP to use the DNS settings provided by the DHCP server.<br />
To make manual settings, select Use the following DNS server address and specify the following:<br />
Domain name - Enter the domain(s) to search for the host name used by the Axis product. Multiple domains can be separated by<br />
semicolons. The host name is always the first part of a fully qualified domain name, for example, myserver is the host name in the<br />
fully qualified domain name myserver.mycompany.com where mycompany.com is the domain name.<br />
Primary/Secondary DNS server - Enter the IP addresses of the primary and secondary DNS servers. The secondary DNS server is<br />
optional and will be used if the primary is unavailable.<br />
NTP Configuration<br />
NTP (Network Time Protocol) is used to synchronize the clock times of devices in a network. The NTP settings are configured under<br />
System Options > Network > TCP/IP > Advanced.<br />
Select Obtain NTP server address via DHCP to use the NTP settings provided by the DHCP server.<br />
To make manual settings, select Use the following NTP server address and enter the host name or IP address of the NTP server.<br />
Host Name Configuration<br />
The Axis product can be accessed using a host name instead of an IP address. The host name is usually the same as the assigned DNS<br />
name. The host name is configured under System Options > Network > TCP/IP > Advanced.<br />
Select Obtain host name via IPv4 DHCP to use host name provided by the DHCP server running on IPv4.<br />
Select Use the host name to set the host name manually.<br />
Select Enable dynamic DNS updates to dynamically update local DNS servers whenever the Axis product’s IP address changes.<br />
For more information, see the online help .<br />
Link-Local IPv4 Address<br />
Link-Local Address is enabled by default and assigns the Axis product an additional IP address which can be used to access<br />
the product from other hosts on the same segment on the local network. The product can have a Link-Local IP and a static<br />
or DHCP-supplied IP address at the same time.<br />
44
AXIS M3007–P<br />
System Options<br />
This function can be disabled under System Options > Network > TCP/IP > Advanced.<br />
HTTP<br />
The HTTP port used by the Axis product can be changed under System Options > Network > TCP/IP > Advanced. In addition to the<br />
default setting, which is 80, any port in the range 1024–65535 can be used.<br />
HTTPS<br />
The HTTPS port used by the Axis product can be changed under System Options > Network > TCP/IP > Advanced. In addition to<br />
the default setting, which is 443, any port in the range 1024–65535 can be used.<br />
To enable HTTPS, go to System Options > Security > HTTPS. For more information, see page 39.<br />
NAT traversal (port mapping) for IPv4<br />
A network router allows devices on a private network (LAN) to share a single connection to the Internet. This is done by forwarding<br />
network traffic from the private network to the “outside”, that is, the Internet. Security on the private network (LAN) is increased<br />
since most routers are pre-configured to stop attempts to access the private network (LAN) from the public network (Internet).<br />
Use NAT traversal when the Axis product is located on an intranet (LAN) and you wish to make it available from the other<br />
(WAN) side of a NAT router. With NAT traversal properly configured, all HTTP traffic to an external HTTP port in the NAT router<br />
is forwarded to the product.<br />
NAT traversal is configured under System Options > Network > TCP/IP > Advanced.<br />
Note<br />
• For NAT traversal to work, this must be supported by the router. The router must also support UPnP TM .<br />
• The router has many different names: “NAT router”, “Network router”, “Internet Gateway”, ”Broadband router”, “Broadband<br />
sharing device” or “Home firewall” but the essential purpose of the device is the same.<br />
Enable/Disable - When enabled, the Axis product attempts to configure port mapping in a NAT router on your network, using UPnP TM .<br />
Note that UPnP TM must be enabled in the product (see System Options > Network > UPnP).<br />
Use manually selected NAT router - Select this option to manually select a NAT router and enter the IP address for the router in<br />
the field. If no router is specified, the product automatically searches for NAT routers on your network. If more than one router is<br />
found, the default router is selected.<br />
Alternative HTTP port - Select this option to manually define an external HTTP port. Enter the port number in the field. If no port is<br />
entered here, a port number is automatically selected when NAT traversal is enabled.<br />
Note<br />
• An alternative HTTP port can be used or be active even if NAT traversal is disabled. This is useful if your NAT router does not<br />
support UPnP and you need to manually configure port forwarding in the NAT router.<br />
• If you attempt to manually enter a port that is already in use, another available port is automatically selected.<br />
• When the port is selected automatically it is displayed in this field. To change this, enter a new port number and click Save.<br />
FTP<br />
The FTP server running in the Axis product enables upload of new firmware, user applications, etc. The FTP server can be disabled<br />
under System Options > Network > TCP/IP > Advanced.<br />
Note<br />
This FTP server has nothing to do with the product’s ability to transfer images via FTP to other locations and servers.<br />
45
AXIS M3007–P<br />
System Options<br />
RTSP<br />
The RTSP server running in the Axis product allows a connecting client to start an H.264 stream. The RTSP port number can be<br />
changed under System Options > Network > TCP/IP > Advanced. The default port is 554.<br />
Note<br />
H.264 video streams will not be available if the RTSP server is disabled.<br />
SOCKS<br />
SOCKS is a networking proxy protocol. The Axis product can be configured to use a SOCKS server to reach networks on the other<br />
side of a firewall or proxy server. This functionality is useful if the Axis product is located on a local network behind a firewall, and<br />
notifications, uploads, alarms, etc need to be sent to a destination outside the local network (for example the Internet).<br />
SOCKS is configured under System Options > Network > SOCKS. For more information, see the online help .<br />
QoS (Quality of Service)<br />
QoS (Quality of Service) guarantees a certain level of a specified resource to selected traffic on a network. A QoS-aware network<br />
prioritizes network traffic and provides a greater network reliability by controlling the amount of bandwidth an application may use.<br />
The QoS settings are configured under System Options > Network > QoS. Using DSCP (Differentiated Services Codepoint) values, the<br />
Axis product can mark the following types of traffic: live video, event/alarm traffic and management traffic.<br />
SMTP (email)<br />
To send email messages from the Axis product via SMTP (Simple Mail Transfer Protocol), an SMTP mail server must be set up. This<br />
is done under System Options > Network > SMTP (email).<br />
Enter the host names or IP addresses and port numbers for the primary and secondary mail servers in the fields provided. A From<br />
email address is also required. If the mail server requires authentication, check Use authentication to log in to this server and enter<br />
the necessary information.<br />
SNMP<br />
The Simple Network Management Protocol (SNMP) allows remote management of network devices. An SNMP community is the<br />
group of devices and management station running SNMP. Community names are used to identify groups.<br />
The Axis product can be configured to support SNMP on the System Options > Network > SNMP page.<br />
Depending on the level of security required, select the version on SNMP to use.<br />
SNMP v1/v2 provides the lowest level of security. The community name can be specified as a password for read or read/write<br />
access to all supported SNMP devices. The default password for the Read community is public and the default password for the<br />
Write community is write.<br />
Note<br />
If HTTPS is enabled, SNMP v1 and SNMP v2c should be disabled.<br />
Traps for SNMP v1/v2 are used by the Axis product to send messages to a management system on important events and status<br />
changes. Check Enable traps and enter the IP address where the trap message should be sent and the Trap community that<br />
should receive the message.<br />
The following traps are available:<br />
• Cold start<br />
• Warm start<br />
• Link up<br />
46
AXIS M3007–P<br />
System Options<br />
• Authentication failed<br />
SNMP v3 provides encryption and secure passwords. To use traps with SNMP v3, an SNMP v3 management application is required.<br />
To use SNMP v3, HTTPS must be enabled, see HTTPS, on page 39. To enable SNMP v3, check the box and provide the initial user<br />
password.<br />
Note<br />
The initial password can only be set once. If the password is lost, the Axis product must be reset to factory default, see<br />
Reset to Factory Default Settings, on page 50.<br />
UPnP TM<br />
The Axis product includes support for UPnP TM . UPnP TM is enabled by default and the product is automatically detected by operating<br />
systems and clients that support this protocol.<br />
UPnP TM can be disabled under System Options > Network > UPnP TM .<br />
RTP/H.264<br />
The RTP port range and multicast settings are configured under System Options > Network > RTP.<br />
The RTP port range defines the range of ports from which the video ports are automatically selected. For multicast streams, only<br />
certain IP addresses and port numbers should be used.<br />
Select Always Multicast Video to start multicast streaming without opening an RTSP session.<br />
Bonjour<br />
The Axis product includes support for Bonjour. Bonjour is enabled by default and the product is automatically detected by operating<br />
systems and clients that support this protocol.<br />
Bonjour can be disabled under System Options > Network > Bonjour.<br />
Storage<br />
SD Card<br />
NOTICE<br />
To prevent corruption of recordings, the SD card should always be unmounted before it is ejected.<br />
The Axis product supports SD cards with the following file systems:<br />
• ext4 — recommended due to its resilience against data loss if the card is ejected or if there is abrupt power loss. To access<br />
data stored on the card from the Windows operating system, a third-party ext4 driver or application is required.<br />
• vFAT — most SD cards are pre-formatted with vFAT when purchased.<br />
If required, the SD card can be manually formatted to the desired file system. To format the SD card:<br />
1. Insert the SD card in the SD card slot.<br />
2. Go to System Options > Storage and click SD Card.<br />
3. Click Format and select the desired file system.<br />
Note<br />
During formatting any previous data stored on the disk will be lost.<br />
47
AXIS M3007–P<br />
System Options<br />
Mounting is done automatically when the card is inserted or when the product is started. A manual mount is only required if the<br />
card has been unmounted and not ejected and re-inserted.<br />
To unmount the SD card:<br />
1. Go to System Options > Storage and click SD Card.<br />
2. Click Unmount.<br />
3. The card can now be removed.<br />
The SD card is managed on the System Options > Storage page. Click SD Card to open Storage Management.<br />
If the card’s status shows as failed, click Check disk to see if the problem can be found and then try Repair. This option is only<br />
available for SD cards with ext4. For SD cards with vFAT, use a card reader or computer to troubleshoot the card.<br />
To avoid filling the card, it is recommended to remove recordings continuously. Under Recording Settings, select Remove recordings<br />
older than and select the number of days or weeks.<br />
To stop writing to the card and protect recordings from being removed, select Lock under Recording Settings.<br />
Network Share<br />
Network share allows you to add network storage such as a NAS (Network Attached Storage) or any server that uses CIFS (Common<br />
Internet File System) and use them for storage of recordings.<br />
To add a network share:<br />
1. Go to System Options > Storage.<br />
2. Click Network Share.<br />
3. Enter the IP address, DNS or Bonjour name to the host server in the Host field.<br />
4. Enter the name of the share in the Share field. Sub folders cannot be used.<br />
5. If required, select The share requires login and enter the user name and password.<br />
6. Click Connect.<br />
To clear all recordings and data from the Axis product’s folder on the designated share, click Clear under Storage Tools.<br />
To avoid filling the share, it is recommended to remove recordings continuously. Under Recording Settings, select Remove recordings<br />
older than and select the number of days or weeks.<br />
To stop writing to the share and protect recordings from being removed, select Lock under Recording Settings.<br />
Maintenance<br />
The Axis product provides several maintenance functions. These are available under System Options > Maintenance.<br />
Click Restart to perform a correct restart if the Axis product is not behaving as expected. This will not affect any of the current<br />
settings.<br />
Click Restore to reset most settings to the factory default values. The following settings are not affected:<br />
• the boot protocol (DHCP or static)<br />
• the static IP address<br />
• the default router<br />
• the subnet mask<br />
48
AXIS M3007–P<br />
System Options<br />
• the system time<br />
• the IEEE 802.1X settings<br />
• uploaded applications are kept but must be restarted<br />
Click Default to reset all settings, including the IP address, to the factory default values. This button should be used with caution. The<br />
Axis product can also be reset to factory default using the control button, see Reset to Factory Default Settings, on page 50.<br />
To identify the product or test the Status LED, click Flash LED under Identify and specify the duration in seconds, minutes or hours.<br />
This can be useful for identifying the product among other products installed in the same location.<br />
For information about firmware upgrade, see Upgrading the Firmware, on page 51.<br />
Support<br />
Support Overview<br />
The System Options > Support > Support Overview page provides information on troubleshooting and contact information,<br />
should you require technical assistance.<br />
See also Troubleshooting, on page 51.<br />
System Overview<br />
To get an overview of the Axis product’s status and settings, go to System Options > Support > System Overview. Information that<br />
can be found here includes firmware version, IP address, network and security settings, event settings, image settings and recent log<br />
items. Many of the captions are links to the proper Setup page.<br />
Logs & Reports<br />
The System Options > Support > Logs & Reports page generates logs and reports useful for system analysis and troubleshooting. If<br />
contacting Axis Support, please provide a valid Server Report with your query.<br />
System Log - Provides information about system events.<br />
Access Log - Lists all failed attempts to access the product. The Access Log can also be configured to list all connections to the<br />
product (see below).<br />
Server Report - Provides information about the product status in a pop-up window. The Access Log is automatically included<br />
in the Server Report.<br />
You can view or download the server report. Downloading the server report creates a .zip file that contains a complete server report<br />
text file in UTF–8 format. Select the Include snapshot with default image settings option to include a snapshot of the product’s<br />
Live View that also shows the settings specified under Video Stream>Image>Image Appearance. The server report .zip file should<br />
always be included when contacting support.<br />
Parameter List - Shows the product's parameters and their current settings. This may prove useful when troubleshooting or<br />
when contacting Axis Support.<br />
Connection List - Lists all clients that are currently accessing media streams.<br />
Crash Report - Generates an archive with debugging information. The report takes several minutes to generate.<br />
The log levels for the System Log and the Access Log are set under System Options > Support > Logs & Reports > Configuration.<br />
The Access Log can be configured to list all connections to the product (select Critical, Warnings & Info).<br />
49
AXIS M3007–P<br />
System Options<br />
Advanced<br />
Scripting<br />
Scripting allows experienced users to customize and use their own scripts.<br />
NOTICE<br />
Improper use may cause unexpected behavior and loss of contact with the Axis product.<br />
Axis strongly recommends that you do not use this function unless you understand the consequences. Axis Support does not provide<br />
assistance for problems with customized scripts.<br />
To open the Script Editor, go to System Options > Advanced > Scripting. If a script causes problems, reset the product to its<br />
factory default settings, see page 50.<br />
For more information, see www.axis.com/developer<br />
File Upload<br />
Files, for example web pages and images, can be uploaded to the Axis product and used as custom settings. To upload a file, go<br />
to System Options > Advanced > File Upload.<br />
Uploaded files are accessed through http:///local// where is the<br />
selected user group (viewer, operator or administrator) for the uploaded file.<br />
Plain Config<br />
Plain Config is for advanced users with experience of Axis product configuration. Most parameters can be set and modified from this<br />
page. Help is available from the standard help pages.<br />
To open Plain Config, go to System Options > Advanced > Plain Config. Axis Support does not provide assistance.<br />
Reset to Factory Default Settings<br />
Important<br />
Reset to factory default should be used with caution. A reset to factory default will reset all settings, including the IP<br />
address, to the factory default values.<br />
To reset the product to the factory default settings:<br />
1. Disconnect power from the product.<br />
2. Press and hold the control button and reconnect power. See Hardware Overview, on page 4 .<br />
3. Keep the control button pressed for about 15 seconds until the status LED indicator flashes amber.<br />
4. Release the control button. The process is complete when the status LED indicator turns green. The product has been reset<br />
to the factory default settings. If no DHCP server is available on the network, the default IP address is 192.168.0.90<br />
5. Use the tools provided on the Installation and Management Software CD to assign an IP address, set the password and<br />
access the video stream. This information is also available from the support pages on www.axis.com/techsup<br />
It is also possible to reset parameters to factory default via the web interface. Go to Setup > System Options > Maintenance.<br />
50
AXIS M3007–P<br />
Troubleshooting<br />
Troubleshooting<br />
Checking the Firmware<br />
Firmware is software that determines the functionality of network devices. One of your first actions when troubleshooting a problem<br />
should be to check the current firmware version. The latest version may contain a correction that fixes your particular problem. The<br />
current firmware version in the Axis product is displayed in the page Setup > Basic Setup and in Setup > About.<br />
Upgrading the Firmware<br />
When you upgrade the product with the latest firmware from Axis website, the product receives the latest functionality available.<br />
Always read the upgrade instructions and release notes available with each new release, before upgrading the firmware.<br />
To upgrade, follow these instructions:<br />
1. Save the firmware file to your computer. The latest version of the firmware is available free of charge from Axis website<br />
at www.axis.com/techsup<br />
2. Go to Setup > System Options > Maintenance in the products web pages.<br />
3. Under Upgrade Server, click Browse and locate the file on your computer. Click Upgrade.<br />
After starting the upgrade process, always wait at least 5–10 minutes before restarting the product, even if you suspect the<br />
upgrade has failed.<br />
AXIS Camera Management can be used for multiple upgrades. See www.axis.com for more information.<br />
Note<br />
• Your dealer reserves the right to charge for any repair attributable to faulty upgrade by the user.<br />
• Preconfigured and customized settings are saved when the firmware is upgraded (providing the features are available in the<br />
new firmware) although this is not guaranteed by Axis Communications AB.<br />
Symptoms, Possible Causes and Remedial Actions<br />
Problems setting the IP address<br />
When using ARP/Ping<br />
Try the installation again. The IP address must be set within two minutes after power has been<br />
applied to the product. Ensure the Ping length is set to 408. For instructions, see Assign IP Address<br />
using ARP/Ping, on page 43.<br />
51
AXIS M3007–P<br />
Troubleshooting<br />
The product is located on a<br />
different subnet<br />
The IP address is being used<br />
by another device<br />
Possible IP address conflict<br />
with another device on the<br />
same subnet.<br />
If the IP address intended for the product and the IP address of the computer used to access the<br />
product are located on different subnets, you will not be able to set the IP address. Contact your<br />
network administrator to obtain an IP address.<br />
Disconnect the Axis product from the network. Run the Ping command (in a Command/DOS<br />
window, type ping and the IP address of the product:<br />
• If you receive: Reply from : bytes=32; time=10...<br />
this means that the IP address may already be in use by another device on the network.<br />
Obtain a new IP address from the network administrator and reinstall the product.<br />
• If you receive: Request timed out, this means that the IP address is available<br />
for use with the Axis product. Check all cabling and reinstall the product.<br />
The static IP address in the Axis product is used before the DHCP server sets a dynamic address.<br />
This means that if the same default static IP address is also used by another device, there may<br />
be problems accessing the product.<br />
The product cannot be accessed from a browser<br />
Cannot log in<br />
When HTTPS is enabled, ensure that the correct protocol (HTTP or HTTPS) is used when attempting<br />
to log in. You may need to manually type http or https in the browser’s address field.<br />
The IP address has been<br />
changed by DHCP<br />
Certificate error when using<br />
IEEE 802.1X<br />
If the password for the user root is lost, the product must be reset to the factory default settings.<br />
See Reset to Factory Default Settings, on page 50.<br />
IP addresses obtained from a DHCP server are dynamic and may change. If the IP address has<br />
been changed, use AXIS IP Utility or AXIS Camera Management to located the product on the<br />
network. Identify the product using its model or serial number, or by the DNS name (if the name<br />
has been configured).<br />
If required, a static IP address can be assigned manually. For instructions, see the Installation and<br />
Management Software CD or the document Assign an IP Address and Access the Video Stream on<br />
Axis Support web at www.axis.com/techsup<br />
For authentication to work properly, the date and time settings in the Axis product should be<br />
synchronized with an NTP server. See Date & Time, on page 42.<br />
The product is accessible locally but not externally<br />
Router configuration<br />
Firewall protection<br />
To configure your router to allow incoming data traffic to the Axis product, enable the NAT-traversal<br />
feature which will attempt to automatically configure the router to allow access to the Axis<br />
product, see NAT traversal (port mapping) for IPv4, on page 45. The router must support UPnP TM .<br />
Check the Internet firewall with your network administrator.<br />
Default routers required Check if you need to configure the router settings from System Options > Network > TCP/IP ><br />
Basic.<br />
Problems with streaming H.264<br />
Problems with AXIS Media<br />
Control (Internet Explorer<br />
only)<br />
No H.264 displayed in the<br />
client<br />
To enable the updating of video images in Internet Explorer, set the browser to allow ActiveX<br />
controls. Also, make sure that AXIS Media Control is installed on your computer.<br />
Check that the relevant H.264 connection methods and correct interface are enabled in the AMC<br />
Control Panel (streaming tab). See AXIS Media Control (AMC), on page 11.<br />
In the AMC Control Panel, select the H.264 tab and click Set to default H.264 decoder.<br />
Multicast H.264 only<br />
accessible by local clients<br />
Check that RTSP is enabled under System Options > Network > TCP/IP > Advanced.<br />
Check if your router supports multicasting, or if the router settings between the client and the<br />
product need to be configured. The TTL (Time To Live) value may need to be increased.<br />
52
AXIS M3007–P<br />
Troubleshooting<br />
No multicast H.264<br />
displayed in the client<br />
Installation of additional<br />
ActiveX component<br />
restricted or prohibited<br />
Poor rendering of H.264<br />
images<br />
Color saturation is different<br />
in H.264 and Motion JPEG<br />
Lower frame rate than<br />
expected<br />
Check with your network administrator that the multicast addresses used by the Axis product<br />
are valid for your network.<br />
Check with your network administrator to see if there is a firewall preventing viewing.<br />
Configure the Axis product to use a Java applet for updating video images in your browser. Go to<br />
Setup > Live View Config and select Java applet under Default viewer.<br />
Ensure that your graphics card is using the latest driver. The latest drivers can usually be<br />
downloaded from the manufacturer’s website.<br />
Modify the settings for your graphics adapter. Refer to the adapter’s documentation for more<br />
information.<br />
See Performance Considerations, on page 56.<br />
Reduce the number of applications running on the client computer.<br />
Limit the number of simultaneous viewers.<br />
Check with the network administrator that there is enough bandwidth available.<br />
Check in the AMC Control Panel (H.264 tag) that video processing is NOT set to Decode only<br />
key frames.<br />
Lower the image resolution.<br />
The maximum frames per second is dependent on the utility frequency (60/50 Hz) of the Axis<br />
product. See Technical Specifications, on page 54.<br />
Video and image problems, general<br />
Image unsatisfactory Check the video stream and camera settings under Setup > Video > Video Stream and Setup ><br />
Video > Camera Settings.<br />
Disturbed focus<br />
Set the focus manually by turning the focus ring.<br />
Motion Detection triggers unexpectedly<br />
Changes in luminance<br />
Motion detection is based on changes in luminance in the image. This means that if there are<br />
sudden changes in the lighting, motion detection may trigger mistakenly. Lower the sensitivity<br />
setting to avoid problems with luminance.<br />
Storage and disk management problems<br />
Video cannot be recorded Check that the SD card is not write protected (that is, read only).<br />
SD card cannot be mounted Reformat the SD card and then click Mount.<br />
53
AXIS M3007–P<br />
Technical Specifications<br />
Technical Specifications<br />
Function/group Item Specifications<br />
Camera<br />
Video<br />
Network<br />
System<br />
Integration<br />
Model AXIS M3007–P: 5 MP resolution, 360°/180°<br />
Image sensor<br />
Lens<br />
1/3.2" progressive scan RGB CMOS<br />
M12 mount, F2.8, fixed iris, megapixel resolution<br />
1.3 mm, horizontal angle of view: 187°, vertical angle of view: 168°, Diagonal angle<br />
of view: 187°<br />
Light sensitivity 0.6 - 200000 lux, F2.8<br />
Shutter time<br />
Camera angle<br />
adjustment<br />
Video<br />
compression<br />
1/24000 to 2 s<br />
Rotation +/-180°<br />
H.264 Baseline and Main profile (MPEG-4 Part 10/AVC)<br />
Motion JPEG<br />
Resolutions 2592 x 1944 (5 MP) to 160 x 120<br />
Frame rate H.264<br />
Frame rate<br />
Motion JPEG<br />
Video streaming<br />
Multi-view<br />
streaming<br />
Pan/Tilt/Zoom<br />
Image settings<br />
Security<br />
Supported<br />
protocols<br />
Application<br />
Programming<br />
Interface<br />
Intelligent video<br />
Event Triggers<br />
Event Actions<br />
12 fps in 360° overview and panoramic views<br />
8 fps in 1600x1200 quad view<br />
12 fps in 360° overview and panoramic views<br />
8 fps in 1600x1200 quad view<br />
Multiple, individually configurable streams in H.264 and Motion JPEG<br />
Controllable frame rate and bandwidth VBR/CBR H.264<br />
360° overview, panorama, double panorama, quad view. Up to 4 individually cropped and<br />
dewarped view areas. When streaming 4 dewarped view areas and one 360° overview in<br />
VGA resolution, the frame rate is 10 fps per stream<br />
Digital PTZ with dewarping, preset positions, guard tour<br />
Compression, color, brightness, sharpness, contrast, white balance, exposure control,<br />
exposure zones, backlight compensation, wide dynamic range - dynamic contrast, fine<br />
tuning of low light behavior, text and image overlay, privacy mask, mirroring of images<br />
Rotation: 0°, 180°<br />
Password protection, IP address filtering, IEEE 802.1X** network access control,HTTPS**<br />
encryption, digest authentication, user access log<br />
IPv4/v6, HTTP, HTTPS*, SSL/TLS*, QoS Layer 3 DiffServ, FTP, CIFS/SMB, SMTP, Bonjour,<br />
UPnP, SNMPv1/v2c/v3(MIB-II), DNS, DynDNS, NTP, RTSP, RTP, TCP, UDP, IGMP, RTCP,<br />
ICMP, DHCP, ARP, SOCKS, etc. *This product includes software developed by the OpenSSL<br />
Project for use in the OpenSSL Toolkit.<br />
Open API for software integration, VAPIX® and AXIS Camera Application Platform from<br />
Axis Communications, specifications available at www.axis.com<br />
Support for AXIS Video Hosting System (AVHS) with One-Click Camera connection<br />
Video motion detection, active tampering alarm<br />
AXIS Camera Application Platform enabling installation of additional applications<br />
(additionally installed applications can be used together with 360° overview only)<br />
Intelligent video, edge storage events<br />
File upload: FTP, HTTP, network share and email<br />
Notification: email, HTTP and TCP<br />
Go to PTZ preset, guard tour<br />
Video recording to edge storage<br />
Pre- and post-alarm video buffering<br />
54
AXIS M3007–P<br />
Technical Specifications<br />
Function/group Item Specifications<br />
General<br />
Video access from<br />
web browser<br />
Management and<br />
maintenance<br />
Built-in<br />
installation aids<br />
Data Streaming<br />
Camera live view<br />
Video recording to file (ASF)<br />
Customizable HTML pages<br />
Windows Vista, XP, Windows 7, Server 2003 and Server 2008<br />
DirectX 9c or higher<br />
For other operating systems and browers see www.axis.com/techsup<br />
AXIS Camera Management tool on CD and web-based configuration<br />
Firmware upgrades over HTTP or FTP, firmware available on www.axis.com<br />
Pixel counter<br />
Event data<br />
Casing Casing color: White NCS S 1002-B<br />
Encapsulated electronics<br />
Aluminum and polycarbonate/ABS casing<br />
Memory<br />
Power<br />
Connectors<br />
Edge storage<br />
Storage<br />
temperature<br />
Operating<br />
conditions<br />
Approvals<br />
Dimensions<br />
(Diameter x<br />
Height)<br />
Weight<br />
Included<br />
accessories<br />
Optional<br />
accessories<br />
Video<br />
management<br />
software<br />
512 MB RAM, 128 MB Flash<br />
Power over Ethernet IEEE 802.3af<br />
Class 2, max. 4.6W<br />
Male RJ-45 10BASE-T/100BASE-TX PoE on a 2 m (6.6 ft.) Cat-5e SFTP network cable<br />
microSD/SDHC memory card slot (card not included)<br />
Support for recording to network share (network-attached storage or file server)<br />
-25 °C to 70 ºC (-13 °F to 158 ºF)<br />
Temperature: 0 ºC to 45 ºC (32 ºF to 113 ºF)<br />
Humidity 15–85% RH (non-condensing)<br />
CE: Emission: EN55022:2006+A1 Class B Harmonics: EN61000-3-2 Flicker: EN61000-3-3<br />
Immunity: EN55024, EN61000-6-1, EN61000-6-2 Safety: IEC/EN 60950-1<br />
FCC: FCC Part 15, Subpart B, Class B demonstrated by compliance with EN55022 (CISPR<br />
22)<br />
UL: Safety: UL60950-1<br />
Japan: VCCI-2011, Class B, ITE • C-tick AS/NZS CISPR 22, demonstrated by compliance<br />
with EN55022 (CISPR 22) Canada: ICES-003 Canadian ICES-003, Class B digital,<br />
demonstrated by compliance with EN55022 (CISPR 22) Korea: KCC Class B<br />
132 x 53 mm (5.2" x 2.1")<br />
Camera: 560 g (1.3 lb.)<br />
Installation Guide, Installation and Management Software CD, Windows decoder 1-user<br />
license, drill hole template, T10 Torx L-key<br />
AXIS T90A White LED Illuminators<br />
AXIS P8221 Network I/O Audio Module<br />
AXIS T8414 Installation Display<br />
AXIS Camera Companion - Basic surveillance, typical for small business, where video is<br />
recorded in the cameras (included)<br />
AXIS Camera Station - Fully featured surveillance, typical for medium-sized businesses,<br />
where video is recorded on a system server (not included)<br />
For more software application via partners, see www.axis.com/products/video/software/<br />
55
AXIS M3007–P<br />
Technical Specifications<br />
Performance Considerations<br />
When settings up your system, it is important to consider how various settings and situations will affect performance. Some factors<br />
affect the amount of bandwidth (the bit rate) required, others can affect the frame rate, and some affect both. If the load on the<br />
CPU reaches its maximum, this will also affect the frame rate.<br />
The following factors are among the most important to consider:<br />
• High image resolution and/or lower compression levels result in images containing more data. Bandwidth affected.<br />
• Access by large numbers of Motion JPEG and/or unicast H.264 clients. Bandwidth affected.<br />
• Simultaneous viewing of different streams (resolution, compression) by different clients. Effect on frame rate and<br />
bandwidth.<br />
• Accessing Motion JPEG and H.264 video streams simultaneously. Frame rate and bandwidth affected.<br />
• Heavy usage of event settings affect the product’s CPU load. Frame rate affected.<br />
• Heavy network utilization due to poor infrastructure. Bandwidth affected.<br />
• Viewing on poorly performing client computers lowers perceived performance. Frame rate affected.<br />
56
User Manual Ver. M2.2<br />
AXIS M3007–P Date: January 2013<br />
© Axis Communications AB, 2012 - 2013 Part No. 50206