Download Zed Bull Operation Manual - OBD China
Download Zed Bull Operation Manual - OBD China
Download Zed Bull Operation Manual - OBD China
Create successful ePaper yourself
Turn your PDF publications into a flip-book with our unique Google optimized e-Paper software.
IMPORTANT NOTES 1<br />
-This device is produced for assisting automotive locksmiths.<br />
-Before using device, read the user manual carefully.<br />
-Avoid strokes to device and accessories.<br />
-Avoid device and accessories contacting with water and conductive liquids.<br />
-Use only original accessories.<br />
-After using device unplug power adapter.<br />
-Do not use device under high electromagnetic field.<br />
-Use the device in a sturdy, dust-free, well-ventilated place.<br />
-Updated user manuals can be downloaded from web page.<br />
MAINTENANCE AND CLEANING 2<br />
-After using device, unplug all accessories and keep them in the package.<br />
-Do not place heavy materials on the package.<br />
-Keep package in room conditions.<br />
-Clean the device with soft and dry piece of cloth.<br />
-If a problem occurs do not disassemble the device. Contact your local<br />
distributor or device manufacturer.<br />
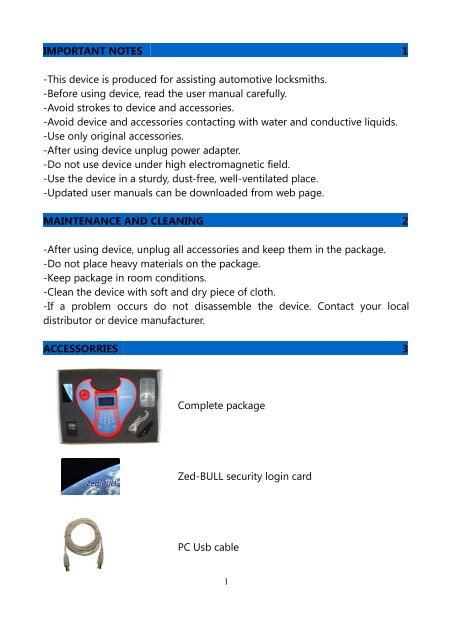
ACCESSORRIES 3<br />
Complete package<br />
<strong>Zed</strong>-BULL security login card<br />
PC Usb cable<br />
1
Power Adapter<br />
Lighter Adapter<br />
Transponder box<br />
SPECIFICATIONS 4<br />
DIMENSIONS 4.1<br />
Width = 285 mm<br />
Height = 285 mm<br />
Depth = 105 mm<br />
Weight = 0,6 kg<br />
External Power Supply<br />
100/250 V – 50/60Hz AC<br />
Current = 117 mA<br />
Power consumption ≅ 1,05 Watt<br />
Adapter Type<br />
9-12 V DC<br />
TECHNICAL DETAILS 4.2<br />
Transponder Frequencies<br />
125 Khz -134 Khz<br />
Communication Interface<br />
USB and Serial Port<br />
Temperature range ≅ -5 C to 40C<br />
2
GENERAL INFORMATION 5<br />
<strong>Zed</strong>-BULL is a friendly automotive locksmithing tool, it has been<br />
developed for all range of automotive locksmiths from beginners to<br />
advanced. It's ease in use, technical support and unique properties makes it a<br />
powerfull device in the market.<br />
Let's take a look what <strong>Zed</strong>-BULL can do.<br />
It can identify all transponders used in autmotive industry, copy all fixed<br />
coded transponders, copy some of 40, all 41, all 42, unlocked 44(VAG), all 45<br />
and all 4D transponders.<br />
Also it can copy all type of Texas 4C transponders to batteryless TPX1<br />
transponder.<br />
It can prepare transponder from EEPROM or MCU datas of car which<br />
directly starts car or ready to match with diagnostic devices.<br />
It can calculate pin codes from EEPROM, MCU, VIN number or key data<br />
of the car for some car models.<br />
Device is supported with PC software, which you can find usefull<br />
informations about transponders and matching car models and remote<br />
programming procedures. Storing unlimited(limited with Pc harddrive<br />
capacity) customer information to database is another advantage of <strong>Zed</strong>-<br />
BULL PC Software.<br />
<strong>Zed</strong>-BULL PC Software also has all functionalities of the device itself<br />
such as reading, identifying and writing to transponder.<br />
<strong>Zed</strong>-BULL PC Software is capable of reading and writing to new<br />
generation Philips Hitag 2 crypto transponders.<br />
One of the most usefull property of the PC Software is transponder<br />
production property. User can prepare their own transponders such as; 11, 12,<br />
13, 4C, 33, 40, 41, 42, 44 VAG, 44 Mitsubishi, 45, 46, 61, 62, 65 and 73 for<br />
diagnostic devices.<br />
There are 2 types of tokens, one token is device token, which is free of<br />
charge and the other one is Pc token which is used for Eeprom & Mcu<br />
applications and transponder production applications(with charge).when<br />
device is turned on, before logging in number of tokens, 16 digit device serial<br />
number, device software version, device applications information (ZB:refers to<br />
<strong>Zed</strong>-BULL which is consisted of transponder cloning functions, ZBE:refers to<br />
<strong>Zed</strong>-BULL + Eeprom and MCU application, ZBET:refers to <strong>Zed</strong>-BULL +<br />
Eeprom & Mcu Application + transponder production) are displayed on the<br />
3
<strong>Zed</strong>-BULL screen.<br />
User should contact local distributor for both device and Pc token. Tokens are<br />
loaded as in the steps below.<br />
1.Choose 5 th choice(settings) in the main menu.<br />
2.Choose 4 th choice(Load PC token) in the settings sub menu.<br />
3.Device will give Outcode, outcode should be given to local distributor, Local<br />
distributor will give user In code, this In code should be entered carefully and<br />
correctly to the device, if 5 times repeatedly In code is entered wrong, device<br />
will want new In code. If In code is entered correctly tokens will be loaded to<br />
the device.<br />
4
All connections of <strong>Zed</strong>-BULL are shown in the picture below.<br />
After Power switch of the <strong>Zed</strong>-BULL is turned on, user should put the<br />
Security login card on the antenna. Unless Security login card is put on the<br />
antenna at start up, the <strong>Zed</strong>-BULL functions won't work, Pressing button “R”<br />
allows to try logging in again. The Security login card is put on the antenna as<br />
in the picture below;<br />
5
Screen at start up Screen at login card error Screen at successfull login<br />
If user looses or has problem with security login card, local distributor<br />
should be contacted immediately.<br />
Functions of the key pad buttons are described in the figure below.<br />
All the functionalities of <strong>Zed</strong>-BULL such as, transponder identification,<br />
transponder cloning, transponder production, Eeprom and Mcu applications,<br />
Pc Software are upgradable, it is possible to improve fuctionalities of <strong>Zed</strong>-<br />
BULL with new developed technologies.<br />
6
<strong>Zed</strong>-BULL MENU 6<br />
TRANSPONDER IDENTIFICATION 6.1<br />
This menu is used for reading and identifying transponder. Transponder<br />
ID, transponder logic, lock status and car type for some models are displayed<br />
on the <strong>Zed</strong>-BULL screen. Also for Renault 33 transponders, pin-code of the car<br />
is diplayed.<br />
Usage:<br />
Insert customer key to the <strong>Zed</strong>-BULL antena and Press “R” button on<br />
<strong>Zed</strong>-BULL keypad or use up and down arrow to highlight choice 1 on main<br />
menu and press enter(right arrow).<br />
An important point is; while reading the transponder, It should be put<br />
on the antenna perpendicular. See pictures below.<br />
7
<strong>Zed</strong>-<strong>Bull</strong> screen displays of some of identified transponders are as below.<br />
8
TRANSPONDER CLONING 6.2<br />
This menu is used for duplicating transponders.<br />
Usage:<br />
Insert customer key to the <strong>Zed</strong>-BULL antenna and highlight choice<br />
2(Clone chip) on main menu and press enter(right arrow).<br />
press “R” button on <strong>Zed</strong>-BULL keypad, transponder details will be displayed<br />
on the screen,<br />
after this step press button “W”. If there is more than 1 choice for the<br />
transponder type to write onto, suitable transponders to write onto will be<br />
displayed on the <strong>Zed</strong>-BULL screen, remove customer key from antenna and<br />
insert suitable transponder. Select the transponder type by pressing the listed<br />
numbers on the display.<br />
After transponder type is selected and enter button is pressed the following<br />
expressions will be seen on <strong>Zed</strong>-BULL screen.<br />
transponder cloning process is completed. If transponder must be cloned<br />
with PC software , “Copy with PC Software” expression is displayed on the<br />
screen. All 4D transponders are cloned to Silca Electronic Heads (EH2)with<br />
<strong>Zed</strong>-BULL 4D client PC software.<br />
Copying 4D transponders is possible only with <strong>Zed</strong>-BULL Client PC<br />
Software.<br />
9
User must connect to server to copy 4D transponders. <strong>Zed</strong>-BULL PC<br />
Software connects to the server and gets neccessary datas to write on to<br />
electronic key. User should choose correct communication port, car<br />
manufacturer, car model and model year, if these informations are not<br />
selected correctly, copy operation will be successfull but in order to reduce<br />
the copying process time, these informations should be selected correctly.<br />
After informations are selected, copy button is pressed, server will give<br />
approximate time for copy process, when user confirm the given time copying<br />
process will start. If user wants to end process before it is completed<br />
“Disconnect” button should be pressed. After server makes the calculation<br />
“write” button is pressed to write the datas to electronic head. Copying<br />
process is completed.<br />
Note:To copy 4D transponders user should use a PC which has internet<br />
connection.<br />
TYPING TRANSPONDER DATA MANUALLY 6.3<br />
If customer transponder data is present, it is possible to type these<br />
datas manually using <strong>Zed</strong>-BULL keypad. This transponder is ready to start the<br />
car.<br />
In main menu highlight choice 3 using up and down arrows and press<br />
enter(right arrow). Type of transponder will be asked to user. Using up and<br />
down arrows choose transponder type that you want to write data. Press<br />
enter(right arrow), using key pad type the datas manually and press<br />
enter(right arrow). Use up and down arrows to choose the type of<br />
transponder that the datas will be written into. Finally press “W” button to<br />
write datas to the transponder.<br />
10
An important point is that the data entered manually, must include valid<br />
information for the 11,12,13 and 4C type transponders. Before writing process<br />
starts, <strong>Zed</strong>-BULL checks the validity of the data and informs the user if the<br />
data is non-valid.<br />
For example:<br />
ID 11 : should have at least 1 “5F” byte in data string.<br />
ID 12 : should have at least 1 “C1” byte in data string.<br />
ID 13 : should have at least “1111 1111 xxxx xxx1” bit string in data string.<br />
ID 4C : Crc calculation must be valid for the data string.<br />
TESTING 6.4<br />
This menu is used for checking whether key has a working transponder<br />
inside or not.<br />
Usage:<br />
Highlight choice 4 using up and down arrows and press enter(right<br />
arrow). When there is transponder inside the key “TRANSPONDER” expression<br />
will be displayed on <strong>Zed</strong>-BULL screen, if there is no transponder inside the key<br />
only “TEST” expression will be displayed on the screen for some seconds and<br />
main menu will be displayed back.<br />
11
SETTINGS 6.5<br />
This menu is used for choosing device language, updating device,<br />
getting device info and loading Pc token.<br />
Usage:<br />
Highlight choice 5 using up and down arrow and press enter(right<br />
arrow), for language selection highlight choice 1 and press enter(right arrow),<br />
language options will be displayed on the screen. Highlight your language<br />
using up and down arrows and press enter(right arrow) selected language<br />
choice is now activated. Use exit button(left arrow) to return back to main<br />
menu.<br />
Updating Firmware: When user wants to update device this choice<br />
should be selected. The loader version and the serial number is displayed on<br />
the screen. Detailed information of firmware update is described in the Pc<br />
software settings sub menu.<br />
Loading Pc Token: Load Pc Token sub menu should be choosed in<br />
settings menu. In main menu highlight 5th choice(settings) using up and<br />
down arrow and press enter(right arrow), highlight choice 4(Load Pc token)<br />
and press enter(right arrow).<br />
The device will give an outcode, user should give this outcode to the<br />
local distributor, Local distributor will give user an in code. User should enter<br />
the in code carefully and correctly. At most 4 times user can enter wrong in<br />
code, for the fifth time if wrong incode is entered system will refresh the<br />
outcode and realting to this, incode will be refreshed, previous in code will<br />
not be used.<br />
OVERVIEW OF PC SOFTWARE 7<br />
<strong>Zed</strong>-BULL PC software is used for EEPROM and MCU applications,<br />
transponder production, Hitag 2 reading and writing, storing customer<br />
information, getting informations about transponders and matching car<br />
models, key-fob programming procedures, distributor contact details.<br />
12
Transponder reading and writing can be both done with or without PC<br />
software.<br />
Software Setup:<br />
Double click on the setup.exe icon and install the software. After<br />
installing software, with the USB cable given, connect <strong>Zed</strong>-BULL to PC using<br />
any of the USB ports. Click on <strong>Zed</strong>-BULL.exe to run the software.<br />
Note: to use the software .NET framework(minimum version 2.0) should be<br />
installed in your PC.<br />
MAIN MENU 7.1<br />
In this menu all settings must be done correctly in order to use the<br />
software. Choose language and com port. To learn which com port you are<br />
using, right click on My Computer, click on properties, click on hardware, click<br />
on device manager, and finally click on the ports choice. The communication<br />
port that you are using will be displayed on that menu.<br />
After choosing correct com port, click on connect button, if connection<br />
fails, an error message will be displayed, if connection is succesfull all buttons<br />
will be active.<br />
In main menu window, normal read write operations are done, when<br />
“READ” button is clicked, the transponder identification is displayed on the<br />
software window.<br />
Writing to transponder is done in 2 steps; first the transponder type to<br />
write onto is choosen later “WRITE” button is clicked.<br />
Transponder informations are added to database after clicking on “ADD<br />
TO LIST” button.<br />
On bottom left side status bar gives information about the existing<br />
process. When process is completed the bar becomes totally blue.<br />
13
EXTENDED FUNCTIONS 7.2<br />
Left side of the window is reserved for EEPROM and MCU applications.<br />
Picture of the immobox and suitable adapter of the IC programmer is<br />
displayed on left bottom side. Details of the selected module is displayed on<br />
the text box just below the selected module. When IC programmer adapter<br />
picture or immobox picture is clicked bigger picture of each is displayed on<br />
another window, the IC that must be removed from board is marked with red<br />
buble. See the pictures below.<br />
The EEPROM or MCU of the selected module is read with IC<br />
Programmer. File with “.bin” extension is selected using open file button from<br />
the exact location of the file in PC hard drive. After choosing the correct file<br />
choose the format correctly, if the output file of the IC programmer is 8 bits<br />
use 8 bit format, if the output file of the IC programmer is 16 bits use 16 bit<br />
format. Choosing wrong format will cause corrupted data and calculated<br />
datas will be wrong. To programme transponder, place the correct<br />
transponder to the <strong>Zed</strong>-BULL antenna and click on button “programme<br />
transponder”<br />
14
EEPROM & MCU APPLICATIONS 7.2.1<br />
The Eeprom & Mcu application list is as below. As long as new solutions<br />
are obtained number of the aaplications will be increased soon, new<br />
applications will be added to software with new updates.<br />
Eeprom & Mcu applications have token system, for each application 1<br />
token is needed.<br />
Car ID Immo box<br />
Pin<br />
code<br />
Transponder for<br />
diagnostic<br />
Opel 40 siemens √ √<br />
Vw, seat 42 Siemens immo 2 √ √<br />
Vw, seat 44 Valeo immo 3 √ √<br />
Fiat, lancia,citroen,<br />
peugeot<br />
13 delphi<br />
Alfa romeo, iveco 33 Bosch code 1 √<br />
Honda, acura 13 megamos √<br />
Honda, rover 33 valeo √<br />
Fiat, lancia 11 Immo 001.01 marelli √<br />
Fiat, lancia 11 Immo 110.01 marelli √<br />
Mercedes sprinter,<br />
vito<br />
Fiat, lancia, alfa<br />
romeo<br />
12 temic<br />
48 magnetti marelli<br />
Vw, skoda, seat 33 Siemens immo 1 √ √<br />
Renault laguna 33 valeo √ √<br />
Renault, dacia 33 sagem √ √<br />
renault 46 Uch siemens √<br />
Fiat, lancia, alfa<br />
romeo<br />
48 delphi<br />
Bmw 33R ews1 √<br />
Bmw 33R ews2 √<br />
Bmw 33R ews3 √<br />
Toyota corolla 98-99 4C toyota √<br />
Toyota corolla 00-02 4C Delson ic900 √<br />
Toyota corolla 4C bosch √<br />
Toyota yaris II 4C toyota √<br />
Toyota corona 4C toyota √<br />
Renault laguna 46 renault √<br />
15<br />
√<br />
√<br />
√<br />
√<br />
Transponder<br />
to start car<br />
√<br />
√
iveco 46 iveco √ √<br />
Renault megane II 46 renault √<br />
Alfa romeo code 2 44 bosch √<br />
mitsubishi 44 bosch √<br />
Volvo 44 Bosch immo 3 √<br />
Peugeot,Citroen 33 Valeo √ √<br />
Mitsubishi Lancer 4C Mitsubishi √<br />
Daihatsu 98-00 4C Daihatsu √<br />
Audi 13 Delphi √<br />
Nissan,Subaru 33 Siemens √<br />
Mercedes Sprinter,<br />
Vito<br />
12 Temic<br />
√<br />
Opel 33 Siemens √<br />
Daihatsu 00-01 4C Daihatsu √<br />
Mercedes Actros,<br />
Atego<br />
13 Temic<br />
√<br />
Suzuki swift 4C suzuki √<br />
Toyota corolla 2000 4C toyota √<br />
Volvo,mitsubishi<br />
carisma<br />
33 bosch<br />
√<br />
Peugeot motorbike 11 marelli √<br />
Renault 46 sagem √<br />
Peugeot 406 45 siemens √ √<br />
Peugeot 206 45 siemens √ √<br />
Peugeot, Fiat, lancia,<br />
Citroen<br />
33 texton<br />
√<br />
Chrysler 64 Skim type 2 √ √<br />
Mazda 323 12 temic √<br />
Suzuki Grand Vitara 4C suzuki √<br />
Fiat, Citroen,<br />
Peugeot<br />
48 delphi<br />
√<br />
√<br />
Alfa Romeo 33 bosch √<br />
Important Notes:<br />
-User must use external IC programmer to read the Eeproms and Mcus.<br />
-The pictures of the IC programmer in <strong>Zed</strong>-<strong>Bull</strong> Pc software is for brand<br />
Omega-Mtrk IC Programmer.<br />
-Omega-Mtrk IC Programmer covers all the applications in the list and we<br />
16
suggest this programmer.But user is free to use any of the IC programmers in<br />
the market.<br />
-According to the features of IC Programmer, all the Eeproms and Mcus might<br />
need to be desoldered from immo board. For most of the IC programmers in<br />
the market Eeproms and Mcus must be desoldered from immo board.<br />
-While desoldering the Eeproms and Mcus, user must be very carefull, since<br />
the pins of the Eeproms and Mcus are thin, they might be broken if not<br />
disoldered slowly and properly.<br />
-When an Eeprom or Mcu is read with IC Programmer, we strongly<br />
recommend user to save a copy of the original Eeprom or Mcu data file.<br />
When a problem occurs while using the file , copy of the original file will be<br />
still holding the needed datas and might be used for recovery.<br />
-The Eeprom or Mcu must be soldered back in the same direction when it is<br />
desoldered.<br />
-While soldering back the Eeprom or Mcu, user must be carefull against<br />
unwanted short circuits between pins.<br />
-While reading motorola Mcus, removing the security of the Mcu is<br />
suggested. If the Mcu is read without removing the security, all the<br />
informations might be deleted for some Mcu types. So user must be carefull<br />
about this detail while reading Mcus.<br />
-Some non-original IC programmers in the market might delete Eeprom and<br />
Mcu datas while reading. Using original IC programmers is suggested.<br />
-While desoldering the Eeprom or Mcu, user must be careful about not<br />
desoldering the neighbour components on the immo board accidentaly.<br />
-For BMW applications, user must be careful about the key number. When<br />
customer wants spare key, the original customer key should be read and the<br />
key number should be noted. In the PC software window proper key number<br />
should be selected.<br />
To make key which directly starts the car for the modules 11,12, and 18 few<br />
additional steps required. The prosedure is as below:<br />
1-Desolder the Eeprom or Mcu from immo board.<br />
2-Read Eeprom or Mcu with external IC Programmer.<br />
3-Save the read file with “.bin” extension with any name and to any location as<br />
you wish.<br />
4-Open the file that you saved, using the <strong>Zed</strong>-<strong>Bull</strong> Pc Software, insert the<br />
suitable transponder to the antenna and click the “programme transponder”<br />
17
utton on <strong>Zed</strong>-BULL Pc Software, precoded transponder is prepared.<br />
5-Do not remove the transponder from antenna, press “Create Image File”<br />
button on Extended Function Menu. Save the file with different name such as<br />
“.....image.bin” in order not to overwrite on to the previous file.<br />
6-Using the IC programmer write the file that you saved to the eeprom or<br />
Mcu of the immo board. The process is completed. The tranponder will start<br />
the car directly.<br />
18
PREPARING TRANSPONDER DATA 7.2.2<br />
Right top side of the main menu window is reserved for preparing data<br />
for 11,12 temic, 13 megamos, 4C texas and 33 renault transponders from<br />
eeprom bytes. This feature is added to the software for professionals. If the<br />
location of bytes that is related with transponder data is known this feature is<br />
used. The eeprom bytes are written and key data is calculated. This calculated<br />
data can be written manually to transponder. Preparing random data, and<br />
unlocking 48 megamos crypto transponder is also available in this sub menu.<br />
HYUNDAI KIA PIN CODE CALCULATION 7.2.3<br />
Right bottom side is reserved for Hyundai-Kia pin code application.<br />
Hyundai and Kia pin code is calculated from last 6 digits of the VIN. For<br />
Hyundai, calculation is not valid for numbers beginning with “0”, for Kia all<br />
numbers are valid.<br />
TRANSPONDER PRODUCTION 7.3<br />
This menu is used for preparing transponders to use with diagnostic<br />
devices. Transponders that can be produced with this menu is listed below;<br />
40 opel, 41 nissan, 42 VAG, 44 Mitsubishi, 44 VAG, 45 Peugeot, 46, 61, 62,65<br />
and 73 Mitsubishi.<br />
“Produce Transponder” button will not be active unless “Check Token”<br />
button is clicked. User should first check whetter there is enough token for<br />
19
this application or not.<br />
When transponder type is selected key number options are displayed<br />
on the same window under transponder type options area. Both transponder<br />
type and key number must be selected before clicking the button “produce<br />
transponder”. Transponders with different key numbers can be programmed<br />
to same car.<br />
Transponder production property has a token system, 1 transponder can<br />
be produced with 1 token, pressing “check token” button will show the<br />
remaining tokens for the application.<br />
On the right side of the window according to the selected transponder<br />
type matching car models are displayed.<br />
HITAG 2 7.4<br />
It is possible to edit latest generation transponder hitag 2 with <strong>Zed</strong>-<br />
BULL Pc software. Pages of hitag 2 transponders can be both read and<br />
written with <strong>Zed</strong>-BULL and <strong>Zed</strong>-BULL PC Software. Software shows<br />
transponder type, transponder mode, frequency mode, transponder pages<br />
and transponder configuration bits to the user and can be edited by the user.<br />
20
TRANSPONDER CATALOGUE 7.5<br />
In transponder catalogue sub menu, user finds usefull informations<br />
about transponders and matching car models. Information about the IC type<br />
in immo box of the car is also given for most of the car models.<br />
KEY-FOB 7.6<br />
Programming key fobs manually is described step by step in this sub<br />
menu. On the left side of the window, car type is selected and on the right<br />
side of the window programming procedures are displayed in a text box.<br />
21
DATABASE 7.7<br />
Unlimited number of customer information can be stored in database<br />
section of the PC software. When a customer whose information exists in the<br />
database comes again, using recorded information, it is possible to make key.<br />
DISTRIBUTORS 7.8<br />
Here user will find contact details of <strong>Zed</strong>-BULL distributors around the<br />
world.<br />
SETTINGS 7.9<br />
In this menu user can load token and update the device. Loading token<br />
will be active soon. User can load token with <strong>Zed</strong>-BULL menu.<br />
Clicking the button “Serial number-version”, user can learn the device<br />
serial number and version of the software.<br />
When user wants to update the device, update file is loaded using<br />
“open file” button and selecting the correct update file for the device and<br />
“Update” button is clicked. Device starts updating it self. The status bar shows<br />
the percentage of the process.<br />
Important note: When user wants to update device for additional applications<br />
such as; Eeprom & Mcu applications or transponder production applications,<br />
uploading ZBC file is required. When user wants to update <strong>Zed</strong>-BULL for new<br />
version; first ZBC file then ZBP file needs to be uploaded to <strong>Zed</strong>-BULL. User<br />
should contact local distributor for ZBC and ZBP files.<br />
Steps for updating <strong>Zed</strong>-BULL:<br />
1-Choose Update Firmware choice in Settings sub menu.<br />
2-The device will be in loader mode. The screen display should be as below.<br />
22
Here user should upload ZBC(<strong>Zed</strong>-BULL Customer) file using pc software<br />
use button to add<br />
ZBC file<br />
3.After uploading ZBC file user may restart the device and end updating or<br />
upload ZBP file if updating to newer version is required.<br />
Device is restarted turning off the power switch.<br />
SUPPORT/CONTACT 7.10<br />
Whenever user has problems or questions this sub menu can be used.<br />
An e-mail will be sent to the manufacturer company directly.<br />
23
QUALITY MANAGEMENT SYSTEM OF ISTANBUL ELEKTRONIK ANAHTAR VE GUVENLIK<br />
SIS. SAN. TIC. LTD. STI. IS REGISTIRED WITH THE STANDARD ISO 9001 : 2000


