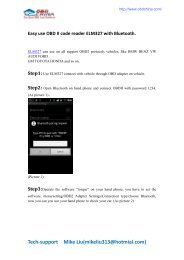
OBD CHINA, The best auto OBD tools supplier
OBD CHINA, The best auto OBD tools supplier
OBD CHINA, The best auto OBD tools supplier

Create successful ePaper yourself
Turn your PDF publications into a flip-book with our unique Google optimized e-Paper software.
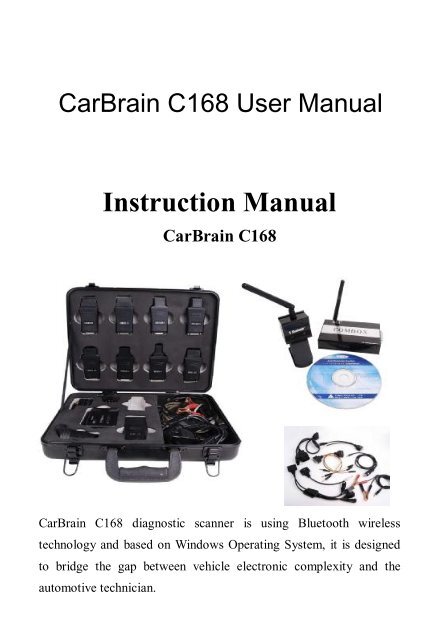
CarBrain C168 User Manual<br />
Instruction Manual<br />
CarBrain C168<br />
CarBrain C168 diagnostic scanner is using Bluetooth wireless<br />
technology and based on Windows Operating System, it is designed<br />
to bridge the gap between vehicle electronic complexity and the<br />
<strong>auto</strong>motive technician.
CarBrain C168 Instruction Manual<br />
1. CarBrain C168 Software<br />
1.1 Software requirement<br />
windows95/98/me/2000/XP,suggest to use windows 2000/XP<br />
1.2 Software part<br />
Software part consists of vehicle failure diagnosis software,<br />
maintenance data and driver procedure of USB converting to RS232.<br />
Automobile failure diagnosis software: all kinds of vehicle types<br />
diagnosis software including tens of thousands of Asian, European<br />
and American <strong>auto</strong>mobile types.<br />
Maintenance data: all kinds of <strong>auto</strong>mobile types mantenance data<br />
including maintenance light reseting to zero etc.<br />
USB to RS232 driver: driver of computer and communication<br />
equipment port.<br />
2
2.1 Hardware requirement<br />
2. CarBrain C168 Hardware<br />
,<br />
‣ One USB port at least<br />
‣ P II or above processor<br />
‣ 64M or above EMS memory<br />
‣ Suggest to use CRT or LCD screen<br />
‣ Suggest to use mobile PC<br />
‣ Resolution is 640*480/800*720/1024*768, suggest to use<br />
800*600/1024*768<br />
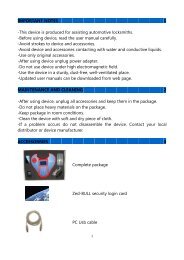
2.2 Hardware accessory<br />
CarBrain C168 Hardware consists of communication equipment、<br />
diagnosis adaptor and several cables.<br />
Communication equipment:<br />
COMBOX<br />
RF-BOX<br />
Diagnosis adaptor:<br />
3
CarBrain C168 Instruction Manual<br />
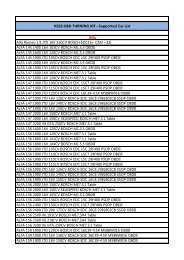
BMW-20<br />
BENZ-38<br />
Chrysler-6<br />
GM-12<br />
KIA-20<br />
CANBUS-II<br />
NISSAN-14<br />
<strong>OBD</strong>II-16<br />
TOYOTA-17F<br />
TOYOTA/MAZDA-17R<br />
4
,<br />
HONDA-3<br />
Cable:<br />
AUDI-4<br />
CITROEN-2<br />
FIAT/SUZUKI/DAIHATSU<br />
MITSUBISHI/HYUNDAI<br />
LIGHT CABLE<br />
UNIVERSAL L-3<br />
UNIVERSAL S-3<br />
5
CarBrain C168 Instruction Manual<br />
USB<br />
Packing:<br />
Plastic box with strong resistance<br />
Installation CD<br />
Note:<br />
<strong>The</strong>re is interior wireless communication module, <strong>auto</strong>mobile port module and<br />
computer port module in the COMBOX.<br />
Main cable is using to connect computer and COMBOX.<br />
Diagnosis extend line is connected to COMBOX and diagnosis socket.<br />
Light cable is using to supply power from <strong>auto</strong>mobile to COMBOX.<br />
Clipper cable is using to supply power from <strong>auto</strong>mobile storage battery to<br />
Wireless signal indicator<br />
COMBOX<br />
Reset button<br />
Power indicator<br />
Main unit jack<br />
Antenna<br />
RF-BOX<br />
6
,<br />
Note:<br />
1. When the power LED is red, then it is under normal condition, whereas<br />
under abnormal condition.<br />
2. <strong>The</strong> blue LED is wireless signal indicator,It shows the signal is stable when<br />
the LED lights constantly and is unstable when the LED lights flickeringly.<br />
3. USB jack connects the main cable to computer.<br />
Antenna<br />
Power indicator<br />
Main unit jack<br />
Power jack<br />
Communication LED<br />
Fixture rotary switch<br />
Diagnosis adaptor<br />
COMBOX<br />
Note:<br />
1. When the power LED is red, then it is under normal condition,whereas under<br />
abnormal condition.<br />
2. Other LEDs are communication indicator, will flicker when communicating<br />
3. USB jack as the wire communication connects the main cable to computer.<br />
4. DB26 socket is diagnosis socket connecting to diagnosis adpator or<br />
diagnostic extend cable.<br />
5. <strong>The</strong> rotary switch is using to connect diagnosis adpator or diagnostic extend<br />
line<br />
Diagnostic extend cable<br />
Note:<br />
Connect one jack of diagnostic extend cable to diagnosis adpator, and the other side<br />
7
to COMBO<br />
CarBrain C168 Instruction Manual<br />
USB cable<br />
Note:<br />
Connect one jack of main cable to computer and the other jack to COMBOX when<br />
it is under wired connection or RF box when it is under wireless connection.<br />
BMW-20 diagnosis adaptor<br />
Note:<br />
Connect one jack of BMW-20 diagnosis adaptor to the <strong>auto</strong>mobile<br />
diagnosis jack, and other jack to the COMBOX or diagnosis extend cable。<br />
8
3. Hardware connection sketch map<br />
,<br />
9
CarBrain C168 Instruction Manual<br />
Note:<br />
1. <strong>The</strong> location of <strong>auto</strong>mobile diagnosis jack is not fixed, some are under the<br />
control board, some are in the engine storehouse, and some are under the cab<br />
seat.<br />
2. Please insert the diagnosis adaptor to the <strong>auto</strong>mobile diagnosis jack directly.<br />
3. You can connect the COMBOX and diagnosis adaptor directly. If the<br />
COMBOX jack can’t be connected with the diagnosis adaptor conveniently,<br />
you can use the diagnostic extend cable to connect.<br />
4. In the above drawing, there are two cables, the end user can select any one to<br />
connect according to the actual situation.<br />
5. Wire communication: You can connect the COMBOX and computer by the<br />
main cable, and the main cable can be connected to the USB jack on the<br />
computer directly, please refer to the above drawing 1.<br />
6. Wireless communication: You can connect the COMBOX and computer by<br />
the RF-BOX, and connect the RF-BOX with the USB jack on the computer by<br />
the main cable, please refer to the above drawing 2.<br />
7. If there is no power supply from the <strong>auto</strong>mobile adaptor, please obtain power<br />
source from the <strong>auto</strong>mobile through the light cable or alligator clip of the<br />
double pliers’ light cable; connect one jack of light cable to the <strong>auto</strong>mobile jack,<br />
and connect other jack to the power jack of COMBOX.<br />
10
4. Install CD introduction<br />
<strong>The</strong>re are <strong>auto</strong>mobile failure diagnosis software, maintenance help documents<br />
and USB to RS232 driver in the CD.<br />
CarBrain_XX.exe......................<strong>auto</strong>mobile failure diagnosis software<br />
CarDocs.exe.............................maintenance help documents<br />
USB to RS232(2.0) Driver..........USB to RS232 driver<br />
Note:<br />
1. If the XX in the CarBrain_XX is SD, it means Carbrain C168’s install<br />
software is simple Chinese version for all vehicles.<br />
2. If the XX in the CarBrain_XX is CN, it means Carbrain C168’s install<br />
software is simple Chinese version for the vehicles made in China.<br />
3. If the XX in the CarBrain_XX is TW, it means Carbrain C168’s install<br />
software is complicated Chinese version for Taiwan user.<br />
4. In the XX in the CarBrain_XX is HK, it means Carbrain C168’s install<br />
software is complicated Chinese version for Hongkong user.<br />
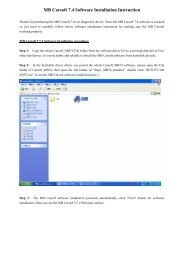
4.1. Install Carbrain C168<br />
4.1.1 Install<br />
‣ Lay the Carbrain C168 install CD in the computer driver<br />
‣ Operate CarBrain_XX file in the disc。<br />
‣ It will show the installation inferface, please refer to the below drawing:<br />
Click the next step button to continue the installation or the cancel button<br />
11
CarBrain C168 Instruction Manual<br />
to quit installation<br />
‣ Click the next step button to show the installation permissive agreement,<br />
refer to the below drawing.<br />
Please read the permissive agreement carefully, if you don’t agree with the<br />
permission agreement, please click the Cancel button to quit installation; if<br />
you agree with the permission agreement, please select “I agree with the<br />
permission agreement” and click the next step to continue the installation.<br />
‣ Click the next step button to show the end user’s information interface,<br />
refer to the below drawing.<br />
Please imput your information and click the Next step button to continue the<br />
installation, or click the Cancel button to quit the installation.<br />
‣ Click the Next step button to show the installation folder interface,refer<br />
to the below drawing.<br />
12
Please imput or select the installation file path, and click the Next step to<br />
continue the installation or click the Cancel button to quit the installation.<br />
‣ Click the Next step button to show the installation shortcut folder<br />
interface, refer to the below drawing;<br />
Click the Next step button to continue the installation or click Cancel<br />
to quit the installation.<br />
‣ Click the Next step to show the ready installation interface, refer to the<br />
below drawing:<br />
13
CarBrain C168 Instruction Manual<br />
Click the Next step button to continue the installation or click Cancel to<br />
quit the installation.<br />
‣ Click the Next step button to show the installation progress interface,<br />
refer to the below drawing:<br />
If want to quit the installation, please click the Cancel button, or please<br />
wait for the successful installation interface, refer to the below drawing:<br />
14
,<br />
Click the Finish button to finish the installation of <strong>auto</strong>mobile failure<br />
diagnosis system, and continue to install the USB to RS232 driver.<br />
Install USB to RS232 driver <strong>auto</strong>matically:<br />
‣ <strong>The</strong> installation procedure will install the USB to RS232 driver<br />
<strong>auto</strong>matically after finishing the installation of <strong>auto</strong>mobile failure<br />
diagnosis software, refer to the below drawing:<br />
OK<br />
‣ Click the Confirm button to install USB to RS232 driver, refer to the<br />
below drawing:<br />
‣ Click Browse button to select the installation path for USB to RS232<br />
driver, and click Cancel button to quit this installation or click Install to<br />
process the USB to RS232 driver.<br />
After a few minutes, the successful installation interface will be showed on<br />
15
screen, refer to the below drawing:<br />
CarBrain C168 Instruction Manual<br />
‣ Click Confirm button to finish the installation of USB to RS232 dirver,<br />
and continue to install the maintenance data.<br />
‣ Installation complete<br />
After finishing the software installation, the below icon will be created in<br />
theWinwdows Desktop.<br />
4.1.2 Registration<br />
C168 software is copyright software; only the user that has been authorized by<br />
our company can use this software. After register, users can use this software<br />
freely and without any limitation. Without our company’s permission and<br />
authorization, please don’t release or diffuse C168 software.<br />
<strong>The</strong> detailed register procedure is blow:<br />
1. Operate C168 software, and system will show the register interface<br />
<strong>auto</strong>matically.<br />
2. Input the equipment code in the equipment code column.<br />
3. Input the register code in the register code column<br />
4. Click the register button to register, and system will show register success of<br />
failure.<br />
After successful register, then have no need to register again when enters into<br />
next time.<br />
Note:<br />
1. <strong>The</strong> equipment code and register code are in the packing box.<br />
2. Please get the register code from our company, and provide the equipment<br />
code and identifier code, it will be displayed when start the software.<br />
3. Please keep your equipment code and register code safely.<br />
4. If you reinstall your system, then you need to register again. (Inputting the<br />
original equipment code and register code is OK)<br />
16
Method 1:<br />
5. Operate Carbrain C168<br />
Click the Start menu of Windows, and select Start → Programs→ CarBrain<br />
→CarBrain, please refer to the below diagram:<br />
,<br />
Method 2:<br />
Click the shortcut Iconon your computer’s desktop directly.<br />
17
CarBrain C168 Instruction Manual<br />
6. Uninstall Carbrain C168<br />
1. Click the Start menu of Windows, and select Start→ Programs→ CarBrain→<br />
Uninstall CarBrain, refer to the below drawing:<br />
2. After selecting Uninstall Carbrain, then the “uninstall Carbrain interface”<br />
will be showed on screen, refer to the below drawing:<br />
Click the Next step button to continue, or click Cancel button to quit uninstall.<br />
18
3. Click the Next step button, the below message will appear on screen.<br />
,<br />
If select Yes, then all the user information、the relative diagnosis records and<br />
system self-learn data will be deleted. If select No, then the above data will<br />
be kept, we suggest you to select No.<br />
4. After selecting Yes or No, then start to uninstall Carbrain file, and the<br />
uninstall progress interface will appear on screen refer to the below drawing:<br />
It may take a few minutes to complete this uninstall, and the successful<br />
uninstall interface will appear on screen, refer to the below drawing:<br />
5. Click Confirm button the finish uninstall<br />
19
CarBrain C168 Instruction Manual<br />
7. Carbrain C168 software upgrade<br />
If you use the upgrade disc provided by our company, please refer to the<br />
Carbrain C168 to install, if you download the upgrade software, please refer to<br />
the below steps to upgrade.<br />
1. Log on our company’s website<br />
2. Register or log on from the member column.(Only the customers have the<br />
member qualification can download the upgrade software)<br />
3. Select upgrade on-line, then select upgrade software.<br />
4. Download the diagnosis installation program (CarBrain_En.exe).<br />
5. Run CarBrain_En.exe program, if you’ve already installed Carbrain C168,<br />
the system will remind you to uninstall Carbrain C168 (refer to Uninstall<br />
Carbrain C168 on page18)firstly, and if not, then the system will remind you to<br />
install Carbrain C168(refer to Install Carbrain C168 on page 10).<br />
6. Thus, the upgrade is completed.<br />
20
,<br />
8. USB TO RS232<br />
Explanation:<br />
Carbrain C168 is using RS232 to communicate with computer. In view of some<br />
notebook don’t have RS232 jack, but almost all the PC and notebook<br />
computers have RS232 jack, so we use USB as the exterior jack, and RS232 as<br />
the interior communication mode. <strong>The</strong>n we need to install a dummy RS232<br />
jack to complete the communication. So we install USB to RS232 driver to<br />
simulate RS232 jack. Consideration of the convenience of USB jack, USB to<br />
RS232 can be connected to the peripheral equipment of the serial port (RS232)<br />
and provide an easy communication environment, the transmitted speed is up to<br />
12Mbps. <strong>The</strong> working theory is that after the installation of USB to RS232, it<br />
will simulate one serial COM port in your computer <strong>auto</strong>matically. For example:<br />
there are two serial ports COM1 & COM2, after the installation of USB to<br />
RS232 driver, then it will simulate one COM3 jack <strong>auto</strong>matically. In general,<br />
the driver will allot the detailed COM number <strong>auto</strong>matically. If there is no<br />
RS232 jack in your computer such as the newer notebook computer, then the<br />
driver will simulate one COM1 port <strong>auto</strong>matically. This simulated COM port is<br />
same as the original COM port in computer for the applied software. If your<br />
applied software can select this simulated COM port, then the communication<br />
to RS232 will be come true.<br />
1. Performance<br />
‣ Communication between(ASIC)USB jack and serial port.<br />
‣ Support Windows 98/ME and Windows 2000/XP<br />
‣ Accord with USB V1.1 and USB V2.0 criterion<br />
‣ USB full speed connection (12Mbps)<br />
‣ No need to get power supply from external cable, just using USB cable<br />
to get.<br />
‣ Standard USB jack (4pin), and have symbol.<br />
21
2. Check<br />
CarBrain C168 Instruction Manual<br />
If want to check the USB to RS232 driver is installed successful or not, you just<br />
need to check whether there is dummy RS232 jack in your computer. Please<br />
follow the below steps to check:<br />
‣ Using main cable to connect the COMBOX or RF-box to your<br />
computer.<br />
‣ Follow the below steps to check whether there is CP2101 USB to Uart<br />
Bridge Controller (COMx): Start→ Setting→ Control panel→<br />
System→<br />
Hardware→ Device Manager→ Ports(COM & LPT)→CP2101 USB to<br />
UART Bridge Controller(COMx). If it exits, then the driver is installed<br />
successfully, if it doesn’t exit, please refer to Step c. If X in COMx is<br />
number such as 1、2、3, then they are corresponding to COM1、COM2<br />
and COM3,etc.<br />
‣ Please check the connection between your computer and COMBOX or<br />
RF-Box is OK or not, if it isn’t fine, please correct it and return to Step<br />
b; if it is OK, then refer to Stepd.<br />
‣ Please check if “Universal Serial Bus controllers” appears “Cygnal<br />
USB Composite Device” or if “other devices” appears “CP2102 USB<br />
to UART Bridge Controller” like diagrams below please refer to<br />
3.Installation.<br />
3. Installation<br />
Here below is the introduction of how to install USB to RS232 driver, taking<br />
Windows2000 as the example:<br />
After connecting COMBOX or RF-Box to computer, please click the right key<br />
on the mouse, and follow the below steps Attribute→Driver→Update driver to<br />
select Update driver, then the guide interface of hardware installation will be<br />
displayed, refer to the below diagram:<br />
22
,<br />
Click the Next step button, then the below drawing will be displayed.<br />
Select “Searching the suitable driver for me”, and click the Next step button,<br />
refer to the below drawing:<br />
23
CarBrain C168 Instruction Manual<br />
Select “Specify a location”, and click the Next step button, refer to the below<br />
drawing:<br />
Select Browse under “Copy manufacture’s file from”, find the directory of your<br />
USB to RS232(2.0) saved. Click “Open” to next step.<br />
Please click the Next step button, then the successful installation.<br />
Thus, USB to RS232 driver is installed completely, after successful installation<br />
of USB to RS232 driver in your computer, it creates one dummy COM port<br />
(CP2101 USB to Bridge Controller ) <strong>auto</strong>matically under COM &<br />
LPT port of equipment manager, and you can find the installed Cygnal USB<br />
Composite Device under “Ports(COM & LPT)”.<br />
24
If the driver is installed unsuccessfully, then it will return to the above 3. Check<br />
step on page22, and please repeat the operation again.<br />
Note:<br />
In order to protect the normal use of serial port, please make sure it is under<br />
closing condition when pull or plug RS232C because RS232C can’t be pulled<br />
and plugged when it is working.<br />
9. Common Question<br />
1. System shows “connect to COMBOX unsuccessfully”<br />
Here below are the reasons of such issue:<br />
‣ Check the hardware connection is OK or not, refer to Hardware<br />
connection on page 9&10.<br />
‣ Check the power led (red) is light or not, refer to COMBOX on page 7.<br />
‣ Check USB to RS232 jack is working normally or not, refer to USB to<br />
RS232 on page 21.<br />
‣ When it is under wireless communication, check the power led (red) and<br />
signal indicator are light or not, refer to RF-Box on page 7.<br />
2. System shows “communicate unsuccessfully”<br />
Here below are the reasons of such issue:<br />
‣ Whether the vehicle installed the computer control system or not.<br />
‣ Whether the ignition switch is open or not.<br />
‣ Whether the diagnosis adaptor is correct or not.<br />
‣ Whether the communication equipment is normal.<br />
‣ When it is under wireless communication, please check the signal<br />
indicator of main unit is light or not, if it is flickering or unlighted, then the<br />
signal is unstable or missing.<br />
‣ Check the voltage of battery in vehicle, whether the voltage is too low.<br />
25