pdf version - The Old Car Manual Project
pdf version - The Old Car Manual Project
pdf version - The Old Car Manual Project

You also want an ePaper? Increase the reach of your titles
YUMPU automatically turns print PDFs into web optimized ePapers that Google loves.
6-6<br />
CHASSIS<br />
SUSPENSION<br />
Positive Caster Angle Negative Caster Angle<br />
C/L of<br />
Knuckle Pin<br />
Vertical<br />
Positive Camber<br />
C/I of Wheel<br />
Front<br />
Knuckle<br />
Pin Angle<br />
Front Wheel Caster<br />
Front Wheel Camber<br />
This position for caster,<br />
camber and knuckle<br />
pin angle<br />
This position for<br />
toe-in and toe-out<br />
on turns<br />
Fig. 6-6<br />
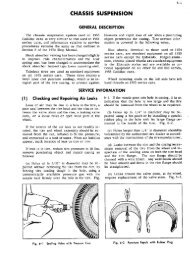
7 Wheel Alignment Measuring<br />
Methods<br />
All wheel alignment equipment manufacturers<br />
provide detailed instructions for checking equip<br />
mdnt accuracy and measurement of alignment<br />
factors that should be followed exactly.<br />
In addition to the manufacturers instructions,<br />
be sure to observe the following general recom<br />
mendations:<br />
1. Check to see that there is no excess weight<br />
in the car.<br />
2. Align the car on the moveable plates of the<br />
alignment machine carefully so that the wheels<br />
are in the center of the plates. In addition, the car<br />
should be square with the plates.<br />
3. Inflate tires to proper pressure.<br />
4. Block both rear wheels, in addition to setting<br />
the hand brake, to prevent any slight movement<br />
of the car.<br />
Run-Out Location<br />
Elements of Front Wheel Alignment<br />
5. Raise the front end and check the runout on<br />
the outer surface of the tire. Mark the spot where<br />
maximum runout occurs.<br />
6. Place the maximum runout either to the front<br />
or rear as shown in Fig. 6-6. This neutralizes<br />
the effect of runout on caster or camber. Lower<br />
the wheels.<br />
7. Normalize the position of front spring by<br />
working the bumper up and down to get normal<br />
height of front spring.<br />
8. Caster and camber may now be checked.<br />
9. Raise front wheels and set maximum runout<br />
at top or bottom to neutralize effect on toe-in and<br />
toe-out. Fig. 6-6.<br />
10. Lower car, normalize springs and check<br />
toe-in.<br />
11. If any of the measurements are beyond the<br />
recommended limits, make the necessary adjust<br />
ments as outlined in Notes 8, 9, and 10.