Lacrimal dilation and syringing - Optometry Today
Lacrimal dilation and syringing - Optometry Today
Lacrimal dilation and syringing - Optometry Today

Create successful ePaper yourself
Turn your PDF publications into a flip-book with our unique Google optimized e-Paper software.
<strong>Lacrimal</strong> <strong>dilation</strong> <strong>and</strong> <strong>syringing</strong><br />
b) Slit lamp examination<br />
Inspect the puncta for poor<br />
position, narrowing or blockage<br />
- pouting suggests canaliculitis.<br />
A high marginal tear strip may<br />
indicate epiphora. If fluorescein<br />
is instilled in the conjunctival<br />
sac, it should disappear within<br />
two minutes - retention<br />
suggests there is a problem with<br />
lacrimal drainage.<br />
c) Irrigation<br />
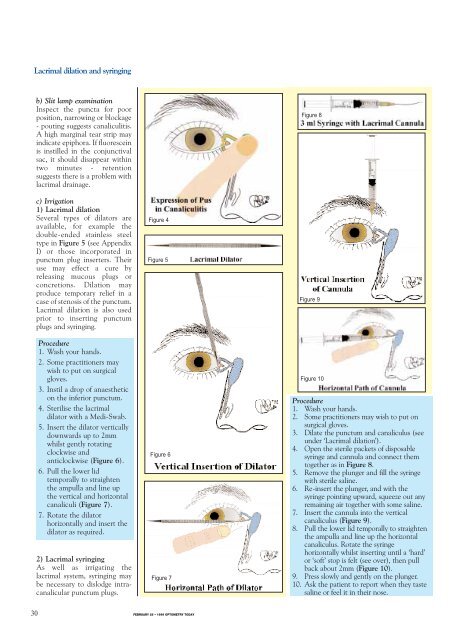
1) <strong>Lacrimal</strong> <strong>dilation</strong><br />
Several types of dilators are<br />
available, for example the<br />
double-ended stainless steel<br />
type in Figure 5 (see Appendix<br />
I) or those incorporated in<br />
punctum plug inserters. Their<br />
use may effect a cure by<br />
releasing mucous plugs or<br />
concretions. Dilation may<br />
produce temporary relief in a<br />
case of stenosis of the punctum.<br />
<strong>Lacrimal</strong> <strong>dilation</strong> is also used<br />
prior to inserting punctum<br />
plugs <strong>and</strong> <strong>syringing</strong>.<br />
Procedure<br />
1. Wash your h<strong>and</strong>s.<br />
2. Some practitioners may<br />
wish to put on surgical<br />
gloves.<br />
3. Instil a drop of anaesthetic<br />
on the inferior punctum.<br />
4. Sterilise the lacrimal<br />
dilator with a Medi-Swab.<br />
5. Insert the dilator vertically<br />
downwards up to 2mm<br />
whilst gently rotating<br />
clockwise <strong>and</strong><br />
anticlockwise (Figure 6).<br />
6. Pull the lower lid<br />
temporally to straighten<br />
the ampulla <strong>and</strong> line up<br />
the vertical <strong>and</strong> horizontal<br />
canaliculi (Figure 7).<br />
7. Rotate the dilator<br />
horizontally <strong>and</strong> insert the<br />
dilator as required.<br />
2) <strong>Lacrimal</strong> <strong>syringing</strong><br />
As well as irrigating the<br />
lacrimal system, <strong>syringing</strong> may<br />
be necessary to dislodge intracanalicular<br />
punctum plugs.<br />
Figure 4<br />
Figure 5<br />
Figure 6<br />
Figure 7<br />
Figure 8<br />
Figure 9<br />
Figure 10<br />
Procedure<br />
1. Wash your h<strong>and</strong>s.<br />
2. Some practitioners may wish to put on<br />
surgical gloves.<br />
3. Dilate the punctum <strong>and</strong> canaliculus (see<br />
under ‘<strong>Lacrimal</strong> <strong>dilation</strong>’).<br />
4. Open the sterile packets of disposable<br />
syringe <strong>and</strong> cannula <strong>and</strong> connect them<br />
together as in Figure 8.<br />
5. Remove the plunger <strong>and</strong> fill the syringe<br />
with sterile saline.<br />
6. Re-insert the plunger, <strong>and</strong> with the<br />
syringe pointing upward, squeeze out any<br />
remaining air together with some saline.<br />
7. Insert the cannula into the vertical<br />
canaliculus (Figure 9).<br />
8. Pull the lower lid temporally to straighten<br />
the ampulla <strong>and</strong> line up the horizontal<br />
canaliculus. Rotate the syringe<br />
horizontally whilst inserting until a ‘hard’<br />
or ‘soft’ stop is felt (see over), then pull<br />
back about 2mm (Figure 10).<br />
9. Press slowly <strong>and</strong> gently on the plunger.<br />
10. Ask the patient to report when they taste<br />
saline or feel it in their nose.<br />
30<br />
FEBRUARY 26 • 1999 OPTOMETRY TODAY