AUTO BAKERY - Palsonic
AUTO BAKERY - Palsonic
AUTO BAKERY - Palsonic

Create successful ePaper yourself
Turn your PDF publications into a flip-book with our unique Google optimized e-Paper software.
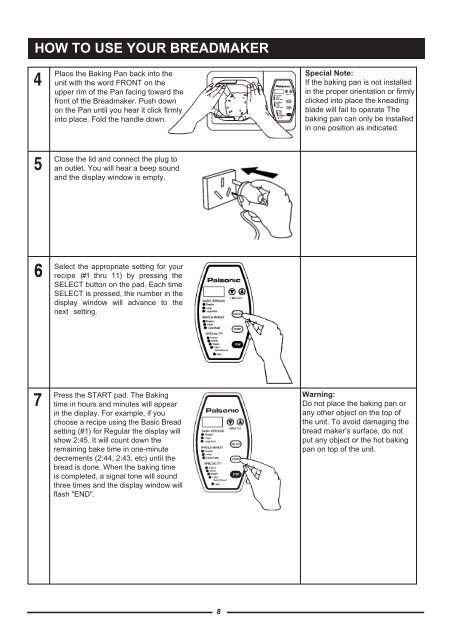
HOW TO USE YOUR BREADMAKER<br />
4<br />
Place the Baking Pan back into the<br />
unit with the word FRONT on the<br />
upper rim of the Pan facing toward the<br />
front of the Breadmaker. Push down<br />
on the Pan until you hear it click firmly<br />
into place. Fold the handle down.<br />
Special Note:<br />
If the baking pan is not installed<br />
in the proper orientation or firmly<br />
clicked into place the kneading<br />
blade will fail to operate The<br />
baking pan can only be installed<br />
in one position as indicated.<br />
5<br />
Close the lid and connect the plug to<br />
an outlet. You will hear a beep sound<br />
and the display window is empty.<br />
6<br />
Select the appropriate setting for your<br />
recipe (#1 thru 11) by pressing the<br />
SELECT button on the pad. Each time<br />
SELECT is pressed, the number in the<br />
display window will advance to the<br />
next setting.<br />
7<br />
Press the START pad. The Baking<br />
time in hours and minutes will appear<br />
in the display. For example, if you<br />
choose a recipe using the Basic Bread<br />
setting (#1) for Regular the display will<br />
show 2:45. It will count down the<br />
remaining bake time in one-minute<br />
decrements (2:44, 2:43, etc) until the<br />
bread is done. When the baking time<br />
is completed, a signal tone will sound<br />
three times and the display window will<br />
flash "END".<br />
Warning:<br />
Do not place the baking pan or<br />
any other object on the top of<br />
the unit. To avoid damaging the<br />
bread maker’s surface, do not<br />
put any object or the hot baking<br />
pan on top of the unit.<br />
8