Xerox DocuColor 250 (DC250 style)⦠- The Parts Drop
Xerox DocuColor 250 (DC250 style)⦠- The Parts Drop
Xerox DocuColor 250 (DC250 style)⦠- The Parts Drop

You also want an ePaper? Increase the reach of your titles
YUMPU automatically turns print PDFs into web optimized ePapers that Google loves.
A Service Excellence Publication.<br />
www.partsdrop.com<br />
<strong>Xerox</strong> <strong>DocuColor</strong> <strong>250</strong> (DC<strong>250</strong> <strong>style</strong>)…<br />
Black Drum Cartridge Reconditioning<br />
(13R602)<br />
<strong>Xerox</strong> Docucolor 240, <strong>250</strong>, 242, 252, 260,<br />
WorkCentre 7655, 7665, 7675<br />
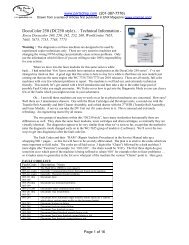
<strong>The</strong> <strong>Xerox</strong> <strong>DocuColor</strong> (DC) <strong>250</strong> <strong>style</strong> machines are doing good out there and the<br />
supply items are in need of attention… <strong>The</strong>y have 4 Drum Cartridges. One is for the black<br />
color (113R602) which sits in the “R1” position, and then they have 3 of the 113R603 drum<br />
cartridges in the machine (one for cyan, magenta and yellow in “R2”, “R3”, & “R4”<br />
respectively). This instructional deals with the black drum cartridge.<br />
Like many of the other parts in this machine, the drums are accessed by pulling out a<br />
maintenance drawer (the drum ctgs are in the top drawer). <strong>The</strong> black drum cartridge has two<br />
finger-pull rings (one at the front and one near the rear end) so it is removed by sliding out the<br />
drum maintenance drawer and then lifting the cartridge out.<br />
<strong>The</strong>se cartridges are sold under the part number 13R602. When you buy one it comes<br />
with the Charge Corotron on top… that corotron is also spared by itself under the part number<br />
13R604. Apparently the corotron has a shorter lifespan than the drum cartridge itself. <strong>The</strong><br />
drum cartridge is equipped with a CRUM (customer replaceable unit monitor) which uses the<br />
relatively new RF (Radio Frequency) type of Chip. <strong>The</strong> machine reads and writes to the RF<br />
CRUM to keep track of the drum cartridge’s copy count. Replacing the CRUM (our part#:<br />
DC<strong>250</strong>CNB) will reset the drum count and allow you to get a full yield out of the cartridge.<br />
Interestingly, the Charge Corotron also has its own little board (this one has two contacts… not<br />
an RF type of chip). <strong>The</strong> little board on the corotron has a tiny component on it… probably a<br />
fuse but it could also be an indexing resistor since its shape doesn’t give it away.<br />
<strong>The</strong> Charge Corotron has a clever little self-cleaning apparatus on it. A cleaning pad on<br />
a little carriage rides across the corotron cleaning the top of the charge grid… it’s driven by an<br />
auger which gets its drive from a motor on the<br />
machine side. <strong>The</strong> Charge Corotron is easily<br />
separated from the rest of the drum cartridge by<br />
simply sliding it forward about a quarter of inch<br />
and then lifting it up and off.<br />
<strong>The</strong> cartridge is pretty straight forward<br />
and comes apart easily for cleaning and replacing<br />
components. <strong>The</strong> drum cleaning is done by a<br />
rather typical looking Cleaning Blade and a<br />
cleaning brush as well as a typical mylar<br />
recovery blade opposite the Cleaning Blade.<br />
<strong>The</strong>re’s a waste toner auger along side the<br />
cleaning brush which takes the waste toner away<br />
through a spring-loaded sliding shutter at the rear<br />
end of the cartridge.<br />
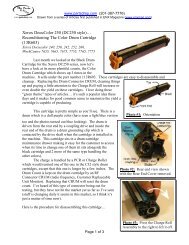
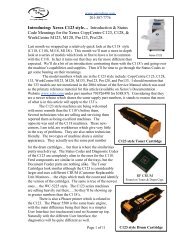
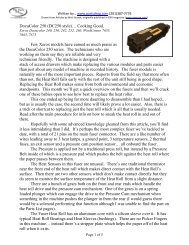
Photo #1: Orientation<br />
Page 1 of 2
A Service Excellence Publication.<br />
www.partsdrop.com<br />
Drum drive is from the rear end of the cartridge… a coupling type of gear. <strong>The</strong> drum<br />
ground is made from the machine’s drive shaft which makes contact with a ground clip inside<br />
the drum cylinder at the drive end of the drum.<br />
PROCEDURE:<br />
Have a look at Photo #1 which shows the<br />
orientation of the cartridge as I’ll refer to it in the<br />
procedure which follows.<br />
1.- <strong>The</strong> Charge Corotron Assembly comes off<br />
by sliding it forward about ¼ inch, and then<br />
lifting it up & off.<br />
2.- Remove the front end cover (1 phillips head<br />
screw). On the front end cover you’ll find a pair<br />
of static grounding clips. <strong>The</strong> front Finger Pull<br />
falls off in your hand. Behind the cover you’ll<br />
also find a pair of ‘D-Shaft’ gears which transfer drive from<br />
the Cleaning Brush to the Waste Toner Auger. Mind the<br />
gears because they will now fall right off.<br />
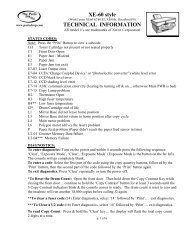
3.- Remove the Rear End Cover (1 phillips head screw).<br />
(see Photo #2) <strong>The</strong> RF Connector CRUM (customer<br />
replaceable unit monitor) is located behind this cover (it’ll<br />
fall off of the cover at this point easily enough). You will<br />
need to replace this RF CRUM to reset the Black Drum<br />
Count. <strong>The</strong> rear Finger Pull is now loose, so take it off. <strong>The</strong><br />
Cleaning Brush Drive Gear can also be easily removed at<br />
this point.<br />
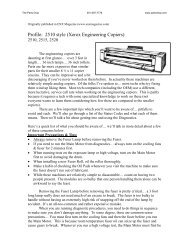
Photo #2: Rear View<br />
Photo #3: Rear Drum Bearing<br />
Retaining Clip<br />
4.- Turn the unit on its “left side” so that the drum is facing<br />
upward. Now remove the Rear Drum Bearing Retaining<br />
Clip which slides directly out the back (see Photo #3) and the<br />
Front Drum Bearing Retaining Clip (slides out the front in a<br />
similar fashion). <strong>The</strong>n lift the Drum up and out of the<br />
cartridge.<br />
5.- <strong>The</strong> Drum Cleaning Blade can be removed (2 phillipshead<br />
screws). You will need to either peel off or cut the “R1”<br />
sticker as well as the barcode sticker because both stickers are<br />
on the blade’s bracket and the plastic frame.<br />
Photo #4: Drum & Blade<br />
6.- Clean everything up nicely & reassemble… Use a toner dust cloth and a vacuum with a<br />
toner-rated filter… be particularly gentle around the cleaning brush and the mylar recovery<br />
blade which are easily damaged. Slide forward the spring-loaded waste toner “Cleaning Auger<br />
Shutter” to get to the toner in the end of the waste auger (refer again to Photo #2)<br />
Page 2 of 2