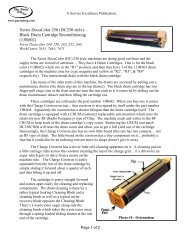
DC265 style Xerographic Module - The Parts Drop
DC265 style Xerographic Module - The Parts Drop
DC265 style Xerographic Module - The Parts Drop

You also want an ePaper? Increase the reach of your titles
YUMPU automatically turns print PDFs into web optimized ePapers that Google loves.
from: <strong>The</strong> <strong>Parts</strong> <strong>Drop</strong><br />
201-387-7776<br />
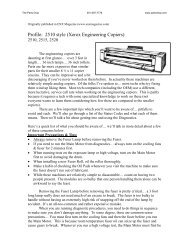
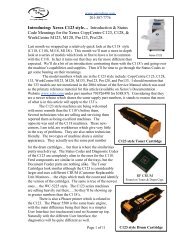
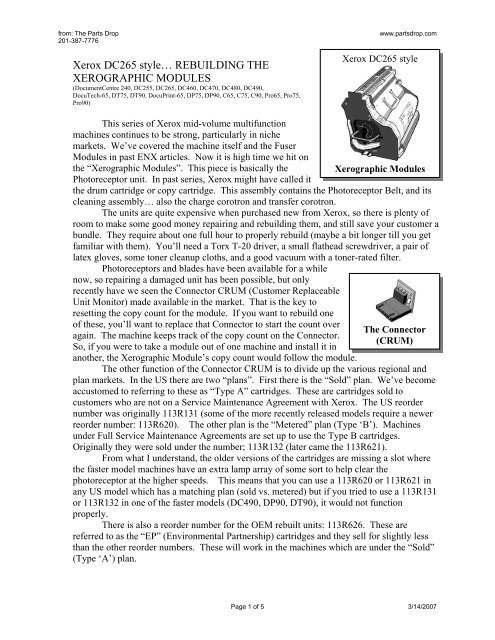
Xerox <strong>DC265</strong> <strong>style</strong>… REBUILDING THE<br />
XEROGRAPHIC MODULES<br />
(DocumentCentre 240, DC255, <strong>DC265</strong>, DC460, DC470, DC480, DC490,<br />
DocuTech-65, DT75, DT90, DocuPrint-65, DP75, DP90, C65, C75, C90, Pro65, Pro75,<br />
Pro90)<br />
www.partsdrop.com<br />
Xerox <strong>DC265</strong> <strong>style</strong><br />
This series of Xerox mid-volume multifunction<br />
machines continues to be strong, particularly in niche<br />
markets. We’ve covered the machine itself and the Fuser<br />
<strong>Module</strong>s in past ENX articles. Now it is high time we hit on<br />
the “<strong>Xerographic</strong> <strong>Module</strong>s”. This piece is basically the <strong>Xerographic</strong> <strong>Module</strong>s<br />
Photoreceptor unit. In past series, Xerox might have called it<br />
the drum cartridge or copy cartridge. This assembly contains the Photoreceptor Belt, and its<br />
cleaning assembly… also the charge corotron and transfer corotron.<br />
<strong>The</strong> units are quite expensive when purchased new from Xerox, so there is plenty of<br />
room to make some good money repairing and rebuilding them, and still save your customer a<br />
bundle. <strong>The</strong>y require about one full hour to properly rebuild (maybe a bit longer till you get<br />
familiar with them). You’ll need a Torx T-20 driver, a small flathead screwdriver, a pair of<br />
latex gloves, some toner cleanup cloths, and a good vacuum with a toner-rated filter.<br />
Photoreceptors and blades have been available for a while<br />
now, so repairing a damaged unit has been possible, but only<br />
recently have we seen the Connector CRUM (Customer Replaceable<br />
Unit Monitor) made available in the market. That is the key to<br />
resetting the copy count for the module. If you want to rebuild one<br />
of these, you’ll want to replace that Connector to start the count over<br />
again. <strong>The</strong> machine keeps track of the copy count on the Connector.<br />
So, if you were to take a module out of one machine and install it in<br />
another, the <strong>Xerographic</strong> <strong>Module</strong>’s copy count would follow the module.<br />
<strong>The</strong> Connector<br />
(CRUM)<br />
<strong>The</strong> other function of the Connector CRUM is to divide up the various regional and<br />
plan markets. In the US there are two “plans”. First there is the “Sold” plan. We’ve become<br />
accustomed to referring to these as “Type A” cartridges. <strong>The</strong>se are cartridges sold to<br />
customers who are not on a Service Maintenance Agreement with Xerox. <strong>The</strong> US reorder<br />
number was originally 113R131 (some of the more recently released models require a newer<br />
reorder number: 113R620). <strong>The</strong> other plan is the “Metered” plan (Type ‘B’). Machines<br />
under Full Service Maintenance Agreements are set up to use the Type B cartridges.<br />
Originally they were sold under the number; 113R132 (later came the 113R621).<br />
From what I understand, the older versions of the cartridges are missing a slot where<br />
the faster model machines have an extra lamp array of some sort to help clear the<br />
photoreceptor at the higher speeds. This means that you can use a 113R620 or 113R621 in<br />
any US model which has a matching plan (sold vs. metered) but if you tried to use a 113R131<br />
or 113R132 in one of the faster models (DC490, DP90, DT90), it would not function<br />
properly.<br />
<strong>The</strong>re is also a reorder number for the OEM rebuilt units: 113R626. <strong>The</strong>se are<br />
referred to as the “EP” (Environmental Partnership) cartridges and they sell for slightly less<br />
than the other reorder numbers. <strong>The</strong>se will work in the machines which are under the “Sold”<br />
(Type ‘A’) plan.<br />
Page 1 of 5 3/14/2007
from: <strong>The</strong> <strong>Parts</strong> <strong>Drop</strong><br />
201-387-7776<br />
www.partsdrop.com<br />
<strong>The</strong>re are similar pairs of cartridge types for the overseas markets. Europe has its<br />
own, as does Latin America. Here’s a chart of the different reorder numbers and where they<br />
fit into the scheme of things:<br />
Reorder # Models Region – Market<br />
113R131 All except DC490 / DP90 / DT90 US – Sold (Type ‘A’)<br />
113R132 All except DC490 / DP90 / DT90 US – Metered (Type ‘B’)<br />
113R133 All except DC490 / DP90 / DT90 Europe (XE) – Sold<br />
113R134 All except DC490 / DP90 / DT90 Europe (XE) – Metered (FSMA)<br />
113R174 All except DC490 / DP90 / DT90 Latin America (ACO) – Sold<br />
113R175 All except DC490 / DP90 / DT90 Latin America (ACO) – FSMA<br />
113R620 All Models US – Sold (Type ‘A’)<br />
113R621 All Models US – Metered (FSMA)<br />
113R622 All Models Europe (XE) – Sold<br />
113R623 All Models Europe (XE) – Metered (FSMA)<br />
113R624 All Models Latin America (ACO) – Sold<br />
113R625 All Models Latin America (ACO) – Metered (FSMA)<br />
113R626 All Models<br />
US – Sold (EP : “Environmental<br />
Partnership”… OEM rebuilt)<br />
To rebuild one of these cartridges is somewhat time consuming, however with the<br />
proper procedure, it gets a lot easier. My first stab at taking one apart was at least two years<br />
ago. Since I didn’t have the Connectors available yet, I didn’t get too far into it, before I<br />
decided to procrastinate for a while (till now actually). I was very fortunate and thankful that<br />
a DVD called “Lakes CRU Rebuild” was given to me by a good friend. It turned out to be my<br />
sort of tutorial. Nothing fancy… very well explained. <strong>The</strong> fellow on the DVD has an easy<br />
going, matter-of-fact way of talking. He is obviously very comfortable with the procedure<br />
and it’s unscripted which is kind of refreshing. <strong>The</strong> DVD gave me a leg-up on the process<br />
and probably saved me from destroying the first cartridge in the process of learning how to<br />
properly take it apart.<br />
This is also a rather messy procedure… make sure you prepare a good work space<br />
accordingly. Toner will spill out of the dust filter vacuum ducts right from the onset (the<br />
ducts start on the left side of the cartridge and travel through the front end cover).<br />
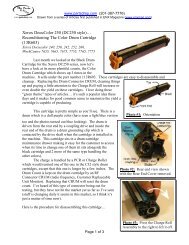
You’ll start by removing the Front End Cover. This is held on by 4 screws (Torx T20<br />
heads) (see the little white arrows on Photo 1). With the screws removed, you need to<br />
shimmy the cover and jiggle it a bit till it comes off towards the front. Pay attention to the<br />
Photo 1 – Front View<br />
Photo 2 – Front Cover (inside)<br />
Page 2 of 5 3/14/2007
from: <strong>The</strong> <strong>Parts</strong> <strong>Drop</strong><br />
201-387-7776<br />
www.partsdrop.com<br />
way the corona cleaning knob pokes through the front cover and also how the cleaning<br />
assembly cam tensioner on the front cover mates with the cam on the cartridge (see Photo 2).<br />
Next remove the dust filter & its container from the right side of the cartridge. It is<br />
easily released by simply flexing the rear frame of the cartridge where it forms a collar around<br />
the round part of the dust container. <strong>The</strong>n it can be pivoted out and removed (see Photo 3).<br />
Vacuum the filter out carefully and thoroughly.<br />
Photo 3 – Dust Filter Container<br />
Removal (release collar at the rear end)<br />
Photo 4 – Toner Waste Sump Removal<br />
(jiggle and pull down)<br />
<strong>The</strong> Toner Waste Sump is next. It is a large container on the lower right side of the<br />
cartridge. You will jiggle it and pull it down till it clears the chute above it (see Photo 4). Be<br />
prepared for a big mess here… toner will spill out of the Cleaning Assembly Chute which<br />
feeds the waste container.<br />
Now go to the other side and remove first the Front-Left Photoreceptor Guide Clip by<br />
compressing the top anchor and pushing it through, then gently pivot the guide clip inward till<br />
the lower “L” shaped anchor can be extracted (see Photo 5). <strong>The</strong>n you can remove the Left<br />
Side Cover by removing 6 T-20 screws. If you are planning on preserving the used<br />
photoreceptor belt, be particularly careful not to kink the belt (it is still held by the left-rear<br />
guide clip, so it<br />
would be easy to get<br />
it hung up when<br />
removing the left<br />
cover). <strong>The</strong> yellow<br />
“U” shaped on the<br />
top rear of the<br />
cartridge will now<br />
fall right off, so grab<br />
it and put it aside<br />
(that piece helps the<br />
customer line the<br />
cartridge up properly<br />
during installation).<br />
Now the<br />
Charge Corotron is<br />
Photo 5 –Left Side Cover Removal (Remove the front-left<br />
photoreceptor guide clip first)<br />
Page 3 of 5 3/14/2007
from: <strong>The</strong> <strong>Parts</strong> <strong>Drop</strong><br />
201-387-7776<br />
www.partsdrop.com<br />
holding on by only its two mounting position pins and the metal contact terminal on the rear<br />
end. (Take notice of how the terminal is connected to the unit so it will be clear to you where<br />
it goes during reassembly). Remove the Transfer / Detack Corotron’s Rear Photoreceptor<br />
Belt Guide Clip by compressing one anchor and swinging it down and off. (See Photo 6).<br />
Take the Transfer assembly off and lay it aside for now.<br />
Photo 6 – Rear view of the Transfer<br />
Corotron Assembly…<br />
Photo 7 – Front retaining clip removal…<br />
Next go to the front of the cartridge and remove another Photoreceptor guide Clip<br />
from the front of the Cleaning Assembly (compress an anchor and extract the clip… see Photo<br />
7). At this point, the photoreceptor belt is retained by only one more Guide Clip (at the rear<br />
of the Cleaning Assembly), so it can easily be removed. If you plan on reusing the belt, make<br />
sure to put it in a black bag to protect it from light-shock.<br />
Remove the Charge Corotron Assembly by sliding it forward till it clears its rear metal<br />
retaining flat-spring and the pair of ground clips behind the center of the corona assembly.<br />
When handling the Corotron Assemblies, wear latex gloves or otherwise avoid touching the<br />
corona wires, teeth, contacts, and particularly the charge grid. <strong>The</strong>se items can cause some<br />
serious copy quality problems if you get oils from your finger or dirt on them. Clean both<br />
Corotron Assemblies thoroughly. For the charge Grid, use only a water-dampened lintless<br />
cloth to clean the grid’s face gently. Don’t use solvents or alchohol because they will destroy<br />
the grid’s fragile coating. <strong>The</strong> grid can be safely released from its anchors by pressing in on a<br />
white, spring loaded piece at the front end of the corona assembly.<br />
Now at long last, we come to the Cleaning Assembly and most significantly to the<br />
Cleaning Blade. While working in the Cleaning Assembly, be gentle and respectful to the<br />
seal blade and other soft gasket or sponge pieces so as not to damage anything. First remove<br />
the discharge lamp’s seal blade from above the cleaning brush (release 3 clips from the right<br />
outside of the cartridge). Release the spring at the front end which tensions the blade retract<br />
cam. Remove one screw near the front end of the cleaning assembly. Now the Cleaning<br />
Brush is loose and can be removed for a thorough but gentle vacuuming. <strong>The</strong> Cleaning Blade<br />
is bolted onto a mounting bar which has the cam for the blade retract mechanism at the front<br />
end. <strong>The</strong> Blade Assembly can be removed at this point. <strong>The</strong>re are two little nuts which hold<br />
the blade to its mounting bar. <strong>The</strong> aftermarket blades which we have seen so far, come<br />
without the mylar baffle attached to them. You’ll want to peel off the old mylar baffle<br />
Page 4 of 5 3/14/2007
from: <strong>The</strong> <strong>Parts</strong> <strong>Drop</strong><br />
201-387-7776<br />
www.partsdrop.com<br />
piece… clean it<br />
thoroughly with<br />
alcohol, and readhere<br />
it to the new<br />
cleaning blade using<br />
some industrial<br />
strength doublesided<br />
tape. Note that<br />
the edge of the baffle<br />
lines up with the<br />
first bend in the<br />
metal of the blade<br />
(see Photo 8). You Photo 8 – Cleaning Blade Assembly… (Reuse your old mylar<br />
will need to gently baffle on the new blade)<br />
flex the lower Seal<br />
Blade down a bit when reinstalling<br />
the Cleaning Blade Assembly… Be<br />
gentle and patient and it’ll all go<br />
back together and seat right with a<br />
little finesse.<br />
Now you can clean<br />
everything up nicely and replace the<br />
Connector CRUM (it is mounted on<br />
the back of the Main Connector on<br />
the rear of the cartridge body… see<br />
Photo 9). With the new Connector,<br />
the machine should show the<br />
<strong>Xerographic</strong> <strong>Module</strong> counter as<br />
being reset, and it should get up<br />
running. Just make sure you get the<br />
right Connector CRU to match the<br />
market which your machine is set-up<br />
for.<br />
That does it for this one<br />
folks! As the <strong>Xerographic</strong> <strong>Module</strong>s<br />
become increasingly scarce, this one<br />
is bound to be something worth<br />
tackling.<br />
Photo 8 – Cleaning Blade Assembly… (Reuse<br />
your old mylar baffle on the new blade)<br />
Britt works for <strong>The</strong> <strong>Parts</strong> <strong>Drop</strong>, a company whose primary business is providing parts,<br />
supplies and information for Xerox brand copiers, printers and fax machines. You can find<br />
more information, including many of Britt’s past ENX articles on their website,<br />
www.partsdrop.com. If you’d like to read more about Xerox brand office equipment, there’s<br />
also a complete listing of past articles under contributing writers on the ENX website<br />
(www.ENXMAG.com).<br />
Page 5 of 5 3/14/2007