Frigodrink Service manual - Ugolini
Frigodrink Service manual - Ugolini
Frigodrink Service manual - Ugolini

You also want an ePaper? Increase the reach of your titles
YUMPU automatically turns print PDFs into web optimized ePapers that Google loves.
ARCTIC COMPACT & DELUXE<br />
5. 2 OPERATION HELPFUL HINTS<br />
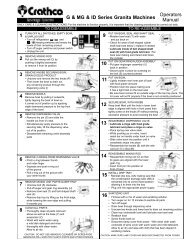
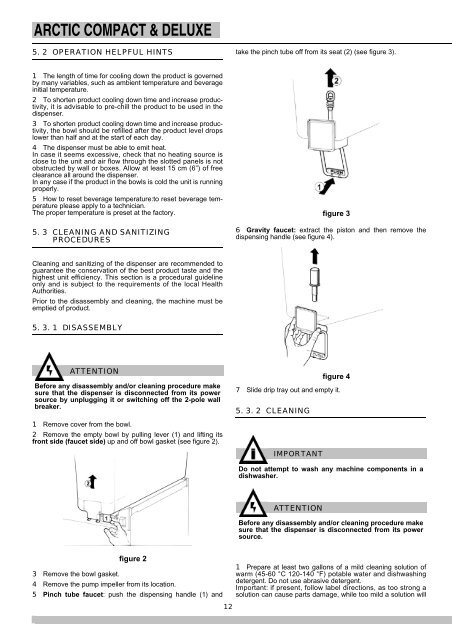
take the pinch tube off from its seat (2) (see figure 3).<br />
1 The length of time for cooling down the product is governed<br />
by many variables, such as ambient temperature and beverage<br />
initial temperature.<br />
2 To shorten product cooling down time and increase productivity,<br />
it is advisable to pre-chill the product to be used in the<br />
dispenser.<br />
3 To shorten product cooling down time and increase productivity,<br />
the bowl should be refilled after the product level drops<br />
lower than half and at the start of each day.<br />
4 The dispenser must be able to emit heat.<br />
In case it seems excessive, check that no heating source is<br />
close to the unit and air flow through the slotted panels is not<br />
obstructed by wall or boxes. Allow at least 15 cm (6”) of free<br />
clearance all around the dispenser.<br />
In any case if the product in the bowls is cold the unit is running<br />
properly.<br />
5 How to reset beverage temperature:to reset beverage temperature<br />
please apply to a technician.<br />
The proper temperature is preset at the factory.<br />
5. 3 CLEANING AND SANITIZING<br />
PROCEDURES<br />
figure 3<br />
6 Gravity faucet: extract the piston and then remove the<br />
dispensing handle (see figure 4).<br />
Cleaning and sanitizing of the dispenser are recommended to<br />
guarantee the conservation of the best product taste and the<br />
highest unit efficiency. This section is a procedural guideline<br />
only and is subject to the requirements of the local Health<br />
Authorities.<br />
Prior to the disassembly and cleaning, the machine must be<br />
emptied of product.<br />
5. 3. 1 DISASSEMBLY<br />
ATTENTION<br />
Before any disassembly and/or cleaning procedure make<br />
sure that the dispenser is disconnected from its power<br />
source by unplugging it or switching off the 2-pole wall<br />
breaker.<br />
1 Remove cover from the bowl.<br />
2 Remove the empty bowl by pulling lever (1) and lifting its<br />
front side (faucet side) up and off bowl gasket (see figure 2).<br />
figure 4<br />
7 Slide drip tray out and empty it.<br />
5. 3. 2 CLEANING<br />
IMPORTANT<br />
Do not attempt to wash any machine components in a<br />
dishwasher.<br />
ATTENTION<br />
Before any disassembly and/or cleaning procedure make<br />
sure that the dispenser is disconnected from its power<br />
source.<br />
figure 2<br />
3 Remove the bowl gasket.<br />
4 Remove the pump impeller from its location.<br />
5 Pinch tube faucet: push the dispensing handle (1) and<br />
12<br />
1 Prepare at least two gallons of a mild cleaning solution of<br />
warm (45-60 °C 120-140 °F) potable water and dishwashing<br />
detergent. Do not use abrasive detergent.<br />
Important: if present, follow label directions, as too strong a<br />
solution can cause parts damage, while too mild a solution will