Frigodrink Service manual - Ugolini
Frigodrink Service manual - Ugolini
Frigodrink Service manual - Ugolini

You also want an ePaper? Increase the reach of your titles
YUMPU automatically turns print PDFs into web optimized ePapers that Google loves.
not provide adequate cleaning.<br />
its gasket (see figure 6).<br />
IMPORTANT<br />
In order to prevent any damages to the dispenser, use<br />
only a detergent suitable with plastic parts.<br />
2 Using a brush, suitable for the purpose, thoroughly clean all<br />
disassembled parts in the cleaning solution.<br />
ATTENTION<br />
When cleaning the machine, do not allow excessive<br />
amounts of water around the electrically operated components<br />
of the unit. Electrical shock or damage to the<br />
machine may result.<br />
figure 6<br />
4 Fit the bowl gasket to the evaporator. Note: the larger brim<br />
of the gasket must face against the drip plate (see figure 7).<br />
3 Do not immerse the lighted top covers in liquid. Wash them<br />
apart with the cleaning solution. Carefully clean their undersides.<br />
4 In the same manner clean the evaporator plate(s) using a<br />
soft bristle brush.<br />
5 Rinse all cleaned parts with cool clean water.<br />
5. 3. 3 SANITIZING<br />
Sanitizing should be performed immediately prior to<br />
starting the machine. Do not allow the unit to sit for<br />
extended periods of time after sanitization.<br />
1 Wash hands with a suitable antibacterial soap.<br />
2 Prepare at least two gallons of a warm (45-60 °C 120-<br />
140 °F) sanitizing solution (100 PPM available chlorine concentration<br />
or 1 spoon of sodium hypoclorite diluted with two litres of<br />
water) according to your local Health Codes and manufacturer’s<br />
specifications.<br />
3 Place the parts in the sanitizing solution for five minutes.<br />
4 Do not immerse the lighted top covers in liquid. Carefully<br />
wash their undersides with the sanitizing solution.<br />
5 Place the sanitized parts on a clean dry surface to air dry.<br />
6 Wipe clean all exterior surfaces of the unit. Do not use abrasive<br />
cleaner.<br />
5. 3. 4 ASSEMBLY<br />
1 Slide the drip tray into place.<br />
2 Pinch tube faucet: push the dispensing handle (1) and<br />
insert the pinch tube into its vertical seat in the bowl bottom(2).<br />
Lightly pull the pinch tube end downwards til it is well arranged<br />
(3) (see figure 5).<br />
figure 5<br />
3 Gravity faucet: install the faucet handle and the piston with<br />
13<br />
figure 7<br />
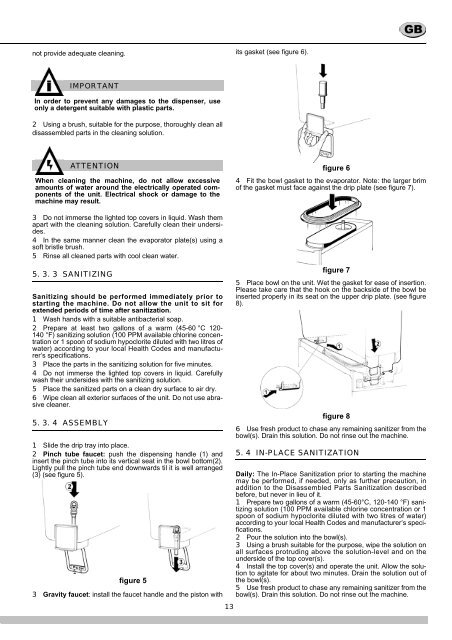
5 Place bowl on the unit. Wet the gasket for ease of insertion.<br />
Please take care that the hook on the backside of the bowl be<br />
inserted properly in its seat on the upper drip plate. (see figure<br />
8).<br />
figure 8<br />
6 Use fresh product to chase any remaining sanitizer from the<br />
bowl(s). Drain this solution. Do not rinse out the machine.<br />
5. 4 IN-PLACE SANITIZATION<br />
Daily: The In-Place Sanitization prior to starting the machine<br />
may be performed, if needed, only as further precaution, in<br />
addition to the Disassembled Parts Sanitization described<br />
before, but never in lieu of it.<br />
1 Prepare two gallons of a warm (45-60°C, 120-140 °F) sanitizing<br />
solution (100 PPM available chlorine concentration or 1<br />
spoon of sodium hypoclorite diluted with two litres of water)<br />
according to your local Health Codes and manufacturer’s specifications.<br />
2 Pour the solution into the bowl(s).<br />
3 Using a brush suitable for the purpose, wipe the solution on<br />
all surfaces protruding above the solution-level and on the<br />
underside of the top cover(s).<br />
4 Install the top cover(s) and operate the unit. Allow the solution<br />
to agitate for about two minutes. Drain the solution out of<br />
the bowl(s).<br />
5 Use fresh product to chase any remaining sanitizer from the<br />
bowl(s). Drain this solution. Do not rinse out the machine.