Instructions for Use, Manual JURA IMPRESSA Z5 - Esperanza
Instructions for Use, Manual JURA IMPRESSA Z5 - Esperanza
Instructions for Use, Manual JURA IMPRESSA Z5 - Esperanza

You also want an ePaper? Increase the reach of your titles
YUMPU automatically turns print PDFs into web optimized ePapers that Google loves.
The <strong>IMPRESSA</strong> <strong>Z5</strong> – Generation II <strong>Manual</strong><br />
The ‘<strong>IMPRESSA</strong> <strong>Manual</strong>’ has been awarded the seal of<br />
approval by the independent German Technical Inspection<br />
Agency, TÜV SÜD, due to its easy-to-understand style, its<br />
thoroughness and coverage of safety aspects.
Table of contents<br />
Your <strong>IMPRESSA</strong> <strong>Z5</strong><br />
IMPORTANT SAFEGUARDS 4<br />
Control elements and accessories 8<br />
Proper use 10<br />
For your safety 10<br />
The <strong>IMPRESSA</strong> <strong>Z5</strong> <strong>Manual</strong> 13<br />
Model variants ..............................................................................................................................................14<br />
Symbol description ......................................................................................................................................14<br />
Welcome to the world of <strong>IMPRESSA</strong>! 15<br />
1 <strong>IMPRESSA</strong> <strong>Z5</strong> – ‘Two at once’ 16<br />
<strong>JURA</strong> on the Internet ....................................................................................................................................17<br />
2 Preparing and using <strong>for</strong> the first time 18<br />
Supplied as standard ...................................................................................................................................18<br />
Setting up ......................................................................................................................................................18<br />
Filling the water tank ...................................................................................................................................18<br />
Filling the bean container ...........................................................................................................................19<br />
First-time use ................................................................................................................................................19<br />
Using and activating filter ..........................................................................................................................21<br />
Assessing and setting water hardness ....................................................................................................22<br />
Adjusting grinder ........................................................................................................................................ 23<br />
Switching on ................................................................................................................................................24<br />
Switching off (Standby) ..............................................................................................................................25<br />
3 Familiarising yourself with the control options 26<br />
Preparation at the touch of a button .......................................................................................................26<br />
One-off setting be<strong>for</strong>e and during preparation .....................................................................................27<br />
Entering a permanent setting <strong>for</strong> the amount of water <strong>for</strong> a cup size..............................................28<br />
Permanent settings in programming mode ..........................................................................................29<br />
View in<strong>for</strong>mation and care status ............................................................................................................ 32<br />
4 Recipes 34<br />
5 Preparation at the touch of a button 40<br />
Barista tips ....................................................................................................................................................40<br />
Ristretto .........................................................................................................................................................41<br />
Espresso ........................................................................................................................................................42<br />
Coffee ............................................................................................................................................................42<br />
Special coffee ...............................................................................................................................................42<br />
Cappuccino...................................................................................................................................................42<br />
Latte macchiato ...........................................................................................................................................43<br />
2
Table of contents<br />
Pre-ground coffee .......................................................................................................................................45<br />
Hot milk ........................................................................................................................................................46<br />
Hot water .....................................................................................................................................................46<br />
6 Permanent settings in Programming mode 48<br />
Products ........................................................................................................................................................48<br />
Energy-save mode .......................................................................................................................................51<br />
Time and weekday ......................................................................................................................................52<br />
Programmable Switch-on time ................................................................................................................53<br />
Automatic switch-off ..................................................................................................................................54<br />
Rinses ............................................................................................................................................................55<br />
Unit amount of water/time <strong>for</strong>mat ..........................................................................................................56<br />
Logo ...............................................................................................................................................................57<br />
Language ......................................................................................................................................................58<br />
Rename .........................................................................................................................................................58<br />
7 Maintenance 60<br />
Maintenance tips .........................................................................................................................................60<br />
Rinse machine..............................................................................................................................................60<br />
Changing the filter .......................................................................................................................................61<br />
Clean machine .............................................................................................................................................63<br />
Descale machine .........................................................................................................................................65<br />
Rinsing the cappuccino nozzle .................................................................................................................68<br />
Cleaning the cappuccino nozzle ...............................................................................................................68<br />
Dismantling and rinsing the cappuccino nozzle ...................................................................................70<br />
Removing <strong>for</strong>eign objects .........................................................................................................................70<br />
Cleaning the bean container .....................................................................................................................70<br />
Descaling the water tank ............................................................................................................................71<br />
8 CLARIS plus filter cartridge – Water <strong>for</strong> perfect coffee 73<br />
9 ‘The milk makes the difference’ 81<br />
10 Accessories and Service 82<br />
11 Display messages 91<br />
12 Troubleshooting 94<br />
13 Transport and environmentally neutral disposal 96<br />
Transport / Empty system .........................................................................................................................96<br />
Disposal .........................................................................................................................................................96<br />
14 Technical data 97<br />
15 Key technologies and products 100<br />
16 <strong>JURA</strong> contact details 105<br />
Index 110<br />
3
Important Safeguards<br />
IMPORTANT SAFEGUARDS<br />
These safeguards apply <strong>for</strong> machines with UL safety test (see rating<br />
plate and chapter 14, ‘Technical data’).<br />
Follow the basic safety<br />
precautions<br />
When using electrical appliances, basic safety precautions should<br />
always be followed, to reduce the risk of fire, electric shock, and/or<br />
injury to persons, including the following:<br />
Z<br />
Z<br />
Z<br />
Z<br />
Z<br />
Z<br />
Z<br />
Z<br />
Z<br />
Z<br />
Z<br />
Z<br />
Z<br />
Z<br />
Read all instructions.<br />
Do not touch hot surfaces. <strong>Use</strong> handles or knobs.<br />
To protect against fire, electric shock and injury to persons, do<br />
not immerse cord, plugs, or body of machine in water or other<br />
liquid.<br />
Close supervision is necessary when any appliance is used by<br />
or near children.<br />
Unplug from outlet when not in use and be<strong>for</strong>e cleaning.<br />
Allow to cool be<strong>for</strong>e putting or taking off parts, and be<strong>for</strong>e<br />
cleaning the appliance.<br />
Do not operate any appliance with a damaged cord or plug or<br />
after the appliance malfunctions, or has been damaged in any<br />
manner. Return appliance to the nearest authorized service<br />
facility <strong>for</strong> examination, repair or adjustment.<br />
The use of accessory attachement not recommended by the<br />
appliance manufacturer may result in fire, electric shock, or<br />
injury to persons.<br />
Do not use outdoors.<br />
Do not let the cord hang over the edge of a table or counter,<br />
or touch hot surfaces.<br />
Do not place on or near a hot gas or electric burner, or in a<br />
heated oven.<br />
Always attach plug to appliance first, then plug cord into the<br />
wall outlet. To disconnect, turn any control to ‘OFF’ then<br />
remove plug from wall outlet.<br />
Do not use appliance <strong>for</strong> other than intented use.<br />
<strong>Use</strong> extreme caution when dispensing hot steam.<br />
For household use only.<br />
SAVE THESE INSTRUCTIONS<br />
4
Important Safeguards<br />
Special cord set instructions<br />
a. A short power supply cord is provided to reduce the risk<br />
resulting from becoming entangled in or tripping over a long<br />
cord.<br />
Your <strong>IMPRESSA</strong> has a 3-pin grounded plug.<br />
b. Longer extension cords are available and may be used if care<br />
is exercised in their use.<br />
c. If an extension cord is used,<br />
1. the marked electrical rating of the extension cord should be<br />
at least as great as the electrical rating of the appliance,<br />
and<br />
2. if the appliance is of the grounded type, the extension<br />
courd should be a grounding type 3-wire cord, and<br />
3. the longer cord shall be arranged so that it will not drape<br />
over the counter top or tabletop where it can be pulled on<br />
by children of tripped over.<br />
Z<br />
Z<br />
Z<br />
As a safety feature, this plug will fit in a polarized outlet only<br />
one way.<br />
If the plug does not fit fully in the outlet, reverse the plug. If it<br />
still does not fit, contact a qualified electrician.<br />
Do not modify the plug in any way or attempt to defeat this<br />
safety feature.<br />
Warning<br />
To reduce the risk of fire or electric shock, do not remove any service<br />
covers. No user serviceable parts inside. Repair should be done by<br />
authorized personnel only.<br />
Caution<br />
This appliance is <strong>for</strong> household use. Any servicing other than cleaning<br />
and user maintenance should be per<strong>for</strong>med by an authorized<br />
service representative:<br />
Z<br />
Z<br />
Z<br />
Z<br />
Do not immerse base in water or try to disassemble.<br />
To reduce the risk of fire or electric shock, do not remove the<br />
base. No user serviceable parts inside. Repair should be done<br />
by authorized service personnel only.<br />
Check voltage to be sure that the voltage indicated on the<br />
name plate agreees with your voltage.<br />
Never use warm or hot water to fill the water container! <strong>Use</strong><br />
cold water only.<br />
5
Important Safeguards<br />
Z<br />
Z<br />
Keep your hands and the cord away from hot parts of the<br />
appliance during operation.<br />
Never clean with scouring powders or hard implements.<br />
NEVER DO<br />
(or you will void your<br />
warranty protection):<br />
Z<br />
Z<br />
Z<br />
Z<br />
Never fill instant coffee, chocolate mix etc. into the grinder or<br />
ground coffee funnel (grunder by-pass). It will damage the<br />
functioning of the brewing chamber.<br />
Never fill sugar coated coffee beans into the bean hopper. In<br />
case of doubt, call your dealer.<br />
Never fill anything other than coffee beans into the bean container<br />
(no chocolate, no rice, no nuts, no spices, nothing other<br />
than roasted coffee beans).<br />
Never do anything with the machine which is not described in<br />
the <strong>Use</strong>r‘s <strong>Manual</strong>. In case of doubt, call your dealer.<br />
6
Important Safeguards<br />
7
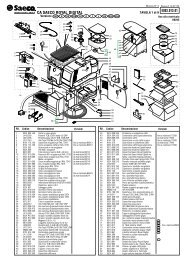
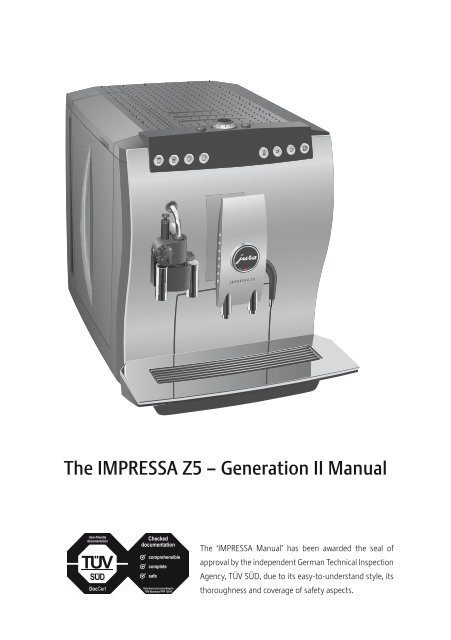
Control elements and accessories<br />
Control elements and accessories<br />
1<br />
2<br />
9<br />
10<br />
3<br />
11<br />
4<br />
12<br />
5<br />
13<br />
6<br />
7<br />
8<br />
14<br />
Figure: <strong>IMPRESSA</strong> <strong>Z5</strong> – Generation II Alu<br />
1 Bean container cover<br />
2 Water tank cover<br />
3 Water tank<br />
4 Power switch and power cable (side)<br />
5 One Touch Cappuccino nozzle, long spout<br />
6 One Touch Cappuccino nozzle, short<br />
spout<br />
7 Coffee grounds container<br />
8 Drip tray<br />
9 Grinding wheel<br />
10 Bean container with aroma preservation<br />
cover<br />
11 Filler funnel <strong>for</strong> pre-ground coffee<br />
12 Height-adjustable coffee spout<br />
13 Hot water spout<br />
14 Cup plat<strong>for</strong>m<br />
8
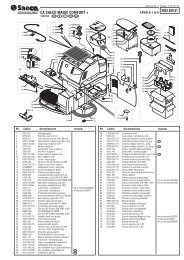
Control elements and accessories<br />
1<br />
2 3<br />
4 5 6 7<br />
8<br />
9 10 11 12<br />
Top of the machine<br />
1 Q On/off button<br />
2 f Rotary Switch<br />
3 c Maintenance button<br />
Front<br />
4 z Milk button<br />
5 q Latte macchiato button<br />
6 p Cappuccino button<br />
7 e Special Coffee button<br />
8 Display<br />
9 m Hot water button<br />
10 u Ristretto button<br />
11 i Espresso button<br />
12 o Coffee button<br />
9
Important in<strong>for</strong>mation<br />
Proper use<br />
The machine has been designed and built <strong>for</strong> domestic use. It should<br />
only be used to prepare coffee and to heat milk and water. <strong>Use</strong> <strong>for</strong><br />
any other purpose will be deemed improper. <strong>JURA</strong> cannot accept<br />
any responsibility <strong>for</strong> the consequences of improper use.<br />
Keep this manual close to the <strong>IMPRESSA</strong> and, if appropriate, pass it<br />
on to the next user.<br />
For your safety<br />
Please read and note carefully the following important safety in<strong>for</strong>mation.<br />
By doing this, you can avoid the life-threatening danger of electric<br />
shock:<br />
Z Never use a machine which has been damaged or with a<br />
defective power cable.<br />
Z For in<strong>for</strong>mation on what to do in case of damage, <strong>for</strong> example<br />
if there is a smell of burning, unplug the machine immedi ately<br />
from the mains supply and contact the <strong>JURA</strong> service centre.<br />
Z If the power cable <strong>for</strong> this machine is damaged, it must be<br />
repaired either directly by <strong>JURA</strong> or by a <strong>JURA</strong> approved service<br />
centre.<br />
Z Make sure that the <strong>IMPRESSA</strong> and the power cable are not<br />
located close to hot surfaces.<br />
Z Be careful to ensure that the power cable does not get caught<br />
and does not rub against sharp edges.<br />
Z Never open and repair the machine yourself. Do not modify<br />
the machine in any way that is not described in the <strong>IMPRESSA</strong><br />
<strong>Manual</strong>. The machine contains live parts. If opened, there is a<br />
danger of serious injury. Repairs may only be carried out by<br />
<strong>JURA</strong> approved service centres, using original spare parts and<br />
accessories.<br />
There is a risk of scalds or burns on the spouts or in the nozzle:<br />
Z<br />
Z<br />
Place the machine out of the reach of children.<br />
Do not touch any hot parts. <strong>Use</strong> the handles provided.<br />
10
Important in<strong>for</strong>mation<br />
Z<br />
Be careful to ensure that the appropriate nozzle is installed<br />
and clean. The nozzle or parts of the nozzle might come off if<br />
the parts are not assembled correctly or a blockage occurs.<br />
A defective machine is not safe and could cause injury or fire. To<br />
avoid damage and any associated risk of injury or fire:<br />
Z<br />
Z<br />
Z<br />
Z<br />
Z<br />
Z<br />
Z<br />
Z<br />
Z<br />
Z<br />
Never allow the power cable to loosely hang down. The power<br />
cable can be tripped over or damaged.<br />
Protect your <strong>IMPRESSA</strong> from environmental influences such<br />
as rain, frost and direct sunlight.<br />
Do not put the <strong>IMPRESSA</strong>, cable or connections in water.<br />
Do not put the <strong>IMPRESSA</strong> or any individual parts in the dishwasher.<br />
Turn your <strong>IMPRESSA</strong> off at the power switch be<strong>for</strong>e starting<br />
any cleaning operation. Always wipe your <strong>IMPRESSA</strong> with a<br />
damp cloth rather than a wet one, and protect it from prolonged<br />
water splash.<br />
Only connect the machine to a power supply in accordance<br />
with the technical data (see rating plate and Chapter 14,<br />
‘Technical data’).<br />
<strong>Use</strong> only original <strong>JURA</strong> care products. <strong>Use</strong> of accessories that<br />
are not explicitly recommended by <strong>JURA</strong> could damage the<br />
<strong>IMPRESSA</strong>.<br />
Do not use any coffee beans treated with additives or caramelised<br />
coffee beans.<br />
Always fill the water tank with cold, fresh mains water.<br />
If you will be absent <strong>for</strong> an extended period, turn the machine<br />
off and unplug.<br />
Risk to children and persons with limited capabilities in operating<br />
machines:<br />
Z The machine is not designed to be operated by children and<br />
persons with limited capabilities.<br />
Z The machine may only be used by persons who are able to<br />
operate the machine safely.<br />
11
Important in<strong>for</strong>mation<br />
Safe handling of the CLARIS plus filter cartridges:<br />
Z CLARIS plus filter cartridges should be kept out of the reach of<br />
children.<br />
Z Store them dry in the sealed package.<br />
Z Protect them from heat and direct sunlight.<br />
Z Do NOT use damaged CLARIS plus filter cartridges.<br />
Z Do NOT open CLARIS filter cartridges.<br />
12
The <strong>IMPRESSA</strong> <strong>Z5</strong> <strong>Manual</strong><br />
The <strong>IMPRESSA</strong> <strong>Z5</strong> <strong>Manual</strong><br />
You are holding the manual <strong>for</strong> your <strong>IMPRESSA</strong> <strong>Z5</strong> in your hand. It<br />
will help you to familiarize yourself with your <strong>IMPRESSA</strong> safely and<br />
quickly and teach you the full range of facilities it offers.<br />
Chapter 2, ‘Preparing and using your <strong>IMPRESSA</strong> <strong>for</strong> the first time’,<br />
explains step-by-step how to set up and prepare the <strong>IMPRESSA</strong>.<br />
Chapter 3, ‘Familiarising yourself with the control options’ is important<br />
<strong>for</strong> you to read as you are familiarising yourself with your<br />
<strong>IMPRESSA</strong>. It invites you to actively explore all the different coffee<br />
experiences that it offers.<br />
As coffee and coffee specialities are very important to <strong>JURA</strong>, we have<br />
compiled a selection of tasty suggestions <strong>for</strong> you in Chapter 4,<br />
‘Recipes’.<br />
All the other chapters are intended to help you when you have a<br />
specific query.<br />
If you use the <strong>IMPRESSA</strong> <strong>Z5</strong> <strong>Manual</strong>, you will become a master at<br />
preparing exciting coffee specialities, you will be a Barista!<br />
13
Model variants<br />
The <strong>IMPRESSA</strong> <strong>Z5</strong> – Generation II <strong>Manual</strong> covers all Z series <strong>IMPRESSA</strong>models.<br />
Symbol description<br />
Warnings<br />
CAUTION<br />
CAUTION<br />
Always take note of any in<strong>for</strong>mation marked<br />
with the CAUTION or WARNING symbol. The<br />
signal word WARNING points out potential risk<br />
of serious injury, and the signal word CAUTION<br />
potential risk of slight injury.<br />
The CAUTION symbol is used to draw attention<br />
to circumstances which could cause the<br />
machine to become damaged.<br />
Symbols used<br />
E<br />
@<br />
T<br />
In<strong>for</strong>mation and tips to make things easier <strong>for</strong><br />
you as you use your <strong>IMPRESSA</strong>.<br />
References to the online <strong>JURA</strong> website, where<br />
you can find interesting further in<strong>for</strong>mation:<br />
www.jura.com<br />
Prompt to take action. This symbol means that<br />
you are being prompted to per<strong>for</strong>m some<br />
action.<br />
14
Welcome to the world of <strong>IMPRESSA</strong>!<br />
Welcome to the world of <strong>IMPRESSA</strong>!<br />
Dear customer,<br />
We thank you <strong>for</strong> the trust that you have placed in us by purchasing<br />
a <strong>JURA</strong> <strong>IMPRESSA</strong> coffee machine. The machines, which are produced<br />
in Switzerland, have already impressed independent, critical<br />
testers of goods and design award juries. We will do everything we<br />
can to ensure that this fully automated, genuine 2-cup Espresso and<br />
coffee machine continues to deliver perfect coffee specialities at the<br />
press of a button to your family and your guests <strong>for</strong> years to come.<br />
The <strong>IMPRESSA</strong> <strong>Manual</strong> will teach you everything you need to know<br />
on the subject of operating and tailoring your <strong>IMPRESSA</strong> to your<br />
particular preferences. Other subjects covered include how to solve<br />
the problem of scale build-up and important tips on care. Our primary<br />
concern is to stimulate your imagination with attractive coffee<br />
recipes and to invite you to put the wealth of possibilities offered by<br />
the <strong>JURA</strong> fully automated machine to use on a daily basis.<br />
We wish you many stimulating and enjoyable moments with your<br />
<strong>IMPRESSA</strong>.<br />
Yours sincerely,<br />
Emanuel Probst<br />
General Manager<br />
15
1 <strong>IMPRESSA</strong> <strong>Z5</strong> – ‘Two at once’<br />
1 <strong>IMPRESSA</strong> <strong>Z5</strong> – ‘Two at once’<br />
Coffee that fulfils your<br />
wildest dreams<br />
Coffee specialities are extremely popular. An increasing number of<br />
perfect hosts treat themselves, friends and families to a wide range<br />
of coffee specialities in the com<strong>for</strong>t of their own homes. Milk is a<br />
very important ingredient of a perfect cup of coffee, both foamed<br />
and heated, as cappuccino, latte macchiato, and caffè latte, also<br />
enhanced with different flavours, are now firm favourites on the<br />
almost inexhaustible and varied list of coffee recipes alongside<br />
alongside the classic ristretto, espresso and café crème.<br />
<strong>JURA</strong> has now developed the second generation of the revolutionary<br />
<strong>IMPRESSA</strong> Z line to satisfy the high demands of the growing community<br />
of speciality gourmets.<br />
Z<br />
Z<br />
Z<br />
One Touch Cappuccino nozzle : The machines of the <strong>IMPRESSA</strong><br />
Z line, which are in the truest sense fully- automatic coffee speciality<br />
machines, can prepare two treats <strong>for</strong> the eye and palate<br />
at the touch of a button with the One Touch cappuccino nozzle.<br />
‘Two at once’ – the quickest, most direct and simple way<br />
to delve into the world of coffee and to revel in all its variety.<br />
Rotary Switch – Intuitive operation : You can ‘navigate’ reliably<br />
through all operating and programming steps by simply<br />
turning and pressing the switch. The in<strong>for</strong>mation on the plain<br />
text and graphic display is in full view at all times. The focus is<br />
fully on your own personal taste. Simply select the coffee<br />
strength, amount of water and temperature according to your<br />
individual preferences.<br />
Stainless steel vacuum milk container : Your fully-automatic<br />
coffee machine is equipped as standard with a vacuum milk<br />
container which keeps the milk cool all day due to its clever<br />
design.<br />
16
1 <strong>IMPRESSA</strong> <strong>Z5</strong> – ‘Two at once’<br />
Z<br />
Active bean monitoring: The <strong>IMPRESSA</strong> <strong>Z5</strong> banishes the<br />
sound of empty rotating coffee grinders and half-full cups<br />
once and <strong>for</strong> all. It always shows you when the coffee beans<br />
need replenishing in good time. The filling level of the bean<br />
container is continuously monitored optically.<br />
<strong>JURA</strong> on the Internet<br />
Visit us on the Internet.<br />
@<br />
At www.jura.com you will find interesting and up-to-date<br />
in<strong>for</strong>mation on your <strong>IMPRESSA</strong> and on every aspect of<br />
coffee.<br />
Knowledge Builder<br />
You can familiarize yourself with your <strong>IMPRESSA</strong> <strong>Z5</strong> in a fun way on<br />
the PC.<br />
@<br />
The Knowledge Builder awaits you at www.jura.com. The<br />
interactive assistant, LEO, will assist you and explain the<br />
benefits of the <strong>IMPRESSA</strong> and how to use it.<br />
17
2 Preparing and using your <strong>IMPRESSA</strong> <strong>for</strong> the first time<br />
2 Preparing and using <strong>for</strong> the first time<br />
This chapter provides you with the in<strong>for</strong>mation you need to use your<br />
<strong>IMPRESSA</strong> without any problems. You will prepare your <strong>IMPRESSA</strong><br />
step-by-step <strong>for</strong> your first coffee experience.<br />
Supplied as standard<br />
The following items are supplied as standard:<br />
Z<br />
Z<br />
Z<br />
Z<br />
Z<br />
Z<br />
Your <strong>JURA</strong> <strong>IMPRESSA</strong> fully automatic coffee machine<br />
Stainless steel vacuum milk container<br />
Milk pipe<br />
The Welcome Pack, which includes:<br />
U The <strong>IMPRESSA</strong> <strong>Z5</strong> – Generation II <strong>Manual</strong><br />
U <strong>IMPRESSA</strong> <strong>Z5</strong> – Generation II: Quick Reference Guide<br />
U CLARIS plus filter cartridge (2x)<br />
U Filter cartridge extension<br />
U Grinder key<br />
U Measuring spoon <strong>for</strong> pre-ground coffee<br />
U <strong>JURA</strong> cleaning tablets<br />
U Aquadur® test strips<br />
<strong>JURA</strong> Auto-Cappuccino Cleaner<br />
<strong>JURA</strong>world of Coffee gift<br />
Keep the packaging of your <strong>IMPRESSA</strong>. It should be used to protect<br />
the machine during transportation.<br />
Setting up<br />
Filling the water tank<br />
When setting up your <strong>IMPRESSA</strong>, please note the following:<br />
Z Set the <strong>IMPRESSA</strong> down on a horizontal surface that is not<br />
sensitive to water.<br />
Z Choose a spot <strong>for</strong> your <strong>IMPRESSA</strong> which is protected against<br />
overheating.<br />
To enjoy perfect coffee we recommend changing the the water<br />
every day.<br />
E<br />
Only use fresh, cold water to refill the water tank and never<br />
milk, mineral water or other liquids.<br />
18
2 Preparing and using your <strong>IMPRESSA</strong> <strong>for</strong> the first time<br />
T Remove the water tank and rinse it with cold water.<br />
T Fill the water tank with fresh, cold mains water and<br />
reinsert.<br />
Filling the bean<br />
container<br />
CAUTION<br />
The bean container has an aroma preservation cover. This will ensure<br />
that your coffee beans retain their aroma <strong>for</strong> longer.<br />
Coffee beans which have been treated with additives (e.g. sugar),<br />
pre-ground or freeze-dried coffee will damage the grinder.<br />
T Only use untreated coffee beans to refill the bean container.<br />
T Open the cover of the bean container and remove the aroma<br />
preservation cover.<br />
T Remove any dirt or <strong>for</strong>eign objects inside the bean container.<br />
T New machines contain an in<strong>for</strong>mation sheet in the bean<br />
container. Remove this in<strong>for</strong>mation sheet.<br />
T Fill the bean container with coffee beans, then close the<br />
aroma preservation cover and the bean container cover.<br />
First-time use<br />
WARNING<br />
If the machine is operated with a defective power cable, there is a<br />
danger of electric shock.<br />
T Never use a machine which has a defective power cable.<br />
Precondition: The water tank and bean container are full.<br />
T Insert the mains plug into a power socket.<br />
3 T Switch on the <strong>IMPRESSA</strong> using the power switch on the left<br />
side of the machine.<br />
The On/Off button Q lights up (standby).<br />
Q T Press the On/Off button to switch the <strong>IMPRESSA</strong> on.<br />
The Rotary Switch lights up. SPRACHE DEUTSCH is<br />
displayed.<br />
g T Turn the Rotary Switch until the desired language is<br />
displayed. For example LANGUAGE ENGLISH.<br />
19
2 Preparing and using your <strong>IMPRESSA</strong> <strong>for</strong> the first time<br />
k T Press the Rotary Switch to confirm the language.<br />
CONFIRMED √ appears briefly on the display to confirm<br />
the setting.<br />
TIME HOURS --:--<br />
g T Turn the Rotary Switch to set the hour.<br />
TIME HOURS 12:00 (Example)<br />
k T Press the Rotary Switch to confirm the hour setting.<br />
TIME MINUTES 12:00<br />
g T Turn the Rotary Switch to set the minutes.<br />
TIME MINUTES 12:45 (Example)<br />
k T Press the Rotary Switch to confirm the minute setting.<br />
CONFIRMED √ appears briefly on the display.<br />
WEEKDAY MONDAY<br />
g T Turn the Rotary Switch to set the weekday.<br />
WEEKDAY WEDNESDAY (Example)<br />
k T Press the Rotary Switch to confirm the setting.<br />
CONFIRMED √ appears briefly on the display.<br />
PRESS RINSE, the maintenance button c lights up.<br />
T Place a receptacle under the hot water spout and below the<br />
cappuccino nozzle.<br />
c T Press the maintenance button.<br />
SYSTEM FILLS, the system fills up with water and the<br />
maintenance button c flashes. A small amount of water<br />
flows from the cappuccino nozzle and the hot water spout.<br />
This operation stops automatically. WELCOME TO <strong>JURA</strong><br />
appears on the display.<br />
UNIT IS HEATING<br />
PRESS RINSE, the maintenance button c lights up.<br />
T Place a receptacle under the coffee spout.<br />
c T Press the maintenance button.<br />
The machine rinses itself, stopping automatically.<br />
COFFEE READY appears on the display. Your <strong>IMPRESSA</strong><br />
is ready to use.<br />
E<br />
After first-time use do not disconnect the <strong>IMPRESSA</strong> from the<br />
power supply <strong>for</strong> 24 hours to ensure that it is in the optimum<br />
operating condition.<br />
20
2 Preparing and using your <strong>IMPRESSA</strong> <strong>for</strong> the first time<br />
E<br />
When a coffee speciality has been prepared <strong>for</strong> the first time,<br />
it is possible that FILL BEANS appears on the display as<br />
the grinder has not yet been completely filled with coffee<br />
beans. In this case prepare a different coffee speciality.<br />
Using and activating<br />
filter<br />
Your <strong>IMPRESSA</strong> no longer has to be descaled if you use the CLARIS<br />
plus filter cartridge.<br />
@<br />
You can also try out the ‘Insert filter’ operation online. Visit the<br />
Knowledge Builder at www.jura.com.<br />
Further in<strong>for</strong>mation on the CLARIS plus filter cartridge can be<br />
found in Chapter 8, ‘CLARIS plus filter cartridge – Water <strong>for</strong> perfect<br />
coffee’.<br />
E<br />
Per<strong>for</strong>m the ‘Insert filter’ operation without interruption. This<br />
will ensure that your <strong>IMPRESSA</strong> always produces its best.<br />
Precondition: COFFEE READY is shown on the display.<br />
k T Keep the Rotary Switch pressed until MAINTENANCE<br />
appears on the display.<br />
g T Turn the Rotary Switch until FILTER I.P.W.S. is<br />
displayed.<br />
k T Press the Rotary Switch to enter the programme item.<br />
FILTER NO<br />
g T Turn the Rotary Switch until FILTER YES is displayed.<br />
k T Press the Rotary Switch to confirm the setting.<br />
CONFIRMED √ appears briefly on the display to confirm<br />
the setting.<br />
INSERT FILTER / PRESS BUTTON, the maintenance<br />
button c lights up.<br />
T Remove a CLARIS plus filter cartridge and the filter cartridge<br />
extension from the Welcome Pack.<br />
T Place the extension on top of the filter cartridge.<br />
T Remove the water tank and empty it.<br />
21
2 Preparing and using your <strong>IMPRESSA</strong> <strong>for</strong> the first time<br />
T Lift the cartridge holder and insert the filter cartridge into<br />
the water tank, applying slight pressure.<br />
T Close the cartridge holder. It will click into place audibly.<br />
T Fill the water tank with fresh, cold water and reinsert.<br />
T Place a receptacle (containing at least 500 ml) under the<br />
cappuccino nozzle.<br />
T Turn the selection lever of the nozzle to the steam position n.<br />
c T Press the maintenance button.<br />
FILTER RINS., water will flow out of the nozzle.<br />
E<br />
E<br />
You can interrupt filter rinsing at any time by pressing any<br />
button.<br />
The water may be slightly discoloured. This is not harmful to<br />
health and does not affect the taste.<br />
Filter rinsing stops automatically after approx. 500 ml.<br />
COFFEE READY appears on the display. The filter is now<br />
activated.<br />
Assessing and setting<br />
water hardness<br />
The harder the water is, the more frequently the <strong>IMPRESSA</strong> needs to<br />
be descaled. It is there<strong>for</strong>e important to adjust the water hardness.<br />
The water hardness can be adjusted on a continuous scale between<br />
1° dH and 30° dH. This can also be deactivated, which means that<br />
the <strong>IMPRESSA</strong> will not let you know when it has to be descaled.<br />
E<br />
However, if you are using the CLARIS plus filter cartridge and<br />
have activated it, you will not be able to adjust the water hardness.<br />
You can find out what the water hardness is by using the Aquadur®<br />
test strips supplied as standard.<br />
T Hold the test strip briefly (<strong>for</strong> one second) under flowing<br />
water. Shake off the water.<br />
22
2 Preparing and using your <strong>IMPRESSA</strong> <strong>for</strong> the first time<br />
T Wait <strong>for</strong> about one minute.<br />
T You will then be able to read the degree of water hardness<br />
from the discolouration of the Aquadur® test strip and the<br />
description on the packaging.<br />
You can now adjust the water hardness.<br />
Example: To change the water hardness from 16° dH to 25° dH,<br />
proceed as follows:<br />
Precondition: COFFEE READY is shown on the display.<br />
k T Keep the Rotary Switch pressed until MAINTENANCE<br />
appears.<br />
g T Turn the Rotary Switch until HARDNESS 16° dH is<br />
displayed.<br />
k T Press the Rotary Switch to enter the programme item.<br />
HARDNESS 16° dH<br />
g T Turn the Rotary Switch until HARDNESS 25° dH is<br />
displayed.<br />
k T Press the Rotary Switch to confirm the setting.<br />
CONFIRMED √ appears briefly on the display to confirm<br />
the setting.<br />
HARDNESS 25° dH<br />
g T Turn the Rotary Switch until EXIT is displayed.<br />
k T Press the Rotary Switch to exit programming mode.<br />
COFFEE READY is shown on the display.<br />
Adjusting grinder<br />
You can adjust the grinder to suit the roast of your coffee.<br />
Our recommendations:<br />
Z<br />
Z<br />
Select a fine setting <strong>for</strong> a light roast.<br />
Select a coarse setting <strong>for</strong> a darker roast.<br />
CAUTION<br />
If you adjust the fineness of grind when the grinder is not operating,<br />
the grinding wheel could be damaged.<br />
T Only adjust the fineness of grind when the grinder is running.<br />
23
2 Preparing and using your <strong>IMPRESSA</strong> <strong>for</strong> the first time<br />
Example: To change the fineness of grind during coffee preparation,<br />
proceed as follows:<br />
T Open the cover of the bean container.<br />
T Place a cup under the coffee spout.<br />
o T Press the Coffee button.<br />
The grinder starts and 1 COFFEE appears on the display.<br />
After this, the coffee strength is briefly displayed.<br />
T Turn the grinding wheel to the desired position while the<br />
grinder is running.<br />
The coffee will be prepared and the fineness of grind is<br />
adjusted.<br />
Switching on<br />
When the <strong>IMPRESSA</strong> is switched on, a prompt <strong>for</strong> the rinse operation<br />
automatically appears which is initiated by pressing the maintenance<br />
button c.<br />
This setting can be changed in programming mode so that the<br />
machine automatically activates the switch-on rinse (see Chapter 6<br />
‘Permanent settings in programming mode – Rinses’).<br />
Precondition: Your <strong>IMPRESSA</strong> is switched on at the power switch<br />
and the On/Off button Q is illuminated (standby).<br />
Q T Press the On/Off button to switch the <strong>IMPRESSA</strong> on.<br />
WELCOME TO <strong>JURA</strong><br />
UNIT IS HEATING<br />
PRESS RINSE, the maintenance button c lights up.<br />
T Place a receptacle under the coffee spout.<br />
c T Press the maintenance button.<br />
The machine rinses itself, stopping automatically.<br />
COFFEE READY appears on the display. Your <strong>IMPRESSA</strong><br />
is ready to use.<br />
24
2 Preparing and using your <strong>IMPRESSA</strong> <strong>for</strong> the first time<br />
Switching off<br />
(Standby)<br />
When you switch your <strong>IMPRESSA</strong> off, the spouts with which a coffee<br />
speciality or milk have been prepared are rinsed.<br />
T Place a receptacle under the coffee spout and the cappuccino<br />
nozzle.<br />
Q T Press the On/Off button.<br />
E<br />
When you prepare a milk product, but have not per<strong>for</strong>med<br />
cappuccino cleaning, CLEAN MILK SYSTEM appears<br />
and the maintenance button lights up. For ten seconds you<br />
can start the ‘Clean cappuccino nozzle’ procedure by pressing<br />
the maintenance button c.<br />
GOODBYE appears on the display, and the coffee spout is<br />
rinsed.<br />
RINSE LEFT SPOUT / PRESS BUTTON.<br />
c T Press the maintenance button.<br />
GOODBYE appears on the display, and the left coffee spout<br />
is rinsed.<br />
The <strong>IMPRESSA</strong> is switched off (standby mode), and the On/<br />
Off symbol Q lights up.<br />
E<br />
When your <strong>IMPRESSA</strong> is switched off, a hissing noise may be<br />
audible. This is normal and does not have any effect on the<br />
machine.<br />
25
3 Familiarising yourself with the control options<br />
3 Familiarising yourself with the control options<br />
With the <strong>IMPRESSA</strong> you can prepare an excellent coffee or milk speciality<br />
at the touch of a button. You also have the option of adjusting<br />
the coffee strength and temperature as well as the amount of water<br />
to your personal taste.<br />
This chapter will allow you to become familiar with all control<br />
options with the aid of examples. To familiarise yourself with your<br />
<strong>IMPRESSA</strong>, we recommend that you make a point of actively trying<br />
the facilities described in this chapter. You will find this is well worthwhile.<br />
Learn how to per<strong>for</strong>m the following:<br />
U<br />
U<br />
U<br />
U<br />
Preparation at the touch of a button<br />
One-off settings be<strong>for</strong>e and during preparation<br />
Adjusting the permanent amount of water to suit the cup<br />
size<br />
Permanent settings in programming mode<br />
E<br />
@<br />
You can stop the machine at any time while a coffee or milk<br />
speciality or hot water is being prepared. To do this, press any<br />
button.<br />
If you prefer to familiarise yourself with your <strong>IMPRESSA</strong> in a<br />
fun way on the computer, the interactive Knowledge Builder<br />
tutorial program can be found on the Internet at<br />
www.jura.com.<br />
Preparation at the<br />
touch of a button<br />
Prepare your favourite coffee speciality at the touch of a button.<br />
All coffee specialities are prepared following this model at the touch<br />
of a button.<br />
26
3 Familiarising yourself with the control options<br />
Preparing a coffee speciality<br />
at the touch of a button<br />
Preparing two coffee<br />
specialities at the touch<br />
of a button<br />
One-off setting be<strong>for</strong>e<br />
and during preparation<br />
Example: Proceed as follows to prepare one espresso.<br />
Precondition: COFFEE READY is shown on the display.<br />
T Place an espresso cup under the coffee spout.<br />
i T Press the Espresso button.<br />
1 ESPRESSO and the coffee strength is displayed.<br />
The pre-set amount of water flows into the cup and the<br />
process stops automatically.<br />
COFFEE READY is shown on the display.<br />
Example: Proceed as follows to prepare two espressi.<br />
Precondition: COFFEE READY is shown on the display.<br />
T Place two espresso cups under the coffee spout.<br />
i T Press the Espresso button twice (within two seconds).<br />
2 ESPRESSI, the pre-set amount of water flows into the<br />
cups.<br />
Preparation stops automatically. COFFEE READY<br />
appears on the display.<br />
The coffee strength can be changed be<strong>for</strong>e preparation or during<br />
the grinding operation.<br />
The following coffee strengths can be selected <strong>for</strong> 1 ristretto,<br />
1 espresso, 1 coffee, 1 special coffee, 1 cappuccino and 1 latte macchiato:<br />
U<br />
U<br />
U<br />
U<br />
U<br />
Xmild<br />
Mild<br />
Normal<br />
Strong<br />
Xstrong<br />
E<br />
The pre-set amount of water can be changed during the<br />
brewing operation by turning the Rotary Switch.<br />
One-off settings be<strong>for</strong>e and during coffee preparation always follow<br />
this model. These settings are not saved.<br />
27
3 Familiarising yourself with the control options<br />
Changing the coffee<br />
strength be<strong>for</strong>e preparation<br />
Changing the amount of<br />
water during preparation<br />
Entering a permanent<br />
setting <strong>for</strong> the amount<br />
of water <strong>for</strong> a cup size<br />
Example: Proceed as follows to prepare a strong cup of coffee.<br />
Precondition: COFFEE READY is shown on the display.<br />
T Place a cup under the coffee spout.<br />
g T Turn the Rotary Switch until STRONG appears on the display.<br />
o T Press the Coffee button <strong>for</strong> as long as STRONG is displayed.<br />
1 COFFEE / STRONG.<br />
The pre-set amount of water flows into the cup. Preparation<br />
stops automatically. COFFEE READY appears on the<br />
display.<br />
Example: Proceed as follows to prepare a 110 ML cup of coffee.<br />
Precondition: COFFEE READY is shown on the display.<br />
T Place a cup under the coffee spout.<br />
o T Press the Coffee button.<br />
The grinding operation starts. 1 COFFEE appears on the<br />
display, and then the strength is shown.<br />
g T Turn the Rotary Switch during the brewing operation until<br />
110 ML is displayed.<br />
The set amount of water flows into the cup. Preparation<br />
stops automatically. COFFEE READY appears on the<br />
display.<br />
It is easy to make permanent settings <strong>for</strong> the amount of water <strong>for</strong> all<br />
coffee and milk specialities as well as hot water according to the cup<br />
size. As in the following example, adjust the amount of water once.<br />
Every time you prepare a drink in the future, this amount of water<br />
will be dispensed.<br />
The permanent settings <strong>for</strong> adapting the amount of water to to the<br />
cup size <strong>for</strong> all coffee and milk specialities as well as hot water follow<br />
this model.<br />
Example: To enter permanent settings <strong>for</strong> the amount of water <strong>for</strong><br />
a ristretto, proceed as follows:<br />
Precondition: COFFEE READY is shown on the display.<br />
T Place an espresso cup under the coffee spout.<br />
28
3 Familiarising yourself with the control options<br />
u<br />
u<br />
u<br />
E<br />
T Press and hold the Ristretto button.<br />
1 RISTRETTO and the coffee strength is displayed.<br />
T Hold the Ristretto button down until ENOUGH? / PRESS<br />
BUTTON appears.<br />
T Release the Ristretto button.<br />
Coffee preparation starts and the ristretto flows into the<br />
cup.<br />
T Press any button as soon as enough ristretto has flowed into<br />
the cup.<br />
Preparation stops automatically. CONFIRMED √ appears<br />
briefly on the display. The set amount of water <strong>for</strong> a ristretto<br />
is saved as a permanent value. COFFEE READY is shown<br />
on the display.<br />
You can alter these settings at any time by repeating the<br />
above procedure.<br />
Permanent settings in<br />
programming mode<br />
You can easily adjust your <strong>IMPRESSA</strong> to your personal coffee blends<br />
and specialities. Simply by turning and pressing the Rotary Switch,<br />
you can navigate through the easy-to-understand program steps<br />
and make permanent settings.<br />
You can make the following settings with the Rotary Switch:<br />
Programme item Subitem Explanation<br />
MAINTENANCE CAPPUCCINO<br />
CLEANING,<br />
FILTER CHANGE,<br />
MACHINE CLEAN,<br />
CAPPUCCINO<br />
RINSING,<br />
MACHINE DESCALE,<br />
MACHINE RINSE<br />
T Select the desired maintenance programme.<br />
If no action is taken, programming<br />
mode is exited automatically after approx.<br />
five seconds.<br />
PRODUCTS SELECT PRODUCT T Select your settings <strong>for</strong> the coffee and milk<br />
specialities and hot water.<br />
FILTER<br />
I.P.W.S.<br />
YES<br />
NO<br />
T Indicate whether you operate your<br />
<strong>IMPRESSA</strong> with or without a CLARIS plus filter<br />
cartridge.<br />
29
3 Familiarising yourself with the control options<br />
Programme item Subitem Explanation<br />
HARDNESS<br />
(is only displayed<br />
when the filter is not<br />
activated)<br />
ENERGY ESM<br />
NOT ACTIVE,<br />
1° dH – 30° dH<br />
SAVE NO,<br />
SAVE LEVEL1,<br />
SAVE LEVEL2<br />
T Adjust the water hardness.<br />
T Select an energy saving mode.<br />
TIME --:-- T Set the time and weekday.<br />
UNIT ON --:--<br />
MTWTFSS<br />
OFF AFTER<br />
RINSES<br />
RENAME<br />
ABC...<br />
LOGO<br />
INFORMATION<br />
DISPLAY<br />
LANGUAGE<br />
EXIT<br />
NOT ACTIVE,<br />
0.5 HRS – 15 HRS<br />
START RINSE,<br />
CAPPU. RINSE<br />
PRODUCT NAME,<br />
WELCOME MESSAGE,<br />
CLOSING<br />
UNIT,<br />
TIME FORMAT<br />
DEUTSCH<br />
ENGLISH<br />
FRANCAIS<br />
ITALIANO<br />
NL<br />
T Set the switch-on and switch-off time<br />
individually <strong>for</strong> each weekday.<br />
T Set the number of hours after which the<br />
<strong>IMPRESSA</strong> should switch off automatically.<br />
T Set whether the switch-on rinse should<br />
be started manually or automatically.<br />
T Set whether the prompt <strong>for</strong> cappuccino<br />
rinsing should be started immediately or 10<br />
minutes after preparation of a milk speciality.<br />
T Change the individual designations.<br />
T Select a logo which is displayed when<br />
the graphic display is not used <strong>for</strong> other<br />
in<strong>for</strong>mation.<br />
T Keep track of all prepared coffee and milk<br />
specialities and view the care status.<br />
T Select the unit of the amount of water and<br />
the time <strong>for</strong>mat.<br />
T Select your language.<br />
T Exit programming mode.<br />
30
3 Familiarising yourself with the control options<br />
Settings in programming mode always follow the same model.<br />
Example: To change the strength of one espresso from NORMAL<br />
to STRONG proceed as follows:<br />
Precondition: COFFEE READY is shown on the display.<br />
k T Keep the Rotary Switch pressed until MAINTENANCE<br />
appears.<br />
g T Turn the Rotary Switch until PRODUCTS is displayed.<br />
k T Press the Rotary Switch to enter the programme item.<br />
PRODUCTS / SELECT PRODUCT<br />
E<br />
E<br />
Next select the product button <strong>for</strong> which you would like to<br />
make settings. No coffee speciality is prepared during this<br />
procedure.<br />
To enter a setting <strong>for</strong> the double product, press the corresponding<br />
button twice within a period of two seconds.<br />
i T Press the Espresso button.<br />
1 ESPRESSO / AMOUNT 60 ML<br />
g T Turn the Rotary Switch until 1 ESPRESSO / NORMAL is<br />
displayed.<br />
k T Press the Rotary Switch to enter the programme item.<br />
1 ESPRESSO / NORMAL<br />
g T Turn the Rotary Switch until 1 ESPRESSO / STRONG<br />
appears.<br />
k T Press the Rotary Switch to confirm the setting.<br />
CONFIRMED √ appears briefly on the display to confirm<br />
the setting.<br />
1 ESPRESSO / STRONG<br />
g T Turn the Rotary Switch until 1 ESPRESSO / EXIT is<br />
displayed.<br />
k T Press the Rotary Switch to exit the programme item.<br />
PRODUCTS / SELECT PRODUCT<br />
g T Turn the Rotary Switch until PRODUCTS / EXIT is displayed.<br />
k T Press the Rotary Switch to exit the programme item.<br />
PRODUCTS<br />
31
3 Familiarising yourself with the control options<br />
g T Turn the Rotary Switch until EXIT is displayed.<br />
k T Press the Rotary Switch to exit programming mode.<br />
COFFEE READY<br />
View in<strong>for</strong>mation and<br />
care status<br />
Under the programme item INFORMATION you can query the<br />
following in<strong>for</strong>mation:<br />
U Number of the prepared coffee and milk specialities and hot<br />
water<br />
U Care status and number of executed maintenance programmes<br />
(cleaning, descaling, filter change)<br />
U Number of per<strong>for</strong>med cappuccino cleaning operations<br />
Precondition: COFFEE READY is shown on the display.<br />
k T Press the Rotary Switch until MAINTENANCE appears.<br />
g T Turn the Rotary Switch until INFORMATION is displayed.<br />
k T Press the Rotary Switch to enter the programme item.<br />
TOTAL, the sum of all prepared coffee and milk specialities<br />
is displayed.<br />
g T Turn the Rotary Switch <strong>for</strong> further in<strong>for</strong>mation.<br />
E<br />
The care status can also be displayed in addition to the number<br />
of per<strong>for</strong>med maintenance programmes. The bar shows the<br />
current care status. When the bar is filled completely, your<br />
<strong>IMPRESSA</strong> will request the respective maintenance programme.<br />
k T Press the Rotary Switch to exit the programme item.<br />
INFORMATION<br />
g T Turn the Rotary Switch until EXIT is displayed.<br />
k T Press the Rotary Switch to exit programming mode.<br />
COFFEE READY<br />
32
3 Familiarising yourself with the control options<br />
33
4 Recipes<br />
4 Recipes<br />
You can use your <strong>IMPRESSA</strong> to create coffee classics or extraordinary specialities in your home. You<br />
can find additional coffee recipes online at www.jura.com.<br />
Further in<strong>for</strong>mation on how to operate your <strong>IMPRESSA</strong> can be found in Chapter 3, ‘Familiarising<br />
yourself with the control options’.<br />
Cappuzino<br />
Ingredients<br />
(<strong>for</strong> two people)<br />
200 ml cold milk<br />
2 strong Espressi<br />
20 ml cinnamon syrup<br />
Powdered cinnamon <strong>for</strong> decoration purposes<br />
T<br />
T<br />
T<br />
Distribute the cinnamon syrup into Cappuccino cups.<br />
Place cup under the Professional Cappuccino Frother and half fill with milk foam.<br />
Pour Espresso directly into the milk foam and sprinkle it with cinnamon powder.<br />
Café Chocolat Blanc<br />
Ingredients<br />
(<strong>for</strong> two people)<br />
50 g white chocolate<br />
2 Espressi<br />
200 ml milk<br />
Grated white chocolate <strong>for</strong> decoration purposes<br />
T<br />
T<br />
T<br />
T<br />
Froth milk in two decorative glasses with the Professional Cappuccino Frother.<br />
Melt white chocolate in a bain marie.<br />
Prepare two Espressi, stir with the melted chocolate and pour into the milk foam.<br />
Sprinkle grated white chocolate over the drinks.<br />
34
4 Recipes<br />
35
4 Recipes<br />
36
4 Recipes<br />
37
4 Recipes<br />
38
4 Recipes<br />
Winter’s dream coffee<br />
Ingredients<br />
(<strong>for</strong> two people)<br />
2 strong Espressi<br />
200 ml of hot cocoa<br />
1 pinch of gingerbread seasoning<br />
100 ml milk<br />
Sugar to suit personal taste<br />
1-2 gingerbread cakes <strong>for</strong> decoration<br />
T<br />
T<br />
T<br />
T<br />
Prepare 2 Espressi.<br />
Stir Espresso with cocoa and gingerbread seasoning and distribute into two glasses.<br />
Froth the milk and add to the Espressos.<br />
Sprinkle with small pieces of gingerbread.<br />
Latte Macchiato Frio<br />
Ingredients<br />
(<strong>for</strong> two people)<br />
2 cold Espressi<br />
200 ml cold milk<br />
1 small cup crushed ice<br />
20 ml maple syrup<br />
Milk foam<br />
T<br />
T<br />
T<br />
Prepare Espresso and allow to cool.<br />
Put cold milk, the maple syrup and crushed ice in a glass and mix.<br />
Add the cold Espresso.<br />
39
5 Preparation at the touch of a button<br />
5 Preparation at the touch of a button<br />
In this chapter you will find out how to prepare coffee specialities,<br />
milk and hot water without making further settings.<br />
Chapter 3, ‘Familiarising yourself with the control options’, will teach<br />
you how to adjust the settings to your personal preferences. Alternatively,<br />
you can use Chapter 6, ‘Permanent settings in programming<br />
mode’.<br />
E<br />
E<br />
You can stop the machine at any time while a coffee or milk<br />
product or hot water is being prepared. To do this, press any<br />
button.<br />
During preparation, you can change the set amount by turning<br />
the Rotary Switch.<br />
@<br />
You can also try out the preparation of coffee specialities<br />
online. Visit the Knowledge Builder at www.jura.com.<br />
Barista tips<br />
A ‘barista’ is someone who is a professional at preparing espresso<br />
and coffee. The barista knows every coffee speciality and is a master<br />
at preparing perfect beverages. In conjunction with your <strong>JURA</strong><br />
<strong>IMPRESSA</strong>, you too can achieve perfect results.<br />
In addition to the simple preparation at the touch of a button, you<br />
can also adapt the coffee or espresso to suit your own individual<br />
taste. Various setting options are provided to this purpose. Give it a<br />
try:<br />
Z Coffee strength: The coffee strength can be changed be<strong>for</strong>e<br />
preparation or during the grinding operation by turning the<br />
Rotary Switch. This setting changes the coffee powder quantity.<br />
The larger the quantity of coffee powder which is used to<br />
make the coffee, the stronger and more intensive the coffee<br />
speciality will taste.<br />
Z Fineness of grind: In the <strong>IMPRESSA</strong> the coffee beans are<br />
freshly ground each time a coffee speciality is prepared. The<br />
fineness of grind can be adjusted during the grinding opera-<br />
40
5 Preparation at the touch of a button<br />
Z<br />
Z<br />
tion. Select a finer grind <strong>for</strong> espresso than <strong>for</strong> coffee. The fineness<br />
of grind affects the time the water requires to run through<br />
the coffee powder. A finer coffee powder prolongs the extraction<br />
time so that the maximum aroma is unfolded when<br />
espresso is prepared.<br />
Temperature: In programming mode on the <strong>IMPRESSA</strong> you<br />
can adjust the temperature of the coffee specialities. The<br />
temperature can affect the taste of the coffee and must be<br />
adapted to suit individual tastes and the type of coffee bean.<br />
Height-adjustable coffee spout: The height of the coffee<br />
spout can be adjusted on a sliding scale as required to suit the<br />
size of your coffee cups. The distance between the coffee<br />
spout and the edge of the cup should be as small as possible.<br />
This prevents coffee splashing on the machine and produces<br />
a fine, thick crema.<br />
In addition remember the following barista tips:<br />
Z Store your coffee in a dry place. Oxygen, light, heat and moisture<br />
will spoil the coffee.<br />
Z <strong>Use</strong> only fresh, cold water so that the coffee aroma can optimally<br />
unfold.<br />
Z To enjoy perfect coffee, please change the water every day.<br />
Z Pre-heat your cups.<br />
Z <strong>Use</strong> a teaspoon <strong>for</strong> sugar and do not use sugar lumps to<br />
ensure that the crema or milk foam are not spoilt.<br />
Ristretto<br />
Example: This is how to prepare a ristretto.<br />
T Place an espresso cup under the coffee spout.<br />
u T Press the Ristretto button.<br />
1 RISTRETTO and the coffee strength is then briefly<br />
displayed.<br />
The pre-set amount of water flows into the cup. Preparation<br />
stops automatically. COFFEE READY appears on the<br />
display.<br />
41
5 Preparation at the touch of a button<br />
Espresso<br />
The classic coffee drink from Italy. There is a definite crema on the<br />
surface of the espresso.<br />
Example: This is how to prepare an espresso.<br />
T Place an espresso cup under the coffee spout.<br />
i T Press the Espresso button.<br />
1 ESPRESSO and the coffee strength is then briefly<br />
displayed.<br />
The pre-set amount of water flows into the cup. Preparation<br />
stops automatically. COFFEE READY appears on the<br />
display.<br />
Coffee<br />
Special coffee<br />
Cappuccino<br />
Example: This is how to prepare a coffee.<br />
T Place a cup under the coffee spout.<br />
o T Press the Coffee button.<br />
1 COFFEE and the coffee strength is then briefly displayed.<br />
The pre-set amount of water flows into the cup. Preparation<br />
stops automatically. COFFEE READY appears on the<br />
display.<br />
Example: This is how to prepare a special coffee.<br />
T Place a cup under the cappuccino nozzle.<br />
e T Press the Special Coffee button.<br />
1 SPECIAL and the coffee strength is then briefly<br />
displayed.<br />
The pre-set amount of water flows into the cup. Preparation<br />
stops automatically. COFFEE READY appears on the<br />
display.<br />
A classic Italian recipe. The finishing touch <strong>for</strong> the cappuccino is a<br />
sprinkling of cocoa powder.<br />
Example: This is how to prepare a cappuccino.<br />
Precondition: COFFEE READY is shown on the display.<br />
T Remove the milk pipe from the packaging of the vacuum<br />
milk container. For a milk carton/bottle use the long pipe, <strong>for</strong><br />
the vacuum milk container the short pipe.<br />
42
5 Preparation at the touch of a button<br />
T Attach the milk pipe to the nozzle.<br />
T Insert the other end in a milk carton/bottle or connect it to<br />
the vacuum milk container.<br />
T Place a cup under the cappuccino nozzle.<br />
T Turn the selection lever of the nozzle to the milk foam position<br />
p.<br />
p T Press the Cappuccino button.<br />
1 CAPPUCCINO and the coffee strength is displayed.<br />
1 CAPPUCCINO / MILK, the milk foam is being prepared.<br />
The operation stops automatically after reaching the pre-set<br />
amount of milk.<br />
1 CAPPUCCINO<br />
1 CAPPUCCINO / COFFEE, coffee preparation starts.<br />
Preparation stops automatically after reaching the pre-set<br />
amount of water. COFFEE READY is shown on the<br />
display.<br />
To ensure that the cappuccino nozzle works perfectly, you should<br />
rinse and clean it regularly. The description <strong>for</strong> this can be found in<br />
Chapter 7 ‘Maintenance – Cappuccino nozzle’.<br />
Latte macchiato<br />
Your <strong>IMPRESSA</strong> prepares a latte macchiato at the touch of a<br />
button.<br />
Example: This is how to prepare a latte macchiato.<br />
Precondition: COFFEE READY is shown on the display.<br />
T Remove the milk pipe from the packaging of the vacuum<br />
milk container. For a milk carton/bottle use the long pipe, <strong>for</strong><br />
the vacuum milk container the short pipe.<br />
T Attach the milk pipe to the nozzle.<br />
T Insert the other end in a milk carton/bottle or connect it to<br />
the vacuum milk container.<br />
43
5 Preparation at the touch of a button<br />
T Place a glass under the cappuccino nozzle.<br />
T Turn the selection lever of the nozzle to the milk foam<br />
position p.<br />
E<br />
E<br />
To enable the typical layers of a Latte Macchiato to <strong>for</strong>m even<br />
more effectively, add 10 ml of cool milk to the glass be<strong>for</strong>e<br />
preparing this speciality.<br />
You can refine your Latte Macchiato even more by also adding<br />
a little flavoured syrup to the glass as well.<br />
q T Press the Latte Macchiato button.<br />
1 LATTE MAC. and the coffee strength is displayed.<br />
1 LATTE MAC. / MILK, the milk foam is being prepared.<br />
The operation stops automatically after reaching the pre-set<br />
amount of milk.<br />
1 LATTE MAC.<br />
E<br />
A brief interval follows during which the hot milk separates<br />
from the milk foam. This enables the <strong>for</strong>mation of the typical<br />
layers of a latte macchiato. The duration of this interval can be<br />
defined in programming mode.<br />
1 LATTE MAC. / COFFEE, coffee preparation starts.<br />
Preparation stops automatically after reaching the pre-set<br />
amount of water. COFFEE READY is shown on the<br />
display.<br />
To ensure that the cappuccino nozzle works perfectly, you should<br />
rinse and clean it regularly. The description <strong>for</strong> this can be found in<br />
Chapter 7 ‘Maintenance – Cappuccino nozzle’.<br />
44
5 Preparation at the touch of a button<br />
Pre-ground coffee<br />
You can choose a second coffee blend with the filler funnel <strong>for</strong> preground<br />
coffee.<br />
E<br />
E<br />
E<br />
E<br />
Never add more than two level measuring spoons of preground<br />
coffee.<br />
<strong>Use</strong> pre-ground coffee which is not ground too finely. Very<br />
fine coffee can block up the system so that the coffee only<br />
comes out in drips.<br />
If you did not fill the machine with a sufficient amount of preground<br />
coffee, PRE-GROUND / NOT ENOUGH is displayed<br />
and the <strong>IMPRESSA</strong> stops operation.<br />
The desired coffee speciality must be prepared within approx.<br />
one minute after filling with the pre-ground coffee. Otherwise,<br />
the <strong>IMPRESSA</strong> stops the operation and is ready to use<br />
again.<br />
All coffee specialities with pre-ground coffee are prepared following<br />
this model.<br />
Example: This is how to prepare a cup of coffee using pre-ground<br />
coffee.<br />
T Place a cup under the coffee spout.<br />
T Open the cover of the bean container.<br />
T Open the cover <strong>for</strong> pre-ground coffee.<br />
PRE-GROUND / FILL POWDER<br />
T Place one level measuring spoon of pre-ground coffee into<br />
the filler funnel.<br />
T Close the cover <strong>for</strong> pre-ground coffee.<br />
PRE-GROUND / SELECT PRODUCT<br />
o T Press the Coffee button.<br />
1 COFFEE, coffee preparation starts.<br />
The pre-set amount of water flows into the cup. Preparation<br />
stops automatically. COFFEE READY appears on the<br />
display.<br />
45
5 Preparation at the touch of a button<br />
Hot milk<br />
Precondition: COFFEE READY is shown on the display.<br />
T Remove the milk pipe from the packaging of the vacuum<br />
milk container. For a milk carton/bottle use the long pipe, <strong>for</strong><br />
the vacuum milk container the short pipe.<br />
T Attach the milk pipe to the nozzle.<br />
T Insert the other end in a milk carton/bottle or connect it to<br />
the vacuum milk container.<br />
T Place a cup under the cappuccino nozzle.<br />
T Turn the selection lever of the nozzle to the milk position<br />
t.<br />
z T Press the Milk button.<br />
1 MILK, the hot milk flows into the cup.<br />
The operation stops automatically after reaching the pre-set<br />
amount of milk. COFFEE READY is shown on the<br />
display.<br />
To ensure that the cappuccino nozzle works perfectly, you should<br />
rinse and clean it regularly. The description <strong>for</strong> this can be found in<br />
Chapter 7 ‘Maintenance – Cappuccino nozzle’.<br />
Hot water<br />
The following temperatures can be selected <strong>for</strong> preparing hot<br />
water:<br />
Z<br />
Z<br />
Z<br />
Low<br />
Normal<br />
High<br />
CAUTION<br />
There is a danger of scalding from hot water splashes.<br />
T Avoid direct contact with skin.<br />
Precondition: COFFEE READY is shown on the display.<br />
T Place a cup under the hot water spout.<br />
m T Press the Hot water button.<br />
HOT WATER and the temperature is displayed.<br />
E<br />
By pressing the hot water button several times (within approx.<br />
2 seconds) you can set the temperature to your individual<br />
preference. This setting is not saved.<br />
46
5 Preparation at the touch of a button<br />
The pre-set amount of water flows into the cup. Preparation<br />
stops automatically. COFFEE READY appears on the<br />
display.<br />
47
6 Permanent settings in programming mode<br />
6 Permanent settings in Programming mode<br />
Products<br />
With the PRODUCTS programme item you can enter individual<br />
settings <strong>for</strong> all coffee products, milk, hot water and coffee-milk<br />
products.<br />
Settings <strong>for</strong> coffee products,<br />
milk and hot water<br />
The following permanent settings can be entered <strong>for</strong> coffee<br />
products, milk and hot water:<br />
Product Temp. Coffee strength Amount<br />
1 Ristretto LOW, NORMAL, HIGH XMILD, MILD,<br />
NORMAL, STRONG,<br />
XSTRONG<br />
15 ML – 240 ML<br />
2 Ristretti LOW, NORMAL, HIGH – 15 ML – 240 ML<br />
(per cup)<br />
1 Espresso LOW, NORMAL, HIGH XMILD, MILD,<br />
NORMAL, STRONG,<br />
XSTRONG<br />
15 ML – 240 ML<br />
2 Espressi LOW, NORMAL, HIGH – 15 ML – 240 ML<br />
(per cup)<br />
1 Coffee LOW, NORMAL, HIGH XMILD, MILD,<br />
NORMAL, STRONG,<br />
XSTRONG<br />
15 ML – 240 ML<br />
2 Coffees LOW, NORMAL, HIGH – 15 ML – 240 ML<br />
(per cup)<br />
1 Special<br />
coffee<br />
2 Special<br />
coffees<br />
LOW, NORMAL, HIGH XMILD, MILD,<br />
NORMAL, STRONG,<br />
XSTRONG<br />
15 ML – 240 ML<br />
LOW, NORMAL, HIGH – 15 ML – 240 ML<br />
(per cup)<br />
1 Milk – – 3 SEC – 120 SEC<br />
2 Milk – – 3 SEC – 240 SEC<br />
Hot water LOW, NORMAL, HIGH – 15 ML – 450 ML<br />
48
6 Permanent settings in programming mode<br />
E<br />
For 1 milk and 1 special coffee you can also select whether the<br />
preparation of 2 milks or 2 special coffees should be doable or<br />
not doable.<br />
Settings <strong>for</strong><br />
coffee-milk-products<br />
The following permanent settings can be entered <strong>for</strong> coffee-milk<br />
products:<br />
Product Temp. Coffee strength Amount<br />
1 Cappuccino LOW, NORMAL,<br />
HIGH<br />
XMILD, MILD,<br />
NORMAL,<br />
STRONG,<br />
XSTRONG<br />
Amount of milk:<br />
3 SEC – 120 SEC<br />
Pause: 0 SEC – 60 SEC<br />
Amount of water:<br />
15 ML – 240 ML<br />
2 Cappuccini LOW, NORMAL,<br />
HIGH<br />
– Amount of milk:<br />
3 SEC – 240 SEC<br />
Pause: 0 SEC – 60 SEC<br />
Amount of water:<br />
15 ML – 240 ML<br />
(per cup)<br />
1 Latte<br />
Macchiato<br />
LOW, NORMAL,<br />
HIGH<br />
XMILD, MILD,<br />
NORMAL,<br />
STRONG,<br />
XSTRONG<br />
Amount of milk:<br />
3 SEC – 120 SEC<br />
Pause: 0 SEC – 60 SEC<br />
Amount of water:<br />
15 ML – 240 ML<br />
2 Latte<br />
Macchiati<br />
LOW, NORMAL,<br />
HIGH<br />
– Amount of milk:<br />
3 SEC – 240 SEC<br />
Pause: 0 SEC – 60 SEC<br />
Amount of water:<br />
15 ML – 240 ML<br />
(per cup)<br />
E<br />
For 1 cappuccino and 1 latte macchiato you can also select<br />
whether the preparation of 2 cappuccini or 2 latte macchiati<br />
should be doable or not doable.<br />
49
6 Permanent settings in programming mode<br />
Permanent settings in programming mode always follow the same<br />
model.<br />
Example: Proceed as follows to change the amount of milk of<br />
1 latte macchiato from 16 SECS to 20 SECS, the pause from<br />
30 SEC to 40 SEC and the amount of water from 45 ML to<br />
40 ML.<br />
Precondition: COFFEE READY is shown on the display.<br />
k T Keep the Rotary Switch pressed until MAINTENANCE<br />
appears.<br />
g T Turn the Rotary Switch until PRODUCTS is displayed.<br />
k T Press the Rotary Switch to enter the programme item.<br />
PRODUCT / SELECT PRODUCT<br />
E<br />
E<br />
Next select the product button <strong>for</strong> which you would like to<br />
make settings. No product is prepared during this procedure.<br />
To change a setting <strong>for</strong> a double product, press the corresponding<br />
button twice within a period of two seconds.<br />
50<br />
q T Press the Latte Macchiato button.<br />
1 LATTE MAC. / AMOUNT 45 ML<br />
k T Press the Rotary Switch to enter the programme item.<br />
1 LATTE MAC. / AMOUNT 45 ML<br />
g T Turn the Rotary Switch until 1 LATTE MAC. / AMOUNT<br />
40 ML is displayed.<br />
k T Press the Rotary Switch to confirm the setting.<br />
CONFIRMED √ appears briefly on the display to confirm<br />
the setting.<br />
1 LATTE MAC. / AMOUNT 40 ML<br />
g T Turn the Rotary Switch until 1 LATTE MAC. / MILK<br />
16 SECS is displayed.<br />
k T Press the Rotary Switch to enter the programme item.<br />
1 LATTE MAC. / MILK 16 SECS<br />
g T Turn the Rotary Switch until 1 LATTE MAC. / MILK<br />
20 SECS is displayed.<br />
k T Press the Rotary Switch to confirm the setting.<br />
CONFIRMED √ appears briefly on the display.<br />
1 LATTE MAC. / MILK 20 SECS
6 Permanent settings in programming mode<br />
g T Turn the Rotary Switch until 1 LATTE MAC. / PAUSE<br />
30 SEC is displayed.<br />
k T Press the Rotary Switch to enter the programme item.<br />
1 LATTE MAC. / PAUSE 30 SEC<br />
g T Turn the Rotary Switch until 1 LATTE MAC. / PAUSE<br />
40 SEC is displayed.<br />
k T Press the Rotary Switch to confirm the setting.<br />
CONFIRMED √ appears briefly on the display.<br />
1 LATTE MAC. / PAUSE 40 SEC<br />
g T Turn the Rotary Switch until 1 LATTE MAC. / EXIT is<br />
displayed.<br />
k T Press the Rotary Switch to exit the programme item.<br />
PRODUCT / SELECT PRODUCT<br />
g T Turn the Rotary Switch until PRODUCT / EXIT is displayed.<br />
k T Press the Rotary Switch to exit the programme item.<br />
g T Turn the Rotary Switch until EXIT is displayed.<br />
k T Press the Rotary Switch to exit programming mode.<br />
COFFEE READY<br />
Energy-save mode<br />
You can also set various energy saving modes on your <strong>IMPRESSA</strong>:<br />
Z ENERGY SAVE NO<br />
U Your <strong>IMPRESSA</strong> is continuously ready <strong>for</strong> use.<br />
U All coffee and milk products, as well as hot water, can be<br />
prepared without having to wait.<br />
Z ENERGY SAVE LEVEL1<br />
U Your <strong>IMPRESSA</strong> is only continuously ready <strong>for</strong> use <strong>for</strong> coffee<br />
products.<br />
U The machine has to heat up <strong>for</strong> milk preparation.<br />
Z ENERGY SAVE LEVEL2<br />
U Approx. 5 minutes after the last preparation the <strong>IMPRESSA</strong><br />
switches to the energy-saving temperature and is not ready<br />
<strong>for</strong> use.<br />
U Be<strong>for</strong>e coffee, hot water or milk can be prepared, the machine<br />
has to heat up.<br />
51
6 Permanent settings in programming mode<br />
Example: Proceed as follows to change the energy saving mode<br />
from ENERGY SAVE NO to ENERGY LEVEL1.<br />
Precondition: COFFEE READY is shown on the display.<br />
k T Keep the Rotary Switch pressed until MAINTENANCE is<br />
displayed.<br />
g T Turn the Rotary Switch until ENERGY ESM is displayed.<br />
k T Press the Rotary Switch to enter the programme item.<br />
ENERGY SAVE NO<br />
g T Turn the Rotary Switch until ENERGY SAVE LEVEL1<br />
is displayed.<br />
k T Press the Rotary Switch to confirm the setting.<br />
CONFIRMED √ appears briefly on the display to confirm<br />
the setting.<br />
ENERGY ESM<br />
g T Turn the Rotary Switch until EXIT is displayed.<br />
k T Press the Rotary Switch to exit programming mode.<br />
COFFEE READY<br />
Time and weekday<br />
You already set the time and weekday when you used the machine<br />
<strong>for</strong> the first time.<br />
Example: To change the time from 08:45 to 09:50, proceed<br />
as follows.<br />
Precondition: COFFEE READY is shown on the display.<br />
k T Keep the Rotary Switch pressed until MAINTENANCE<br />
appears.<br />
g T Turn the Rotary Switch until TIME 08:45 is displayed.<br />
k T Press the Rotary Switch to enter the programme item.<br />
TIME HOURS 08:45.<br />
g T Turn the Rotary Switch until TIME HOURS 09:45 is<br />
displayed.<br />
k T Press the Rotary Switch to confirm the hour setting.<br />
g T Turn the Rotary Switch until TIME MINUTES 09:50<br />
is displayed.<br />
k T Press the Rotary Switch to confirm the minute setting.<br />
CONFIRMED √ appears briefly on the display to confirm<br />
the setting.<br />
WEEKDAY MONDAY (Example)<br />
52
6 Permanent settings in programming mode<br />
k T Press the Rotary Switch to confirm the weekday setting.<br />
CONFIRMED √ appears briefly on the display.<br />
TIME 09:50<br />
g T Turn the Rotary Switch until EXIT is displayed.<br />
k T Press the Rotary Switch to exit programming mode.<br />
COFFEE READY<br />
Programmable<br />
Switch-on time<br />
The programmable switch-on time can only be set when the time<br />
has been set.<br />
The following settings can be made in the UNIT ON menu item:<br />
Z UNIT ON<br />
U Set the required switch-on time.<br />
Z MACHINE OFF<br />
U Set the required switch-off time.<br />
Z DAY<br />
U Set the weekdays on which <strong>IMPRESSA</strong> should switch on and<br />
off automatically.<br />
E<br />
The programmable switch-on only works when the machine<br />
is switched on at the power switch (standby).<br />
Example: Proceed as follows to set the programmable switch-on<br />
time to 07:30 and stipulate that your <strong>IMPRESSA</strong> does not switch<br />
on automatically on Sundays.<br />
Precondition: COFFEE READY is shown on the display.<br />
k T Keep the Rotary Switch pressed until MAINTENANCE<br />
appears.<br />
g T Turn the Rotary Switch until UNIT ON / --:--<br />
MTWTFSS is displayed.<br />
k T Press the Rotary Switch to enter the programme item.<br />
UNIT ON --:--.<br />
k T Press the Rotary Switch to enter the programme item.<br />
UNIT ON / HOURS --:--<br />
g T Turn the Rotary Switch until UNIT ON / HOURS 07:00<br />
is displayed.<br />
k T Press the Rotary Switch to confirm the hour setting.<br />
53
6 Permanent settings in programming mode<br />
g T Turn the Rotary Switch until UNIT ON / MINUTES<br />
07:30 is displayed.<br />
k T Press the Rotary Switch to confirm the minute setting.<br />
CONFIRMED √ appears briefly on the display to confirm<br />
the setting.<br />
UNIT ON 07:30<br />
g T Turn the Rotary Switch until DAY is displayed.<br />
k T Press the Rotary Switch to enter the programme item.<br />
DAY / MON YES<br />
g T Turn the Rotary Switch until TAG / SUN YES is displayed.<br />
k T Press the Rotary Switch to enter the programme item.<br />
DAY / SUN YES<br />
g T Turn the Rotary Switch until TAG / SUN NO is displayed.<br />
k T Press the Rotary Switch to confirm the setting.<br />
CONFIRMED √ appears briefly on the display.<br />
DAY / SUN NO<br />
g T Turn the Rotary Switch until EXIT is displayed.<br />
k T Press the Rotary Switch to exit the programme item.<br />
DAY<br />
g T Turn the Rotary Switch until EXIT is displayed.<br />
k T Press the Rotary Switch to exit the programme item.<br />
UNIT ON / 07:30 MTWTFSn<br />
g T Turn the Rotary Switch until EXIT is displayed.<br />
k T Press the Rotary Switch to exit programming mode.<br />
COFFEE READY<br />
Automatic switch-off<br />
By instructing your <strong>IMPRESSA</strong> to automatically switch itself off, you<br />
can cut down your energy consumption. If this function is activated,<br />
your <strong>IMPRESSA</strong> switches off automatically after the last action on<br />
the machine.<br />
E<br />
The automatic switch-off time can be adjusted between 0.5<br />
and 15 hours or deactivated.<br />
54
6 Permanent settings in programming mode<br />
Example: Proceed as follows to change the automatic switch-off<br />
time from 5 HRS to 2 HRS.<br />
Precondition: COFFEE READY is shown on the display.<br />
k T Keep the Rotary Switch pressed until MAINTENANCE<br />
appears.<br />
g T Turn the Rotary Switch until OFF AFTER 5 HRS is<br />
displayed.<br />
k T Press the Rotary Switch to enter the programme item.<br />
OFF AFTER 5 HRS<br />
g T Turn the Rotary Switch until OFF AFTER 2 HRS is<br />
displayed.<br />
k T Press the Rotary Switch to confirm the setting.<br />
CONFIRMED √ appears briefly on the display to confirm<br />
the setting.<br />
OFF AFTER 2 HRS<br />
g T Turn the Rotary Switch until EXIT is displayed.<br />
k T Press the Rotary Switch to exit programming mode.<br />
COFFEE READY<br />
Rinses<br />
You can set whether the switch-on rinse should be started<br />
manually or automatically.<br />
You can set whether cappuccino rinsing should be prompted immediately<br />
or 10 minutes after a milk product has been prepared.<br />
Example: Proceed as follows to programme that cappuccino rinsing<br />
should be prompted immediately after a milk product has been<br />
prepared.<br />
Precondition: COFFEE READY is shown on the display.<br />
k T Keep the Rotary Switch pressed until MAINTENANCE<br />
appears.<br />
g T Turn the Rotary Switch until RINSES is displayed.<br />
k T Press the Rotary Switch to enter the programme item.<br />
START RINSE MANUAL<br />
g T Turn the Rotary Switch until CAPPU. RINSE AFTER<br />
10 MIN is displayed.<br />
k T Press the Rotary Switch to enter the programme item.<br />
CAPPU. RINSE AFTER 10 MIN<br />
55
6 Permanent settings in programming mode<br />
g T Turn the Rotary Switch until CAPPU. RINSE NOW is<br />
displayed.<br />
k T Press the Rotary Switch to confirm the setting.<br />
CONFIRMED √ appears briefly on the display to confirm<br />
the setting.<br />
CAPPU. RINSE NOW<br />
g T Turn the Rotary Switch until RINSES EXIT is displayed.<br />
k T Press the Rotary Switch.<br />
RINSES<br />
g T Turn the Rotary Switch until EXIT is displayed.<br />
k T Press the Rotary Switch to exit programming mode.<br />
COFFEE READY<br />
Unit amount of water/<br />
time <strong>for</strong>mat<br />
You can change the unit of the amount of water from ‘ml’ to ‘oz’ and<br />
the time <strong>for</strong>mat to ‘24 HRS’ or ‘AM/PM’ .<br />
Example: To change the unit <strong>for</strong> the amount of water from UNIT<br />
ML to UNIT OZ, proceed as follows.<br />
Precondition: COFFEE READY is shown on the display.<br />
k T Keep the Rotary Switch pressed until MAINTENANCE<br />
appears.<br />
g T Turn the Rotary Switch until SETTINGS is displayed.<br />
k T Press the Rotary Switch to enter the programme item.<br />
SETTINGS UNIT<br />
E<br />
To change the time <strong>for</strong>mat, turn the Rotary Switch until<br />
SETTINGS TIME FORMAT is displayed.<br />
k T Press the Rotary Switch to enter the programme item.<br />
SETTINGS UNIT ML<br />
g T Turn the Rotary Switch until SETTINGS UNIT OZ is<br />
displayed.<br />
k T Press the Rotary Switch to confirm the setting.<br />
CONFIRMED √ appears briefly on the display to confirm<br />
the setting.<br />
SETTINGS UNIT<br />
56
6 Permanent settings in programming mode<br />
g T Turn the Rotary Switch until SETTINGS EXIT is displayed.<br />
k T Press the Rotary Switch to exit the programme item.<br />
DISPLAY<br />
g T Turn the Rotary Switch until EXIT is displayed.<br />
k T Press the Rotary Switch to exit programming mode.<br />
COFFEE READY<br />
Logo<br />
You can choose various logos which appear when the display is not<br />
used <strong>for</strong> other in<strong>for</strong>mation. The following logos can, <strong>for</strong> example, be<br />
selected:<br />
Z<br />
Z<br />
Z<br />
Z<br />
<strong>JURA</strong> Logo<br />
Animated coffee cup<br />
Time<br />
No logo<br />
Example: Proceed as follows to show the time on the display.<br />
Precondition: COFFEE READY is shown on the display.<br />
k T Keep the Rotary Switch pressed until MAINTENANCE<br />
appears.<br />
g T Turn the Rotary Switch until LOGO is displayed.<br />
k T Press the Rotary Switch to enter the programme item.<br />
LOGO<br />
g T Turn the Rotary Switch until LOGO 08:45 (example) is<br />
displayed.<br />
k T Press the Rotary Switch to confirm the setting.<br />
CONFIRMED √ appears briefly on the display to confirm<br />
the setting.<br />
LOGO 08:45 (example)<br />
g T Turn the Rotary Switch until EXIT is displayed.<br />
k T Press the Rotary Switch to exit programming mode.<br />
COFFEE READY / 08:45<br />
57
6 Permanent settings in programming mode<br />
Language<br />
You set the language when you used the machine <strong>for</strong> the first<br />
time.<br />
You can choose among the following languages.<br />
Z<br />
Z<br />
Z<br />
Z<br />
Z<br />
German<br />
English<br />
French<br />
Italian<br />
Dutch<br />
Example: To change the language from ENGLISH to DEUTSCH,<br />
proceed as follows.<br />
Precondition: COFFEE READY is shown on the display.<br />
k T Keep the Rotary Switch pressed until MAINTENANCE is<br />
displayed.<br />
g T Turn the Rotary Switch until LANGUAGE ENGLISH is<br />
displayed.<br />
k T Press the Rotary Switch to enter the programme item.<br />
LANGUAGE ENGLISH<br />
g T Turn the Rotary Switch until SPRACHE DEUTSCH<br />
appears.<br />
k T Press the Rotary Switch to confirm the setting.<br />
GESPEICHERT √ appears briefly on the display to<br />
confirm the setting.<br />
SPRACHE DEUTSCH<br />
g T Turn the Rotary Switch until EXIT is displayed.<br />
k T Press the Rotary Switch to exit programming mode.<br />
BITTE WÄHLEN<br />
Rename<br />
All product names as well as the on message and closing can be<br />
changed.<br />
Example: To change the product name from 1 COFFEE to<br />
MY COFFEE, proceed as follows:<br />
Precondition: COFFEE READY is shown on the display.<br />
k T Keep the Rotary Switch pressed until MAINTENANCE<br />
appears.<br />
58
6 Permanent settings in programming mode<br />
g T Turn the Rotary Switch until RENAME ABC... is displayed.<br />
k T Press the Rotary Switch to enter the programme item.<br />
RENAME PRODUCT NAME<br />
E<br />
The welcome text and closing can be selected by turning the<br />
Rotary Switch.<br />
k T Press the Rotary Switch to enter the programme item.<br />
PRODUCT NAME CHANGE<br />
k T Press the Rotary Switch.<br />
PRODUCT NAME / SELECT PRODUCT<br />
E<br />
Next select the button of the product which you would like to<br />
rename. No product is prepared during this procedure.<br />
o T Press the Coffee button.<br />
j / ABCDEFG...√<br />
g T Turn the Rotary Switch so that it points to the correct<br />
character.<br />
k T Press the Rotary Switch to confirm the character.<br />
MY COFFEE / ABCDEFG...√<br />
E<br />
To delete the character which was entered last, select the<br />
character at the end of the alphabet and press the Rotary<br />
Switch.<br />
k T Select the character √ at the end of the alphabet and press<br />
the Rotary Switch to confirm the entry.<br />
CONFIRMED √ appears briefly on the display.<br />
RENAME ABC...<br />
g T Turn the Rotary Switch until EXIT appears on the display.<br />
k T Press the Rotary Switch to exit programming mode.<br />
COFFEE READY<br />
59
7 Maintenance<br />
7 Maintenance<br />
Your <strong>IMPRESSA</strong> has the following integrated maintenance programmes:<br />
Z<br />
Z<br />
Z<br />
Z<br />
Z<br />
Z<br />
Rinse machine<br />
Filter change<br />
Clean machine<br />
Descale machine<br />
Rinse cappuccino nozzle<br />
Clean cappuccino nozzle<br />
E<br />
Clean or descale the machine or change the filter whenever<br />
the appropriate indicator lights up.<br />
Maintenance tips<br />
To ensure that you get many years’ reliable service out of your<br />
<strong>IMPRESSA</strong> and to guarantee the optimum coffee quality, the<br />
machine requires daily maintenance.<br />
You should proceed as follows:<br />
Z Empty the coffee grounds container and the drip tray. Rinse<br />
them with warm water.<br />
Z Rinse the water tank with clean water.<br />
Z Dismantle and rinse the cappuccino nozzle (see Chapter 7,<br />
‘Maintenance – Rinsing the cappuccino nozzle’)<br />
Z Wipe the surface of the machine with a damp cloth.<br />
Rinse machine<br />
When the <strong>IMPRESSA</strong> is switched on, a prompt to per<strong>for</strong>m a rinse<br />
operation appears after heating, or this is automatically started.<br />
It can be set in programming mode whether the switch-on rinse<br />
needs to be activated manually or whether the machine automatically<br />
activates the switch-on rinse (see Chapter 6 ‘Permanent settings<br />
in programming mode – Rinses’).<br />
When the <strong>IMPRESSA</strong> is switched off, a rinse operation is automatically<br />
initiated.<br />
You can initiate the rinse operation manually at any time.<br />
60
7 Maintenance<br />
Precondition: COFFEE READY is shown on the display.<br />
T Place a receptacle under the coffee spout.<br />
k T Keep the Rotary Switch pressed until MAINTENANCE<br />
appears.<br />
k T Press the Rotary Switch to enter the programme item.<br />
CAPPUCCINO CLEANING<br />
g T Turn the Rotary Switch until MACHINE RINSING<br />
appears.<br />
k T Press the Rotary Switch to initiate the rinse operation.<br />
RINSING<br />
Rinsing stops automatically and your <strong>IMPRESSA</strong> is then<br />
ready <strong>for</strong> use.<br />
Changing the filter<br />
E<br />
E<br />
After 50 litres of water have flowed through the filter, or after<br />
two months, its capacity is reached. Your <strong>IMPRESSA</strong> will automatically<br />
prompt you to change the filter.<br />
If the CLARIS plus filter cartridge is not activated, you will not<br />
be prompted to change the filter.<br />
@<br />
You can also try out ‘changing the filter’ online. Visit the<br />
Knowledge Builder at www.jura.com.<br />
Change following a prompt<br />
To change the CLARIS plus filter cartridge when prompted to do so<br />
by your <strong>IMPRESSA</strong>, proceed as follows:<br />
Precondition: COFFEE READY / FILTER CHANGE is displayed<br />
and the maintenance button c lights up.<br />
c T Press the maintenance button.<br />
CHANGE TIME 2 MIN / START YES<br />
E<br />
If you want to change the filter at a later point in time, turn the<br />
Rotary Switch until CHANGE / START NO is displayed. Exit<br />
the maintenance programme by pressing the Rotary Switch.<br />
The prompt ‘change filter’ remains on the display.<br />
61
7 Maintenance<br />
c T Press the maintenance button.<br />
INSERT FILTER / PRESS BUTTON<br />
T Remove the water tank and empty it.<br />
T Open up the cartridge holder and remove the old CLARIS<br />
plus filter cartridge and the extension piece.<br />
T Fit the extension on top of a new CLARIS plus filter cartridge.<br />
T Insert the filter cartridge into the water tank, exerting slight<br />
pressure.<br />
T Close the cartridge holder. It will click into place audibly.<br />
T Fill the water tank with fresh, cold water and reinsert.<br />
T Place a receptacle (containing at least 500 ml) under the<br />
cappuccino nozzle.<br />
T Turn the selection lever of the nozzle to the steam position<br />
n.<br />
c T Press the maintenance button.<br />
FILTER RINS., water flows from the nozzle.<br />
E<br />
E<br />
You can interrupt filter rinsing at any time. To do this, press<br />
any button.<br />
The water may be slightly discoloured. This is not harmful to<br />
health and does not affect the taste.<br />
Filter rinsing stops automatically after approx. 500 ml. Your<br />
<strong>IMPRESSA</strong> heats up and is once again ready to use.<br />
<strong>Manual</strong> filter change<br />
You can initiate the ‘Changing the filter’ operation manually.<br />
Precondition: The filter is activated and COFFEE READY<br />
appears on the display.<br />
k T Keep the Rotary Switch pressed until MAINTENANCE<br />
appears.<br />
k T Press the Rotary Switch to enter the programme item.<br />
CAPPUCCINO CLEANING<br />
62
7 Maintenance<br />
g T Turn the Rotary Switch until FILTER CHANGE is displayed.<br />
k T Press the Rotary Switch.<br />
CHANGE TIME 2 MIN / START YES<br />
T Continue with the second prompt to take action (indicated<br />
by a T), as is described under ‘Replacement following a<br />
prompt’.<br />
Clean machine<br />
CAUTION<br />
After 220 coffee preparations or 80 switch-on rinses, the <strong>IMPRESSA</strong><br />
will prompt you to clean it.<br />
If the wrong cleaning agent is used, the machine could be damaged<br />
and/or traces of detergent could be left behind in the water.<br />
T <strong>Use</strong> only original <strong>JURA</strong> care products.<br />
E<br />
E<br />
E<br />
The cleaning programme only lasts about 20 minutes.<br />
Do not interrupt the cleaning programme. The quality of<br />
cleaning will be impaired if you do so.<br />
<strong>JURA</strong> cleaning tablets are available from stockists.<br />
@<br />
You can also try out the ‘clean machine’ operation online.<br />
Visit the Knowledge Builder at www.jura.com.<br />
Cleaning following a<br />
prompt<br />
Precondition: COFFEE READY / CLEAN is displayed and the<br />
maintenance button c lights up.<br />
c T Press the maintenance button.<br />
CLEANING TIME 20 MIN / START YES<br />
E<br />
If you want to clean the machine at a later point in time, turn<br />
the Rotary Switch until CLEANING / START NO is displayed.<br />
Exit the maintenance programme by pressing the<br />
Rotary Switch. The prompt ‘clean machine’ remains on the<br />
display.<br />
c T Press the maintenance button.<br />
TRAY / GROUNDS EMPTY<br />
T Empty the drip tray and coffee grounds container and put<br />
them back into the machine.<br />
63
7 Maintenance<br />
PRESS BUTTON, the maintenance button c lights up.<br />
T Place a receptacle under the coffee spout and the cappuccino<br />
nozzle.<br />
c T Press the maintenance button.<br />
MACHINE IS CLEANING, water flows out of the<br />
coffee spout.<br />
The process is interrupted, ADD TABLET.<br />
T Open the cover of the bean container.<br />
T Open the cover of the filler funnel <strong>for</strong> pre-ground coffee.<br />
T Insert a <strong>JURA</strong> cleaning tablet into the filler funnel.<br />
T Close the cover of the filler funnel and the cover of the bean<br />
container.<br />
PRESS BUTTON, the maintenance button c lights up.<br />
c T Press the maintenance button.<br />
MACHINE IS CLEANING, water flows out of the<br />
coffee spout and the cappuccino nozzle several times.<br />
The process is interrupted TRAY / GROUNDS EMPTY.<br />
T Empty the drip tray and coffee grounds container and put<br />
them back into the machine.<br />
The cleaning operation is now complete. The <strong>IMPRESSA</strong> is<br />
once more ready <strong>for</strong> use.<br />
<strong>Manual</strong> cleaning<br />
You can initiate the ‘Cleaning the machine’ operation manually.<br />
Precondition: COFFEE READY is shown on the display.<br />
k T Keep the Rotary Switch pressed until MAINTENANCE<br />
appears.<br />
k T Press the Rotary Switch to enter the programme item.<br />
CAPPUCCINO CLEANING<br />
g T Turn the Rotary Switch until MACHINE CLEAN is displayed.<br />
k T Press the Rotary Switch.<br />
CLEANING TIME 20 MIN / START YES<br />
T Continue with the second prompt to take action (indicated<br />
by a T), as is described under ‘Cleaning following a prompt’.<br />
64
7 Maintenance<br />
Descale machine<br />
The <strong>IMPRESSA</strong> builds up deposits of limescale over time and automatically<br />
prompts you to descale it when necessary. The degree of<br />
calcification depends on the degree of hardness of your water.<br />
CAUTION<br />
If the descaling agent comes into contact with the skin or eyes, this<br />
can cause irritation.<br />
T<br />
T<br />
Avoid contact with the skin or eyes.<br />
Rinse the descaling agent off with clean water. Should you get<br />
any descaling agent in your eye, consult a doctor.<br />
CAUTION<br />
If the wrong descaling agent is used, the machine could be damaged<br />
and/or traces of detergent could be left behind in the water.<br />
T <strong>Use</strong> only original <strong>JURA</strong> care products.<br />
CAUTION<br />
If the descaling operation is interrupted, there may be damage to<br />
the machine.<br />
T Allow the descaling programme to run to the end.<br />
CAUTION<br />
If the descaling agent comes into contact with sensitive surfaces,<br />
damage may occur.<br />
T Clean up any splashes immediately.<br />
E<br />
E<br />
E<br />
The descaling programme lasts approx. 45 minutes.<br />
<strong>JURA</strong> descaling tablets are available from stockists.<br />
If you use a CLARIS plus filter cartridge and this is activated,<br />
you will not be prompted to change the filter.<br />
@<br />
You can also try out the ‘Descaling the machine’ operation<br />
online. Visit the Knowledge Builder at www.jura.com.<br />
Descaling following a<br />
prompt<br />
Precondition: COFFEE READY / DESCALE is displayed and<br />
the maintenance button c lights up.<br />
c T Press the maintenance button.<br />
DECALCIFYING TIME 45 MIN / START YES<br />
65
7 Maintenance<br />
E<br />
If you want to descale the machine at a later point in time, turn<br />
the Rotary Switch until DECALCIFYING / START NO<br />
is displayed. Exit the maintenance programme by pressing<br />
the Rotary Switch. The prompt ‘Descale machine’ remains on<br />
the display.<br />
c T Press the maintenance button.<br />
TRAY / GROUNDS EMPTY<br />
T Empty the drip tray and coffee grounds container and put<br />
them back into the machine.<br />
SOLVENT IN TANK<br />
T Remove the water tank and empty it.<br />
T Completely dissolve the contents of one blister (3 <strong>JURA</strong><br />
descaling tablets) in a container that holds 600 ml of water.<br />
This may take several minutes.<br />
T Pour the solution into the empty water tank and insert it in<br />
the machine.<br />
SOLVENT IN TANK / PRESS BUTTON, the maintenance<br />
button c lights up.<br />
T Remove the cappuccino nozzle.<br />
T Place a receptacle under the hot water spout and the connector<br />
of the nozzle.<br />
c T Press the maintenance button.<br />
MACHINE IS DECALCIFYING<br />
Water flows from the hot water spout and the connector of<br />
the nozzle. The maintenance button c blinks during the<br />
descaling operation.<br />
The process stops automatically, TRAY / GROUNDS<br />
EMPTY.<br />
T Empty the receptacles below the hot water spout and the<br />
connector of the nozzle.<br />
T Empty the drip tray and coffee grounds container and put<br />
them back into the machine.<br />
WATER TANK FILL<br />
T Remove the water tank and rinse it thoroughly.<br />
T Fill the water tank with fresh, cold mains water and reinsert.<br />
PRESS BUTTON, the maintenance button c lights up.<br />
66
7 Maintenance<br />
T Replace the cappuccino nozzle.<br />
T Place a receptacle under the hot water and coffee spout and<br />
the cappuccino nozzle.<br />
c T Press the maintenance button.<br />
MACHINE IS DECALCIFYING, water flows out of<br />
the hot water spout and the cappuccino nozzle.<br />
UNIT IS HEATING, RINSING water flows out of<br />
the coffee spout.<br />
The process stops automatically, TRAY / GROUNDS<br />
EMPTY.<br />
T Empty the drip tray and coffee grounds container and put<br />
them back into the machine.<br />
The descaling operation is now complete. Your <strong>IMPRESSA</strong><br />
heats up and is once again ready to use.<br />
E<br />
If the descaling operation stops unexpectedly, rinse the water<br />
tank thoroughly.<br />
<strong>Manual</strong> descaling<br />
You can initiate the operation ‘Descaling the machine’ manually.<br />
Precondition: COFFEE READY appears on the display and the<br />
filter is not activated.<br />
k T Keep the Rotary Switch pressed until MAINTENANCE<br />
appears.<br />
k T Press the Rotary Switch to enter the programme item.<br />
CAPPUCCINO CLEANING<br />
g T Turn the Rotary Switch until DESCALE MACHINE is<br />
displayed.<br />
k T Press the Rotary Switch.<br />
DECALCIFYING TIME 45 MIN / START YES<br />
T Continue with the second prompt to take action (indicated<br />
by a T), as is described under ‘Descaling following a<br />
prompt’.<br />
67
7 Maintenance<br />
Rinsing the<br />
cappuccino nozzle<br />
Each time milk has been prepared the <strong>IMPRESSA</strong> displays a prompt<br />
<strong>for</strong> cappuccino rinsing.<br />
It can be set in programming mode whether the rinsing prompt is<br />
displayed immediately or 10 minutes after preparation (refer to<br />
Chapter 6 ‘Permanent settings in programming mode – Rinses’).<br />
Rinsing the cappuccino<br />
nozzle after prompt<br />
Cleaning the<br />
cappuccino nozzle<br />
CAUTION<br />
Precondition: COFFEE READY / CAPPU. RINSING is<br />
shown on the display, the maintenance button c lights up.<br />
T Place a receptacle under the cappuccino nozzle.<br />
T Turn the selection lever of the nozzle to the steam position<br />
n.<br />
c T Press the maintenance button.<br />
CAPPUCCINO RINSING, the cappuccino nozzle is<br />
rinsed.<br />
Preparation stops automatically. COFFEE READY<br />
appears on the display.<br />
To ensure that the cappuccino nozzle works perfectly, you should<br />
clean it daily when you have been preparing milk.<br />
If the wrong cleaning agent is used, the machine could be damaged<br />
and/or traces of detergent could be left behind in the water.<br />
T <strong>Use</strong> only original <strong>JURA</strong> care products.<br />
E<br />
E<br />
@<br />
The <strong>IMPRESSA</strong> will not prompt you to clean the cappuccino<br />
nozzle.<br />
The <strong>JURA</strong> Auto-Cappuccino Cleaner is available from stockists.<br />
You can also try out the ‘Cleaning the cappuccino nozzle’<br />
operation online. Visit the Knowledge Builder at<br />
www.jura.com.<br />
68
7 Maintenance<br />
Starting cappuccino<br />
cleaning manually<br />
Cleaning the cappuccino<br />
nozzle after prompt<br />
Precondition: COFFEE READY is shown on the display.<br />
k T Keep the Rotary Switch pressed until MAINTENANCE<br />
appears.<br />
k T Press the Rotary Switch to enter the programme item.<br />
CAPPUCCINO CLEANING<br />
k T Press the Rotary Switch.<br />
CLEANER FOR CAPPUCCINO / PRESS BUTTON<br />
T Pour 250 ml of fresh water into a container and add one<br />
capful (max. 15 ml) of Auto-Cappuccino Cleaner.<br />
T Immerse the milk pipe in the receptacle.<br />
T Turn the selection lever to the milk foam position p or<br />
milk t.<br />
T Place another receptacle under the cappuccino nozzle.<br />
c T Press the maintenance button.<br />
CAPPUCCINO CLEANING, the nozzle and pipe are<br />
cleaned.<br />
WATER FOR CAPPUCCINO / PRESS BUTTON<br />
T Rinse the receptacle thoroughly, fill it with approx. 250 ml<br />
of fresh water and immerse the milk pipe in the water.<br />
T Empty the receptacle and place it under the nozzle once<br />
more.<br />
c T Press the maintenance button.<br />
CAPPUCCINO CLEANING, the nozzle and pipe are<br />
rinsed with fresh water.<br />
COFFEE READY appears on the display. Your <strong>IMPRESSA</strong><br />
is once more ready to use.<br />
If milk has been prepared, but the cappuccino nozzle has not been<br />
cleaned, the CLEAN MILK SYSTEM prompt is displayed when<br />
the machine is switched off. The maintenance programme can be<br />
started by pressing the maintenance button c.<br />
Precondition: CLEANER FOR CAPPUCCINO / PRESS<br />
BUTTON appears on the screen and the maintenance button c<br />
lights up.<br />
T Continue with the fourth prompt to take action (indicated<br />
by a T), as is described under ‘Start cappuccino cleaning<br />
manually’.<br />
69
7 Maintenance<br />
Dismantling and<br />
rinsing the<br />
cappuccino nozzle<br />
T Carefully pull off the cappuccino nozzle.<br />
T Dismantle the cappuccino nozzle completely.<br />
T Rinse all the nozzle parts thoroughly under running water.<br />
T Reassemble the cappuccino nozzle and attach it once more<br />
to the connector.<br />
Removing <strong>for</strong>eign<br />
objects<br />
Even the highest-quality coffee beans can contain <strong>for</strong>eign objects.<br />
These can block the grinder.<br />
Q T Switch your machine off with the On/Off button.<br />
3 T Switch your machine off at the power switch.<br />
T Open the cover of the bean container and remove the aroma<br />
preservation cover.<br />
T Remove the beans with a vacuum cleaner.<br />
T Position the grinder key.<br />
T Turn the key counterclockwise until the jammed <strong>for</strong>eign<br />
object is released, and remove the object.<br />
T Fill the bean container with coffee beans, then close the<br />
aroma preservation cover and the bean container cover.<br />
Cleaning the bean<br />
container<br />
Coffee beans may be covered with a slight oil film which remains on<br />
the walls of the bean container. These residues may negatively affect<br />
the coffee results. For this reason clean the bean container from<br />
time to time.<br />
Precondition: COFFEE READY / FILL BEANS is shown on<br />
the display.<br />
Q T Switch your machine off with the On/Off button.<br />
3 T Switch your machine off at the power switch.<br />
T Open the cover of the bean container and remove the aroma<br />
preservation cover.<br />
70
7 Maintenance<br />
T Clean the bean container with a soft, dry cloth.<br />
T Fill the bean container with coffee beans, then close the<br />
aroma preservation cover and the bean container cover.<br />
The cleaning of the bean container is now complete.<br />
Descaling the<br />
water tank<br />
Limescale deposits may <strong>for</strong>m in the water tank. To ensure correct<br />
function of the machine, descale the water tank from time to time.<br />
T Remove the water tank.<br />
T If you use a CLARIS plus filter cartridge, remove this.<br />
T Descale the tank with a mild, commercially available descaling<br />
agent in accordance with the instructions of the manufacturer.<br />
T Rinse the water tank with clean water afterwards.<br />
T If you use a CLARIS plus filter cartridge, insert this again.<br />
T Fill the water tank with fresh, cold water and reinsert.<br />
71
7 Maintenance<br />
72
8 CLARIS plus filter cartridge – Water <strong>for</strong> perfect coffee<br />
8 CLARIS plus filter cartridge – Water <strong>for</strong> perfect coffee<br />
As fresh as from the<br />
spring<br />
Anyone who has ever drunk fresh spring water knows: There is a<br />
world of difference between the elixir of life in its natural <strong>for</strong>m and<br />
the processed fluid that comes out of our taps. Very few of us have<br />
ready access to a spring.<br />
The answer to this is: CLARIS plus filter cartridge from <strong>JURA</strong>. It trans<strong>for</strong>ms<br />
the hardness of the mains water into pH-neutral water. On top<br />
of this, CLARIS plus can protect your fully automated coffee/ Espresso<br />
machine against scale, and used properly, can prolong the service<br />
life of your machine.<br />
Our mains water is of very high quality and is excellent <strong>for</strong> drinking.<br />
It is subject to ongoing health checks, meets strict, legally binding<br />
quality requirements and contains the most important minerals<br />
and fluorides.<br />
Water – always<br />
pleasant and freshly<br />
filtered<br />
<strong>Use</strong> of CLARIS plus filter cartridges guarantees you freshly filtered,<br />
delicious-tasting water <strong>for</strong> your tea and coffee at all times. Designed<br />
specially <strong>for</strong> <strong>JURA</strong> coffee machines, it has neutral pH and is placed<br />
directly in the water tank.<br />
This gives you three important benefits:<br />
Z The guarantee that your water is freshly filtered be<strong>for</strong>e any<br />
cup of coffee is prepared;<br />
Z Fresh water and unadulterated aromas guarantee your palate<br />
the coffee experience of a lifetime;<br />
Z Lifelong protection <strong>for</strong> your <strong>IMPRESSA</strong> (eliminating the need<br />
<strong>for</strong> descaling).<br />
CLARIS plus from <strong>JURA</strong> is hard on scale, but soft on your coffee<br />
machine.<br />
73
8 CLARIS plus filter cartridge – Water <strong>for</strong> perfect coffee<br />
Quality knows no<br />
compromises<br />
Quality from A to Z<br />
No more descaling<br />
Interaction of organic<br />
materials<br />
Water freshly filtered<br />
on the ‘just in time’<br />
principle<br />
You can see it at work on your household appliances every day. Left<br />
to its own devices, scale can cause serious damage. Over time, scale<br />
is deposited on the heating elements, clogging the heating elements<br />
and pipes. Scale is also detrimental to the quality of your<br />
chosen drinks because, with the passage of time, the water will no<br />
longer be properly heated. Consequently: The result is that the<br />
coffee will taste weaker, Espresso will lose its strength and tea will<br />
taste bland. In other words: All enjoyment will be lost.<br />
When you buy coffee, Espresso or tea specialities, aren‘t you careful<br />
to buy top quality? In that case, you should insist on the same <strong>for</strong><br />
your water. You will taste and smell the difference the moment you<br />
start using the CLARIS plus filter cartridge. The water will taste purer<br />
and you will be thrilled by the flavour of your coffee specialities.<br />
If you use CLARIS plus filter cartridges regularly, you will be able to<br />
omit the time-consuming business of regular descaling. And your<br />
coffee machine will reward you with a longer service life. We recommend<br />
use of CLARIS plus wherever water is harder than 10° German<br />
hardness (dH). You can determine the water hardness be<strong>for</strong>e using<br />
your <strong>JURA</strong> coffee machine <strong>for</strong> the first time with the Aquadur® test<br />
strip included in the Welcome Pack.<br />
The CLARIS plus filter cartridge was developed specially <strong>for</strong> <strong>JURA</strong><br />
fully automatic coffee/Espresso machines. It contains a granulate<br />
consisting of ion exchangers and active carbon – in other words,<br />
pure, organic materials with no chemical additives. These agents<br />
work together to reduce the <strong>for</strong>mation of calcium deposits, heavy<br />
metals and other harmful substances contained in mains water.<br />
Other substances detrimental to flavour and aroma, such as chlorine,<br />
are also largely eliminated. Minerals and fluorides contained in the<br />
water are, of course, retained.<br />
Unlike other water filtering systems <strong>for</strong> domestic use, CLARIS plus<br />
works according to the professional up-flow principle. Practically<br />
speaking: Only the precise amount of water required <strong>for</strong> a given<br />
beverage is drawn in, and this is filtered directly be<strong>for</strong>e use.<br />
74
8 CLARIS plus filter cartridge – Water <strong>for</strong> perfect coffee<br />
Up-flow principle<br />
Easy to operate<br />
Economical in use<br />
The water flows through the filter at a constant speed, disturbing the<br />
granulate and ensuring that it is used evenly. This system ensures<br />
that the filter is used to optimum effect. The remaining water in the<br />
tank is left untouched until the next cup of coffee is made.<br />
Inserting the CLARIS plus filter cartridge couldn‘t be easier. It is<br />
described in Chapter 2, ‘Preparing and using <strong>for</strong> the first time –<br />
Using and activating filter’.<br />
After 50 litres of water have been dispensed or after two months at<br />
the latest, the filter will cease to work. After this, the cartridge must<br />
be replaced. Your <strong>JURA</strong> coffee machine will prompt you to change<br />
the filter.<br />
This process is described in detail in Chapter 7, ‘Maintenance –<br />
changing the filter’.<br />
You can return used filter cartridges to the stockist. They are returned<br />
<strong>for</strong> recycling to protect the environment.<br />
Maintenance and storage<br />
The CLARIS plus filter cartridge only needs to be removed from the<br />
water tank if you are away <strong>for</strong> a lengthy period of time or if you wish<br />
to clean or descale the tank using a conventional product.<br />
If you do plan to be away <strong>for</strong> some time (e.g. <strong>for</strong> a holiday), we<br />
recommend that you do the following to store the filter cartridge.<br />
Remove the cartridge from the water tank. Place it in a glass with<br />
about two centimetres of water and put it in the fridge.<br />
We recommend that you run about half a litre of water through the<br />
machine be<strong>for</strong>e starting to make coffee again. The water could be<br />
discoloured, but this is not harmful to your health.<br />
75
8 CLARIS plus filter cartridge – Water <strong>for</strong> perfect coffee<br />
Pictures on the next few pages:<br />
1 Water – always pleasant and freshly filtered.<br />
2 CLARIS plus filter cartridges do not require any accessories and do not<br />
take up any extra space. They can be inserted directly into the water tank.<br />
3 4 Water <strong>for</strong> perfect coffee specialities.<br />
5 The professional up-flow principle: Only the precise amount of water<br />
required <strong>for</strong> a given beverage is drawn in, and this is filtered directly be<strong>for</strong>e<br />
use.<br />
6 Stainless steel pipes in the heater element: With CLARIS plus (left) you<br />
can omit the time-consuming descaling operation (right).<br />
7 The following substances are filtered out through the interaction with<br />
organic materials: calcium (Ca), chlorine (Cl), lead (Pb), copper (Cu),<br />
aluminium (Al).<br />
76
1<br />
2<br />
3
5<br />
6 7
9 ‘The milk makes the difference’<br />
9 ‘The milk makes the difference’<br />
Coffee specialities are taking the entire planet by storm. Up until a<br />
few years ago, classics, such as Espresso and Café Crème were the<br />
most popular choices. Today, Cappuccino, Latte Macchiato & co.<br />
have well surpassed them.<br />
Trendy specialities<br />
with milk<br />
Most modern<br />
technology<br />
More and more often, one finds milk among the ingredients of the<br />
trendy specialities. It doesn‘t matter whether whole milk or skim<br />
milk is used. It isn‘t the fat content which is crucial <strong>for</strong> the wonderful<br />
foam, but the protein. Heated or frothed, as cream or whipped<br />
cream, no other natural product is combined with coffee as often or<br />
with as much pleasure as milk. There is a wide variety of alternatives<br />
available to allergy sufferers as well: goat/sheep milk, rice milk or soy<br />
milk.<br />
The most modern technology and ingenious Cappuccino nozzles<br />
allow you to delve into the multi-faceted world of coffee speci alities<br />
with every <strong>IMPRESSA</strong>. Here, the milk is not heated to above 75 °C.<br />
This is namely the only way that the inimitable fine foam can be<br />
fully developed.<br />
Thanks to the variable brewing unit, which can prepare between<br />
5 and 16 grams of coffee powder under ideal conditions, you can<br />
make sure that the tastes of the coffee and milk are harmoniously<br />
balanced. Simply allow your imagination to run free in creating new<br />
recipes and add flavour and fineness to your personal favourite<br />
coffee specialities according to your mood.<br />
Frothing as done<br />
by a professional<br />
Make sure you try out the secret Barista tip: Because milk can <strong>for</strong>m<br />
a vortex on the rough surface of a stainless steel pot especially well,<br />
perfect foam can be <strong>for</strong>med in these receptacles. And the professional<br />
also knows what must also be given special attention: Regularly<br />
and thoroughly clean the Cappuccino nozzle, rinse out the milk<br />
container well every evening and store the milk in the refrigerator<br />
overnight.<br />
81
10 Accessories and Service<br />
10 Accessories and Service<br />
Extend your coffee<br />
horizon<br />
Care products<br />
CLARIS plus filter<br />
cartridge<br />
1 Coffee specialities made with milk are very fashionable these<br />
days. The One Touch cappuccino nozzle: The quickest, most direct<br />
and simple way to delve into the world of coffee and to revel in all<br />
its variety.<br />
2 Original <strong>JURA</strong> care products are optimally tailored to the maintenance<br />
programmes. You should there<strong>for</strong>e use only original <strong>JURA</strong><br />
care products. Your <strong>IMPRESSA</strong> will thank you <strong>for</strong> it.<br />
3 The CLARIS plus filter cartridge was developed specially <strong>for</strong> <strong>JURA</strong><br />
coffee machines. It is placed directly into the water tank. CLARIS plus<br />
works according to the professional up-flow principle.<br />
Further in<strong>for</strong>mation on this subject can be found in Chapter 8,<br />
‘CLARIS plus filter cartridge – Water <strong>for</strong> perfect coffee’.<br />
Cleaning tablets<br />
Descaling tablets<br />
Auto-Cappuccino Cleaner<br />
Service<br />
4 Your <strong>IMPRESSA</strong> machine comes with an integrated cleaning<br />
programme. The original <strong>JURA</strong> cleaning tablets are specifically<br />
tailored <strong>for</strong> the machine and optimally dissolve accumulated coffee<br />
oils.<br />
5 Scale is the biggest enemy of all household appliances that<br />
involve the use of mains water. <strong>JURA</strong> has developed a descaling<br />
tablet <strong>for</strong> the <strong>IMPRESSA</strong> which removes scale and at the same time<br />
is easy on your machine.<br />
6 Clean your Professional Cappuccino Frother and Easy-Cappuccino<br />
Frother with the original Auto-Cappuccino Cleaner from<br />
<strong>JURA</strong>. This will ensure that it is 100% clean.<br />
7 Competent, high-quality service is a top priority as far as <strong>JURA</strong><br />
is concerned, irrespective of whether it is provided by the glassy<br />
service factory of the Swiss parent company or in the authorised<br />
<strong>JURA</strong> service centres all around the world.<br />
8 Every <strong>IMPRESSA</strong> service is preceded by an electronically controlled<br />
diagnostic run.<br />
9 Service work is per<strong>for</strong>med competently and professionally by<br />
<strong>JURA</strong>‘s trained technicians.<br />
82
1<br />
83
2<br />
84
2<br />
85
3<br />
86
4<br />
5 6<br />
87
7<br />
88
8<br />
9<br />
90
11 Messages on plain text display<br />
11 Display messages<br />
Message Cause/Result Action<br />
TRAY EMPTY<br />
WATER TANK FILL<br />
GROUNDS EMPTY<br />
TRAY MISSING<br />
COFFEE TRAY<br />
MISSING<br />
PRESS RINSE<br />
The drip tray is full. You cannot<br />
prepare any coffee products,<br />
hot water or milk products.<br />
The water tank is empty.<br />
You cannot prepare any coffee<br />
products, hot water or milk<br />
products.<br />
The coffee grounds container<br />
is full. You cannot prepare any<br />
coffee products, but you can<br />
prepare hot water or milk.<br />
The drip tray is not inserted<br />
correctly or is not inserted at<br />
all. You cannot prepare any<br />
coffee products, hot water or<br />
milk products.<br />
The coffee grounds container<br />
is not inserted correctly or is<br />
not inserted at all. You cannot<br />
prepare any coffee products,<br />
hot water or milk products.<br />
The <strong>IMPRESSA</strong> is prompting<br />
you to rinse it.<br />
T Empty the drip tray.<br />
T Fill the water tank<br />
(See Chapter 2, ‘Preparing and<br />
using <strong>for</strong> the first time – Filling<br />
the water tank’).<br />
T Empty the coffee grounds<br />
container and the drip tray.<br />
T Insert the drip tray.<br />
T Clean the metal contacts on<br />
the back of the drip tray.<br />
T Insert the coffee grounds<br />
container.<br />
T Press the maintenance<br />
button to start rinsing.<br />
COFFEE READY /<br />
FILL BEANS<br />
COFFEE READY /<br />
CAPPU. RINSE<br />
The bean container is empty.<br />
You cannot prepare any coffee<br />
products, but you can prepare<br />
hot water or milk.<br />
The <strong>IMPRESSA</strong> is prompting<br />
you to run cappuccino rinsing.<br />
T Fill the bean container<br />
(See Chapter 2, ‘Preparing and<br />
using <strong>for</strong> the first time – Filling<br />
the bean container’).<br />
T Press the maintenance<br />
button to start cappuccino<br />
rinsing.<br />
91
11 Messages on plain text display<br />
Message Cause/Result Action<br />
COFFEE READY /<br />
CLEAN<br />
COFFEE READY /<br />
CLEAN (flashes)<br />
CLEAN NOW / CLEAN<br />
(flashes)<br />
COFFEE READY /<br />
DESCALE<br />
COFFEE READY /<br />
DESCALE (flashes)<br />
DECALCIFY NOW /<br />
DESCALE (flashes)<br />
COFFEE READY /<br />
FILTER CHANGE<br />
COFFEE READY /<br />
FILTER CHANGE<br />
(flashes)<br />
CHANGE NOW / FILTER<br />
CHANGE (flashes)<br />
After 220 preparations or<br />
80 switch-on rinses, the<br />
<strong>IMPRESSA</strong> will prompt you to<br />
clean it.<br />
After 250 preparations the<br />
<strong>IMPRESSA</strong> will prompt you to<br />
clean it.<br />
After 260 preparations the<br />
<strong>IMPRESSA</strong> will prompt you to<br />
clean it.<br />
The <strong>IMPRESSA</strong> is prompting<br />
you to descale it.<br />
The <strong>IMPRESSA</strong> is prompting<br />
you to descale it.<br />
The <strong>IMPRESSA</strong> is prompting<br />
you to descale it.<br />
After 2 months or when<br />
50 litres of water have flowed<br />
through the filter, its capacity<br />
is reached.<br />
After 2 months or when<br />
55 litres of water have flowed<br />
through the filter, its capacity<br />
is reached.<br />
After 2 months or when<br />
60 litres of water have flowed<br />
through the filter, its capacity<br />
is reached.<br />
T Clean the machine<br />
(See Chapter 7, ‘Maintenance –<br />
Cleaning the machine’).<br />
T Clean the machine<br />
(See Chapter 7, ‘Maintenance –<br />
Cleaning the machine’).<br />
T Clean the machine<br />
(See Chapter 7, ‘Maintenance –<br />
Cleaning the machine’).<br />
T Descale the machine<br />
(See Chapter 7, ‘Maintenance –<br />
Descaling the machine’).<br />
T Descale the machine<br />
(See Chapter 7, ‘Maintenance –<br />
Descaling the machine’).<br />
T Descale the machine<br />
(See Chapter 7, ‘Maintenance –<br />
Descaling the machine’).<br />
T Replace the CLARIS plus filter<br />
cartridge (refer to Chapter 7<br />
‘Maintenance – Changing the<br />
filter’).<br />
T Replace the CLARIS plus filter<br />
cartridge (refer to Chapter 7<br />
‘Maintenance – Changing the<br />
filter’).<br />
T Replace the CLARIS plus filter<br />
cartridge (See Chapter 7<br />
‘Maintenance – Changing the<br />
filter’).<br />
92
11 Messages on plain text display<br />
Message Cause/Result Action<br />
CLEANER FOR<br />
CAPPUCCINO /<br />
PRESS BUTTON<br />
BEANCOVER MISSING<br />
The <strong>IMPRESSA</strong> prompts you to<br />
clean the cappuccino nozzle.<br />
The beancover is not inserted<br />
correctly or is not inserted at<br />
all. You cannot prepare any<br />
coffee products, but you can<br />
prepare hot water or milk.<br />
T Per<strong>for</strong>m cappuccino<br />
cleaning (refer to Chapter 7<br />
‘Maintenance – Cleaning the<br />
cappuccino nozzle’).<br />
T Insert the beancover.<br />
PRE-GROUND /<br />
NOT ENOUGH<br />
P0WDERFUNNEL<br />
TOO HOT<br />
There is too little pre-ground<br />
coffee in the filler funnel. The<br />
<strong>IMPRESSA</strong> stops the operation.<br />
The powder funnel <strong>for</strong> preground<br />
coffee is not fitted.<br />
System is too hot to begin a<br />
maintenance programme.<br />
T The next time you make<br />
coffee use more pre-ground<br />
coffee (refer to Chapter 5,<br />
‘Preparation – Pre-ground<br />
coffee’).<br />
T Insert the powder funnel.<br />
T Prepare a coffee speciality or<br />
hot water.<br />
93
12 Troubleshooting<br />
12 Troubleshooting<br />
Problem Cause/Result Action<br />
Grinder is making a very<br />
loud noise.<br />
The frother does not<br />
produce enough milk<br />
foamor milk sprays from<br />
the cappuccino nozzle.<br />
Coffee only comes out<br />
in drips when it is being<br />
prepared.<br />
Water hardness cannot be<br />
adjusted.<br />
COFFEE READY /<br />
FILL BEANS<br />
is displayed, although the<br />
bean container has been<br />
filled.<br />
COFFEE READY /<br />
FILL BEANS<br />
is not displayed although<br />
the bean container is<br />
empty.<br />
TRAY EMPTY<br />
stays on constantly.<br />
WATER TANK FILL<br />
is displayed although the<br />
water tank is full.<br />
There are <strong>for</strong>eign objects<br />
in the grinder.<br />
The cappuccino nozzle is<br />
dirty.<br />
Coffee or pre-ground<br />
coffee has been ground<br />
too finely and is blocking<br />
the system.<br />
The CLARIS plus filtercartridge<br />
is activated.<br />
The grinder is not yet<br />
completely filled with<br />
beans.<br />
The bean monitor is<br />
dirty.<br />
The metal contacts of the<br />
drip tray are dirty or wet.<br />
The water tank float is<br />
trapped.<br />
T Remove the <strong>for</strong>eign objects (see<br />
Chapter 7, ‘Maintenance – Removing<br />
<strong>for</strong>eign objects’).<br />
T Rinse and clean the cappuccino<br />
nozzle (see Chapter 7, ‘Maintenance –<br />
Cappuccino nozzle’).<br />
T Put the grinder on a coarser setting<br />
or use coarser pre-ground coffee (refer<br />
to Chapter 2, ‘Preparing and using <strong>for</strong><br />
the first time – Adjusting grinder’).<br />
T Deactivate the CLARIS plus filter<br />
cartridge.<br />
T Prepare a coffee speciality.<br />
T Clean the bean container<br />
(see Chapter 7, ‘Maintenance –<br />
Cleaning the bean container’).<br />
T Clean the metal contacts on the back<br />
of the drip tray.<br />
T Descale the water tank<br />
(see Chapter 7, ‘Maintenance –<br />
Descaling the water tank’).<br />
94
12 Troubleshooting<br />
Problem Cause/Result Action<br />
ERROR 2 is displayed.<br />
Other ERROR messages<br />
are displayed.<br />
If the device was exposed<br />
to the cold <strong>for</strong> a long<br />
period of time, it is<br />
disabled from heating up<br />
due to safety reasons.<br />
T Warm up the device at room<br />
temperature.<br />
– T Turn the <strong>IMPRESSA</strong> off at the power<br />
switch. Contact Customer Support<br />
in your country (see Chapter 16 ‘<strong>JURA</strong><br />
contact details’).<br />
E<br />
If you have not been able to solve the problem, contact<br />
Customer Support in your country. You will find the phone<br />
number in Chapter 16, ‘<strong>JURA</strong> contact details’.<br />
95
13 Transport and environmentally neutral disposal<br />
13 Transport and environmentally neutral disposal<br />
Transport / Empty<br />
system<br />
Keep the packaging of your <strong>IMPRESSA</strong>. It should be used to protect<br />
the machine during transportation.<br />
In order to protect the <strong>IMPRESSA</strong> from frost during transportation,<br />
the system must be emptied.<br />
Precondition: The <strong>IMPRESSA</strong> must be switched off (standby).<br />
T Remove the water tank.<br />
T Place a receptacle under the hot water spout and below the<br />
cappuccino nozzle.<br />
c T Press the maintenance button until SYS. EMPTY. is<br />
displayed.<br />
A small amount of water flows from the cappuccino nozzle<br />
and the hot water spout. The operation stops automatically.<br />
The <strong>IMPRESSA</strong> will switch itself off.<br />
3 T Turn your <strong>IMPRESSA</strong> off at the power switch.<br />
E<br />
The next time you use the machine the system must be<br />
refilled (see Chapter 2, ’Preparing and using your the machine<br />
or the first time –First-time use’).<br />
Disposal<br />
H<br />
Please dispose of old machines in an environmentally neutral way.<br />
Old machines contain valuable materials which should be salvaged<br />
<strong>for</strong> recycling. Please there<strong>for</strong>e dispose of old machines via your<br />
regional collection system.<br />
96
14 Technical data<br />
14 Technical data<br />
Rating plate<br />
E<br />
The voltage and current vary according to the safety test.<br />
Please refer to the rating plate be<strong>for</strong>e connecting the device.<br />
The rating plate is located on the bottom of your <strong>IMPRESSA</strong>. The<br />
in<strong>for</strong>mation shown on the rating plate has the following meaning:<br />
Z<br />
Z<br />
V AC = alternating current in volts<br />
W = power output in watts<br />
A<br />
This product complies with all applicable EU directives.<br />
S<br />
This product meets the requirements of the Decree concerning<br />
Low Voltage Electrical Products and the Decree concerning<br />
Electromagnetic Compatibility (VEMV). This is issued by<br />
the ESTI (Swiss Federal Inspectorate <strong>for</strong> Heavy Current Installations).<br />
F<br />
This product complies with all applicable UL directives<br />
(Underwriters Laboratories Inc. ® ).<br />
D<br />
This product complies with all applicable SAA directives<br />
(Standards Association of Australia).<br />
G<br />
This product complies with all applicable CCC directives<br />
(China Compulsory Certification).<br />
97
14 Technical data<br />
Technical data<br />
Voltage<br />
Power<br />
Safety test<br />
Energy Save No<br />
Energy Save Level 1<br />
Energy Save Level 2<br />
Pump pressure<br />
Holding capacity of water tank<br />
Holding capacity of bean<br />
container<br />
Holding capacity of coffee<br />
grounds container<br />
Cable length<br />
Weight<br />
Dimensions (W x H x D)<br />
A S 230 V AC, 50 Hz<br />
F 120 V AC, 60 Hz<br />
D 220 –240 V AC, 50 Hz<br />
G 220 V AC, 50 Hz<br />
1350 W<br />
S D F G<br />
23 Wh<br />
16 Wh<br />
14 Wh<br />
Static max. 15 bar<br />
2.8 l<br />
280 g<br />
Approx. 20 servings<br />
Approx. 1.1 m<br />
13.3 kg<br />
31 x 37 x 43.5 cm<br />
98
14 Technical data<br />
99
15 Key technologies<br />
15 Key technologies and products<br />
1 Intelligent Pre Brew Aroma System (I.P.B.A.S. © ).<br />
Perfect coffee is no accident. The Intelligent Pre Brew Aroma System ©<br />
produces the very best in flavour from every coffee blend and<br />
roast.<br />
1a The freshly ground coffee beans are delivered to the infusing<br />
cylinder as a powder from the grinder.<br />
1b There it is optimally compressed.<br />
1c Prior to brewing, the powder is moistened. The pores swell and<br />
the flavours are released.<br />
1d During brewing, perfect coffee is delivered to the cup, crowned<br />
by a velvety, soft crema <strong>for</strong> perfect enjoyment.<br />
2 The <strong>IMPRESSA</strong> range of products includes the following series:<br />
Z <strong>IMPRESSA</strong> Z series, Cappuccino at the touch of a button, premium<br />
professional technology <strong>for</strong> domestic use.<br />
Z <strong>IMPRESSA</strong> S series <strong>for</strong> demanding households<br />
Z <strong>IMPRESSA</strong> J series, Perfect Enjoyment, Perfect Aesthetics<br />
Z <strong>IMPRESSA</strong> F series, simple operation, multi-winner<br />
Z <strong>IMPRESSA</strong> C series, Click & Drink<br />
Z <strong>IMPRESSA</strong> X series <strong>for</strong> catering and office applications<br />
Obtain the advice of the <strong>JURA</strong> experts.<br />
@<br />
You will find the purchase advisor at www.jura.com.<br />
3 For perfect coffee quality it is important to get the grinding<br />
right. To this end, a powerful 6-level powerful conical burr grinder<br />
with grinding cones constructed out of hardened steel is provided.<br />
4 The variable brewing unit holds between 5 and 16 g of coffee.<br />
This means that two cups can be prepared at once in a single brewing<br />
operation.<br />
5 Durable pipes constructed from a high-quality steel alloy conduct<br />
the water through the thermoblocks where it is heated to the<br />
correct temperature.<br />
100
1<br />
1a<br />
1b<br />
1c<br />
1d
2<br />
<strong>IMPRESSA</strong> Z<br />
<strong>IMPRESSA</strong> S<br />
<strong>IMPRESSA</strong> J<br />
<strong>IMPRESSA</strong> F
<strong>IMPRESSA</strong> C<br />
<strong>IMPRESSA</strong> X<br />
<strong>IMPRESSA</strong> XF
3<br />
4 5
16 <strong>JURA</strong> contact details<br />
16 <strong>JURA</strong> contact details<br />
A<br />
Australia<br />
Global Coffee Solutions Pty Ltd.<br />
Customer Service Phone +61 1300 552 883<br />
Fax +61 0242 846 099<br />
E-mail info@globalcoffee.com.au<br />
Opening Hours<br />
Distributor Address/<br />
Service Address<br />
B<br />
Monday to Friday<br />
8:00 am – 5:00 pm<br />
Global Coffee Solutions Pty Ltd<br />
5/77 Jardine Street<br />
Fairy Meadow NSW 2519<br />
Bangladesh<br />
Please contact the Singapore office <strong>for</strong> details.<br />
Brunei<br />
Please contact the East Malaysian office <strong>for</strong> details.<br />
Burma<br />
Please contact the Singapore office <strong>for</strong> details.<br />
C<br />
Cambodia<br />
Please contact the Singapore office <strong>for</strong> details.<br />
Canada<br />
Faema Canada<br />
Customer Service Phone (416) 535-1555<br />
Toll free (877) 323-6226<br />
Fax (416) 535-3843<br />
E-mail espresso@faema.net<br />
China<br />
Shanghai HJ Coffee Co., Ltd.<br />
Customer Service<br />
Phone +86 21 62940690 ext.31<br />
E-mail service@hjcoffee.com<br />
Opening Hours Monday to Friday 09:00 – 17:30<br />
Distributor Address/<br />
Service Address<br />
Czech Republic<br />
Petraco, Spol. S R.O.<br />
Shanghai HJ Coffee Co., Ltd.<br />
Room D 3F, building one<br />
Xinhua Road No. 543<br />
Shanghai 200052<br />
Customer Service Phone +420 775 997 557<br />
E-mail dokladal@juraswiss.cz<br />
Opening Hours Monday to Thursday 9:00 – 17:00<br />
Friday 9:00 – 15:00<br />
Distributor Address/<br />
Service Address<br />
D<br />
Denmark<br />
Scandinavian CoffeeSystem Aps<br />
Petraco, Spol. S R.O.<br />
Udolni 5<br />
602 00 Brno<br />
Customer Service Phone +45 7020 7333<br />
Fax +45 7020 7343<br />
E-mail service@coffeesystem.com<br />
Opening Hours Monday to Thursday 09:00 – 16:30<br />
Friday 09:00 – 16:00<br />
Distributor Address/<br />
Service Address<br />
Scandinavian CoffeeSystem Aps<br />
Tordenskjoldsgade 19<br />
1055 Kobenhavn K<br />
Opening Hours<br />
Distributor Address/<br />
Service Address<br />
Monday to Friday<br />
9:00 am – 6:00 pm<br />
Saturday 10:00 am – 5:00 pm<br />
Faema Canada<br />
672 Dupont Street, Suite 201<br />
Toronto, Ontario M6G 1Z6<br />
105
16 <strong>JURA</strong> contact details<br />
E<br />
Estonia<br />
Infomelton OÜ<br />
Customer Service Phone +372 651 88 55<br />
+372 651 88 50<br />
E-mail lavazza@lavazza.ee<br />
Opening Hours Monday to Friday 09:00 – 17:00<br />
Distributor Address/<br />
Service Address<br />
F<br />
Infomelton OÜ<br />
Weizenbergi 27<br />
Tallinn 10150<br />
Finland<br />
Home Appliance Brokers HAB Oy<br />
Customer Service Phone +358 207 300 090<br />
E-mail info@haboy.fi<br />
Opening Hours Monday to Friday 08:00 – 16:00<br />
Distributor Address<br />
Service Address<br />
G<br />
Greece<br />
COFFEE CONNECTION S.A.<br />
Home Appliance Brokers HAB Oy<br />
Elimäenkatu 29, 00510 Helsinki<br />
Monilaite-Thomeko Oy<br />
Salpakuja 6, 01200 Vantaa<br />
Customer Service Phone +30 210 66 40 640<br />
E-mail coffeeway@coffeeway.com<br />
Opening Hours Monday to Friday 09:00 – 17:00<br />
Distributor Address/<br />
Service Address<br />
H<br />
Hong Kong PRC<br />
Pacific Coffee Company Ltd<br />
COFFEE CONNECTION S.A.<br />
Agiou Louka str. Peania<br />
Attica 190 02<br />
Customer Service Phone +852 2805 1627<br />
E-mail sales@pacificcoffee.com<br />
Opening Hours<br />
Distributor Address/<br />
Service Address<br />
I<br />
Iceland<br />
Karl K. Karlsson<br />
Monday to Friday<br />
9:00 am – 6:00 pm<br />
Saturday 9:00 am – 1:00 pm<br />
Pacific Coffee Company Ltd<br />
701–704 Hollywood Center<br />
233 Hollywood Road, Sheung Wan<br />
Customer Service Phone +354 540 9003<br />
E-mail karlk@karlsson.is<br />
Opening Hours Monday to Friday 09:00 – 18:00<br />
Distributor Address/<br />
Service Address<br />
Indonesia Bali<br />
BHINEKA JAYA<br />
Karl K. Karlsson<br />
Pacific Coffee Company Ltd<br />
Skútuvogur 5, 104 Reykjavík<br />
Customer Service Phone +62 361 724746<br />
Mobile Nr. +62 81 23817951 or<br />
+62 361 7460521<br />
E-mail vivi@kopibali.com<br />
Opening Hours Monday to Saturday 08:30 – 16:30<br />
Distributor Address/<br />
Service Address<br />
Indonesia Jakarta<br />
SUKSES PRATAMA JAYA P.T.<br />
BHINEKA JAYA<br />
Jl. Pulau Moyo 9A, Denpasar, Bali<br />
Customer Service Phone +62 21 6331177<br />
Fax +62 21 63857008<br />
E-mail cs@suprajaya.com<br />
Opening Hours Monday to Saturday 09:00 – 17:00<br />
Service Number during off hours: +62<br />
21 6331177<br />
Distributor Address/<br />
Service Address<br />
SUKSES PRATAMA JAYA P.T.<br />
Jalan: K.H. Hasyim Ashari 125<br />
Pusat Niaga Roxy Mas<br />
Blok C.4 No.14–15, Jakarta 10150<br />
106
16 <strong>JURA</strong> contact details<br />
Israel<br />
J.Feffer l.t.d.<br />
Customer Service Phone +972 353 350 38<br />
Fax +972 353 305 54<br />
E-mail feffer-j@barak-online.net<br />
Opening Hours Sunday–Thursday 08:00 – 18:00<br />
Friday 09:00 – 13:00<br />
Distributor Address/<br />
Service Address<br />
K<br />
Korea<br />
HLI Company Limited<br />
J.Feffer l.t.d.<br />
9,Simtat Ma‘ale Hachoma<br />
Ind. Zone<br />
Or-Yehuda 60370, Israel<br />
Customer Service Phone +82 234 522 127<br />
Fax Phone +82 345 229 50<br />
E-mail wj_lee@hlikorea.com<br />
Opening Hours Monday to Friday 09:00 – 18:00<br />
Distributor Address/<br />
Service Address<br />
L<br />
HLI Company Limited<br />
7floor, Sungwon Bldg<br />
Yeoksam-Dong, Kangnam-Ku<br />
Seoul<br />
Labuan<br />
Please contact the East Malaysian office <strong>for</strong> details.<br />
Lativa<br />
CREMA SIA<br />
Customer Service Phone +371 7244082<br />
+371 26622888<br />
E-mail crema@crema.lv<br />
Opening Hours Monday to Friday 10:00 – 17:00<br />
Distributor Address/<br />
Service Address<br />
CREMA SIA<br />
Gertrudes 86, Riga, LV-1009<br />
Lithuania<br />
JSC Pretendentas<br />
Customer Service Phone + 370 315 73442<br />
Mobile +370 650 84779<br />
E-mail alma@pretendentas.lt<br />
Opening Hours Monday to Friday 09:00 – 18:00<br />
Distributor Address/<br />
Service Address<br />
M<br />
Malaysia, East<br />
RICMAS Borneo Sdn. Bhd.<br />
JSC Pretendentas<br />
62161 Alytus, str. Ulonu 33<br />
Customer Service Phone +60 88 456 100, –200<br />
Fax +60 88 241 600<br />
E-mail jura@ricmas-malaysia.com<br />
Opening Hours Monday to Friday 09:00 – 17:30<br />
Service Number during off hours: +60<br />
16 830 60 83<br />
Distributor Address/<br />
Service Address<br />
Malaysia, West<br />
RICMAS Peninsular Sdn. Bhd.<br />
RICMAS Borneo Sdn. Bhd.<br />
Unit # E3–8, 3rd Floor<br />
Block E, Plaza Tanjung Aru<br />
Jalan Mat Salleh, Tanjung Aru<br />
88150 Kota Kinabalu, Sabah<br />
Customer Service Phone +6 03 4296 5989<br />
Fax +6 03 4297 5636<br />
E-mail jura@ricmas-malaysia.com<br />
Opening Hours Monday to Friday 09:00 – 17:30<br />
Service Number during off hours:<br />
016 201 5789<br />
Office Address/ Service<br />
Address<br />
RICMAS Peninsular Sdn. Bhd.<br />
3A-1 Jalan Perubatan 3<br />
Pandan Indah<br />
55100 Kuala Lumpur<br />
107
16 <strong>JURA</strong> contact details<br />
N<br />
New Zealand<br />
Euro Espresso Ltd.<br />
Customer Service Phone +64 9 277 1334<br />
Fax +64 9 277 9375<br />
E-mail info@euroespresso.co.nz<br />
Opening Hours<br />
Distributor Address/<br />
Service Address<br />
Norway<br />
Black Cat Kaffe og Tehus AS<br />
Monday to Friday<br />
8.30 am – 5:00 pm<br />
6 Mepal Place, Manukau City,<br />
Auckland<br />
PO Box 76–342, Manukau City,<br />
Auckland 1730<br />
Customer Service Phone +47 22 06 29 90<br />
Fax +47 22 06 29 99<br />
E-mail<br />
info@blackcatkaffeogtehus.no<br />
Opening Hours Monday to Friday 08:30 – 16:30<br />
Distributor Address/<br />
Service Address<br />
P<br />
Philippines<br />
Pacific Continental Company Inc.<br />
Black Cat Kaffe og Tehus AS<br />
Aslakveien 20h, 0753 Oslo<br />
Customer Service Phone +63 2 551 3216<br />
Fax +63 2 831 8314<br />
E-mail jura@conlinscoffee.com<br />
Opening Hours Monday to Friday 09:00 – 18:00<br />
Service Number during off hours: +63<br />
916 5294052<br />
Distributor Address/<br />
Service Address<br />
Pacific Continental Company Inc.<br />
2753 Park Avenue, Pasay City<br />
Metro Manila 1300<br />
Puerto Rico<br />
ProExpo CA Consultores S.A.<br />
Customer Service Phone +506 234 7404<br />
Fax +506 253 5296<br />
E-mail info@grupocapresso.com<br />
Distributor Address/<br />
Service Address<br />
S<br />
Saudi Arabia<br />
Saudi Marketing Solutions<br />
ProExpo CA Consultores S.A.<br />
P.O. Box 75-2120<br />
Calle Blancos, San Jose<br />
Customer Service Phone +9661 201 2053<br />
Fax +9661 201 2056<br />
E-mail info@sms-arabia.com<br />
Opening Hours<br />
Saturday to Wednesday<br />
09:00 – 13:00 and 17:00 – 21:00<br />
Distributor Address P.O.Box 12679 Jeddah 21483<br />
Service Address<br />
Singapore<br />
RICMAS INTERNATIONAL Pte. Ltd.<br />
Aruba & Muhandis Musad<br />
Al-Anqari Street Intersection, Riyadh<br />
Customer Service Phone +65 6562 8853<br />
Fax +65 6562 8854<br />
E-mail jura@ricmas.com<br />
Opening Hours Monday to Friday 09:00 – 17:30<br />
Service Number during off hours: +65<br />
90210314<br />
Office Address/ Service<br />
Address<br />
RICMAS INTERNATIONAL Pte. Ltd.<br />
25 International Business Park<br />
German Center #01–57/58<br />
Singapore 609916<br />
108
16 <strong>JURA</strong> contact details<br />
South Africa<br />
International Coffee Equipment CC<br />
Customer Service Phone +27 11 708 2481<br />
E-mail info@icesa.za.net<br />
Opening Hours Monday to Friday 08.00 – 17.00<br />
Saturday 08.00 – 13.00<br />
Office Address<br />
Service Address<br />
T<br />
Taiwan<br />
Eurocafé Corporation<br />
International Coffee Equipment CC<br />
<strong>JURA</strong> Corner Building, Showroom<br />
475/3 Hans Strydom Drive<br />
KYA Sand<br />
International Coffee Equipment CC<br />
<strong>JURA</strong> Corner Building, 1st Floor<br />
475/3 Hans Strydom Drive<br />
KYA Sand<br />
Customer Service Phone +886 2 28272683<br />
Fax +886 2 28225797<br />
E-mail service@eurocafe.com.tw<br />
Opening Hours<br />
Office Address/ Service<br />
Address<br />
Thailand<br />
RICMAS (Thailand) Co., Ltd.<br />
Monday to Friday<br />
9:00 am – 6.00 pm<br />
Eurocafé Corporation<br />
2F, No. 251 Sec. 2 Hsi An Street<br />
Pei-Tou District<br />
Taipei<br />
Customer Service Phone +66 2262 0543<br />
Fax +66 2262 0542<br />
E-mail jura@ricmas-thailand.com<br />
Opening Hours Monday to Friday 09.00 – 17.00<br />
Service Number during off hours:<br />
+66 1828 6996<br />
Office Address/ Service<br />
Address<br />
55 Biohouse Building Sukhumvit<br />
39 Rd.<br />
Klongtan-nue, Wattana,<br />
Bangkok 10110<br />
Turkey<br />
John’s Coffee<br />
Customer Service Phone +90 216 420 2400<br />
Fax +90 216 313 56 32<br />
E-mail info@johnscoffee.com.tr<br />
Opening Hours Monday to Friday 08:30 – 18:00<br />
Office Address/ Service<br />
Address<br />
U<br />
United Arab Emirates<br />
Boncafé Middle East LLC.<br />
John’s Coffee<br />
Imes Sanayi Sitesi C blok 308 Sok.<br />
Yukari Dudullu-Istanbul, 34776<br />
Customer Service Phone +97 14 28 28 742<br />
Fax +44 20 77 222 333<br />
E-mail info@boncafeme.com<br />
Opening Hours Saturday to Thursday 8.30 – 17.30<br />
Service Number during off hours:<br />
+44 870 165 0429<br />
Distributor Address/<br />
Service Address<br />
United Kingdom<br />
Fairfax Coffee Ltd<br />
Boncafé Middle East LLC.<br />
P.O. Box 74044, DUBAI<br />
Customer Service Phone +44 20 7722 7646<br />
Fax +44 20 77 222 333<br />
E-mail info@fairfaxcookshop.com<br />
Opening Hours Monday to Friday 09.00 – 17.30<br />
Distributor Address/<br />
Service Address<br />
V<br />
Fairfax Coffee Ltd<br />
1 Regency Parade, Finchley Road,<br />
London NW3 5EQ<br />
Vietnam<br />
Please contact the Singapore office <strong>for</strong> details.<br />
109
Index<br />
Index<br />
A<br />
Accessories 82<br />
Adjusting grinder 23<br />
Assessing and setting water hardness 22<br />
Automatic switch-off 54<br />
B<br />
Bean container 8<br />
Cleaning 70<br />
Filling 19<br />
C<br />
Cappuccino 42<br />
Cappuccino nozzle<br />
Cleaning 68<br />
Dismantling and rinsing 70<br />
One Touch Cappuccino nozzle 8<br />
One Touch cappuccino nozzle 16<br />
Rinsing 68<br />
Care products 82<br />
CLARIS plus 73, 81<br />
CLARIS plus filter cartridge<br />
Using and activating 21<br />
Clean<br />
Machine 63<br />
Cleaning<br />
Bean container 70<br />
Cappuccino nozzle 68<br />
Coffee 42<br />
Coffee grounds container 8<br />
Coffee spout, height adjustable 8<br />
Cover<br />
Bean container 8<br />
Water tank 8<br />
D<br />
Descale<br />
Machine 65<br />
Descaling<br />
Water tank 71<br />
Display messages 91<br />
Drip tray 8<br />
E<br />
Energy-save mode 51<br />
Espresso 42<br />
F<br />
Filter<br />
Change 61<br />
Using and activating 21<br />
Fineness of grind<br />
Adjusting grinder 23<br />
First-time use 19<br />
First-time use 19<br />
G<br />
Grinding wheel 8<br />
Ground coffee 45<br />
H<br />
Hot milk 46<br />
Hot water 46<br />
Hot water spout 8<br />
I<br />
Internet 17<br />
K<br />
Knowledge Builder 17<br />
L<br />
Language 58<br />
Latte macchiato 43<br />
Logo 57<br />
M<br />
Machine<br />
Clean 63<br />
Descale 65<br />
Rinse 60<br />
Machine accessories 82<br />
Maintenance 60<br />
Maintenance button 9<br />
Maintenance tips 60<br />
Viewing maintenance status 32<br />
Messages on display 91<br />
Milk 81<br />
Hot 46<br />
Milk container<br />
Vacuum milk container 16<br />
110
Index<br />
O<br />
One Touch Cappuccino nozzle 8, 16<br />
P<br />
Pre-ground coffee 45<br />
Preparation<br />
At the touch of a button 40<br />
Cappuccino 42<br />
Coffee 42<br />
Espresso 42<br />
Hot milk 46<br />
Hot water 46<br />
Latte macchiato 43<br />
Pre-ground coffee 45<br />
Ristretto 41<br />
Special coffee 42<br />
Problems<br />
Troubleshooting 94<br />
Programmable switch-on time 53<br />
Programming mode 48<br />
Automatic switch-off 54<br />
Energy-save mode 51<br />
Programmable switch-on mode 53<br />
Rename 58<br />
Rinses 55<br />
Switch-on time 53<br />
Time and weekday 52<br />
R<br />
Rating plate 97<br />
Recipes 34<br />
Removing <strong>for</strong>eign objects 70<br />
Removing stones 70<br />
Rename product name 58<br />
Rinse<br />
Cappuccino nozzle 68<br />
Machine 60<br />
Rinses 55<br />
Ristretto 41<br />
Rotary Switch 9, 16<br />
S<br />
Safety 10<br />
Service 82<br />
Settings<br />
Default settings in programming mode 48<br />
Entering a default setting <strong>for</strong> the amount<br />
of water <strong>for</strong> a cup size 28<br />
One-off settings be<strong>for</strong>e and during<br />
preparation 27<br />
Water hardness 22<br />
Setting up 18<br />
Special coffee 42<br />
Specialities 34<br />
Trendy specialities with milk 81<br />
Standby<br />
Switching off 25<br />
Supplied as standard 18<br />
Switch-off<br />
Automatic 54<br />
Switch-on<br />
Switch-on time 53<br />
Switch-on time, programmable 53<br />
Switching off 25<br />
Standby 25<br />
Switching on<br />
Machine 24<br />
T<br />
Technical data 97<br />
Time and weekday 52<br />
Troubleshooting 94<br />
U<br />
Unit amount of water/Time <strong>for</strong>mat 56<br />
<strong>Use</strong><br />
Proper 10<br />
V<br />
Viewing in<strong>for</strong>mation 32<br />
W<br />
Water tank 8<br />
Descaling 71<br />
Filling 18<br />
111
Art. 67228/<strong>Z5</strong>/en/0708<br />
Directives<br />
The machine complies with the following EU directives:<br />
Z 73/23/EEC of 19 February 1973, Low Voltage Directive including<br />
Amending Directive 93/68/EEC.<br />
Z 89/336/EEC of 3 May 1989, Electromagnetic Compatibility, including<br />
Amending Directive 92/31/EEC.<br />
Technical changes<br />
We reserve the right to make technical changes.<br />
The illustrations used in the <strong>IMPRESSA</strong> <strong>Z5</strong> – Generation II <strong>Manual</strong><br />
show the <strong>IMPRESSA</strong> <strong>Z5</strong> – Generation II Alu model. Your <strong>IMPRESSA</strong><br />
could incorporate minor changes.<br />
Feedback<br />
Your opinion is important to us!<br />
<strong>Use</strong> the contact link at www.jura.com.<br />
The <strong>Instructions</strong> <strong>for</strong> <strong>Use</strong> contain in<strong>for</strong>mation which is protected by<br />
copyright. It is not permitted to photocopy or translate these<br />
<strong>Instructions</strong> <strong>for</strong> <strong>Use</strong> into another language without the express<br />
written consent of <strong>JURA</strong> Elektroapparate AG.<br />
<strong>JURA</strong> Elektroapparate AG<br />
Kaffeeweltstrasse 10<br />
CH-4626 Niederbuchsiten<br />
www.jura.com<br />
112