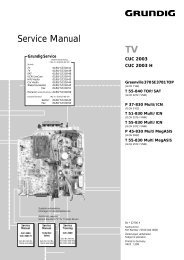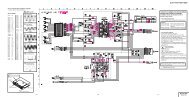
ICC9 - Schematic Diagram - Reptips
ICC9 - Schematic Diagram - Reptips
ICC9 - Schematic Diagram - Reptips

You also want an ePaper? Increase the reach of your titles
YUMPU automatically turns print PDFs into web optimized ePapers that Google loves.
<strong>ICC9</strong><br />
<strong>Schematic</strong> <strong>Diagram</strong>
Teletext - <strong>ICC9</strong><br />
DVT 9001<br />
DVT 9002<br />
DVT 9003<br />
DVT 9100-9102<br />
DVT 9101-9103
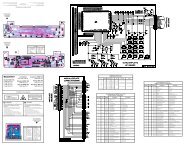
LOCATION OF CONTROLS - EMPLACEMENT DES REGLAGES -<br />
SERVICE LAGEPLAN - POSIZIONE REGULATOR1 DI SERVIZIO -<br />
SITUAClÓN DE LOS AJUSTES<br />
IPO1<br />
1 16 LP10<br />
1<br />
4p<br />
1 21<br />
-K-FL”<br />
I I IF01 TL40<br />
SCART BX02 SCART BXO1<br />
B<br />
LLO5<br />
I<br />
DP61<br />
*<br />
I 1L:<br />
I-<br />
Tubes 4/3<br />
21” MP<br />
25” SF-H<br />
25” FST<br />
28” FST<br />
28” DFS<br />
29” SF-H<br />
33” FST<br />
33” MP<br />
Tubes lii/'l<br />
28" FST<br />
32” SF<br />
3%” FST<br />
\<br />
u-w--<br />
118V<br />
154V<br />
154v<br />
154v<br />
154V<br />
154v<br />
154V<br />
__154V<br />
u<br />
154v<br />
135v<br />
I<br />
Ic;OV t<br />
ADJUSTMENTS - REGLAGES - EINSTELLUNGEN<br />
REGOLAZIONE - AJUSTES<br />
Aligning the television set<br />
Recommended order<br />
- Configuration of the television set<br />
- U System<br />
- Adjusting G2 and Focus<br />
- H-VCO<br />
- Vertical and horizontal geometry<br />
- Video adjustments<br />
- satellite Module<br />
Einstellen des Fernsehgertätes<br />
Empfohlene Reihenfolge<br />
- TV Einstellungen<br />
- U System<br />
- Einstellung G2 und Focus<br />
- H-VCO<br />
- Vertikal und horizontal Geometrie<br />
- Video Abgleich<br />
- Satelliten Baustein<br />
U sys<br />
TV-Keypad<br />
+ / (Volume)<br />
Service MODE<br />
lent, GEOMETR’<br />
VOLI<br />
I<br />
Contrast, brightness and<br />
volume to minimum<br />
Tubes 413<br />
21” MP<br />
25” SF-H<br />
25” FST<br />
28” FST<br />
28” DFS<br />
29” SF-H<br />
33” FST<br />
33” MP<br />
IJ G2<br />
,sutoff<br />
SCREEN<br />
AV (no Signal, black screen:<br />
CRT IBO<br />
pfns 9 i 1<br />
highest output<br />
i-<br />
F OCUI<br />
FOCUS<br />
Test pattern<br />
(standard values)<br />
<strong>ICC9</strong><br />
First issue 02 / 96<br />
3
I<br />
L SERVICE-MODE ri<br />
It is necessary to enter the Service Mode In order to carry out alignment of<br />
the TV set. Most adjustments can be made with the RCU, except the Focus<br />
and Screen voltages<br />
1. Service Mode Access<br />
Important : The Service Mode cannot be entered if any equipment IS<br />
connected to the Scart socket, i.e pin 8 switching voltage present<br />
1 1 With the RCU, switch the TV set into the “Standby” mode.<br />
1.2 Switch “Off” the TV set by mains supply switch (wait until LED IS dark)<br />
1 3 Whilst depressing the RCU “Blue (VT)” button. switch “On” the TV<br />
set using the mains supply switch.<br />
1.4 Release and press once again the RCU “Blue (VT) “ button, the<br />
following “Set-Up” menu should be displayed ”<br />
Der Service-Mode wird fur den Gertäteabgleich benötigt Alle Einstellungen<br />
erfolgen mit der Fernbedlenung FB ( bis auf Fokuseinstellung und<br />
Schirmgitterspannung )<br />
1 Service-Mode einschalten<br />
Achtung : Der Service-Mode I%t sich nicht einschalten, wenn an einer<br />
Euro-AV-Buchse ein Gerät aktiviert ist. d h die Schaltspannung anliegt<br />
1 1 Mit der Fernbedienung das Fernsehgerät in Stand-by schalten<br />
1 2 Das Gerät mit dem Netrschalter ausschalten (warten bis LED dunkel ist)<br />
1 3 Die blaue Taste der Fernbedlenung gedrückt halten und gleichzeitig<br />
das Gerät mit dem Netrschalter einschalten<br />
1 4 Das folgende Menu erscheint nach erneutem Drücken der blauen Taste<br />
SET UP VIDEO GEOM<br />
X 802F WY TTNDMPZK71<br />
LI<br />
li-<br />
Access to and<br />
indlcatlon of<br />
sub-menus<br />
SET - UP VIDEO GEOM ~<br />
X 802F WY TTNDMPZK71<br />
ROM<br />
version<br />
I<br />
Serial<br />
number<br />
STD BLI BDI q DLI BD I<br />
L<br />
Adjustment menu selectIo<br />
1 to 4 line dlsplayc<br />
bar n<br />
whicd<br />
hcan<br />
be selected by kevs 1 t o4 on the<br />
remot econtrol<br />
CornposItIon of the<br />
receiver The<br />
folIowIng table shows<br />
how the characters<br />
used correspond to<br />
the cornposItIon of<br />
J the receiver<br />
ROM<br />
Version<br />
I<br />
--r-T--<br />
STD BLI BDI BDLI BD I<br />
Auswahl-Block des E~nstell<br />
Menus 1 4 Zellen werden angezelgt<br />
dlese konnen mit den Tasteli 1-4 der<br />
Fernbedlenung angewahll werden<br />
Konflguratlon des<br />
Elllpfallgers<br />
Folgende Tab&<br />
relgl woe die<br />
benutrten Zelchen<br />
de1 Konflouratlon des<br />
Thre<br />
e sub-menus can be accessed from the main service mode menu:<br />
a) SET-UP TVsettigs<br />
b) VIDEO Access to video adjustments<br />
c) GEOM Geometry adjustments<br />
2. Sub-Menu Selection<br />
2 1 Wiht hthe RCU Volume “+ ”and “- ”buttons, hIghlIgh the t<br />
menu<br />
contalnln the g<br />
function to be aligned<br />
2 2 Press the RC “Blue U (VT) ” button Selectton<br />
Press the RCU “-w ” button<br />
: SelectIon<br />
to hIghlIght the function to be allgned<br />
3. Switching between Service and TV modes<br />
3.1 Whilst in the Service Mode, normal TV controls are disabled, to enable<br />
these controls whilst in the Service Mode (1.e for channel changing<br />
etc ) press the”TV” button on the RCU To return to the Service Mode,<br />
press the “Blue (VT)” button on the RCU<br />
4. Alignment and storing new function value<br />
4.1 The current value of the selected function IS dlsplayed in a<br />
hexadecimal form to the right of the function name This value IS<br />
adjusted by means of the RCU Volume “+” and “-” buttons<br />
4 2 To STORE the functions new value, hIghlIght MEMO and press the<br />
RCU Volume I’+” button<br />
4 3 To RESTORE the functions orlglnal value, hIghlIght RESTORE<br />
and press the RCU Volume “+‘I button.<br />
So It’s possible to check and here and there wlthout destroying any<br />
values unless the store function were executed<br />
4 4 Selectton the ROM functions downloads the production software default<br />
values, these are not very accurate and should only be used in<br />
very spoclal cases<br />
5. Leaving the Service Mode<br />
5 1 To leave the Service mode either. switch the TV set Into “Standby” or<br />
switch “Off” the mains supply<br />
Drei Untermenüs sind vom Haupt-Servicemenü aus zugänglich<br />
: a) SET-UP TV Elnstellungen<br />
b) VIDEO V!deoelnstellungen<br />
c) GEOM Blld-Geometrle-Elnstellungcn<br />
2. Sub-Menü Wahl<br />
2 1 Mit den Tasten +/- wlrd das entsprechende Menu gewzihlt, welches mlt<br />
der blauen Taste ssdurchgeblattert wlrd>x<br />
2.2 Drticken Sle die “blaue FB-Taste (VT) ” Selektlon<br />
Dr&ken Sle die ” -+f+” FB-Taste Selektlon<br />
urn elnrustellende Funktlonen hervorruheben<br />
3. Umschalten zwischen Service-Mode und TV-Betrieb<br />
3 1 Im Service-Mode sind die normalen Fernsehfunktionen nicht bedienbar<br />
Werden diese im Service-Mode benBtlgt (z B. Programmwechsel), kann<br />
mlt der Taste ( TV ) in den normalen TV-Betrlcb geschaltet werdcn<br />
Durch Driicken der blauen Taste gelangt man rurtick zum Service-<br />
Mode.<br />
4. Abgleich der gewtihlten Funktion und Speichern<br />
Der momentane Wert der gewtihlten Funktlon wlrd hexaderlmal<br />
rechts neben der abruglelchenden Positlon angegeben und kann mlt<br />
der Taste + bzw - auf der Fembedlenung verandert werdcn<br />
Die Anderungen des fewelllgen Meniis kbnnen unter MEMO rnlt der +<br />
Taste gespelchert, brw unter RESTORE ruckgangig gemacht werden.<br />
So 1st es m6gllch. an verschledenen Stellen LU prtifen. ohno Irgendwelthe<br />
Werte LLI IBschen: es se! denn.dle Spelcher-Funktlon wurde ausgeftihrt.<br />
Im MeniJpunkt ROM kann man die Software-Defnultwerte laden Sic<br />
sind aber nur elne grobe Annaherung an den noch vorrunehmenden<br />
Abglelch und sollten nur Irn Notfall verwendet werden<br />
5. Service-Mode verlassen<br />
5.1 Zum Verlassen des Service-Mode das Gernt in Stand-by schalten odcr<br />
mlt dem Netrschalter ausschalten<br />
4<br />
<strong>ICC9</strong><br />
First issue 02 I96