Operating manual LRP, QRP2, QRW2, TNP Mounts and ... - Aimpoint
Operating manual LRP, QRP2, QRW2, TNP Mounts and ... - Aimpoint
Operating manual LRP, QRP2, QRW2, TNP Mounts and ... - Aimpoint

You also want an ePaper? Increase the reach of your titles
YUMPU automatically turns print PDFs into web optimized ePapers that Google loves.
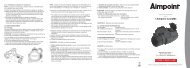
Mounting Procedure<br />
a) Install the sight <strong>and</strong> spacer (if any) on the mount, according to Chapter II.<br />
b) Select a groove on the rail that will give you a correct position of the sight.<br />
Ensure that the groove is undamaged <strong>and</strong> clear of dirt <strong>and</strong> s<strong>and</strong>.<br />
c) Loosen the Torque Knob (1) by turning it counterclockwise.<br />
d) Install the mount <strong>and</strong> sight on the rail (fig. 4). Make sure that the mount is<br />
correctly positioned <strong>and</strong> that the Recoil Stop (2) is in the selected groove.<br />
e) Push the mount forward (fig. 5). The Recoil Stop shall be in contact with the<br />
front edge of the groove.<br />
fig. 4<br />
fig. 5<br />
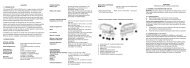
Location <strong>and</strong> description of major components<br />
Torsion Nuts (1)<br />
Clamps (2)<br />
Recoil Stop (3)<br />
Mounting Procedure<br />
a) Install the sight <strong>and</strong> spacer (if any) on the mount, according to Chapter II.<br />
b) Select a groove on the Picatinny rail that will give you a correct position of<br />
the sight. Ensure that the groove is clear <strong>and</strong> free from dirt <strong>and</strong> s<strong>and</strong>.<br />
c) Install the mount <strong>and</strong> sight on the rail (fig. 6). Make sure that the mount is<br />
correctly positioned <strong>and</strong> that the Recoil Stop (3) is in the selected groove.<br />
CHAPTER IV<br />
AIMPOINT SPACERS<br />
4.1 st<strong>and</strong>ard spacer<br />
The St<strong>and</strong>ard Spacer increases the height of the optical axis by 9 mm. The Sight<br />
is assembled to the Mount <strong>and</strong> Spacer by means of the two long screws supplied.<br />
Physical specifications<br />
Weight<br />
25 grams (0.9 oz)<br />
Height of optical axis<br />
39 mm (1.5”) over rail<br />
Length 70 mm (2.8”)<br />
Width 20.5 mm (0.8”)<br />
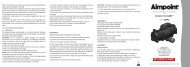
<strong>Operating</strong> <strong>and</strong> Maintenance Manual<br />
for<br />
<strong>Aimpoint</strong> <strong>LRP</strong>, <strong>QRP2</strong>, <strong>QRW2</strong>, <strong>TNP</strong> <strong>Mounts</strong><br />
<strong>and</strong> Spacers for the<br />
CompM4 <strong>and</strong> CompM4s Sights<br />
f) Tighten the Torque Knob (1) clockwise until it snaps twice. This ensures<br />
that the Mount is secured.<br />
NOTE: Grasp the checkered portion of the knob only to prevent pinching of<br />
fingers when the shaft opens <strong>and</strong> snaps shut.<br />
g) Test shoot the weapon with the sight mounted. Retighten the Torque Knob<br />
(1) after a few rounds, if necessary.<br />
h) Perform complete zeroing according to 2.2.1 in the <strong>manual</strong> for CompM4 <strong>and</strong><br />
CompM4s.<br />
3.3 AIMPOINT <strong>TNP</strong><br />
The <strong>Aimpoint</strong> <strong>TNP</strong> is a fixed mount which is designed to be used with <strong>Aimpoint</strong><br />
Comp series sights. If the mount is removed <strong>and</strong> placed back to the rail, it will<br />
be necessary to re-zero the sight. The <strong>TNP</strong> is designed for installation on most<br />
types of firearms with a MIL-Std 1913 Picatinny Rail.<br />
Physical Specifications<br />
Weight<br />
60 grams (2.1 oz)<br />
Height of “optical axis”<br />
30 mm (1.2”) over rail, without spacer<br />
Length 70 mm (2.8”)<br />
Width 41.3 mm (1.6”)<br />
fig. 6<br />
fig. 7<br />
d) Push the mount forward (fig. 7). The Recoil Stop shall be in contact with the<br />
front edge of the groove.<br />
e) H<strong>and</strong> tighten the nuts (1) first, then use tool to tighten it another ¼ to ½<br />
turn maximum.<br />
NOTE! Do not over tighten the nuts – about ¼ to ½ turn is enough after that they<br />
have been tightened by <strong>manual</strong> power.<br />
f) Test shoot the weapon with the sight mounted. Retighten the nuts after a<br />
few rounds, if necessary.<br />
g) Perform complete zeroing according to 2.2.1 in the <strong>manual</strong> for CompM4 <strong>and</strong><br />
CompM4s.<br />
h) Always inspect the tightness of the Torsion Nuts before using your firearm.<br />
4.2 Extension SPACER<br />
The Extension Spacer increases the height of the optical axis by 9 mm <strong>and</strong><br />
moves the position of the sight forward by 40 mm. The Sight<br />
is assembled to the Mount <strong>and</strong> Spacer by means of four short screws.<br />
Physical specifications<br />
Weight<br />
45 grams (1.6 oz)<br />
Height of optical axis<br />
39 mm (1.5”) over rail<br />
Length 110 mm (4.3”)<br />
Width 20.5 mm (0.8”)<br />
<strong>Aimpoint</strong> AB<br />
Jägershillgatan 15<br />
SE- 213 75 Malmö, Sweden<br />
Phone +46 (0)40 671 50 20<br />
Fax +46 (0)40 21 92 38<br />
e-mail: info@aimpoint.se<br />
www.aimpoint.com<br />
<strong>Aimpoint</strong> Inc.<br />
14103 Mariah Court<br />
Chantilly, VA 20151-2113, USA<br />
Phone +1 703-263-9795<br />
Fax +1 703-263-9463<br />
e-mail: info@aimpoint.com<br />
www.aimpoint.com<br />
© Copyright 2012. Contents property of <strong>Aimpoint</strong>. All rights reserved. [13510-0]
CHAPTER I<br />
presentation<br />
<strong>Aimpoint</strong> CompM4 <strong>and</strong> CompM4s sights are designed to be mounted on<br />
most types of firearms which have a MIL-Std 1913 Picatinny Rail or a Weaver<br />
Rail. Both the CompM4 <strong>and</strong> CompM4s sights may be adjusted (by adding or<br />
removing the spacer) to match the optical line of sight required by different<br />
firearms. The height of the optical axis of the mounted sight alone (without<br />
Spacer) is 30 mm (1.2”) above the rail. With a spacer mounted, the height of the<br />
optical axis is increased by 9 mm (0.35”) to 39 mm.<br />
2.3 Mount <strong>and</strong> extension<br />
spacer<br />
Assemble the sight to the mount <strong>and</strong><br />
Extension Spacer using the four<br />
short screws <strong>and</strong> the Allen Wrench.<br />
Tighten firmly. It is recommended<br />
that thread sealer (such as blue<br />
Loctite) is used on the screw threads.<br />
Mounting Procedure<br />
a) Install the sight <strong>and</strong> spacer (if any) on the mount, according to Chapter II.<br />
b) Select a groove on the Picatinny rail that will give you a correct position of<br />
the sight. Ensure that the groove is undamaged <strong>and</strong> free of dirt <strong>and</strong> s<strong>and</strong>.<br />
c) Loosen the Lever H<strong>and</strong>le (2), by first lifting it up to unlock <strong>and</strong> then<br />
moving it fully to the side, to its most open position.<br />
d) Install the mount <strong>and</strong> sight on the rail (fig 1.). Make sure that the mount is<br />
correctly positioned <strong>and</strong> that the Recoil Stop (3) is in the selected groove.<br />
g) If the Lever H<strong>and</strong>le (2) will not close or is too loose, release it. Turn the<br />
Adjustment Screw (1) clockwise to increase tightness, or counter-clockwise<br />
to loosen. Close the Lever H<strong>and</strong>le <strong>and</strong> repeat until the proper preferred<br />
clamping force is achieved. Do NOT attempt to remove the Adjustment<br />
Screw from the mount.<br />
h) Grasp the mounted sight with your h<strong>and</strong> <strong>and</strong> apply force. There should be<br />
no movement of the sight on the rail.<br />
i) Perform complete zeroing according to 2.2.1 in the <strong>manual</strong> for CompM4 <strong>and</strong><br />
CompM4s.<br />
j) After the first few rounds, check that the mount is fixed firmly to the rail.<br />
Retighten if necessary<br />
CHAPTER II<br />
assembling the sight, mount AND spacer<br />
To detach the <strong>Aimpoint</strong> <strong>LRP</strong> release the Lever H<strong>and</strong>le (2) <strong>and</strong> dismount the sight<br />
from the rail.<br />
2.1 Mount only<br />
Assemble the sight to the mount<br />
using the two short screws <strong>and</strong> the<br />
Allen Wrench. Tighten firmly. It is<br />
recommended that thread sealer<br />
(such as blue Loctite) is used on the<br />
screw threads.<br />
2.2 Mount <strong>and</strong> spacer<br />
Assemble the sight to the mount <strong>and</strong><br />
Spacer using the two long screws<br />
<strong>and</strong> the Allen Wrench. Tighten firmly.<br />
It is recommended that thread sealer<br />
(such as blue Loctite) is used on the<br />
screw threads.<br />
CHAPTER III<br />
AIMPOINT MOUNTS<br />
3.1 AIMPOINT <strong>LRP</strong><br />
The <strong>Aimpoint</strong> <strong>LRP</strong> is a quick detach mount which is designed to be used with<br />
<strong>Aimpoint</strong> Comp series sights. The <strong>LRP</strong> is designed for installation on<br />
most types of firearms with a MIL-Std 1913 Picatinny rail.<br />
Physical Specifications<br />
Weight<br />
75 grams (2.7 oz)<br />
Height of “optical axis”<br />
30 mm (1.2”) over rail, without spacer<br />
Length 79.4 mm (3.1”)<br />
Width 47 mm (1.9”)<br />
Location <strong>and</strong> description of major components<br />
Adjustment Screw (1)<br />
Lever H<strong>and</strong>le (2)<br />
Recoil Stop (3)<br />
fig 1.<br />
e) Push the mount forward (fig. 2). The Recoil Stop shall be in contact with the<br />
front edge of the groove.<br />
f) Close the Lever H<strong>and</strong>le (2) to fix the mount to the rail (fig. 3).<br />
fig 3.<br />
fig 2.<br />
Make sure that the lever is fully closed <strong>and</strong> snaps on to the lock. The lever<br />
should provide resistance when being closed to provide an adequate<br />
amount of clamping force on the rail.<br />
NOTE: Do not use tools or objects to close the Lever H<strong>and</strong>le if there is too much<br />
resistance.<br />
3.2 AIMPOINT qrp2/<strong>QRW2</strong><br />
The <strong>Aimpoint</strong> <strong>QRP2</strong> <strong>and</strong> <strong>QRW2</strong> are quick detach mounts that are designed to be<br />
used with <strong>Aimpoint</strong> Comp series sights. The <strong>QRP2</strong> is designed for installation on<br />
most types of firearms with a MIL-Std 1913 Picatinny Rail, while the <strong>QRW2</strong> fits a<br />
Weaver Rail.<br />
Physical Specifications<br />
Weight<br />
70 grams (2.5 oz)<br />
Height of “optical axis”<br />
30 mm (1.2”) over rail, without spacer<br />
Length 70 mm (2.8”)<br />
Width 54.8 mm (2.2”)<br />
Location <strong>and</strong> description of major components<br />
Torque Knob (1)<br />
Recoil Stop (2)