RIGHT-click here - Monitoring Times
RIGHT-click here - Monitoring Times
RIGHT-click here - Monitoring Times

You also want an ePaper? Increase the reach of your titles
YUMPU automatically turns print PDFs into web optimized ePapers that Google loves.
compensate for “other issues” in the audio<br />
chain. These internal EQs are definitely<br />
desirable, but external EQs are often easier<br />
and more convenient to adjust.<br />
• Speech processors: Many rigs have built-in<br />
audio or DSP speech processors. A little<br />
compression goes a long way. Too much<br />
compression really spoils the soup.<br />
• Interstage coupling: Even if your mic and<br />
speech amp are top notch, if the speech amp<br />
isn’t coupled correctly to follow-on stages<br />
(especially to the TX mixer and TX IF amplifier),<br />
your sound can be degraded. More than<br />
a few rigs suffer from audio coupling issues<br />
(in RX and TX amplifiers).<br />
• TX mixer: Once your rig’s audio, whatever<br />
shape it’s in at this point (influenced by all<br />
preceding factors), gets converted to RF in the<br />
TX mixer, it’s still far from being free from<br />
undue influence. The accuracy and fidelity of<br />
the TX mixer (linearity, distortion, amplifier<br />
class, harmonic content, etc) directly colors<br />
your TX audio. High performance is desirable<br />
at this stage of the game!<br />
• TX IF filters: Conventional transmitters use<br />
crystal IF filters (one or more) to directly<br />
shape the bandwidth (and hence, the audio<br />
frequency response) of the transmitted SSB<br />
signal. In most cases this is a “non-negotiable,<br />
law of physics” factor: If your rig’s TX IF and<br />
filter is designed to pass audio signals from<br />
300 to 2700 Hz, signals outside that range<br />
will be greatly attenuated.<br />
• TX drive and carrier power: Too much drive<br />
and too much carrier power make it difficult<br />
or impossible to achieve perfect SSB signals.<br />
• RF amplifiers, internal and external: The<br />
linearity and distortion characteristics of<br />
your radio’s TX RF circuits (or external<br />
linear amplifier) affects the “sound” of your<br />
transmitted signal. Manufacturers have been<br />
paying more attention to these circuits lately,<br />
as TX IMD and other “TX cleanliness” factors<br />
are ways to differentiate contest-grade<br />
rigs from the masses. In-depth reviews in<br />
QST and elsew<strong>here</strong> are detailing TX IMD and<br />
related characteristics, making it easy to spot<br />
expensive radios that have awesome, highperformance<br />
receivers but bargain-basement<br />
transmitters!<br />
This list, as big as it is, isn’t exhaustive. T<strong>here</strong><br />
are other factors to consider, but I’m sure you get<br />
the idea! You can’t even rely on the SSB monitor<br />
built into higher-end transceivers. It only samples<br />
the TX audio before it’s converted to RF – useful,<br />
but not a complete picture.<br />
❖ Tune Up and Test, Test,<br />
Test!<br />
• Instructions that cover how to handle all of the<br />
above-mentioned factors are far beyond the<br />
scope of this column (and require access to<br />
oscilloscopes, calibrated power meters and<br />
two-tone generators, etc). Let’s focus on a<br />
few key practices that will put you far ahead<br />
of the average ham.<br />
• Before optimizing your SSB TX audio, make<br />
sure your rig is in good working order and<br />
that you are familiar with how to use it,<br />
tune it up (if necessary) and access any<br />
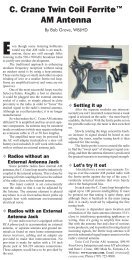
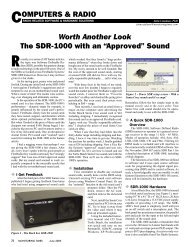
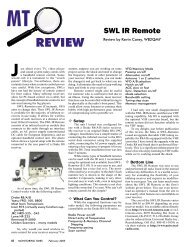
Unlike conventional radios that use fixedbandwidth<br />
crystal filters to ultimately define<br />
their TX bandwidths, DSP-based rigs and<br />
SDRs can offer adjustable TX bandwidths (in<br />
addition to any audio equalization or speech<br />
processing, etc). Shown <strong>here</strong> is the 6-meter<br />
SSB TX output of my FLEX-1500 transceiver<br />
(looks like I need to work on my personal EQ<br />
settings!). The top trace shows a typical output<br />
bandwidth of about 3 kHz. The bottom trace<br />
shows a narrower output of about 2.1 kHz that<br />
may prove useful for QRP contesting (not yet<br />
tested). – NT0Z<br />
and all controls relating to TX audio (gain,<br />
bandwidth control, processing, etc). Read<br />
the manual, and then read it again!<br />
• Make sure your mic is of good quality, has a<br />
response that’s appropriate for your needs<br />
(ragchewing, DXing, contesting), and can<br />
be appropriately connected to your radio.<br />
• For initial tests, use a dummy load! Don’t test<br />
on the air, especially on an open band, unless<br />
your call sign happens to be TEST...<br />
• If your rig has internal EQs, set them for a<br />
“flat” response. Turn off any speech processing<br />
for now.<br />
• Make sure your TX is tuned up and set an RF<br />
power output to a point that is well below<br />
the rated maximum (to avoid IMD, splatter<br />
and the chances of overdriving the RF<br />
amplifiers).<br />
• Scour your rig’s user manual to learn how to<br />
adjust your mic gain for proper modulation.<br />
When transmitting, the meter on your rig<br />
can usually be switched to “ALC mode,”<br />
which helps you set the audio/modulation<br />
levels properly. This is a critical adjustment!<br />
If you mess up <strong>here</strong>, everything else<br />
gets worse. Too little modulation reduces<br />
RF output power, while too much causes<br />
distortion. You want the sweet spot, which is<br />
what the ALC meter will help you achieve.<br />
At this point, you should have a properly<br />
adjusted mic/radio transmitting a clean SSB sig-<br />
nal into your dummy load. If you have a second<br />
receiver and a pair of headphones you can listen<br />
to your own signal. You may have to disconnect<br />
the antenna or use just a short piece of wire as<br />
an antenna to keep signal levels appropriate.<br />
You should also turn off noise blankers and<br />
receiver-based DSP to provide an “undoctored”<br />
signal. Remember: This is the “baseline sound”<br />
for your particular voice, mic and radio, with no<br />
EQ and no processing (remember that the sound<br />
can be “colored” by the particular receiver you’re<br />
using). At this point, some setups sound great.<br />
If so, congratulations! If not, t<strong>here</strong>’s work to be<br />
done!<br />
Improving your baseline sound involves<br />
adjusting the audio equalization settings of an<br />
internal or external equalizer and, optionally,<br />
adjusting your radio’s TX bandwidth, which<br />
is adjustable on many DSP-based radios. The<br />
EQ settings required to improve “your” sound<br />
will vary according to your voice, your mic and<br />
your rig. Experiment with the EQ settings as you<br />
transmit to get a feel for the changes that may be<br />
required.<br />
In general, for ragchewing or other “full<br />
sound” applications, you want a reasonably flat<br />
response from 200 to 2800 Hz. For DXing and<br />
contesting a 400- to 2600-Hz response works<br />
best, with boosts of 4 to 10 dB at 1600 and 2100<br />
Hz. Your particular mic will affect these settings,<br />
so you really do have to test, test, test.<br />
Once you have the sound (or sounds) dialed<br />
in from your perspective, it’s time to enlist an onair<br />
helper or two to get some feedback and make<br />
further adjustments. Initial on-air tests with local<br />
hams on a dead band are best. If your helper is<br />
experienced in these matters, that’s all the better.<br />
Remember to keep your RF power output within<br />
specs, and to keep your ALC settings “spot on”<br />
throughout your tests.<br />
After your EQ settings are dialed in you<br />
may want to add a bit of compression (no more<br />
than 6 dB, please) to increase average power.<br />
With compression on you may have to readjust<br />
your mic gain/ALC settings. Have your helpers<br />
listen carefully while making compression adjustments.<br />
A little goes a long way, and you don’t<br />
want to spoil all of your hard work by adding too<br />
much processing!<br />
These are just the basics, of course, but<br />
if you follow these relatively simple steps you<br />
will be way ahead of the game when it comes to<br />
generating a sweet SSB signal. In a future Part<br />
3, I will expand on equalization (TX and RX),<br />
applicable communication theory and various<br />
types of compression and audio processing.<br />
RESOURCES<br />
A detailed and informative presentation<br />
on SSB bandwidths and TX equalization<br />
by Bill Leonard, N0CU, can be<br />
found at www.na0tc.org/Equalization_<br />
Presentation,_Nov_6_2010.pdf.<br />
Useful commercial sites: www.w2ihy.<br />
com, www.heilsound.com.<br />
Although it’s aimed primarily at “enhanced,”<br />
high-fidelity SSB, www.nu9n.com<br />
has a gigantic collection of information and<br />
links about SSB equalization and set-up.<br />
August 2012 MONITORING TIMES 29