Cadillac Esacalade/ESV - Scosche
Cadillac Esacalade/ESV - Scosche
Cadillac Esacalade/ESV - Scosche

You also want an ePaper? Increase the reach of your titles
YUMPU automatically turns print PDFs into web optimized ePapers that Google loves.
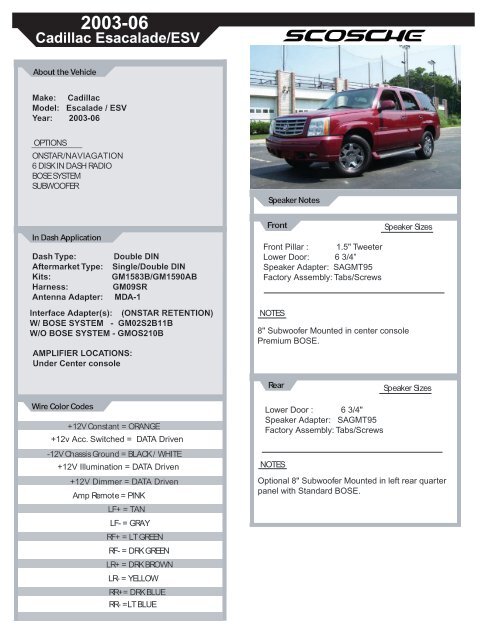
2003-06<br />
<strong>Cadillac</strong> <strong>Esacalade</strong>/<strong>ESV</strong><br />
About the Vehicle<br />
Make: <strong>Cadillac</strong><br />
Model: Escalade / <strong>ESV</strong><br />
Year: 2003-06<br />
OPTIONS<br />
ONSTAR/NAVIAGATION<br />
6 DISK IN DASH RADIO<br />
BOSE SYSTEM<br />
SUBWOOFER<br />
Speaker Notes<br />
In Dash Application<br />
Dash Type:<br />
Aftermarket Type:<br />
Kits:<br />
Harness:<br />
Antenna Adapter:<br />
Double DIN<br />
Single/Double DIN<br />
GM1583B/GM1590AB<br />
GM09SR<br />
MDA-1<br />
Interface Adapter(s): (ONSTAR RETENTION)<br />
W/ BOSE SYSTEM - GM02S2B11B<br />
W/O BOSE SYSTEM - GMOS210B<br />
AMPLIFIER LOCATIONS:<br />
Under Center console<br />
Front<br />
Front Pillar : 1.5" Tweeter<br />
Lower Door: 6 3/4”<br />
Speaker Adapter: SAGMT95<br />
Factory Assembly: Tabs/Screws<br />
NOTES<br />
Speaker Sizes<br />
8" Subwoofer Mounted in center console<br />
Premium BOSE.<br />
Rear<br />
Speaker Sizes<br />
Wire Color Codes<br />
+12V Constant = ORANGE<br />
+12v Acc. Switched = DATA Driven<br />
-12V Chassis Ground = BLACK / WHITE<br />
+12V Illumination = DATA Driven<br />
+12V Dimmer = DATA Driven<br />
Amp Remote = PINK<br />
LF+ = TAN<br />
LF- = GRAY<br />
RF+ = LT GREEN<br />
RF- = DRK GREEN<br />
LR+ = DRK BROWN<br />
LR- = YELLOW<br />
RR+= DRK BLUE<br />
RR- =LT BLUE<br />
Lower Door : 6 3/4"<br />
Speaker Adapter: SAGMT95<br />
Factory Assembly: Tabs/Screws<br />
NOTES<br />
Optional 8" Subwoofer Mounted in left rear quarter<br />
panel with Standard BOSE.
<strong>Cadillac</strong> Escalade / <strong>ESV</strong><br />
Radio removal<br />
2003-06<br />
1.Turn Ignition on and shift vehicle into first.<br />
2.Trim bezel unsnaps by pulling firmly.<br />
3. Using a 7mm socket remove 3 bolt from<br />
radio disconnect and remove.<br />
Images<br />
Front speaker<br />
Front speaker<br />
Rear speaker<br />
1. Use panel removal tool to remove plastic triangle.<br />
2. Use panel removal tool to remove plastic trim bezel<br />
around door opener handle.<br />
3. Use panel removal tool and remove window control<br />
panel, Disconnect and remove. Extract (1) 9/32" screw<br />
from behind.<br />
4. Extract (1) 9/32" from behind door handle.<br />
5. Use panel removal tool and remove door lock and<br />
unlock indicator.<br />
6. Pull upwards on door panel, Disconnect and remove<br />
all connectors.<br />
7. Push down on top finger tad of speaker and remove.<br />
Rear speaker<br />
1. Extract (1) 9/32" screw from bottom corner<br />
of door panel.<br />
2. Extract (1) 9/32" from upper door handle.<br />
3. Using a small flat screw driver, remove plastic<br />
bezel from door opener handle.<br />
4. Pull upwards on door panel, Disconnect and<br />
remove.<br />
5. Extract (4) T-15 torx screws from speaker,<br />
Disconnect and remove.<br />
Front<br />
1. Unsnap and remove A-<br />
Pillar panel.<br />
Front Pillar<br />
Rear<br />
1. Remove top center panel<br />
with panel removal tool.<br />
2. Remove plastic side panel<br />
with panel removal tool.<br />
3. Cut wire tie and extract<br />
speaker, disconnect and<br />
remove.<br />
Rear Pillar