oem color codes about the vehicle applications speaker ... - Scosche
oem color codes about the vehicle applications speaker ... - Scosche
oem color codes about the vehicle applications speaker ... - Scosche

Create successful ePaper yourself
Turn your PDF publications into a flip-book with our unique Google optimized e-Paper software.
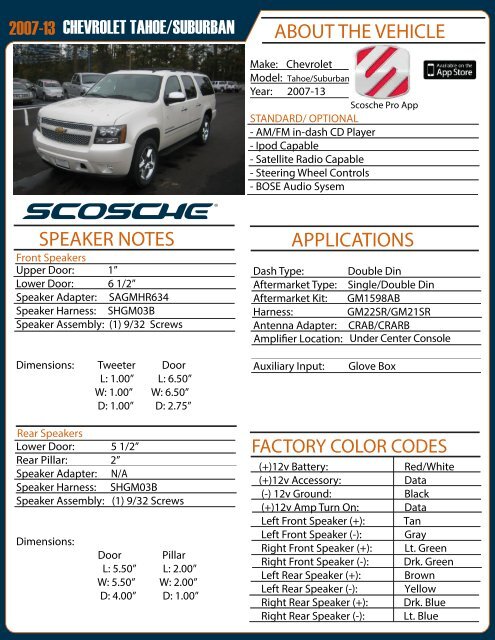
2007-13<br />
CHEVROLET TAHOE/SUBURBAN<br />
ABOUT THE VEHICLE<br />
Make: Chevrolet<br />
Model: Tahoe/Suburban<br />
Year: 2007-13<br />
<strong>Scosche</strong> Pro App<br />
STANDARD/ OPTIONAL<br />
- AM/FM in-dash CD Player<br />
- Ipod Capable<br />
- Satellite Radio Capable<br />
- Steering Wheel Controls<br />
- BOSE Audio Sysem<br />
SPEAKER NOTES<br />
Front Speakers<br />
Upper Door: 1”<br />
Lower Door: 6 1/2”<br />
Speaker Adapter: SAGMHR634<br />
Speaker Harness: SHGM03B<br />
Speaker Assembly: (1) 9/32 Screws<br />
Dimensions: Tweeter Door<br />
L: 1.00” L: 6.50”<br />
W: 1.00” W: 6.50”<br />
D: 1.00” D: 2.75”<br />
Rear Speakers<br />
Lower Door: 5 1/2”<br />
Rear Pillar: 2”<br />
Speaker Adapter: N/A<br />
Speaker Harness: SHGM03B<br />
Speaker Assembly: (1) 9/32 Screws<br />
Dimensions:<br />
Door Pillar<br />
L: 5.50” L: 2.00”<br />
W: 5.50” W: 2.00”<br />
D: 4.00” D: 1.00”<br />
APPLICATIONS<br />
Dash Type: Double Din<br />
Aftermarket Type: Single/Double Din<br />
Aftermarket Kit: GM1598AB<br />
Harness:<br />
GM22SR/GM21SR<br />
Antenna Adapter: CRAB/CRARB<br />
A<br />
Under Center Console<br />
Auxiliary Input: Glove Box<br />
FACTORY<br />
OEM<br />
COLOR<br />
COLOR CODES<br />
CODES<br />
(+)12v +12 Volt Battery: Constant: Lt. Green/ Red/White Purple<br />
(+)12v +12 Volt Accessory: Acessory: Pink/ Data Black<br />
(-) 12v Ground: Ground: Black/ Black Lt. Green<br />
(+)12v Illumination:<br />
Amp Turn On: Lt. Blue/ Data Red<br />
Left Front Front Left Speaker Positive: (+): Orange/ TanLt. Green<br />
Left Front Front Left Speaker Negative: (-): Lt. Blue/ Gray Red<br />
Right Front Front Right Speaker Positive: (+): White/ Lt. Lt. Green Green<br />
Right Front Front Right Speaker Negative: (-): Drk. Green/ Drk. Green Orange<br />
Left Rear Rear Left Speaker Positive: (+): Gray/ Brown Lt. Blue<br />
Left Rear Rear Left Speaker Negative:: (-): Tan/ Yellow<br />
Right Rear Right Rear Speaker Positive: (+): Orange/ Drk. Red Blue<br />
Right Rear Right Rear Speaker Negative: (-): Brown/ Lt. Pink Blue
2007-13<br />
CHEVROLET TAHOE/SUBURBAN<br />
PRELIMINARY:<br />
Disconnect <strong>the</strong> negative battery cable.<br />
RADIO REMOVAL<br />
VEHICLE DISASSEMBLY<br />
Make: Chevrolet<br />
Model:<br />
Year: 2007-13<br />
Tahoe/Suburban<br />
<strong>Scosche</strong> Pro App<br />
FRONT DOOR TWEETERS<br />
1. Using a PRT unsnap <strong>the</strong> dash bezel surrounding <strong>the</strong><br />
factory radio.<br />
2. Extract (8) 9/32 bolts securing <strong>the</strong> factory radio.<br />
3. Lift away disconnect and remove.<br />
FRONT DOOR SPEAKERS<br />
1. Extract (2) 10mm bolts securing <strong>the</strong> A pillar handle.<br />
2. Using a PRT unsnap <strong>the</strong> top of <strong>the</strong> A pillar. Lift away,<br />
disconnect and remove.<br />
3. Tweeter is secured to A pillar by plastic snaps.<br />
REAR DOOR SPEAKERS<br />
1. Remove (1) 10mm hex bolt located in <strong>the</strong> door<br />
release cup.<br />
2. Located in <strong>the</strong> middle of <strong>the</strong> door panel behind<br />
<strong>the</strong> door handle <strong>the</strong>re is a small panel hiding (2)<br />
10mm hex bolts. Using a pick tool remove <strong>the</strong><br />
panel and extract (2) hex bolts.<br />
3. Unlock <strong>the</strong> door to make sure <strong>the</strong> door lock pin is<br />
resting in its highest position. Release tab located<br />
at <strong>the</strong> bottom and lift up on <strong>the</strong> door pin to<br />
remove.<br />
4. Using a PRT unsnap <strong>the</strong> parameter of <strong>the</strong> door<br />
panel. Lift away disconnect and remove.<br />
5. Extract (1) 9/32 securing <strong>the</strong> factory <strong>speaker</strong>, lift<br />
away disconnect and remove<br />
+12 Volt Constant: Lt. Green/ Purple<br />
+12 Volt Acessory: Pink/ Black<br />
Ground: Black/ Lt. Green<br />
1. Remove (1) 10mm hex bolt located in <strong>the</strong> door<br />
release cup.<br />
2. Located in <strong>the</strong> middle of <strong>the</strong> door panel behind<br />
<strong>the</strong> door handle <strong>the</strong>re is a little panel hiding (1)<br />
10mm hex bolts. Using a pick tool remove <strong>the</strong><br />
panel and extract <strong>the</strong> (1) hex bolt.<br />
3. Unlock <strong>the</strong> door to make sure <strong>the</strong> door lock pin is<br />
resting in its highest position. Release tab located<br />
at <strong>the</strong> bottom and lift up on <strong>the</strong> door pin to<br />
remove.<br />
4. Using a PRT unsnap <strong>the</strong> parameter of <strong>the</strong> door<br />
panel. Lift away disconnect and remove.<br />
5. Extract (1) 9/32 securing <strong>the</strong> factory <strong>speaker</strong>, lift<br />
away disconnect and remove.<br />
R ight Positive: Orange/ Red<br />
h ative: Brown/ ink
2007-13<br />
CHEVROLET TAHOE/SUBURBAN<br />
PRELIMINARY:<br />
Disconnect <strong>the</strong> negative battery cable.<br />
AMPLIFIER<br />
VEHICLE DISASSEMBLY<br />
Make: Chevrolet<br />
Model:<br />
Year: 2007-13<br />
Tahoe/Suburban<br />
<strong>Scosche</strong> Pro App<br />
REAR PILLAR TWEETER<br />
PHOTO NOT AVAILABLE<br />
Location: Under Center Console<br />
Dissasembly: Extract (3) 10mm. Bolts<br />
AUX/USB<br />
1. Using a PRT remove <strong>the</strong> rear panel running across <strong>the</strong><br />
headliner from one pillar to <strong>the</strong> o<strong>the</strong>r.<br />
2. Using a pick tool remove <strong>the</strong> small oval panel<br />
covering <strong>the</strong> (1) Phillips screw.<br />
3. Extract (1) Phillips screw from <strong>the</strong> rear panel. Using a<br />
PRT unsnap pillar, lift away disconnect and remove.<br />
4. Remove (1) Philips securing <strong>the</strong> factory tweeter to <strong>the</strong><br />
pillar panel.<br />
REAR ENTERTAINMENT<br />
OEM COLOR CODES<br />
+12 Volt Constant: Lt. Green/ Purple<br />
+12 Volt Acessory: Pink/ Black<br />
Ground: Black/ Lt. Green<br />
Rear Right Positive:<br />
ear Right Negative:<br />
Orange/ Red<br />
Brown/ Pink