

VSA-E03 - Service.pioneer-eur.com - Pioneer
VSA-E03 - Service.pioneer-eur.com - Pioneer
VSA-E03 - Service.pioneer-eur.com - Pioneer

Create successful ePaper yourself
Turn your PDF publications into a flip-book with our unique Google optimized e-Paper software.
Names of Parts and Basic Operations<br />
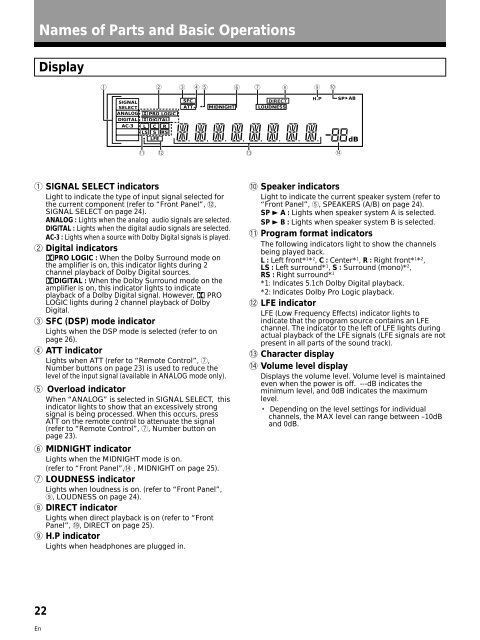
Display<br />
1 2 3 4 5 6 7 8 9 0<br />
<br />
<br />
SIGNAL<br />
SELECT<br />
ANALOG<br />
DIGITAL<br />
AC-3<br />
PRO LOGIC<br />
DIGITAL<br />
L C R<br />
LS S RS<br />
LFE<br />
SFC<br />
DIRECT<br />
ATT MIDNIGHT LOUDNESS<br />
H.P<br />
SP<br />
AB<br />
dB<br />
- =<br />
~<br />
!<br />
1 SIGNAL SELECT indicators<br />
Light to indicate the type of input signal selected for<br />
the current <strong>com</strong>ponent (refer to “Front Panel”, =,<br />
SIGNAL SELECT on page 24).<br />
ANALOG : Lights when the analog audio signals are selected.<br />
DIGITAL : Lights when the digital audio signals are selected.<br />
AC-3 : Lights when a source with Dolby Digital signals is played.<br />
2 Digital indicators<br />
PRO LOGIC : When the Dolby Surround mode on<br />
the amplifier is on, this indicator lights during 2<br />
channel playback of Dolby Digital sources.<br />
DIGITAL : When the Dolby Surround mode on the<br />
amplifier is on, this indicator lights to indicate<br />
playback of a Dolby Digital signal. However, PRO<br />
LOGIC lights during 2 channel playback of Dolby<br />
Digital.<br />
3 SFC (DSP) mode indicator<br />
Lights when the DSP mode is selected (refer to on<br />
page 26).<br />
4 ATT indicator<br />
Lights when ATT (refer to “Remote Control”, 7,<br />
Number buttons on page 23) is used to reduce the<br />
level of the input signal (available in ANALOG mode only).<br />
5 Overload indicator<br />
When “ANALOG” is selected in SIGNAL SELECT, this<br />
indicator lights to show that an excessively strong<br />
signal is being processed. When this occurs, press<br />
ATT on the remote control to attenuate the signal<br />
(refer to “Remote Control”, 7, Number button on<br />
page 23).<br />
6 MIDNIGHT indicator<br />
Lights when the MIDNIGHT mode is on.<br />
(refer to “Front Panel”,! , MIDNIGHT on page 25).<br />
7 LOUDNESS indicator<br />
Lights when loudness is on. (refer to “Front Panel”,<br />
9, LOUDNESS on page 24).<br />
8 DIRECT indicator<br />
Lights when direct playback is on (refer to “Front<br />
Panel”, ^, DIRECT on page 25).<br />
9 H.P indicator<br />
Lights when headphones are plugged in.<br />
0 Speaker indicators<br />
Light to indicate the current speaker system (refer to<br />
“Front Panel”, 5, SPEAKERS (A/B) on page 24).<br />
SP 3 A : Lights when speaker system A is selected.<br />
SP 3 B : Lights when speaker system B is selected.<br />
- Program format indicators<br />
The following indicators light to show the channels<br />
being played back.<br />
L : Left front* 1 * 2 , C : Center* 1 , R : Right front* 1 * 2 ,<br />
LS : Left surround* 1 , S : Surround (mono)* 2 ,<br />
RS : Right surround* 1<br />
*1: Indicates 5.1ch Dolby Digital playback.<br />
*2: Indicates Dolby Pro Logic playback.<br />
= LFE indicator<br />
LFE (Low Frequency Effects) indicator lights to<br />
indicate that the program source contains an LFE<br />
channel. The indicator to the left of LFE lights during<br />
actual playback of the LFE signals (LFE signals are not<br />
present in all parts of the sound track).<br />
~ Character display<br />
! Volume level display<br />
Displays the volume level. Volume level is maintained<br />
even when the power is off. ---dB indicates the<br />
minimum level, and 0dB indicates the maximum<br />
level.<br />
• Depending on the level settings for individual<br />
channels, the MAX level can range between –10dB<br />
and 0dB.<br />
22<br />
En


