

User Manual for Biometric Safe - Amazon S3
User Manual for Biometric Safe - Amazon S3
User Manual for Biometric Safe - Amazon S3

You also want an ePaper? Increase the reach of your titles
YUMPU automatically turns print PDFs into web optimized ePapers that Google loves.
<strong>User</strong> <strong>Manual</strong> <strong>for</strong> <strong>Biometric</strong> <strong>Safe</strong><br />
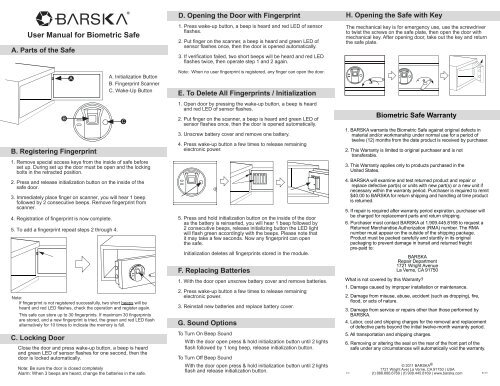
A. Parts of the <strong>Safe</strong><br />
D. Opening the Door with Fingerprint<br />
1. Press wake-up button, a beep is heard and red LED of sensor<br />
flashes.<br />
2. Put finger on the scanner, a beep is heard and green LED of<br />
sensor flashes once, then the door is opened automatically.<br />
3. If verification failed, two short beeps will be heard and red LED<br />
flashes twice, then operate step 1 and 2 again.<br />
H. Opening the <strong>Safe</strong> with Key<br />
The mechanical key is <strong>for</strong> emergency use, use the screwdriver<br />
to twist the screws on the safe plate, then open the door with<br />
mechanical key. After opening door, take out the key and return<br />
the safe plate.<br />
A<br />
A. Initialization Button<br />
B. Fingerprint Scanner<br />
C. Wake-Up Button<br />
Note: When no user fingerprint is registered, any finger can open the door.<br />
E. To Delete All Fingerprints / Initialization<br />
B. Registering Fingerprint<br />
1. Remove special access keys from the inside of safe be<strong>for</strong>e<br />
set up. During set up the door must be open and the locking<br />
bolts in the retracted position.<br />
2. Press and release initialization button on the inside of the<br />
safe door.<br />
3. Immediately place finger on scanner, you will hear 1 beep<br />
followed by 2 consecutive beeps. Remove fingerprint from<br />
scanner.<br />
4. Registration of fingerprint is now complete.<br />
5. To add a fingerprint repeat steps 2 through 4.<br />
Note:<br />
If fingerprint is not registered successfully, two short beeps will be<br />
heard and red LED flashes, check the operation and register again.<br />
This safe can store up to 30 fingerprints. If maximum 30 fingerprints<br />
are stored, and a new fingerprint is tried, the green and red LED flash<br />
alternatively <strong>for</strong> 10 times to indicate the memory is full.<br />
C. Locking Door<br />
B<br />
Close the door and press wake-up button, a beep is heard<br />
and green LED of sensor flashes <strong>for</strong> one second, then the<br />
door is locked automatically.<br />
Note: Be sure the door is closed completely<br />
Alarm: When 3 beeps are heard, change the batteries in the safe.<br />
C<br />
1. Open door by pressing the wake-up button, a beep is heard<br />
and red LED of sensor flashes.<br />
2. Put finger on the scanner, a beep is heard and green LED of<br />
sensor flashes once, then the door is opened automatically.<br />
3. Unscrew battery cover and remove one battery.<br />
4. Press wake-up button a few times to release remaining<br />
electronic power.<br />
5. Press and hold initialization button on the inside of the door<br />
as the battery is reinserted, you will hear 1 beep followed by<br />
2 consecutive beeps, release initializing button the LED light<br />
will flash green accordingly with the beeps. Please note that<br />
it may take a few seconds. Now any fingerprint can open<br />
the safe.<br />
Initialization deletes all fingerprints stored in the module.<br />
F. Replacing Batteries<br />
1. With the door open unscrew battery cover and remove batteries.<br />
2. Press wake-up button a few times to release remaining<br />
electronic power.<br />
3. Reinstall new batteries and replace battery cover.<br />
G. Sound Options<br />
To Turn On Beep Sound<br />
With the door open press & hold initialization button until 2 lights<br />
flash followed by 1 long beep, release initialization button.<br />
To Turn Off Beep Sound<br />
With the door open press & hold initialization button until 2 lights<br />
flash and release initialization button.<br />
<strong>Biometric</strong> <strong>Safe</strong> Warranty<br />
1. BARSKA warrants the <strong>Biometric</strong> <strong>Safe</strong> against original defects in<br />
material and/or workmanship under normal use <strong>for</strong> a period of<br />
twelve (12) months from the date product is received by purchaser.<br />
2. This Warranty is limited to original purchaser and is not<br />
transferable.<br />
3. This Warranty applies only to products purchased in the<br />
United States.<br />
4. BARSKA will examine and test returned product and repair or<br />
replace defective part(s) or units with new part(s) or a new unit if<br />
necessary within the warranty period. Purchaser is required to remit<br />
$40.00 to BARSKA <strong>for</strong> return shipping and handling at time product<br />
is returned.<br />
5. If repair is required after warranty period expiration, purchaser will<br />
be charged <strong>for</strong> replacement parts and return shipping.<br />
6. Purchaser must contact BARSKA at 1.909.445.8168 to request a<br />
Returned Merchandise Authorization (RMA) number. The RMA<br />
number must appear on the outside of the shipping package.<br />
Product must be packed carefully and sturdily in its original<br />
packaging to prevent damage in transit and returned freight<br />
pre-paid to:<br />
BARSKA<br />
Repair Department<br />
1721 Wright Avenue<br />
La Verne, CA 91750<br />
What is not covered by this Warranty?<br />
1. Damage caused by improper installation or maintenance.<br />
2. Damage from misuse, abuse, accident (such as dropping), fire,<br />
flood, or acts of nature.<br />
3. Damage from service or repairs other than those per<strong>for</strong>med by<br />
BARSKA.<br />
4. Labor, cost and shipping charges <strong>for</strong> the removal and replacement<br />
of defective parts beyond the initial twelve-month warranty period.<br />
5. All transportation and shipping charges.<br />
6. Removing or altering the seal on the rear of the front part of the<br />
safe under any circumstances will automatically void the warranty.<br />
2/12<br />
© 2011 BARSKA ®<br />
1721 Wright Ave| La Verne, CA 91750 | USA<br />
(t) 888.666.6769 | (f) 909.445.8169 | www.barska.com<br />
BC187
BIOMETRIC SAFE<br />
Wall & Floor Mounting<br />
Keep your valuables from the wrong hands with the Barska<br />
<strong>Biometric</strong> <strong>Safe</strong>. The safe opens at the touch of a finger but only<br />
yours. Fingerprint control can store up to 30 permanent or<br />
temporary users, allowing you to control of who can access safe.<br />
The compact design makes it easy to hide nearly anywhere.<br />
Weight of safe is 31 pounds.<br />
NOTE<br />
When selecting a place <strong>for</strong> the safe please keep in mind<br />
- <strong>Safe</strong> must be supported beneath by a shelf and/or floor.<br />
- The door of the safe must be able to swing open at least 85º.<br />
- For added security, purchase 3½ wood screws at your local<br />
hardware store. When using alternate screws, adjust mounting<br />
instructions accordingly.<br />
- Metallic anchors supplied may not reach wall stud.<br />
- These instructions are meant to keep safe in place, and will<br />
not deter theft.<br />
WALL MOUNTING<br />
1. Two of the three<br />
mounting holes in the<br />
rear of the safe will be<br />
used to fasten the safe<br />
to the wall.<br />
2. Place the safe into<br />
position, with the door<br />
of the safe open, mark<br />
mounting holes 1 and<br />
2 on the rear wall from<br />
inside the safe. Set<br />
safe aside.<br />
3. According to the<br />
marks, drill two 15/32”<br />
holes.<br />
4. Disassemble one<br />
metallic anchor. Fit the nut into the groved end of the<br />
shaft. See diagram A. below. Insert this assembled piece into<br />
wall hole. Repeat this step with the other metallic anchor and<br />
into the other hole.<br />
5. Set safe into place, aligning the holes of the safe to the holes<br />
of the wall.<br />
6. Open safe and from the inside of the safe insert washer into<br />
screw. Slide this piece into the shaft. See diagram B. below.<br />
7. Tighten the metallic anchors using the 15/32” socket wrench.<br />
8. Close safe.<br />
Metallic Anchor<br />
A<br />
Diagram of Wall Mounted <strong>Safe</strong><br />
Back of <strong>Safe</strong><br />
B<br />
W<br />
A<br />
L<br />
L<br />
S<br />
A<br />
F<br />
E<br />
FLOOR MOUNTING<br />
Under Side of <strong>Safe</strong><br />
1. One of the mounting holes in<br />
the bottom of the safe will be<br />
used to fastened safe to the floor.<br />
2. Pull back any carpet off the floor.<br />
Place the safe into position,<br />
remove liner from safe and<br />
with the door of the safe open,<br />
mark the hole on the bottom<br />
of the safe from the inside. Note:<br />
The safe can be mounted to<br />
the floor directly on top of the<br />
existing carpet, but may not be<br />
as secure. Set safe aside<br />
3. According to the mark, drill a<br />
15/32” hole into the floor.<br />
4. Disassemble metallic anchor. Fit<br />
the nut into the groved end of the<br />
shaft. See Diagram A. Insert this<br />
assembled piece into the hole in<br />
the floor.<br />
5. Set safe into position aligning the hole of the safe to the hole<br />
of the floor.<br />
6. Open safe. From the inside of the safe insert washer into<br />
screw. Slide this piece into the shaft. Diagram B.<br />
7. Tighten the metallic anchor using the 15/32” socket wrench.<br />
8. Replace liner and close safe.<br />
Diagram of Floor Mounted <strong>Safe</strong><br />
Metallic Anchor<br />
A<br />
B<br />
BOTTOM OF SAFE<br />
FLOOR<br />
SETUP<br />
Tools Needed<br />
1x – Drill<br />
1x – 15/32” Drill Bit<br />
1x – 15/32” Socket Wrench<br />
Parts Included<br />
1x – Allen Wrench<br />
2x – Emergency Keys<br />
2x – Flat Washers<br />
2x – Metallic Anchors<br />
©2010 BARSKA ® La Verne, CA 91750<br />
www.barska.com<br />
www.barska.com<br />
9/10 www.barska.com<br />
BC168


