Manual Color Video Door Phone DP-222Q - SECO-LARM
Manual Color Video Door Phone DP-222Q - SECO-LARM
Manual Color Video Door Phone DP-222Q - SECO-LARM
Create successful ePaper yourself
Turn your PDF publications into a flip-book with our unique Google optimized e-Paper software.
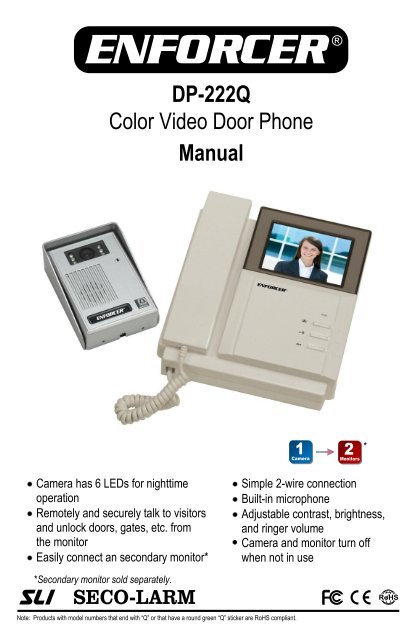
<strong>DP</strong>-<strong>222Q</strong><br />
<strong>Color</strong> <strong>Video</strong> <strong>Door</strong> <strong>Phone</strong><br />
<strong>Manual</strong><br />
*<br />
Camera has 6 LEDs for nighttime<br />
operation<br />
Remotely and securely talk to visitors<br />
and unlock doors, gates, etc. from<br />
the monitor<br />
Easily connect an secondary monitor*<br />
Simple 2-wire connection<br />
Built-in microphone<br />
Adjustable contrast, brightness,<br />
and ringer volume<br />
Camera and monitor turn off<br />
when not in use<br />
*Secondary monitor sold separately.<br />
Note: Products with model numbers that end with “Q” or that have a round green “Q” sticker are RoHS compliant.
ENFORCER <strong>Color</strong> <strong>Video</strong> <strong>Door</strong> <strong>Phone</strong><br />
Table of Contents<br />
Specifications ................................................ 2<br />
Parts List ....................................................... 2<br />
Overview ....................................................... 3<br />
Installation Notes ........................................... 4<br />
Installation – Primary Monitor ........................ 4<br />
Installation – Secondary Monitor ................... 5<br />
Installation – Camera .................................... 5<br />
Operating Instructions ................................... 6<br />
Wiring Diagram ............................................. 7<br />
Troubleshooting ............................................ 8<br />
Specifications<br />
Type<br />
Chip<br />
Resolution<br />
Lens<br />
Relay Output<br />
Weight<br />
Dimensions<br />
Camera<br />
<strong>Color</strong> Camera<br />
CCD<br />
420 TV lines<br />
3.6mm<br />
1Amp@12VDC max. dry contact<br />
11-oz (312g)<br />
5 1 /4” x 3 9 /16” x 1 3 /8”<br />
(130 x 90 x 33 mm)<br />
Display<br />
Current Draw<br />
Operating Voltage<br />
Weight<br />
Dimensions<br />
Monitor<br />
TFT<br />
440mA max.<br />
17VDC<br />
1-lb, 7-oz (652g)<br />
7 5 /8”x 8 1 /2” x 1 13 /16”<br />
(194 x 216 x 46 mm)<br />
Parts List<br />
<strong>DP</strong>-<strong>222Q</strong><br />
Complete Kit<br />
1x Camera<br />
1x Camera bracket<br />
8x Screws<br />
8x Screw anchors<br />
1x Camera screw<br />
1x Allen wrench<br />
1x Primary monitor<br />
1x Monitor bracket<br />
1x AC Power adapter<br />
2x Wire connectors (2-Wire)<br />
<strong>DP</strong>-222-MQ<br />
Secondary Monitor Only<br />
1x Monitor<br />
1x Monitor bracket<br />
1x AC Power adapter<br />
4x Screws<br />
4x Screw anchors<br />
2x Wire connectors (2-Wire)<br />
2 <strong>SECO</strong>-<strong>LARM</strong> U.S.A., Inc.
Overview<br />
Primary Monitor<br />
ENFORCER <strong>Color</strong> <strong>Video</strong> <strong>Door</strong> <strong>Phone</strong><br />
Display<br />
Power LED<br />
Camera button<br />
<strong>Door</strong> unlock button<br />
(This button is not used)<br />
Handset<br />
Front<br />
To<br />
power<br />
Ring volume<br />
Handset Volume<br />
Brightness<br />
Contrast<br />
To camera<br />
To optional<br />
secondary monitor<br />
(Secondary monitor not included with <strong>DP</strong>-<strong>222Q</strong>)<br />
Rear<br />
Side<br />
Camera<br />
Camera<br />
Camera speaker volume<br />
High-intensity LEDs<br />
Microphone<br />
Speaker<br />
To primary<br />
monitor<br />
To locking<br />
device<br />
Request-to-enter button<br />
Front (with bracket)<br />
Rear (without bracket)<br />
<strong>SECO</strong>-<strong>LARM</strong> U.S.A., Inc. 3
ENFORCER <strong>Color</strong> <strong>Video</strong> <strong>Door</strong> <strong>Phone</strong><br />
Installation Notes<br />
1. Unpack the video door phone and note the included parts.<br />
2. Read this manual thoroughly. A clear understanding of the manual will make installation and<br />
operation much easier.<br />
3. Find a good location to mount the monitor and camera. Make sure there is enough 22AWG<br />
2-conductor wire to wire both units correctly.<br />
4. Use only untwisted-pair wire; twisted-pair wire may cause interference.<br />
5. Avoid mounting the camera or monitor(s) near sources of strong electromagnetic signals or<br />
other electronic devices as they may cause interference.<br />
6. Avoid mounting the camera in direct sunlight or exposing the camera to strong vibrations or<br />
direct rain or other moisture, which could result in damage to the camera.<br />
7. The camera and the monitor contain no user-serviceable parts. Opening them may damage<br />
sensitive components and void the warranty.<br />
Installation – Primary Monitor<br />
1. The monitor must be positioned so that the image can be seen clearly and the user can<br />
operate the monitor’s functions.<br />
2. Use the mounting bracket as a template to pencil in where to drill the holes for the mounting<br />
bracket screws.<br />
3. Drill the mounting bracket holes as needed. Drill a hole large enough to fit a min. 22AWG<br />
2-conductor wire, which will run through the wall from the monitor to the camera.<br />
4. Using 4 of the included screws and 4 of the included screw anchors, attach the monitor<br />
bracket to the wall, running the cable through the large hole in the mounting bracket.<br />
5. Plug the 2-wire connector from the camera into the “P1” socket<br />
NOTE: If using only one monitor, the “P2”socket on the back of the monitor will not<br />
be used.<br />
6. Plug the AC power adapter’s cable into the “DC” socket on the back of the monitor.<br />
7. Plug the AC power adapter into a 120VAC socket.<br />
8. Test the monitor and camera unit by pressing the camera button. The image in front of the<br />
camera should be displayed clearly.<br />
Monitor mounting bracket<br />
Connection points<br />
To power<br />
Adjust ringer<br />
volume<br />
To camera<br />
To secondary monitor<br />
(not included with the <strong>DP</strong>-<strong>222Q</strong>)<br />
4 <strong>SECO</strong>-<strong>LARM</strong> U.S.A., Inc.
Installation – Secondary Monitor<br />
1. If using a secondary monitor, follow steps<br />
1~4 on page 4.<br />
2. Connect the 2-wire connector between<br />
the secondary monitor’s “P1” socket and<br />
the primary monitor’s “P2” socket. The<br />
“P2” socket on the back of the secondary<br />
monitor will not be used.<br />
3. Follow steps 6~8 on page 4 to continue<br />
the installation.<br />
ENFORCER <strong>Color</strong> <strong>Video</strong> <strong>Door</strong> <strong>Phone</strong><br />
Primary monitor<br />
Connect the<br />
main monitor to the<br />
secondary monitor<br />
Secondary monitor<br />
Installation – Camera<br />
1. Position the camera so the area to be<br />
monitored is easily visible, typically 5 feet<br />
(150cm) above the ground. Do not position the<br />
camera in direct sunlight, or where it will be<br />
exposed directly to rain or snow.<br />
2. Cut a hole large enough to run the min.<br />
22AWG 2-conductor wire through the wall to<br />
where the camera unit is to be mounted. If<br />
using a locking device, the wires used to<br />
control the device must also be run through<br />
this hole.<br />
3. Run the 2-conductor wire from the camera<br />
location to where the primary monitor is<br />
mounted.<br />
Note: Do not let the distance between the<br />
camera and monitor exceed 246ft (75m).<br />
4. Using 4 of the included screws and 4 of the<br />
included screw anchors, attach the camera<br />
mounting bracket to the wall.<br />
5. Connect the wires coming from the monitor to<br />
the first two terminals on the left.<br />
6. If the <strong>Color</strong> <strong>Video</strong> <strong>Door</strong> <strong>Phone</strong> will control a<br />
locking device, connect the wires coming from<br />
the locking device to the last three terminals.<br />
See the diagram on page 7.<br />
7. Adjust the camera’s speaker volume using the<br />
potentiometer on the back of the unit.<br />
8. Push the two tabs on top of the bracket into the<br />
top of the camera. Make sure that no wires<br />
are preventing the camera from seating<br />
properly in the bracket.<br />
9. Secure the camera to the mounting bracket<br />
with the included camera screw.<br />
5ft<br />
(150cm)<br />
Camera Mounting Bracket<br />
Use this<br />
hole to<br />
secure the<br />
camera to<br />
the bracket.<br />
Connection points<br />
Speaker adjustment<br />
Adjust the camera’s<br />
speaker volume by<br />
turning the<br />
potentiometer on<br />
the back of the unit.<br />
<strong>SECO</strong>-<strong>LARM</strong> U.S.A., Inc. 5
ENFORCER <strong>Color</strong> <strong>Video</strong> <strong>Door</strong> <strong>Phone</strong><br />
Operating Instructions<br />
1. When the request-to-enter button on the camera is pressed, the monitor will ring twice. After<br />
ringing, any connected monitors will switch on.<br />
2. When the handset is picked up, audio can be heard through the handset.<br />
3. If the video door phone is connected to an electric door strike or other locking device, press<br />
the door unlock button to allow entrance. See the wiring diagram on page 7 for more details.<br />
Note: The lock will only remain unlocked for 1 second. The camera and monitor will turn off<br />
immediately.<br />
4. To see and hear what is going on at the entrance, lift the handset. The camera and monitor<br />
will automatically switch on. When finished, simply hang up the handset and the camera will<br />
switch off. If the handset is not hung up, the camera will switch off after 2 minutes.<br />
Hang up the<br />
handset to turn<br />
the monitor off.<br />
6 <strong>SECO</strong>-<strong>LARM</strong> U.S.A., Inc.
ENFORCER <strong>Color</strong> <strong>Video</strong> <strong>Door</strong> <strong>Phone</strong><br />
Wiring Diagram – Wiring a Secondary Monitor and Electric <strong>Door</strong> Strike<br />
Primary<br />
monitor<br />
Optional secondary<br />
monitor<br />
Electric<br />
<strong>Door</strong> Strike<br />
Camera<br />
Connection Points<br />
Primary<br />
monitor<br />
Optional<br />
secondary<br />
monitor<br />
Electric<br />
<strong>Door</strong> Strike<br />
Camera<br />
<strong>SECO</strong>-<strong>LARM</strong> U.S.A., Inc. 7
ENFORCER <strong>Color</strong> <strong>Video</strong> <strong>Door</strong> <strong>Phone</strong><br />
Troubleshooting:<br />
The screen is blank.<br />
The screen image is dim<br />
The screen image has poor contrast or flickers.<br />
The screen image is distorted.<br />
The camera case is hot.<br />
IR LEDs do not turn on.<br />
Lock button does not operate the relay.<br />
Check that the camera is powered up.<br />
Check that the power supply’s polarity is correct.<br />
Check that the monitor is powered up.<br />
Check that the video cable connecting the camera to the<br />
monitor is connected properly.<br />
Clean the lens using a soft, clean cloth.<br />
Check that the light source is adequate.<br />
Adjust the monitor’s contrast knob.<br />
Change the position of the camera.<br />
Change the position of the camera.<br />
Check that the correct power supply is in use.<br />
Check that the correct power supply is in use.<br />
Check that the correct power supply is in use (17VDC).<br />
IMPORTANT<br />
Users and installers of this product are responsible for ensuring this product complies with all national, state, and local laws and<br />
statutes related to monitoring and recording audio and video signals. <strong>SECO</strong>-<strong>LARM</strong> will not be held responsible for the use of this<br />
product in violation of any current laws or statutes.<br />
WARNING<br />
Stop using the camera if you see a malfunction such as smoke or unusual heat, as it could cause fire or electric shock. Do not open<br />
the case of this device, as there are no field-serviceable components inside.<br />
FCC COMPLIANCE STATEMENT<br />
Information to the user: This equipment has been tested and found to comply with the limits for a class B digital device, pursuant to<br />
part 15 of the FCC rules. These limits are designed to provide reasonable protection against harmful interference in a residential<br />
installation. This equipment generates, uses and can radiate radio frequency energy and, if not installed and used in accordance with<br />
the instructions, may cause harmful interference to radio communications. However, there is no guarantee that interference will not<br />
occur in a particular installation. If this equipment does cause harmful interference to radio or television reception, which can be<br />
determined by turning the equipment off and on, the user is encouraged to try to correct the interference by one or more of the<br />
following measures: • Reorient or relocate the receiving antenna. • Increase the separation between the equipment and receiver.<br />
• Connect the equipment into an outlet on a circuit different from that to which the receiver is connected. • Consult the dealer or an<br />
experienced radio/TV technician for help.<br />
WARRANTY: This <strong>SECO</strong>-<strong>LARM</strong> product is warranted against defects in material and workmanship while used in normal service for a<br />
period of one (1) year from the date of sale to the original customer. <strong>SECO</strong>-<strong>LARM</strong>’s obligation is limited to the repair or replacement of<br />
any defective part if the unit is returned, transportation prepaid, to <strong>SECO</strong>-<strong>LARM</strong>.<br />
This Warranty is void if damage is caused by or attributed to acts of God, physical or electrical misuse or abuse, neglect, repair or<br />
alteration, improper or abnormal usage, or faulty installation, or if for any other reason <strong>SECO</strong>-<strong>LARM</strong> determines that such equipment is<br />
not operating properly as a result of causes other than defects in material and workmanship.<br />
The sole obligation of <strong>SECO</strong>-<strong>LARM</strong>, and the purchaser’s exclusive remedy, shall be limited to replacement or repair only, at<br />
<strong>SECO</strong>-<strong>LARM</strong>’s option. In no event shall <strong>SECO</strong>-<strong>LARM</strong> be liable for any special, collateral, incidental, or consequential personal or<br />
property damages of any kind to the purchaser or anyone else.<br />
NOTICE<br />
The information and specifications printed in this manual are current at the time of publication. However, the <strong>SECO</strong>-<strong>LARM</strong> policy is<br />
one of continual development and improvement. For this reason, <strong>SECO</strong>-<strong>LARM</strong> reserves the right to change specifications without<br />
notice. <strong>SECO</strong>-<strong>LARM</strong> is also not responsible for misprints or typographical errors.<br />
Copyright © 2012 <strong>SECO</strong>-<strong>LARM</strong> U.S.A., Inc. All rights reserved. This material may not be reproduced or copied, in whole or in part,<br />
without the written permission of <strong>SECO</strong>-<strong>LARM</strong>.<br />
<strong>SECO</strong>-<strong>LARM</strong> U.S.A., Inc.<br />
16842 Millikan Avenue, Irvine, CA 92606<br />
Tel: 800-662-0800 / 949-261-2999 Fax: 949-261-7326<br />
Website: www.seco-larm.com<br />
E-mail: sales@seco-larm.com<br />
Mi<strong>DP</strong>-<strong>222Q</strong>_1202.docx<br />
8 <strong>SECO</strong>-<strong>LARM</strong> U.S.A., Inc.<br />
PICCN2


