

T32P Thermostat Installation Guide - Autani Corporation
T32P Thermostat Installation Guide - Autani Corporation
T32P Thermostat Installation Guide - Autani Corporation

You also want an ePaper? Increase the reach of your titles
YUMPU automatically turns print PDFs into web optimized ePapers that Google loves.
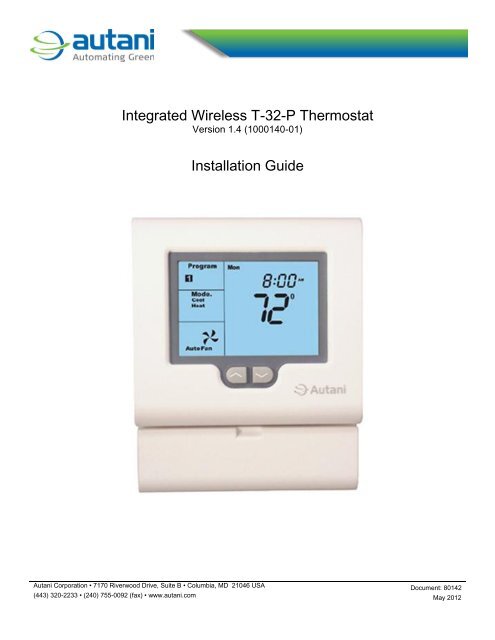
Integrated Wireless T-32-P <strong>Thermostat</strong><br />
Version 1.4 (1000140-01)<br />
<strong>Installation</strong> <strong>Guide</strong><br />
<strong>Autani</strong> <strong>Corporation</strong> • 7170 Riverwood Drive, Suite B • Columbia, MD 21046 USA Document: 80142<br />
(443) 320-2233 • (240) 755-0092 (fax) • www.autani.com May 2012
Contents<br />
Major <strong>Installation</strong> Tasks .................................................. 3<br />
Installing <strong>Thermostat</strong>s ..................................................... 3<br />
Locating <strong>Thermostat</strong>s .................................................. 3<br />
Opening the <strong>Thermostat</strong> ............................................. 3<br />
Mounting a <strong>Thermostat</strong> Subbase ................................ 3<br />
Terminal Designations................................................. 3<br />
Typical Wiring Diagrams and Switch Settings ............ 4<br />
Dual Fuel Applications................................................. 5<br />
Setting the System Switches ........................................... 5<br />
Activating the Battery ...................................................... 6<br />
Accessing the Settings Menu .......................................... 7<br />
Installing Remote Sensors .............................................. 9<br />
Types of Remote Sensors ........................................... 9<br />
Installing Indoor Sensor <strong>Guide</strong>lines ............................ 9<br />
Installing Outdoor Sensor <strong>Guide</strong>lines.......................... 9<br />
Calibrating Sensors ..................................................... 9<br />
Wiring Sensors ................................................................ 9<br />
Function Overview for ‘T’ Terminals ............................ 9<br />
Wiring Outdoor Sensors .............................................. 9<br />
Wiring Indoor Sensors ............................................... 10<br />
Wiring Sensors for Indoor Temperature Averaging .. 10<br />
Wiring Multiple Sensors for Indoor Temperature<br />
Averaging ............................................................ 10<br />
Wiring to Turn Off <strong>Thermostat</strong>s Remotely................. 10<br />
Wiring to Override Settings Remotely ....................... 10<br />
Testing ........................................................................... 10<br />
Disabling and Resetting <strong>Thermostat</strong> Delays ............. 11<br />
Testing Fan Operation............................................... 11<br />
Testing Conventional Systems .................................. 11<br />
Testing Heat Pumps .................................................. 11<br />
Using Factory Test Mode .......................................... 11<br />
Basic Troubleshooting ................................................... 11<br />
Specifications ................................................................ 12<br />
Legal Notice .................................................................. 12<br />
List of Figures<br />
Figure 1. Opening the T-32-P ........................................ 3<br />
Figure 2. Subbase Mounting .......................................... 3<br />
Figure 3. Terminal Designations .................................... 3<br />
Figure 4. Wiring Diagram: Heat Only ............................ 4<br />
Figure 5. Wiring Diagram: 1 Heat/1 Cool ...................... 4<br />
Figure 6. Wiring Diagram: 2 Heat/2Cool ....................... 4<br />
Figure 7. Wiring Diagram: 2 Heat/1 Cool Heat Pump... 4<br />
Figure 8. Wiring Diagram: 3 Heat/2 Cool Heat Pump... 5<br />
Figure 9. Wiring Diagram: 2 Heat/1 Cool Dual Fuel ..... 5<br />
Figure 10. Wiring Diagram: 3 Heat/2 Cool Dual Fuel ... 5<br />
Figure 11: System Switches .......................................... 6<br />
Figure 12. Removing the Battery Tab ............................ 6<br />
Figure 13. Wiring Diagram: Outdoor Sensor ................ 9<br />
Figure 14. Wiring Diagram: Indoor Sensors ............... 10<br />
Figure 15. Wiring Diagram: Turning Off Sensors<br />
Remotely ................................................... 10<br />
Figure 16. <strong>Thermostat</strong> LCD Display ............................ 10<br />
List of Tables<br />
Table 1. Terminal Designation Chart ............................. 3<br />
Table 2. Switch Functions and Settings ........................ 6<br />
Table 3. Factory Default Switch Settings ....................... 6<br />
Table 4. Settings Menu Options .................................... 7<br />
Table 5. Sensor Calibration Chart ................................. 9<br />
Table 6. Troubleshooting ............................................. 11<br />
Table 7. T-32-P Specifications ..................................... 12<br />
2
Major <strong>Installation</strong> Tasks<br />
This <strong>Installation</strong> <strong>Guide</strong> contains installer setup<br />
functions which, if not correctly set, may cause<br />
damage to the HVAC equipment or seriously<br />
affect performance.<br />
There are no user-serviceable parts inside the<br />
T-32-P. Unauthorized dismantling will void the<br />
warranty. For warranty information, see<br />
www.autani.com/legal.<br />
1. Thoroughly read this <strong>Installation</strong> <strong>Guide</strong>.<br />
2. Install the T-32-P.<br />
3. Set the eight system switches to match the<br />
equipment application.<br />
4. Wire the optional remote temperature sensor(s).<br />
5. Power the thermostat.<br />
6. Select options in the Settings menu.<br />
7. Program and setup the T-32-P thermostat.<br />
Refer to the T-32-P User’s Manual.<br />
8. Test heating, cooling, and other functions.<br />
Installing <strong>Thermostat</strong>s<br />
Locating <strong>Thermostat</strong>s<br />
Install the T-32-P in a location that represents the<br />
ambient space temperature.<br />
Do not install thermostats on an external wall or in areas:<br />
<br />
<br />
<br />
<br />
<br />
<br />
Where air movement is limited<br />
Affected by direct sunlight<br />
Near lamps or appliances<br />
Where there may be drafts<br />
Near the floor<br />
Behind doors<br />
Opening the <strong>Thermostat</strong><br />
1. Insert a small coin (such as a dime) in the<br />
release slot located on the bottom of the<br />
thermostat.<br />
2. Gently twist the coin to release the thermostat<br />
from the subbase.<br />
Mounting a <strong>Thermostat</strong> Subbase<br />
1. Pull the control wires through the large opening<br />
in the thermostat subbase.<br />
2. Level and mount the subbase on the wall using<br />
the supplied anchors and screws.<br />
• Do not over tighten the mounting screws as<br />
the subbase may warp causing the improper<br />
seating of the thermostat connecting pins to<br />
the terminal blocks.<br />
• Use a properly sized screwdriver to connect<br />
each wire to its dedicated terminal.<br />
• Do not over tighten the terminal screws.<br />
• Check to ensure that all wires are connected<br />
correctly and dressed properly to prevent<br />
any shorts.<br />
3. Seal the control wire hole to prevent drafts in the<br />
wall cavities that can affect the internal<br />
temperature sensor.<br />
Figure 2. Subbase Mounting<br />
Terminal Designations<br />
Based on the T-32-P slide switch configuration, some<br />
terminals have multiple output functions.<br />
Figure 3. Terminal Designations<br />
Avoid twisting the case to protect the LCD<br />
screen and avoid bending the terminal<br />
connector pins.<br />
Figure 1. Opening the T-32-P<br />
Table 1. Terminal Designation Chart<br />
Terminal<br />
Designation<br />
W2 Second stage heating or auxiliary heat<br />
Y2 Second stage compressor<br />
W1<br />
O/B<br />
First state heating<br />
Reversing Valve<br />
Y1 First stage compressor<br />
G1 Fan relay<br />
R 24 volt hot (jumpered to ‘24’)<br />
3
Terminal<br />
Designation<br />
24 24 volt hot<br />
24C 24 volt common<br />
B Modbus communications<br />
A Modbus communications<br />
T Auxiliary input terminal<br />
T Auxiliary input terminal<br />
Typical Wiring Diagrams and Switch<br />
Settings<br />
Figure 4. Wiring Diagram: Heat Only<br />
Switch Settings<br />
Sw1 = OFF – Fan Relay<br />
Sw2 = OFF – Heat/Cool<br />
Sw3 = OFF – Single Stage<br />
Sw4 = OFF – Equipment Controls Fan<br />
Sw5 = Installer Preference<br />
OFF – No Short Cycle Protection<br />
ON – 4 Minute Short Cycle Protection<br />
Sw6 = OFF – Non-programmable<br />
Sw7 = Installer Preference<br />
OFF – 2 Minute Minimum Run Time<br />
ON – 6 Minute Minimum Run Time<br />
Sw8 = ON – 2 Setpoints<br />
Note: Set FN to H in the Settings menu. See Accessing<br />
the Settings Menu section.<br />
Figure 5. Wiring Diagram: 1 Heat/1 Cool<br />
Switch Settings<br />
Sw1 = OFF – Fan Relay<br />
Sw2 = OFF – Heat/Cool<br />
Sw3 = OFF – Single Stage<br />
Sw4 = OFF – Equipment Controls Fan<br />
Sw5 = Installer Preference<br />
OFF – No Short Cycle Protection<br />
ON – 4 Minute Short Cycle Protection<br />
Sw6 = OFF – Non-programmable<br />
Sw7 = Installer Preference<br />
OFF – 2 Minute Minimum Run Time<br />
ON – 6 Minute Minimum Run Time<br />
Sw8 = ON – Separate Heat and Cool Setpoints<br />
4<br />
Figure 6. Wiring Diagram: 2 Heat/2Cool<br />
Switch Settings<br />
Sw1 = OFF – Fan Relay<br />
Sw2 = OFF – Heat/Cool<br />
Sw3 = ON – Two Stage<br />
Sw4 = OFF – Equipment Controls Fan<br />
Sw5 = Installer Preference<br />
OFF – No Short Cycle Protection<br />
ON – 4 Minute Short Cycle Protection<br />
Sw6 = OFF – Non-programmable<br />
Sw7 = Installer Preference<br />
OFF – 2 Minute Minimum Run Time<br />
ON – 6 Minute Minimum Run Time<br />
Sw8 = ON – Separate Heat and Cool Setpoints<br />
Figure 7. Wiring Diagram: 2 Heat/1 Cool Heat Pump<br />
Switch Settings<br />
Sw1 = OFF – Fan Relay<br />
Sw2 = ON – Heat Pump<br />
Sw3 = OFF – Single Stage<br />
Sw4 = Reversing Valve<br />
OFF – O = RV Energized in Cooling<br />
ON – B = RV Energized in Heating<br />
Sw5 = Installer Preference<br />
OFF – No Short Cycle Protection<br />
ON – 4 Minute Short Cycle Protection<br />
Sw6 = OFF – Non-programmable<br />
Sw7 = Installer Preference<br />
OFF – 2 Minute Minimum Run Time<br />
ON – 6 Minute Minimum Run Time<br />
Sw8 = ON – Separate Heat and Cool Setpoints
Figure 8. Wiring Diagram: 3 Heat/2 Cool Heat Pump<br />
Figure 10. Wiring Diagram: 3 Heat/2 Cool Dual Fuel<br />
Switch Settings<br />
Sw1 = OFF – Fan Relay<br />
Sw2 = ON – Heat Pump<br />
Sw3 = ON – Two Stage<br />
Sw4 = Reversing Valve<br />
OFF – O = RV Energized in Cooling<br />
ON – B = RV Energized in Cooling<br />
Sw5 = Installer Preference<br />
OFF – No Short Cycle Protection<br />
ON – 4 Minute Short Cycle Protection<br />
Sw6 = OFF – Non-programmable<br />
Sw7 = Installer Preference<br />
OFF – 2 Minute Minimum Run Time<br />
ON – 6 Minute Minimum Run Time<br />
Sw8 = ON – Separate Heat and Cool Setpoints<br />
Figure 9. Wiring Diagram: 2 Heat/1 Cool Dual Fuel<br />
Switch Settings<br />
Sw1 = OFF – Fan Relay<br />
Sw2 = ON – Heat Pump<br />
Sw3 = OFF – Single Stage<br />
Sw4 = Reversing Valve<br />
OFF – O = RV Energized in Cooling<br />
ON – B = RV Energized in Cooling<br />
Sw5 = Installer Preference<br />
OFF – No Short Cycle Protection<br />
ON – 4 Minute Short Cycle Protection<br />
Sw6 = OFF – Non-programmable<br />
Sw7 = Installer Preference<br />
OFF – 2 Minute Minimum Run Time<br />
ON – 6 Minute Minimum Run Time<br />
Sw8 = ON – Separate Heat and Cool Setpoints<br />
Switch Settings<br />
Sw1 = OFF – Fan Relay<br />
Sw2 = ON – Heat Pump<br />
Sw3 = ON – Two Stage<br />
Sw4 = Reversing Valve<br />
OFF – O = RV Energized in Cooling<br />
ON – B = RV Energized in Cooling<br />
Sw5 = Installer Preference<br />
OFF – No Short Cycle Protection<br />
ON – 4 Minute Short Cycle Protection<br />
Sw6 = OFF – Non-programmable<br />
Sw7 = Installer Preference<br />
OFF – 2 Minute Minimum Run Time<br />
ON – 6 Minute Minimum Run Time<br />
Sw8 = ON – Separate Heat and Cool Setpoints<br />
Dual Fuel Applications<br />
When the T-32-P is used with dual fuel systems, an<br />
outdoor sensor is recommended for balance point<br />
control.<br />
1. Wire the sensor to the ‘T’ terminals on the<br />
thermostat.<br />
2. In the Settings menu:<br />
a. Set TT to OA to configure the thermostat to<br />
receive outdoor temperature information.<br />
b. Select high and low balance point settings.<br />
<br />
<br />
High balance point range is 32°F-122°F.<br />
Factory default is 55°F.<br />
Low balance point range is 15°F-77°F.<br />
Factory default is 35°F.<br />
c. Configure the W2 relay to lock out the<br />
heat pump at the low balance point or<br />
whenever the thermostat calls for auxiliary<br />
or emergency heat. Set H3 to FF.<br />
Setting the System Switches<br />
The T-32-P printed circuit board contains a set of eight<br />
system switches. The switches are used to match the<br />
thermostat with the type of system being used and user<br />
preferences.<br />
The function of each switch is described in the table<br />
below. For information on switch settings by specific<br />
system configuration, see the section entitled Typical<br />
Wiring Diagrams and Switch Settings.<br />
5
Table 2. Switch Functions and Settings<br />
Switch Function Setting<br />
Sw1 Fan Relay Leave switch in OFF<br />
position (factory default).<br />
Sw2<br />
Sw3<br />
Sw4<br />
Sw5<br />
Sw6<br />
Sw7<br />
Sw8<br />
Equipment<br />
Configuration<br />
Equipment<br />
Stages<br />
Fan Mode<br />
for<br />
heat/cool<br />
systems<br />
Reversing<br />
valve for<br />
heat<br />
pumps<br />
Short Cycle<br />
Timer<br />
<strong>Thermostat</strong><br />
Operation<br />
Minimum<br />
Run Time<br />
Program<br />
Schedule<br />
Heat/cool equipment:<br />
leave switch in OFF<br />
position (factory default).<br />
Heat pump: Set switch to<br />
ON position.<br />
Single stage equipment:<br />
leave switch in OFF<br />
position (factory default).<br />
Multistage equipment:<br />
Set switch to ON position.<br />
Fan mode<br />
• Gas or oil systems<br />
(equipment controls<br />
fan in heating mode):<br />
leave switch in OFF<br />
position (factory<br />
default).<br />
• Electric systems<br />
(thermostat controls<br />
fan in heating mode):<br />
set switch to ON<br />
position.<br />
Reversing Valve<br />
• “O” reversing valve<br />
(energize cooling):<br />
leave switch in OFF<br />
position (factory<br />
default).<br />
• “B” reversing valve<br />
(energize heating):<br />
set switch to ON<br />
position.<br />
Leave switch in ON position<br />
for four minute short cycle<br />
protection (factory default).<br />
Leave switch in OFF<br />
position for nonprogrammable<br />
mode<br />
(factory default).<br />
Leave switch in OFF<br />
position for two minute<br />
minimum run time (factory<br />
default).<br />
Leave switch in ON position<br />
for separate heating and<br />
cooling setpoints (factory<br />
default).<br />
Figure 11: System Switches<br />
Table 3. Factory Default Switch Settings<br />
Switch Default Function<br />
Sw1 OFF Fan relay<br />
Sw2 OFF Heat/cool equipment<br />
Sw3 OFF Equipment stages<br />
Sw4 OFF Fan control/Reversing valve<br />
Sw5 ON Four minute short cycle protection<br />
Sw6 OFF Non-programmable<br />
Sw7 OFF Two minute minimum run time<br />
Sw8 ON Separate heating and cooling<br />
setpoints<br />
Activating the Battery<br />
The T-32-P contains a 3 volt lithium cell battery that<br />
maintains the time of day in the event of a power failure.<br />
If there is a white tab, carefully remove it to activate the<br />
battery.<br />
Figure 12. Removing the Battery Tab<br />
6
Accessing the Settings Menu<br />
1. Press the O/RIDE button once and hold it down<br />
until the number “88:15” is displayed on the LCD<br />
screen (about 15 seconds).<br />
2. Using the arrow button, adjust the value until it<br />
reads “88:32” and then press the O/RIDE button<br />
to enter the menu.<br />
3. To navigate through the menu, press the<br />
O/RIDE button to move forward or the PROG<br />
button to move backwards.<br />
Table 4. Settings Menu Options<br />
Symbol Default Function/Setting Options<br />
PN 32 Keyboard Lock PIN. PIN is<br />
required to enter the Settings<br />
menu.<br />
Range is 00-99.<br />
LC 00 Keyboard Lock OFF<br />
Programmable<br />
Mode<br />
(Sw6=ON)<br />
Manual Mode<br />
(Sw6=OFF)<br />
All buttons are locked except:<br />
01 – ▲and▼ buttons<br />
02 – O/RIDE and ▲and▼<br />
03 – MODE, O/RIDE and<br />
▲and▼<br />
04 – MODE and ▲and▼<br />
05 – O/RIDE<br />
06 – All buttons are locked.<br />
00 – Keyboard lock OFF<br />
01 – All buttons are locked<br />
except MODE.<br />
02 – All buttons are locked<br />
except MODE and ▲and▼.<br />
03 – FAN and PROG are<br />
locked. MODE button can<br />
only select Auto or OFF.<br />
04 – MODE button can only<br />
select Auto or OFF.<br />
05 – All buttons are locked.<br />
06 – All buttons are locked.<br />
HL 90 Maximum heating or high<br />
temperature limit<br />
Range using LCD is 41°F-<br />
120°F.<br />
Range using <strong>Autani</strong><br />
EnergyCenter is 41°F-98°F.<br />
CL 50 Minimum cooling or low<br />
temperature limit<br />
Range using LCD is 43°F-<br />
122°F.<br />
Range using <strong>Autani</strong><br />
EnergyCenter is 43°F-98°F.<br />
CF F Temperature Display<br />
Degrees F or C<br />
C1 0.0 Internal Sensor Calibration<br />
Range is +/- 9°F, in<br />
increments of tenths of a<br />
degree.<br />
Symbol Default Function/Setting Options<br />
TC 12 Time Format<br />
12 or 24 Hour Clock<br />
TD 0 0 – Displays set and space<br />
temperatures.<br />
1 – Displays only the set<br />
temperature.<br />
AH 2.0 After hours override timer<br />
Range is OFF to 12, in<br />
increments of half an hour.<br />
4 Schedules<br />
(Sw6=ON)<br />
(Sw8=ON)<br />
Temporary program override<br />
0 (OFF) extends override until<br />
the next program change.<br />
Range is 1-12 override hours.<br />
SC OF Factory default – Do not change.<br />
SH OF Factory default – Do not change.<br />
DB 2 Factory default – Do not change.<br />
FO 0 0 – Fan runs continuously in<br />
ON mode.<br />
1 – Fan continues to run after<br />
cooling cycle but not heating<br />
cycle.<br />
2 – In programmable mode<br />
(Sw6=ON), fan runs<br />
continuously with program 1<br />
through 4 and then in AUTO<br />
from program 4 through 1.<br />
3 – In programmable mode<br />
(Sw6=ON), fan control is a<br />
combination of options 1 and<br />
2.<br />
FP 0 Fan Purge<br />
Range is 0-5 minutes after<br />
heating or cooling cycle<br />
FN A A – Mode for heating/cooling<br />
system<br />
C – Cooling only system<br />
H – Heating only system<br />
H3 OF OF – W2 relay only operates<br />
as auxiliary heat in heat pump<br />
mode (Sw1=OFF; Sw2=ON).<br />
EH – W2 relay controls<br />
emergency heat.<br />
AH – Do not use this function.<br />
AL – W2 relay used for<br />
auxiliary and emergency heat.<br />
FF – Fossil Fuel (Y is locked<br />
out when W2 is energized.)<br />
7
Symbol Default Function/Setting Options<br />
TT RS RS – For NO remote sensor<br />
or 1 or more remote indoor<br />
sensors without the onboard<br />
sensor being used<br />
OA – For outdoor remote<br />
sensor connection<br />
DA – Sends measured<br />
temperature from remote<br />
sensor via Modbus but does<br />
not display the value on the<br />
LCD.<br />
OC – For connecting dry<br />
contact switch used to replace<br />
user set points with<br />
preprogrammed cooling and<br />
heating setpoints (OC/OH)<br />
OF – For connecting dry<br />
contact switch used to turn<br />
thermostat off when closed<br />
AV – For combined average<br />
from the internal thermostat<br />
sensor and remote indoor<br />
sensor(s)<br />
AF 1 1 – Freeze protection ON. If<br />
thermostat is OFF, heating<br />
comes on if room temperature<br />
falls below 41°F.<br />
0 – No freeze protection<br />
OH OF Override heating setpoint<br />
Range is 41°F-120°F.<br />
OC OF Override cooling setpoint<br />
Range is 43°F-122°F.<br />
SP 2 2 – 1.9° F differential for stage<br />
1<br />
1 – 1.4°F differential<br />
3 – 2.4°F differential<br />
SD 2 2 – 1.9°F differential for stage<br />
2<br />
1 – 1.4°F differential<br />
3 – 2.4°F differential<br />
DT 20 Upstage timer<br />
Range is 10-90 minutes, in<br />
five minute increments.<br />
Only works if thermostat has<br />
not called for second or third<br />
stage and Sw3=ON.<br />
OS 1 1 – Adaptive Recovery ON<br />
0 – Adaptive Recovery OFF<br />
C2 0.0 Remote sensor calibration<br />
Range is +/- 9°F, in<br />
increments of half a degree.<br />
8<br />
Symbol Default Function/Setting Options<br />
CO 55 When outdoor temperature<br />
falls below setpoint, cooling<br />
shuts off.<br />
Range using LCD is 43°F-<br />
122°F.<br />
Range using <strong>Autani</strong><br />
EnergyCenter is 43°F-98°F.<br />
Only works if TT=OA with<br />
outdoor sensor.<br />
HO 75 When outdoor temperature<br />
rises above setpoint, heating<br />
shuts off.<br />
Range using LCD is 41°F-<br />
120°F.<br />
Range using <strong>Autani</strong><br />
EnergyCenter is 41°F-98°F.<br />
Only works if TT=OA with<br />
outdoor sensor.<br />
HB 55 High Balance Point<br />
W2 auxiliary heat is locked out<br />
when temperature rises above<br />
HB setpoint.<br />
Options are 32°F-122°F and<br />
OFF.<br />
Only works if TT=OA with<br />
outdoor sensor and H3=FF for<br />
fossil fuel.<br />
LB 35 Low Balance Point<br />
W2 auxiliary heat is locked out<br />
when temperature falls below<br />
LB setpoint.<br />
Options are 14°F-77°F and<br />
OFF.<br />
Only works if TT=OA with<br />
outdoor sensor and H3=FF for<br />
fossil fuel.<br />
FT OF Replace or clean filter<br />
Range is Off to 90 hours, in<br />
10 hour increments.<br />
AD 1 Modbus Address<br />
Must be set to 1.<br />
BD 19.2 19.2 baud rate<br />
9.6 baud rate<br />
4.8 baud rate<br />
CD 0 0 – Commissioning Mode<br />
OFF; all time delays active<br />
1 – Commissioning Mode ON;<br />
all time delays inactive<br />
SS 0 0 – Start/Stop mode controlled<br />
by thermostat program<br />
1 – <strong>Thermostat</strong> Start only<br />
mode per call by Modbus<br />
Master<br />
2 – <strong>Thermostat</strong> Stop only<br />
mode per call by Modbus<br />
Master<br />
RS 50 Response Time – Do not change<br />
factory default.
Symbol Default Function/Setting Options<br />
TS 0 0 – Factory Test Mode OFF<br />
1 – Display configuration code<br />
2 – Step cycle all relays in<br />
sequence<br />
3 – Reset software to factory<br />
defaults (Press the Fan button<br />
to initiate.)<br />
Installing Remote Sensors<br />
Types of Remote Sensors<br />
Depending on the thermostat configuration, the T-32-P<br />
can use an indoor remote sensor or multiple sensors:<br />
<br />
<br />
<br />
For temperature averaging<br />
As an outdoor sensor for temperature display<br />
As a control function<br />
There are two types of remote sensors.<br />
<br />
<br />
The T-32-S1 is a single sensor that can be used<br />
indoors or outdoors.<br />
The T-32-S2 contains two sensors. A<br />
combination of both sensors can be used for<br />
indoor temperature averaging to simplify wiring.<br />
Installing Indoor Sensor <strong>Guide</strong>lines<br />
Locate the sensor in the same manner as a thermostat.<br />
<br />
<br />
<br />
<br />
<br />
<br />
<br />
Mount the sensor 18” away from outside walls.<br />
Do not install the sensor behind doors, in<br />
corners or other dead air spaces.<br />
Keep the sensor away from direct air flow,<br />
supply registers, or sources of heat such as<br />
lamps and appliances.<br />
The maximum wire length from the sensor to the<br />
thermostat is 300 feet.<br />
Use a separate 18-2 thermostat cable for sensor<br />
wiring.<br />
Prior to wiring the sensor to the thermostat, use<br />
an ohm-meter or multimeter to measure the<br />
resistance of the sensor. Measure at the end of<br />
the wires that will connect to the thermostat.<br />
Confirm the resistance value (within 5%) to the<br />
temperature where the sensor is mounted.<br />
Disconnect power to the thermostat when wiring<br />
the sensor to the T terminals. Strip only as much<br />
insulation off the wires as necessary to provide a<br />
good contact with the terminals. The sensor is<br />
not polarity specific so either sensor lead may<br />
be connected to either terminal.<br />
Installing Outdoor Sensor <strong>Guide</strong>lines<br />
<br />
<br />
<br />
Mount the sensor on a vertical exterior surface<br />
below an overhang.<br />
Choose a location protected from direct sunlight<br />
and exposure to excessive moisture.<br />
Follow the same wiring and test procedures as<br />
installing an indoor sensor.<br />
Calibrating Sensors<br />
Table 5. Sensor Calibration Chart<br />
Temperature<br />
(F°)<br />
Resistance<br />
(10kΩ)<br />
Temperature<br />
(F°)<br />
Resistance<br />
(10kΩ)<br />
30 34.6 70 11.9<br />
40 26.1 80 9.4<br />
50 19.9 90 7.4<br />
60 15.3 100 5.9<br />
Wiring Sensors<br />
Function Overview for ‘T’ Terminals<br />
The ‘T’ terminals on the thermostat are primarily used to<br />
wire an indoor or outdoor remote sensor. The terminals<br />
are not polarity dependent.<br />
Depending on the thermostat configuration, the terminals<br />
can also be used for other functions such as remote<br />
ON/OFF switching of various control functions.<br />
Each configuration requires setup using the Setting<br />
menu. For more information, see the section entitled<br />
Accessing the Settings Menu.<br />
Wiring Outdoor Sensors<br />
To use the T-32-S1 as an outdoor sensor and display<br />
the outside air temperature on the T-32-P:<br />
1. Wire the sensor to the thermostat as shown<br />
using separate 18-2 thermostat cable.<br />
2. In the Settings menu, set TT to OA.<br />
If the outdoor sensor fails, or is not wired properly, two<br />
dashes will appear on the LCD where the outside<br />
temperature would normally be displayed.<br />
The outdoor sensor can also be used for high and low<br />
balance point control in dual fuel systems. For more<br />
information, see the Dual Fuel Applications section.<br />
Figure 13. Wiring Diagram: Outdoor Sensor<br />
9
Wiring Indoor Sensors<br />
To use the T-32-S1 as an indoor sensor and configure<br />
the T-32-P to allow only the remote sensor to control the<br />
temperature:<br />
1. Wire the sensor as shown in Figure 13.<br />
2. In the Settings menu, set TT to RS.<br />
Wiring Sensors for Indoor Temperature<br />
Averaging<br />
To use temperature averaging with or without the<br />
thermostat onboard sensor, multiple sensors can be<br />
connected to the ‘T’ terminals. The total value of remote<br />
sensors wired in series/parallel must equal 10kΩ @<br />
77°F. The onboard sensor is not part of the equation.<br />
To use a single T-32-S1 as an indoor sensor, wire the<br />
sensor as shown in Figure 13.<br />
<br />
<br />
To use both the remote and onboard sensor for<br />
temperature averaging, in the Settings menu set<br />
TT to AV.<br />
To use an optional in-line switch to change the<br />
temperature sensing location from the remote to<br />
the onboard sensor, in the Settings menu set TT<br />
to RS.<br />
Wiring Multiple Sensors for Indoor<br />
Temperature Averaging<br />
<br />
<br />
<br />
See Figure 14 for wiring two T-32-S2 sensors.<br />
For three sensors, one T-32-S2 and two T-32-<br />
S1 sensors can be wired in series/parallel.<br />
For four sensors, four T-32-S1 sensors can be<br />
wired in series/parallel.<br />
Configurations of multiple sensors can be used with or<br />
without the thermostat onboard sensor.<br />
<br />
<br />
To include the onboard sensor, in the Settings<br />
menu set TT to AV.<br />
To exclude the onboard sensor, in the Settings<br />
menu set TT to RS.<br />
Figure 14. Wiring Diagram: Indoor Sensors<br />
Wiring to Turn Off <strong>Thermostat</strong>s Remotely<br />
To use an external dry contact switch to turn a<br />
thermostat off remotely:<br />
1. Wire the switch as shown in Figure 16.<br />
2. In the Settings menu, set TT to OF.<br />
• When the switch is closed, the T-32-P turns<br />
off and the word OFF flashes on the LCD.<br />
• When the switch is opened, the thermostat<br />
returns to the user settings.<br />
Figure 15. Wiring Diagram: Turning Off Sensors<br />
Remotely<br />
Wiring to Override Settings Remotely<br />
To use an external dry contact switch to remotely<br />
change the heating and cooling setpoints to a preprogrammed<br />
override value:<br />
1. Wire the switch as shown in Figure 16 above.<br />
2. In the Settings menu:<br />
Testing<br />
a. Set TT to OC.<br />
b. Use OC and OH to set the cooling and<br />
heating setpoints.<br />
<br />
<br />
When the switch is closed, user<br />
setpoints are replaced by the preprogrammed<br />
override setpoints.<br />
When the switch is open, thermostat<br />
user settings are restored.<br />
When the T-32-P is powered, the LCD screen briefly<br />
displays important information as shown below.<br />
Figure 16. <strong>Thermostat</strong> LCD Display<br />
10
Disabling and Resetting <strong>Thermostat</strong> Delays<br />
1. To disable time delays in the T-32-P to facilitate<br />
testing, in the Settings menu set CD to 1. After<br />
exiting the menu, a wrench icon flashes on the<br />
LCD screen as a reminder to reinstate the time<br />
delays when testing is completed.<br />
2. To reinstate the time delays, in the Settings<br />
menu set CD to 0. The flashing wrench icon no<br />
longer appears on the LCD screen.<br />
Testing Fan Operation<br />
1. Press the MODE button until the word OFF is<br />
displayed on the LCD.<br />
2. Press the FAN button and the words Fan On will<br />
appear. After a brief moment, the internal fan<br />
relay energizes and the fan icon appears and<br />
rotates.<br />
Testing Conventional Systems<br />
1. Press the MODE button until Mode Heat<br />
appears on the LCD.<br />
2. Use the ▲ button to raise the setpoint a few<br />
degrees above the space temperature. The<br />
heating relay will energize and the word Heat<br />
will change to Heating.<br />
3. If the thermostat has been configured for multistage<br />
operation, raise the setpoint further and<br />
the second stage heating relay energizes and a<br />
period is displayed after the word Mode.<br />
4. Press the MODE button until Mode Cool<br />
appears on the LCD.<br />
5. Use the ▼ button to lower the setpoint a few<br />
degrees below the space temperature. The<br />
cooling and fan relays will energize and the word<br />
Cool will change to Cooling.<br />
6. If the thermostat has been configured for multistage<br />
operation, lower the setpoint further and<br />
the second stage cooling relay energizes and a<br />
period is displayed after the word Mode.<br />
Testing Heat Pumps<br />
When the thermostat is in heat pump mode, the<br />
reversing valve is energized when it receives a call for<br />
cooling or heating. The reversing valve remains<br />
energized for 30 minutes unless there is an opposite call<br />
in the interim.<br />
Testing a T-32-P configured for heat pumps is the same<br />
as testing for a conventional heating and cooling system<br />
except the fan relay is energized on a call for heating as<br />
well as for cooling.<br />
Emergency Heat mode is active when the thermostat H3<br />
setting is EH, FF or AL in the Settings menu. E. Heating<br />
is displayed on the LCD when either the thermostat is<br />
placed in emergency heat mode or the W2 relay is<br />
energized.<br />
Using Factory Test Mode<br />
The T-32-P contains a simple factory test mode that can<br />
be used to confirm relay outputs, switch configurations,<br />
or reset the thermostat to factory defaults.<br />
Access the Settings menu and select one of following TS<br />
switch settings:<br />
<br />
<br />
<br />
<br />
0 – Factory Test Mode is OFF.<br />
1 – For factory use only. Displays system<br />
configuration code based on slide switch<br />
settings.<br />
2 – Cycles each relay on and off in an endless<br />
loop. Equipment should be disabled when<br />
performing this test.<br />
3 – Reset software to factory defaults. Press the<br />
Fan button to initiate.<br />
Basic Troubleshooting<br />
Symptom<br />
No LCD<br />
Display<br />
“Locked”<br />
appears on<br />
LCD screen<br />
and heating or<br />
cooling not<br />
operating<br />
Wrench icon<br />
flashes on LCD<br />
Some<br />
thermostat<br />
buttons do not<br />
function<br />
Table 6. Troubleshooting<br />
Potential Solution<br />
1. Remove thermostat from<br />
subbase and check:<br />
a. For 24 volts across ‘24’ and<br />
‘24C’<br />
b. Factory jumper is between<br />
‘R’ and ‘24”.<br />
2. If no voltage, check voltage on<br />
HVAC for 24 volts at HVAC<br />
system terminals ‘R’ and ‘C’. If<br />
no voltage, fault is equipment<br />
related.<br />
3. If voltage, check wiring.<br />
If an outdoor sensor is being used,<br />
it could be preventing heating or<br />
cooling calls. Adjust the<br />
appropriate setting in the Settings<br />
menu if the outdoor air temperature<br />
is:<br />
Close to the OFF setpoint for<br />
heating or cooling<br />
Above the heating OFF setpoint<br />
Below the cooling OFF setpoint<br />
Commission mode is enabled and<br />
time delays are being overridden.<br />
Change CD to 0 in Settings menu.<br />
Lock values have been set. Refer<br />
to LC settings in the Settings menu.<br />
11
Symptom<br />
Temperature<br />
display<br />
inaccurate<br />
Outdoor<br />
temperature<br />
does not<br />
display<br />
(Dashes<br />
appear on the<br />
LCD screen)<br />
“Heating” or<br />
“Cooling” is<br />
flashing while<br />
the HVAC<br />
system is<br />
running<br />
Lock icon<br />
flashes when<br />
trying to set a<br />
higher heating<br />
or lower cooling<br />
temperature<br />
<strong>Thermostat</strong><br />
displays wrong<br />
temperature<br />
scale<br />
Fan continues<br />
to run after a<br />
heating or<br />
cooling call is<br />
satisfied<br />
<strong>Thermostat</strong><br />
clock does not<br />
keep proper<br />
time<br />
Potential Solution<br />
Air from the wall cavity may be<br />
leaking into the rear of the<br />
thermostat. Seal holes in the<br />
wall to prevent air infiltration.<br />
The temperature sensor might be<br />
folded back inside the thermostat<br />
and is not being exposed to the<br />
room temperature. Carefully<br />
move the sensor head so that it<br />
is just behind the sensor opening<br />
in the case.<br />
External influences from<br />
appliances, lighting or drafts may<br />
be affecting temperature<br />
accuracy. Move lamps or other<br />
sources of abnormal temperature<br />
influence away from the<br />
thermostat.<br />
Check wiring to outdoor sensor.<br />
Make sure that TT=OA in the<br />
Settings menu.<br />
The T-32-P has a built-in minimum<br />
equipment run time of either 2 or 6<br />
minutes. Sw6 may be set for 6<br />
minutes (ON) which is keeping the<br />
equipment on after the thermostat<br />
reaches setpoint.<br />
HL and CL restrict the heating and<br />
cooling setpoints. The setpoints<br />
can be changed in the Settings<br />
menu.<br />
The T-32-P can be configured to<br />
use the Fahrenheit or Celsius scale.<br />
Change CF to C or F in the Settings<br />
menu.<br />
The thermostat is set to Fan ON.<br />
Set the thermostat to Auto Fan.<br />
The fan purge mode is set to run<br />
the fan for a fixed period of time<br />
after the equipment shuts off.<br />
Change the FP value in the<br />
Settings menu.<br />
Make sure the plastic tab on the<br />
internal battery has been removed<br />
so that the battery is operational.<br />
Specifications<br />
Table 7. T-32-P Specifications<br />
Input Voltage<br />
24 VAC 50/60 Hz<br />
Relay Rating<br />
24 VAC @ 1Amp maximum<br />
per relay<br />
Operating Temperature 32°F to 122°F<br />
Operating RH<br />
0-95% (non-condensing)<br />
Storage Temperature 32°F to 105°F<br />
Size 4-7/16” W x 4-1/16” H x 7/8”<br />
D<br />
LCD Display Size 2-3/4” W x 1-7/8” H<br />
Temperature Sensor 10K NTC type 3<br />
Voltage<br />
20-30 VAC<br />
Resistance 10kΩ @ 77°F<br />
Tolerance +/- 3% @ 77°F<br />
Stage Delays<br />
Minimum temperature<br />
change over time<br />
Timed Upstage Delay 5 to 90 minutes<br />
Short-cycle Delay Off to 4 minutes<br />
Display Resolution 0.1° F<br />
Control Range Off to 105°F<br />
Outdoor Air<br />
-10°F to 140°F<br />
Temperature Range<br />
Back Light<br />
Blue EL (Electro<br />
Luminescent)<br />
Optimized Start/Stop<br />
Method<br />
Time to start vs.<br />
temperature differential<br />
Communications Modbus<br />
Protocol<br />
Approvals<br />
FCC (Part 15) (Pending)<br />
Warranty<br />
5 years<br />
Legal Notice<br />
Copyright <strong>Autani</strong> <strong>Corporation</strong>, 2010-2012. All rights<br />
reserved. Please refer to www.autani.com/legal for<br />
licensing, intellectual property, and other legal notices<br />
and information.<br />
12


