7603VC - Multiple Camera/VCR Controller Manual - Smarthome
7603VC - Multiple Camera/VCR Controller Manual - Smarthome
7603VC - Multiple Camera/VCR Controller Manual - Smarthome
Create successful ePaper yourself
Turn your PDF publications into a flip-book with our unique Google optimized e-Paper software.
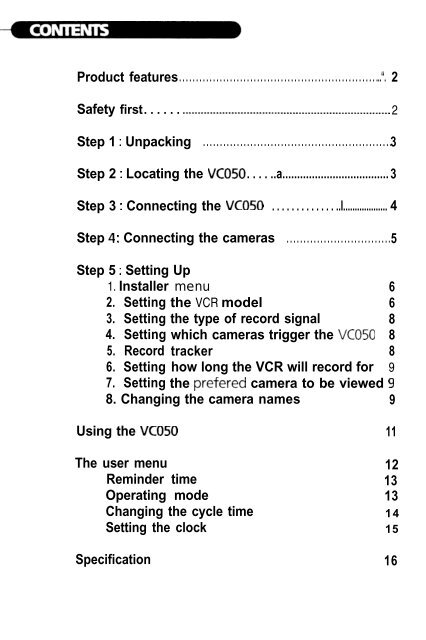
Product features . . . . . . . . . . . . . . . . . . . . . . . . . . . . . . . . . . . . . . . . . . . . . . . . . . . . . . . . . . ...“. 2<br />
Safety first. . . . . . ..l................................................................. 2<br />
Step 1 : Unpacking . . . . . . . . . . . . . . . . . . . . . . . . . . . . . . . . . . . . . . . . . . . . . . . . . . . . . . . .3<br />
Step 2 : Locating the VCO50 . . . . ..a.................................... 3<br />
Step 3 : Connecting the VCO50 . . . . . . . . . . . . . ..I................... 4<br />
Step 4 : Connecting the cameras . . . . . . . . . . . . . . . . . . . . . . . . . . . . . . .5<br />
Step 5 : Setting Up<br />
1. Installer menu 6<br />
2. Setting the <strong>VCR</strong> model 6<br />
3. Setting the type of record signal 8<br />
4. Setting which cameras trigger the VCOSO 8<br />
5. Record tracker 8<br />
6. Setting how long the <strong>VCR</strong> will record for 9<br />
7. Setting the prefered camera to be viewed 9<br />
8. Changing the camera names<br />
9<br />
Using the VCO50<br />
The user menu<br />
Reminder time<br />
Operating mode<br />
Changing the cycle time<br />
Setting the clock<br />
11<br />
12<br />
13<br />
13<br />
14<br />
15<br />
Specification 16
Thank you for purchasing the VCO50. Please study these instructions carefully<br />
before attempting to operate the product.<br />
The VCO50 is a four way camera switcher with on screen display and <strong>VCR</strong><br />
contoller to automatically record camera pictures on your <strong>VCR</strong> while you are<br />
away fom the property.<br />
a<br />
• Very simple to install and operate with on-screen menus.<br />
• Cycle mode feature, switches the camera picture from one to the next<br />
automatically (with adjustable cycle time).<br />
0<br />
a<br />
a<br />
e<br />
Compatible with the MultiCam and MiniCam.<br />
<strong>Manual</strong> camera select feature.<br />
Trigger facility allows the PIR sensor within the MultiCam to detect<br />
visitors/intruders and automatically switch the picture to the area of<br />
interest.<br />
Time & date superimposed onto camera picture for video tape evidence.<br />
RECORD feature will automatically start you <strong>VCR</strong> recording when a<br />
MultiCam detects an intruder and will stop the tape after the<br />
intruder has left.<br />
• Internal bleeper with volume control warns you of an intruder when a<br />
MultiCam detects movement.<br />
• Alarm clock feature.<br />
To prevent fire or shock hazard, do not expose the power supply to rain or<br />
moistuire. To avoid electrical shock, do not open the power supply or VCO50.<br />
Refer servicing to qualified personnel only.<br />
• This unit operates on 11OV ac 60Hz. Check that this voltage is identical with<br />
your local power supply.<br />
a<br />
If anything falls into the cabinet, unplug it and have it checked by qualified<br />
personnel before operating it any further.<br />
• Unplug the unit from the wall outlet if you do not intend to use it for an<br />
extended period of time. To disconnect, pull it out by the plug, never by the<br />
cord.
Please check and familiarize yourself with the contents before proceeding.<br />
_l vco50<br />
video<br />
commander<br />
J lnfra Red<br />
transmitter<br />
lead<br />
_I Power<br />
supply<br />
J Dual RCA<br />
lead<br />
The VCO50 must be positioned close to the <strong>VCR</strong>. A suitable location may be on<br />
top of the <strong>VCR</strong> or TV set.<br />
Please ensure the followina:<br />
J<br />
. .<br />
0<br />
0<br />
a<br />
Do not block any ventilation holes to the TV or <strong>VCR</strong>.<br />
Do not install the unit near heat sources, such as radiators or air ducts, or in a<br />
Place subject to direct sunlight, excessive dust, mechanical vibration or shock.<br />
If the unit is brought directly from a cold to a warm location, moisture may<br />
condense inside the unit. When you move the unit from a cold to a warm<br />
location, wait for about one hour before operating the unit.
REAR VIEW OF TV<br />
1. The VCO50 should be connected to some spare Audio Video (AV) sockets on<br />
your TV or <strong>VCR</strong> using the RCA leads supplied.<br />
If you wish to record the camera pictures, the VCO50 must be connected to the<br />
spare AV sockets on the <strong>VCR</strong>.<br />
If you do not have any spare AV sockets, you will require the MD034 TV<br />
modulator, which will allow you to connect the VCO50 into the aerial input of<br />
your TV/<strong>VCR</strong>. Please see the instructions supplied with the modulator for<br />
further details.<br />
2. Plug the power supply into a mains outlet, but do not switch on just yet, and<br />
then plug the small power plug from the power supply into the VCO50.<br />
3. Plug the lnfra-Red transmitter lead into the VCO50 and then position the<br />
transmitter on the front panel of your <strong>VCR</strong> so the that the transmitter is<br />
pointrng towards the Infra-Red receiver (remote control receiver). Please<br />
ensure that the IR transmitter is placed just to the side of the receiver and that<br />
you do not cover up the receiver. Refer to the <strong>VCR</strong> instruction manual if you<br />
are not: sure where the IR receiver is located on the front panel of your <strong>VCR</strong>.<br />
Use the the sticky back tape on the transmitter to secure into place.
The VCO50 IS compatible with the MiniCam and MultiCam which are connected<br />
using fast push-in connectors.<br />
1. Before installing the cameras we recommend that you temporarily connect<br />
the cameras to the VCO50 so that you may then choose the best viewing<br />
position for each camera.<br />
2. Please note that you will not need to use the power supply or break-out box<br />
supplied with the MiniCam or MultiCam. You will also not need the keypad<br />
supplied with the MultiCam.<br />
3. Taking one camera at a time, connect the small round plug on the end of the<br />
camera lead into a camera socket on the rear of the VCO50. Make sure that<br />
arrow on the case of the plug lines up with the top of the socket.<br />
Note that if only one camera is fitted, it must be connected to the camera 1<br />
socket.<br />
If you wish to add or remove a camera, the power should be removed frorn the<br />
VCO50, the camera added or disconnected and then the power can be<br />
reapplied.<br />
Note: If you are using a PIR-<strong>Camera</strong> such as the MultiCam, the VCO50 will not<br />
show the camera picture until the PIR sensor has settled down, (20 to 60<br />
seconds after power up).
1. Check all connections and then switch on the power to the VCO50.<br />
2. Switch on the TV and <strong>VCR</strong>.<br />
3. If the VCOSO is connected directly to your TV, select the AV channel on your TV<br />
to view the camera pictures. (If you are not sure which button to press, please<br />
consult the instructions supplied with your TV.)<br />
4. If the VCO50 is connected to your <strong>VCR</strong>:<br />
a) On your TV select the <strong>VCR</strong> channel.<br />
bj On your <strong>VCR</strong> select the AV channel (If you are not sure which button to<br />
press, please consult the instructions supplied with TV/<strong>VCR</strong>).<br />
The first time that you use the VCO50 you will need to make a couple of quick<br />
settings which you will probably not need to alter again.<br />
1. Press and hold the RECORD button until the screen changes to the USER<br />
MENU. You can now release the button.<br />
2. Press and hold the RECORD button until the screen changes to the INSTALL<br />
MENU. You can now release the button.<br />
Time<br />
Date<br />
RECORD=SELECT<br />
MANUAL=CHANGE<br />
3. Use the RECORD button to select the different items on the Menu, and use<br />
the MANUAL button to change an item in the menu.<br />
The VCO50 controls your <strong>VCR</strong> using an infra-red link, the same as your remote<br />
control. However, different models of <strong>VCR</strong> use different infra-red commands, it is<br />
therefore necessary to set which model of <strong>VCR</strong> you will be using with the VCO50.<br />
1. Ensure the IR transmitter is placed on the front of your <strong>VCR</strong> as described in<br />
STEP 3.<br />
2. With the selection arrow next to <strong>VCR</strong> Set, press the MANUAL button to<br />
(-ty,p(-jC’ ti?c) i-,+tltlC’c T\n/(: l-,((2c>ry ‘ni;ll ht> hr.-.rJ 2~~4 +hl: i.,-,r’t ‘“r‘vl ’ rrj 7 ,(I
3. Press and hold the CH UP button to search through the codes. The LED will<br />
now flash Indicating infra-red signals are being sent to your <strong>VCR</strong>.<br />
4. When a suitable code is located, the <strong>VCR</strong> will switch OFF. The CH button must<br />
be released immediately.<br />
5. If whilst holdina the CH UP button the LED stops flashina and stavs on. the<br />
search in that dyrection has finished. To repeat the sear&in the opposite<br />
direction press and hold the CH DOWN button.<br />
6<br />
When the correct code has been located, the power to the <strong>VCR</strong> will have been<br />
5witched off. Press the PWR button on the VCO50 to switch the <strong>VCR</strong> back on.<br />
If pressing the PWR button does not switch the <strong>VCR</strong> power back on, see NOTE<br />
1 below.<br />
switch the<br />
button to select ti previous code.<br />
kxmzt axle is sekxtgxl.. Check the.<br />
7. Once the PWR On/Off has been confirmed, press the MANUAL button again<br />
to store the code in memory. Two bleeps will be heard, and the LED on the<br />
front panel will switch off.<br />
8 . The front panel ‘<strong>VCR</strong> CONTROL’ buttons can now be used to switch the <strong>VCR</strong><br />
on and off and select the appropriate channel.<br />
IMPORTANT<br />
A). If whilst in <strong>VCR</strong> Set mode, the CH buttons are no-t pressed for approx 20<br />
seconds, the system will exit ‘<strong>VCR</strong> SET’ automatically without storing a<br />
selected code (this is indicated by the RED LED switching off). If this happens<br />
press MANUAL, two bleeps will be heard.<br />
Press MANUAL again to re-select <strong>VCR</strong> Set, two more bleeps will be heard and<br />
the LED will light RED as before. Now simply repeat steps 2 to 7 above.<br />
B). For every built-in <strong>VCR</strong> On/Off signal, there are corresponding Record/Stop<br />
commands. It is possible that several On/Off signals appear to be correct for<br />
the <strong>VCR</strong> in use, but only one will have correct matching Record/Stop codes.<br />
If after setting up, the <strong>VCR</strong> does not Record and Stop when expected, the<br />
above process should be repeated until the next set of suitable srgnals is<br />
found.
Some models of <strong>VCR</strong> require you to press the record button on the remote<br />
control for ‘1 long period and some models require the play and record button<br />
to be pressed before the <strong>VCR</strong> will start recording. This setting will allow you to<br />
ret the type of <strong>VCR</strong> you are using.<br />
The options 3re :<br />
NORM - This IS 5ultable for the majority of <strong>VCR</strong>’s_<br />
LONG - select this if your <strong>VCR</strong> requires the record button to be held down for<br />
more than 2 seconds to star-t recording.<br />
+PLY select this if your <strong>VCR</strong> requires the record button to be pressed followed<br />
by the play button.<br />
- to change the setting<br />
1. With the INSTALL MENU on the screen, use the RECORD button to place the<br />
flashing arrow n2x-t to REC MODE.<br />
2. Press MANUAL button to change through the options shown above.<br />
If the RECORD rnode IS on and movement is detected by a PIR sensor inside a<br />
MultiCam, the VCO50 will star-t your <strong>VCR</strong> recording. This option allows you to<br />
disable certain cameras from starting the <strong>VCR</strong>.<br />
Please note that the disabled cameras will still be displayed on screen as soon as<br />
the signal is received and the bleeper will be activated and the alarm output in<br />
the AUX socket will still be activated, but the <strong>VCR</strong> will not be triggered.<br />
- to change the setting<br />
1. With the INSTALL MENU on the screen, use the RECORD button to place the<br />
flashing arrow nex-t to ALARM CAMS.<br />
2. Press the MANUAL button to change which cameras will activate the VCO50.<br />
The camera is disabled when the camera number is not shown.<br />
Ret Tracker re-activates the cameras disabled in the ALARM CAMS option, but<br />
only after recording has commenced following a trigger from an enabled<br />
camera.
cameras 1 or 2. If the intruder then moves in front of camera 3 or 4 (which<br />
would normally be disabled), the REC TRACKER option will ensure that they are<br />
recorded onto the video tape.<br />
- to change the setting<br />
1. With the INSTALL MENU on screen, use the RECORD button to place the<br />
flashing arrow next to REC TRACKER.<br />
2. Press the MANUAL button to switch this option ON or OFF.<br />
!<br />
When the RECORD mode IS on and movement is detected by a MultiCam the<br />
<strong>VCR</strong> will star-t recording and will keep recording for a certain time after<br />
movement is no longer detected by the MultiCam. This option will allow you to<br />
alter for how long the <strong>VCR</strong> keeps recording.<br />
- to change the setting<br />
1. With the INSTALL MENU on the screen, use the RECORD button to place the<br />
flashing arrow next to Ret J ,<br />
2. Press the MANUAL button to select the desired record time.<br />
When the CYCLE mode is not selected (see operating the VCOSO), a prefered<br />
camera can be selected to view while their are no triggers from any of the<br />
cdnjeras. When a trigger is received from another camera, the screen will switch<br />
to the area where movement is detected and then after movement has stopped,<br />
the screen will switch back to the prefered camera.<br />
- to change the setting<br />
1. With the INSTALL MENU on screen, use the RECORD button to place the<br />
flashing arrow next to Pref. Cam.<br />
2. Press the MANUAL button to select a prefered camera. Select NONE if you<br />
have no preferncc.<br />
Instead of dispalying CAM 1, CAM2 etc on the screen, this optjon allows you to<br />
assign a name for each camera. Each name can be up to 5 characters long.<br />
- to change the names
2. Press the MANUAL button to select the Text Menu as displayed below:<br />
Time<br />
Date<br />
1<br />
3. Use the RECORD button to position the flashing arrow nex-t to the camera no.<br />
to change.<br />
4. Press the MANUAL button to select the first character. The character will flash.<br />
5. Use the MANUAL button to cycle through the available characters.<br />
6. Use the RECORD button to move to the next character in the name.<br />
7. Repeat steps 5 & 6 to complete the name.<br />
8. Repeat steps 3 to 7 for any other names you wish to change.<br />
9. When finished use the RECORD button to position the flashing arrow next to<br />
EXIT. Press MANUAL to exit this option.
The VCO50 IS very 5lmple to operate, with just two buttons. The RECORD button,<br />
when switched on, will allow the VCO50 to automatlcally record an Intruder<br />
onto your video tape. While the <strong>Manual</strong> button allows you to view the camera<br />
of yolur choice. AU on-screen USER MENU Menu is provided to make further<br />
bettings eds~ly. Further details of the USER MENU ar-e given in the next section.<br />
<strong>Camera</strong> i.d.<br />
Mode<br />
Time<br />
L--- -_il5: 42: 12 j<br />
pcture<br />
.ll -Auq-1998:<br />
_ _ _ _ _ _ _-_<br />
Date<br />
I<br />
,<br />
I<br />
_I<br />
There are two ways in which the chosen switching mode can be manually<br />
overridden: Temporary <strong>Manual</strong> and Locked <strong>Manual</strong>.<br />
1. Temporary:<br />
EJCh press of the MANUAL button manually selects the next camera. A single<br />
‘blip’ will be heard on the camera audio with each selectron and ‘Man’ IS<br />
displayed on the on-screen display.<br />
Appr-oxltn&ely 12 seconds later the picture will revert to the previous mode
2. Locked:<br />
Press Jnd hold the MANUAL button for approx 2 seconds until two bleeps clre<br />
heard. Man Y will be displayed on screen.<br />
The syrtern 15 now locked in manual override and the camera selected by the<br />
MANlJAL button remains on screen indefinateiy.<br />
To exit Locked Override, press and hold the MANUAL button for Z seconds until<br />
two bleeps xe heard. The system will now revert back to the previous mode.<br />
Please note: Selecting locked <strong>Manual</strong> Mode Man ‘? while the RECORD mode is<br />
on will rtart the <strong>VCR</strong> recording. (see PANIC RECORD)<br />
Warning! All triggers and alarms are ignored when either of the manual<br />
override modes are selected.<br />
The record button enables and disables the VCOSO from recording onto your<br />
<strong>VCR</strong>. To enable recording onto your <strong>VCR</strong> :<br />
1. Switch on the <strong>VCR</strong>, insert a blank tape and select the camera channel<br />
2. Press the RECORD button on the front panel of the VCO50, ycx~ will hear two<br />
bleeps, the LED indicator will light up green and REC 00 will appear in the<br />
on-screen display to show the record feature is now ~~rmecj.<br />
When a MultiCam detects movement, the <strong>VCR</strong> will record the cc’rnera<br />
pictures automatically. The green LED will flash to indicate the <strong>VCR</strong> IS<br />
recording.<br />
3. To disable the record feature, press the RECORD button and the VCO50 WIII<br />
revert to the previous mode. If the video is recording at the time the button is<br />
pressed, the <strong>VCR</strong> will stop recording.<br />
Press 8r hold the RECORD button until the user menu i5 shown on the screen.<br />
Time<br />
Date<br />
I<br />
Press the RECORD button to move between the options.<br />
Press the MANUAL button changes the selected item.
Thrs can bc ured as 3 srmple alarm clock to remind the user of l-nportant events<br />
or ;Ippointmcnts.<br />
The t.ime IS based on the 24HR clock format.<br />
- to set the reminder time<br />
I. With the arrow flashing next to Reminder, press the MANUAL button.<br />
The HOURS will flash.<br />
2. Use the MANUAL button to change the HOUR to the required time.<br />
3. Press the RECORD button to select the MINUTES.<br />
The MINUTES wrll flash.<br />
4. Urtl the MANUAL button to change the MINUTES to the required time.<br />
5. Press the RECORD button to select on/off.<br />
‘On’ will flash. Y~x.I will now be able to switch the reminder feature ‘on’ or<br />
‘off’ using the MANUAL button.<br />
6. Press the RECORDQ button to finish.<br />
14 clock symbol will be displayed to the right of the current time at the bottom of<br />
the scrtltn to r.onfirm the reminder time feature has been clnabled.<br />
The system bleeprr will now activate and *Reminder* WIII appear flashing on<br />
screen when the chosen time is reached.<br />
The bleepcr and cm screen message will automatically stop after approx 1 min.<br />
T(I ccinccl before this, simply press the MANUAL button.<br />
It the fcafure IS left ‘on’ In the menu, then a reminder alarm will occur at the<br />
same time each day.<br />
There dr-e 3 cjuton-latri. switching modes available which are displayed In the top<br />
r qht hat Ed c.orner ot the normal screen.<br />
Cycle+Trig (Screen top right = Trig+)<br />
?I-K) 5yster~-I ~~t~tom~tic.allv switches between cameras dwelling on each for the<br />
3c.t cyc-lc tlrne set. If triggers are detected then the o/cling stops and tnggered<br />
( l~r~~eri~s c?re selected immediately.<br />
If no further triggclrs (jre detected for 20 seconds, the cycling resumes.
Trig<br />
(Screen top right = Trig)<br />
Thcl system selects cameras according to detected triggers.<br />
The view from the last triggered camera remains displayed unless overrider- by a<br />
manual selection.<br />
When multiple simultaneous triggers are detected In either of the above r-nodes,<br />
the c_ontroller cycles between the triggered cameras continuously at the dwell<br />
time set until triggers cease.<br />
Cycle<br />
(Screen top right = Cycle)<br />
Operates 2s Cycle+Tric 1<br />
<strong>Manual</strong> overnde IS stii I<br />
except that all triggers are ignored.<br />
possible however.<br />
- to change the mode<br />
1. Use the REC button to place the flashing arrow next to Mode.<br />
2. Each press of the MANUAL button will now change the mo&.<br />
NOTE: When either of the modes allowing triggering are chosen, If a trigger<br />
from a single camera IS continuous, the system bleeper will activate for 3 seconds<br />
at 3 second intervals. If tnggers are continuous from more than one car-nerd<br />
simultaneously, the buzzer will activate continuously.<br />
This is the? trme the system will dwell on each camera when in either the cycle<br />
mode or the trig+cycle mode.<br />
- to change the setting<br />
1. Use the REC button to place the flashing arrow next to Cycle time.<br />
2. Each press of the MANUAL button will now change the cycle time in 2 second<br />
steps up to 14 seconds.
The correti time and date has been factory set and due to the built-in automatic<br />
:umrner/winter time adjustment (UK only), should never need resetting.<br />
However, to adjust from the User Menu follow the steps below:<br />
1. Use the RECORD button to positlon the arrow next to Clock Set.<br />
2. Press the MANUAL button. The seconds will zero dnd the year will flash.<br />
Each press of the MANUAL button will now advance the year by one.<br />
3. Press the RECORD button. The Month will flash.<br />
Each press of the MANUAL button will now advance the month by one.<br />
4. Press the RECORD button. The Dav will flash.<br />
E&l press of the MANUAL button will now advance the day by one.<br />
5. Repeat the above for the minutes and hours. When the hour has been set,<br />
presslnq the RECORD button will start the seconds and fintsh Clock Set.<br />
._
vc050<br />
Operating Voltage<br />
Current consumption<br />
<strong>Camera</strong> video Input<br />
<strong>Camera</strong> audio input<br />
12Vdc<br />
12OmA (without cameras<br />
connected)<br />
EIA, NTSC composite video<br />
signal into 75 Ohms<br />
1V pk-pk Into 47K Ohms<br />
<strong>Camera</strong> connector<br />
A c1 (j I 0<br />
+ 12Vdc<br />
NC<br />
Video<br />
ov<br />
PIR<br />
Remote pin-out<br />
pin-out<br />
Gnd<br />
+12Vdc<br />
<strong>Manual</strong><br />
Aux output pin-out<br />
Video<br />
ov<br />
+ 12Vdc<br />
Audio<br />
Alarn~ FIR<br />
Dimensions<br />
Power Supply<br />
6.25“ W x 1.4” H x 5.2”D<br />
Input voltage<br />
Output voltage<br />
Output current<br />
12OV ac 60Hz<br />
12V dc regulated<br />
1.5A (max)<br />
General Operating temperature 5” c to + 40°C<br />
Package weight<br />
1.76lb (0.8kqj<br />
Approvals<br />
CE directive 93/68/EEC, EMC directrve 89/3?i;/‘EEC,<br />
LV directive 73/23/EEC.<br />
Thus c-lass B digital apparatus compiir-:3 with Ccsxbn ICES-003


