

SG8840 - 2.4 GHz Wireless Color Video System with ... - Smarthome
SG8840 - 2.4 GHz Wireless Color Video System with ... - Smarthome
SG8840 - 2.4 GHz Wireless Color Video System with ... - Smarthome

Create successful ePaper yourself
Turn your PDF publications into a flip-book with our unique Google optimized e-Paper software.
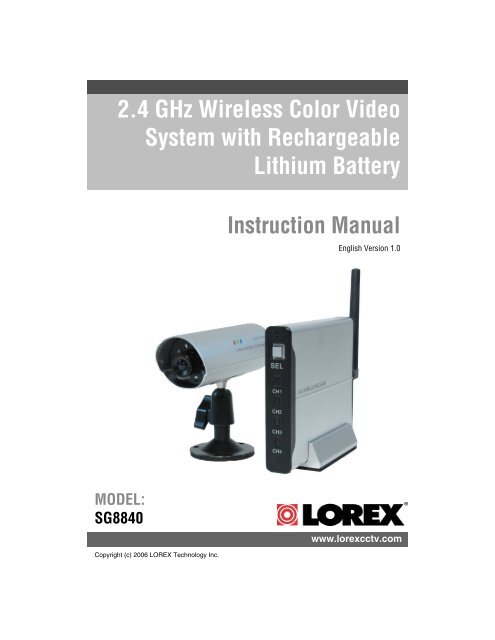
<strong>2.4</strong> <strong>GHz</strong> <strong>Wireless</strong> <strong>Color</strong> <strong>Video</strong><br />
<strong>System</strong> <strong>with</strong> Rechargeable<br />
Lithium Battery<br />
Instruction Manual<br />
English Version 1.0<br />
MODEL:<br />
<strong>SG8840</strong><br />
www.lorexcctv.com<br />
Copyright (c) 2006 LOREX Technology Inc.
Turn your TV into a <strong>Wireless</strong> Security <strong>System</strong> <strong>with</strong> the Lorex <strong>2.4</strong> <strong>GHz</strong> <strong>Wireless</strong> <strong>Color</strong><br />
<strong>Video</strong> <strong>System</strong>.<br />
The <strong>SG8840</strong> system has an Integrated Rechargeable Lithium battery allowing for<br />
increased portability <strong>with</strong> up to 5 hours of battery life. Instant protection of your home<br />
or office <strong>with</strong> easy installation and operation.<br />
http://www.lorexcctv.com<br />
CAUTION<br />
RISK OF ELECTRIC SHOCK<br />
DO NOT OPEN<br />
CAUTION: TO REDUCE THE RISK OF ELECTRIC SHOCK<br />
DO NOT REMOVE COVER (OR BACK).<br />
NO USER SERVICEABLE PARTS INSIDE.<br />
REFER SERVICING TO A QUALIFIED SERVICE PERSONNEL<br />
The lightning flash <strong>with</strong> arrowhead symbol, <strong>with</strong>in an<br />
equilateral triangle, is intended to alert the user to the<br />
presence of uninsulated “dangerous voltage” <strong>with</strong>in the<br />
product’s enclosure that may be of sufficient magnitude<br />
to constitute a risk of electric shock to persons.<br />
The exclamation point <strong>with</strong>in an equilateral triangle is<br />
intended to alert the user to the presence of important<br />
operating and maintenance (servicing) instructions in<br />
the literature accompanying the appliance.<br />
WARNING: TO PREVENT FIRE OR SHOCK HAZARD,<br />
DO NOT EXPOSE THIS UNIT TO RAIN OR MOISTURE.<br />
CAUTION: TO PREVENT ELECTRIC SHOCK, MATCH WIDE BLADE<br />
OF PLUG TO WIDE SLOT, FULLY INSERT.<br />
<strong>Wireless</strong> Disclaimer<br />
This product broadcasts over public airways and its video and audio signals may be intercepted<br />
<strong>with</strong>out your consent.<br />
ii
Important Safeguards<br />
Important Safeguards<br />
In addition to the careful attention devoted to quality standards in the manufacture process of your video<br />
product, safety is a major factor in the design of every instrument. However, safety is your responsibility too.<br />
This sheet lists important information that will help to assure your enjoyment and proper use of the video<br />
product and accessory equipment. Please read them carefully before operating and using your video product.<br />
Installation<br />
1. Read and Follow Instructions - All the safety and<br />
operating instructions should be read before the<br />
video product is operated. Follow all operating<br />
instructions.<br />
2. Retain Instructions - The safety and operating<br />
instructions should be retained for future reference.<br />
3. Heed Warnings - Comply <strong>with</strong> all warnings on the<br />
video product and in the operating instructions.<br />
4. Polarization - Do not defeat the safety purpose of<br />
the polarized or grounding-type plug.<br />
A polarized plug has two blades <strong>with</strong><br />
one wider than the other.<br />
A grounding type plug has two blades<br />
and a third grounding prong.<br />
The wide blade or the third prong are<br />
provided for your safety.<br />
If the provided plug does not fit into<br />
your outlet, consult an electrician for<br />
replacement of the obsolete outlet<br />
5. .Power Sources - This video product should be<br />
operated only from the type of power source<br />
indicated on the marking label. If you are not sure of<br />
the type of power supply to your location, consult<br />
your video dealer or local power company. For video<br />
products intended to operate from battery power, or<br />
other sources, refer to the operating instructions.<br />
6. Overloading - Do not overload wall outlets of<br />
extension cords as this can result in the risk of fire<br />
or electric shock. Overloaded AC outlets, extension<br />
cords, frayed power cords, damaged or cracked wire<br />
insulation, and broken plugs are dangerous. They<br />
may result in a shock or fire hazard. Periodically<br />
examine the cord, and if its appearance indicates<br />
damage or deteriorated insulation, have it replaced<br />
by your service technician.<br />
7. Power-Cord Protection - Power supply cords should<br />
be routed so that they are not likely to be walked on<br />
or pinched by items placed upon or against them,<br />
paying particular attention to cords at plugs,<br />
convenience receptacles, and the point where they<br />
exit from the video product.<br />
8. Ventilation - Slots and openings in the case are<br />
provided for ventilation to ensure reliable operation<br />
of the video product and to protect it from<br />
overheating. These openings must not be blocked<br />
or covered. The openings should never be blocked<br />
by placing the video equipment on a bed, sofa, rug,<br />
or other similar surface. This video product should<br />
never be placed near or over a radiator or heat<br />
register. This video product should not be placed in<br />
a built-in installation such as a bookcase or rack<br />
unless proper ventilation is provided or the video<br />
product manufacturer’s instructions have been<br />
followed.<br />
9. Attachments - Do not use attachments unless<br />
recommended by the video product manufacturer as<br />
they may cause a hazard.<br />
10. Water and Moisture - Do not use this video product<br />
near water. For example, near a bath tub, wash bowl,<br />
kitchen sink or laundry tub, in a wet basement, near<br />
a swimming pool and the like.<br />
Caution: Maintain electrical safety. Powerline<br />
operated equipment or accessories connected to<br />
this unit should bear the UL listing mark of CSA<br />
certification mark on the accessory itself and should<br />
not be modified so as to defeat the safety features.<br />
This will help avoid any potential hazard from<br />
electrical shock or fire. If in doubt, contact qualified<br />
service personnel.<br />
11. Accessories - Do not place this video equipment<br />
on an unstable cart, stand, tripod, or table. The video<br />
equipment may fall, causing serious<br />
damage to the video product. Use<br />
this video product only <strong>with</strong> a cart,<br />
stand, tripod, bracket, or table<br />
recommended by the<br />
manufacturer or sold <strong>with</strong> the video<br />
product. Any mounting of the product<br />
should follow the manufacturer’s<br />
instructions and use a mounting accessory<br />
recommended by the manufacturer.<br />
iii
Important Safeguards<br />
Service<br />
13. Servicing - Do not attempt to service this video<br />
equipment yourself as opening or removing covers<br />
may expose you to dangerous voltage or other<br />
hazards. Refer all servicing to qualified service<br />
personnel.<br />
14. Conditions Requiring Service - Unplug this video<br />
product from the wall outlet and refer servicing to<br />
qualified service personnel under the following<br />
conditions.<br />
A. When the power supply cord or plug is<br />
damaged.<br />
B. If liquid has been spilled or objects have fallen<br />
into the video product.<br />
C. If the video product has been exposed to rain<br />
or water.<br />
D. If the video product does not operate normally<br />
by following the operating instructions. Adjust<br />
only those controls that are covered by the<br />
operating instructions. Improper adjustment of<br />
other controls may result in damage and will often<br />
require extensive work by a qualified technician<br />
to restore the video product to its normal<br />
operation.<br />
Use<br />
19. Cleaning - Unplug the video product from the wall<br />
outlet before cleaning. Do not use liquid cleaners or<br />
aerosol cleaners. Use a damp cloth for cleaning.<br />
20. Product and Cart Combination - <strong>Video</strong> and cart<br />
combination should be moved <strong>with</strong> care. Quick<br />
stops, excessive force, and uneven surfaces may<br />
cause the video product and car combination to<br />
overturn.<br />
21. Object and Liquid Entry - Never push objects for<br />
any kind into this video product through openings as<br />
they may touch dangerous voltage points or<br />
“short-out” parts that could result in a fire or electric<br />
shock. Never spill liquid of any kind on the video<br />
product.<br />
22. Lightning - For added protection for this video<br />
product during a lightning storm, or when it is left<br />
unattended and unused for long periods of time,<br />
unplug it from the wall outlet and disconnect the<br />
antenna or cable system. This will prevent damage<br />
to the video product due to lightning and power line<br />
surges.<br />
E. If the video product has been dropped or the<br />
cabinet has been damaged.<br />
F. When the video product exhibits a distinct<br />
change in performance. This indicates a need for<br />
service.<br />
15. Replacement Parts - When replacement parts are<br />
required, have the service technician verify that the<br />
replacements used have the same safety<br />
characteristics as the original parts. Use of<br />
replacements specified by the video product<br />
manufacturer can prevent fire, electric shock or other<br />
hazards.<br />
16. Safety Check - Upon completion of any service or<br />
repairs to this video product, ask the service<br />
technician to perform safety checks recommended<br />
by the manufacturer to determine that the video<br />
product is in safe operating condition.<br />
17. Wall or Ceiling Mounting - The cameras provided<br />
<strong>with</strong> this system should be mounted to a wall or<br />
ceiling only as instructed in this guide, using the<br />
provided mounting brackets.<br />
18. Heat - The product should be situated away from<br />
heat sources such as radiators, heat registers,<br />
stoves, or other products (including amplifiers) that<br />
produce heat.<br />
iv
General Precautions<br />
NOTE<br />
This equipment has been certified and found to comply <strong>with</strong> the limits regulated by FCC, EMC, and LVD. Therefore, it<br />
is designated to provide reasonable protection against interference and will not cause interference <strong>with</strong> other appliance<br />
usage.<br />
However, it is imperative that the user follows this manuals guidelines to avoid improper usage which may result in<br />
damage to the unit, electrical shock and fire hazard injury<br />
In order to improve the feature functions and quality of this product, the specifications are subject to change <strong>with</strong>out<br />
notice from time to time.<br />
FCC CLASS B NOTICE<br />
Note:<br />
This equipment has been tested and found to comply <strong>with</strong> the limits for a Class B digital device, pursuant to Part<br />
15 of the FCC Rules. These limits are designed to provide reasonable protection against harmful interference in<br />
a residential installation. This equipment generates, uses, and can radiate radio frequency energy and, if not installed<br />
and used in accordance <strong>with</strong> the instruction, may cause harmful interference to radio communications.<br />
However, there is no guarantee that interference will not occur in a particular installation. If this equipment does<br />
cause harmful interference to radio or television reception (which can be determined by turning the equipment on<br />
and off), the user is encouraged to try to correct the interference by one or more of the following measures:<br />
• Reorient or relocate the receiving antenna<br />
• Increase the separation between the equipment and receiver<br />
• Connect the equipment into an outlet on a circuit different from that to which the receiver is<br />
connected<br />
• Consult the dealer or an experienced radio or television technician for assistance<br />
General Precautions<br />
1. All warnings and instructions of this manual should be followed<br />
2. Remove the plug from the outlet before cleaning. Do not use liquid aerosol detergents. Use a water dampened cloth<br />
for cleaning<br />
3. Do not use this unit in humid or wet places<br />
4. Keep enough space around the unit for ventilation. Slots and openings in the storage cabinet should not be blocked<br />
5. During lightning storms, or when the unit is not used for a long time, disconnect the power supply, antenna, and cables<br />
to protect the unit from electrical surge<br />
LOREX TECHNOLOGY INC.<br />
http://www.lorexcctv.com<br />
v
Camera Features<br />
Camera Features<br />
• Turns your TV into a <strong>Video</strong> Security <strong>System</strong><br />
• Install and Operate in less than 1 minute<br />
• Flexible - move camera from room to room<br />
• Integrated rechargeable Lithium battery powers the camera for up to 5 hours<br />
• Audio monitoring<br />
• 4 channels available for selecting optimum clear reception<br />
• 300 ft. wireless transmission (open space)*<br />
• Automatic IR illumination provides B&W video images in low light conditions**<br />
• Record picture to any standard VCR/DVR<br />
* Maximum open space transmission range. Actual range dependent upon<br />
building materials and other obstructions in path of wireless signal.<br />
**IR illumination range of 12 ft. under ideal conditions. Objects at or beyond this<br />
range may be partially or completely obscured, depending on the camera<br />
application.<br />
vi
Table of Contents<br />
Table of Contents<br />
Important Safeguards ............................................................................... iii<br />
Installation ................................................................................................. iii<br />
Service and Use ........................................................................................iv<br />
General Precautions ..................................................................................v<br />
Camera Features ......................................................................................vi<br />
<strong>SG8840</strong> - Getting Started - Package Contents ......................................... 9<br />
<strong>SG8840</strong> - Camera Features .................................................................... 10<br />
<strong>SG8840</strong> - Receiver Features .................................................................. 11<br />
Camera Setup ......................................................................................... 12<br />
<strong>Wireless</strong> Receiver Setup ......................................................................... 13<br />
Viewing the Camera ................................................................................ 14<br />
Troubleshooting ...................................................................................... 15<br />
Camera Specifications - Appendix #1 ..................................................... 16<br />
<strong>Wireless</strong> Receiver Specifications - Appendix #2 ..................................... 17<br />
7
<strong>SG8840</strong> Getting Started - Package Contents<br />
<strong>SG8840</strong> Getting Started - Package Contents<br />
The <strong>SG8840</strong> system comes <strong>with</strong> the following components:<br />
<strong>2.4</strong><strong>GHz</strong> <strong>Wireless</strong> <strong>Color</strong> Camera<br />
<strong>with</strong> Adjustable Stand<br />
<strong>Wireless</strong> Receiver<br />
<strong>Wireless</strong> Receiver<br />
Antenna<br />
<strong>Wireless</strong> Receiver<br />
Stand<br />
AV Cable<br />
Power Adapter for <strong>2.4</strong> <strong>GHz</strong><br />
<strong>Wireless</strong> Camera<br />
Power Adapter for <strong>Wireless</strong><br />
Receiver<br />
CHECK YOUR PACKAGE TO CONFIRM THAT YOU HAVE RECEIVED THE COMPLETE<br />
SYSTEM, INCLUDING ALL COMPONENTS SHOWN ABOVE.<br />
8
<strong>SG8840</strong> - Camera Features<br />
<strong>SG8840</strong> - Camera Features<br />
The <strong>SG8840</strong> Camera is a wireless device which allows you to choose from 4 channels for<br />
optimum clear reception<br />
CAMERA - FRONT<br />
LENS: CMOS imaging sensor <strong>with</strong><br />
510x492 total pixels.<br />
Lens<br />
INFRARED LED: Provides illumination in<br />
low light conditions up to a range of 12 ft..<br />
MICROPHONE: Provides Listen-In<br />
Audio<br />
MOUNTING BRACKET AND ADJUST:<br />
Bracket for mounting the camera and<br />
adjusting the view angle. The Mounting<br />
bracket can be permanently mounted to<br />
a surface if desired.<br />
Infrared<br />
LEDs<br />
Microphone<br />
Angle<br />
Adjust<br />
Bracket<br />
Antenna<br />
Power Indicator<br />
LED<br />
Charge Indicator<br />
LED<br />
Power Input Jack<br />
Power / Channel<br />
Select<br />
ANTENNA: Sends signal to<br />
Receiver<br />
POWER INDICATOR LED:<br />
LED indicator for Power ON/OFF.<br />
A Green LED is ON when the<br />
camera is receiving power.<br />
CHARGE INDICATOR LED:<br />
LED flashes when the camera is<br />
charging, and goes dark once the<br />
camera is at Full Charge.<br />
POWER INPUT JACK: Connect<br />
the Camera Power Adapter to this<br />
port to charge the wireless<br />
camera.<br />
CAMERA - BACK<br />
POWER / CHANNEL SELECT:<br />
4 available channels on the 2,400<br />
MHz ~ 2,483 MHz range<br />
9
<strong>SG8840</strong> - Receiver Features<br />
<strong>SG8840</strong> - Receiver Features<br />
The <strong>SG8840</strong> <strong>Wireless</strong> Receiver is a device which allows you to receive data from a selection of 4<br />
channels for optimum clear reception<br />
RECEIVER - FRONT<br />
ANTENNA: Receiving antenna for wireless<br />
transmission<br />
Antenna<br />
(back)<br />
CHANNEL SELECT: Channel selection button.<br />
Press to change between CH1 - CH4<br />
Note: The Channel selection must be set to<br />
correspond between the camera and receiver.<br />
CURRENT CHANNEL LED: Indicates the current<br />
receiving channel<br />
BRACKET: Holds the wireless receiver<br />
Channel<br />
Select<br />
Current<br />
Channel<br />
LED<br />
Bracket<br />
MANUAL / AUTO<br />
Switching<br />
Antenna Socket<br />
Power Input Jack<br />
A/V Connection<br />
Socket<br />
MANUAL / AUTO SWITCHING: Manually<br />
sequence through available Channels using<br />
the CHANNEL SELECT button / AUTO<br />
sequence through all channels.<br />
ANTENNA SOCKET: Connection socket for<br />
the Receiver Antenna.<br />
POWER INPUT JACK: Connection for the<br />
Receiver Power Adapter.<br />
A/V CONNECTION SOCKET: Connection<br />
socket for the A/V Cable. Connect the black<br />
end of the cable to this socket.<br />
RECEIVER - BACK<br />
10
Camera Setup<br />
Camera Setup<br />
1. Adjust the camera height and position using the angle<br />
adjustment thumbscrew on the base.<br />
The camera can be permanently attached to a surface using<br />
the provided screws (3 attachment screws), or it can simply be<br />
placed to stand on any flat surface.<br />
2. Confirm that the camera power is in the OFF position. Connect<br />
the Power Adapter to the camera and to a wall outlet.<br />
• Connect the 5V camera power<br />
supply adapter to the camera,<br />
and connect to a wall outlet.<br />
Note: Confirm that the Power<br />
adapter used is labelled ‘Camera’<br />
• The camera should be charged for<br />
approximately 2 hours prior to use<br />
(the Camera Charge LED will light<br />
up indicating a charge is in<br />
progress), however the camera can be used immediately when connected to a wall outlet.<br />
The 2 hour charge time is for the Lithium Battery to reach full charge.<br />
• Once the camera has reached Full Charge, the LED indicator will turn off.<br />
3. Turn ON the camera by changing the power switch from OFF to Channel 1.<br />
• A green Power LED will light up indicating the camera is ON.<br />
11
<strong>Wireless</strong> Receiver Setup<br />
<strong>Wireless</strong> Receiver Setup<br />
1. Mount the WIRELESS RECEIVER on the STAND.<br />
2. Connect the ANTENNA to the WIRELESS<br />
RECEIVER.<br />
3. Connect the 8V power supply adapter to the<br />
Receiver, and connect to a wall outlet.<br />
NOTE: Confirm that the<br />
power supply is labelled as<br />
the ‘Receiver Power<br />
Adapter’<br />
The unit will automatically<br />
power on.<br />
4. Connect the WIRELESS RECEIVER to a MONITOR / TV using the provided AV Cable<br />
• Connect the BLACK end of the cable to the WIRELESS RECEIVER<br />
• Connect the YELLOW plug to the VIDEO port on the MONITOR / TV<br />
• Connect the RED plug to the AUDIO port on the MONITOR / TV<br />
12
Viewing the Camera<br />
Viewing the Camera<br />
<strong>Video</strong> can be viewed immediately (<strong>with</strong> the AC Adapter connected to the <strong>Wireless</strong> Camera),<br />
however if portable use is desired, the camera Lithium Battery must be charged for 2 hours.<br />
1. Power up the Receiver and the Camera.<br />
2. Set the Camera to CH1 (the <strong>Wireless</strong> Receiver is set to CH1 by default).<br />
Please ensure that the CAMERA and RECEIVER are set to the same channel!<br />
3. Set the MONITOR / TV to VIDEO MODE (or AUX MODE / TV/VIDEO / GAME MODE etc.).<br />
See your specific MONITOR or TV Manual for further instructions)<br />
IMPORTANT: You may find some static on the picture at a selected channel setting. For<br />
optimum viewing reception, you may need to change the channels on BOTH the Camera<br />
and Receiver to a different channel (between CH1-CH4). BOTH the Camera and Receiver<br />
must be set to a matching channel. If Static persists on your image, try adjusting the Antenna<br />
on the <strong>Wireless</strong> Receiver and Camera.<br />
13
Troubleshooting<br />
Troubleshooting<br />
Problem: There is no displayed image or sound on the MONITOR/TV.<br />
Solution:<br />
• Does the camera have a full charge? Try connecting the Power Adaptor to the camera<br />
• Check the LED Power indicators on both the Camera and the Receiver. Try unplugging<br />
and reconnecting the power cable to the <strong>Wireless</strong> Receiver.<br />
• Check the A/V Cable connection at the <strong>Wireless</strong> Receiver and the MONITOR/TV<br />
Problem: I only see TV programs and not video from my camera<br />
Solution:<br />
• Ensure that the TV is set to AV/<strong>Video</strong> Mode<br />
Problem: The displayed image is fuzzy and the sound is not clear.<br />
Solution:<br />
• Confirm that the camera and receiver are using the same channel (Ch1-4)<br />
• Try changing the distance between receiver and camera. Move the camera<br />
• Check for possible interference (thick walls, devices, etc.)<br />
• Adjust the receiver antenna<br />
• Try setting both the receiver and camera to a different channel (between CH1-Ch4)<br />
Problem: The image is ‘ghosting’ but the sound is fine<br />
Solution:<br />
• Possible interference <strong>with</strong> other wireless devices - try a different channel<br />
Problem: Image is in black and white, but the sound is normal<br />
Solution:<br />
• The Hardware is incompatible <strong>with</strong> your existing Monitor / TV. Try the <strong>SG8840</strong> on a different<br />
TV/Monitor<br />
14
Camera Specifications - Appendix #1<br />
Camera Specifications - Appendix #1<br />
Imaging Sensor<br />
1/3” CMOS<br />
CMOS Total Pixels 510 x 492 (NTSC)<br />
View Angle 62°<br />
Minimum Illumination 1.5 Lux / F1.5<br />
Transmission Frequency<br />
Transmission Power<br />
Modulation Type<br />
Bandwidth<br />
Power Supply<br />
Battery Type / Capacity<br />
Charge Time<br />
Working Time<br />
Unobstructed Effective<br />
Range<br />
Night Vision Range<br />
Camera Dimensions<br />
(W x D x H)<br />
Stand Dimensions<br />
(W x D x H)<br />
Weight<br />
Operating Temperature<br />
Range<br />
ISM 2,4000 MHz - 2,483 MHz (4CH)<br />
2 mW (milliwatt)<br />
FM<br />
18 MHz<br />
+ 5V (DC) , 700 mA<br />
Lithium Battery / 500 mAh<br />
2 hr.<br />
Up to 5 hours (less time in IR Mode)<br />
328 ft. / 100 meters<br />
Up to 12 ft. / 3.7 meters<br />
3.5” x 1.25” x 1.25”<br />
10cm x 3cm x 3cm<br />
1.5” x 1.5” x 2”<br />
4cm x 4cm x 5cm<br />
120 g (not including stand)<br />
14° F ~ 122° F<br />
-10° C ~ 50° C<br />
15
<strong>Wireless</strong> Receiver Specifications - Appendix #2<br />
<strong>Wireless</strong> Receiver Specifications - Appendix #2<br />
Receiving Frequency ISM 2,400 MHz - 2,483 MHz - 4CH *<br />
Intermediate Frequency<br />
Demodulation Type<br />
Antenna<br />
Receiving Sensitivity<br />
<strong>Video</strong> Output Level<br />
Audio Output Level<br />
Power Supply<br />
Consumption Current<br />
Unobstructed Effective<br />
Range<br />
Receiver Dimensions<br />
(W x D x H)<br />
Weight<br />
Storage Temperature<br />
Operating Temperature<br />
Operating Humidity<br />
480 MHz<br />
FM<br />
50 OHM SMA<br />
-85 dBm<br />
1 Vp-p @ 75 OHM, S/N > 38DB<br />
1 Vp-p @ 600 OHM<br />
8V (DC)<br />
180 mA<br />
Up to 328 ft. / 100 meters**<br />
4” x 0.75” x 3.25”<br />
10 cm x 2 cm x 8.5 cm<br />
120 g<br />
-22 F to 185 F / -30 C - 85 C<br />
14 F to 122 F /- 10 C to 50 C<br />
85% RH<br />
* 4 available channels for optimal signal<br />
** Maximum open space transmission range. Actual range dependent upon building<br />
materials and other obstructions in path of wireless signal.<br />
As our products are subject to continuous improvement, LOREX Technology Inc. and its<br />
subsidiaries reserve the right to modify product design, specifications and prices, <strong>with</strong>out notice<br />
and <strong>with</strong>out incurring any obligation.<br />
E&OE<br />
16
It’s all on the web<br />
Product Information<br />
User Manuals<br />
Quick Start Guides<br />
Specification Sheets<br />
Software Upgrades<br />
Firmware Upgrades<br />
VISIT<br />
www.lorexcctv.com<br />
LOREX Technology Inc.<br />
wwwlorexcctv.com


