redsound voyager 1 ownersmanual.pdf - bleeps and peeps
redsound voyager 1 ownersmanual.pdf - bleeps and peeps
redsound voyager 1 ownersmanual.pdf - bleeps and peeps

Create successful ePaper yourself
Turn your PDF publications into a flip-book with our unique Google optimized e-Paper software.
INTRODUCTION ........................................................ 2<br />
FRONT PANEL ........................................................... 3<br />
REAR PANEL ............................................................... 5<br />
EXT. MIDI SEQUENCER SETTINGS ................ 6<br />
OPERATING CRITERIA ........................................... 6<br />
INPUT LEVEL SETTINGS ...................................... 7<br />
CONNECTIONS - OPTION A .............................. 8<br />
CONNECTIONS - OPTION B .............................. 9<br />
OPERATION<br />
Getting started / Powering Up ........................ 10<br />
BPM Displays ............................................................. 11<br />
Selecting the Active Channel ............................. 11<br />
Controlling The MIDI Clock .................................. 12<br />
Run/Pause .................................................................. 13<br />
Beat One Re-Set ..................................................... 14<br />
Tap (Stop) ..................................................................... 14<br />
Cue ................................................................................... 16<br />
Beat Tracking Indicator ......................................... 18<br />
Background Channel .............................................. 18<br />
Switching Channels ................................................. 19<br />
TROUBLESHOOTING /HINTS & TIPS........ 20<br />
SPECIFICATION ...................................................... 21<br />
1 VOYAGER 1 - CONTENTS
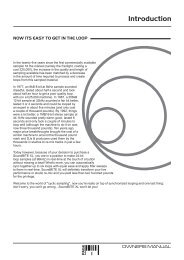
INTRODUCTION<br />
Thank you for buying the RED VOYAGER 1 Beat Xtractor. The product you<br />
have purchased is the essential, creative DJ re-mix product of the decade.<br />
Described by DJ magazine's Daniel Duffel as 'The missing link between<br />
audio <strong>and</strong> MIDI', the VOYAGER 1 analyses audio signals from vinyl or CD/<br />
tape <strong>and</strong> calculates the tempo or 'BPM' of the tracks.<br />
The BPM's are displayed but, more importantly, the beat information from<br />
one of the channels is used to generate a MIDI Clock signal which runs in<br />
synchronisation with the audio track enabling any connected MIDI<br />
sequencer/tone module such as **Rol<strong>and</strong>'s MC303/ MC505, EMU's Orbit /<br />
Planet Phatt, QuasiMidi's latest Rave-o-lution 309 or in fact any computer<br />
/sequencer software setup to automatically lock-in <strong>and</strong> track the tempo of<br />
the audio.<br />
The VOYAGER 1's intelligent software constantly monitors <strong>and</strong> corrects the<br />
relative audio / MIDI beat synchronisation to keep the beats locked together<br />
<strong>and</strong> also follows any tempo changes in real-time if vinyl/CD deck pitch<br />
controls are adjusted.<br />
Now, for the first time, the tempo of patterns & songs programmed into your<br />
MIDI sequencer can be controlled directly from the audio leaving you free<br />
to add or 'tweak' your own MIDI music / percussion parts <strong>and</strong> produce the<br />
ultimate, individual DJ performance.<br />
Please read the following sections of this manual carefully to underst<strong>and</strong><br />
the full potential of your VOYAGER 1 Beat Xtractor.<br />
Ready for launch!<br />
TM<br />
RED VOYAGER 1<br />
Beat Xtractor<br />
** Trademarks of E-MU Systems / Rol<strong>and</strong> Corp. Japan / Quasimidi<br />
VOYAGER 1 MISSION GUIDE<br />
2
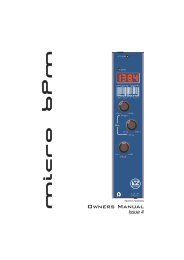
FRONT PANEL<br />
1<br />
2<br />
3<br />
4<br />
5<br />
www.<strong>redsound</strong>.com<br />
CH 1 BPM<br />
RED<br />
VOYAGER 1<br />
Beat Xtractor<br />
CH 2 BPM<br />
SELECT<br />
CHANNEL 1<br />
PULL<br />
OK<br />
PUSH<br />
CHANNEL 2<br />
BEAT TRACKING<br />
-/Down<br />
+/ Up Tempo Edit<br />
Beat One<br />
RUN/PAUSE<br />
CUE<br />
BEAT ONE<br />
RE-SET<br />
MIDI CLOCK<br />
TAP<br />
(STOP)<br />
6<br />
7<br />
8<br />
9<br />
10<br />
1 CHANNEL 1 Display<br />
The BPM reading of the Channel 1 audio input will be displayed here.<br />
2 CHANNEL 1 Button<br />
Press this button to select Channel 1 as the active channel for driving the<br />
MIDI Clock output. Also, press <strong>and</strong> hold to de-activate the beat tracking.<br />
3 BEAT TRACKING Indicator<br />
This 3-way indicator shows any internal synchronisation adjustments.<br />
4 CHANNEL 2 Button<br />
Press this button to select Channel 2 as the active channel for driving the<br />
MIDI Clock output. Also, press <strong>and</strong> hold to de-activate the beat tracking.<br />
3 VOYAGER 1 - FRONT PANEL
FRONT PANEL<br />
5 CHANNEL 2 Display<br />
The BPM reading of the Channel 2 audio input will be displayed here.<br />
6 RUN/PAUSE Button<br />
Press this button to Run <strong>and</strong> Pause your MIDI sequencer.<br />
7 CUE Button<br />
Press this button to set the 'Cue Paused' <strong>and</strong> 'Cue Ready' modes - see<br />
page16 for further information.<br />
8 BEAT ONE RE-SET Button<br />
Press <strong>and</strong> release this button to re-align the start point (beat1/bar1) of the<br />
current pattern or song in your MIDI sequencer with any chosen point in the<br />
audio track.<br />
9 MIDI CLOCK Display<br />
This 8 indicator display 'rotates' at the detected BPM speed when the<br />
VOYAGER 1 is in RUN mode (MIDI Clock running). As the display rotates,<br />
the 'Beat One' indicator flashes brighter to show each beat of the bar. The<br />
Beat One indicator also flashes at the detected BPM when the<br />
VOYAGER 1 is in PAUSE mode.<br />
10 TAP (STOP) Button<br />
'Tap' this button to manually enter a tempo if there is no audio signal<br />
present or when the regular patterns <strong>and</strong> beats in the audio track become<br />
unavailable. When used in conjunction with the '- / Down' <strong>and</strong> '+/ Up'<br />
buttons (Tempo Edit mode - LED on) the tempo can be set more accurately<br />
in single BPM steps. The MIDI Clock will run at the set BPM.<br />
Also, when this button is pressed <strong>and</strong> held for approx.1 second the MIDI<br />
Clock will stop.<br />
VOYAGER 1 MISSION GUIDE<br />
4
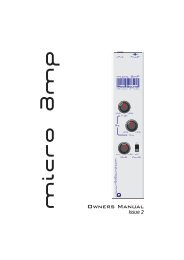
REAR PANEL<br />
1 2 3 4 5<br />
6<br />
7<br />
www.<strong>redsound</strong>.com<br />
MIDI CLOCK<br />
PHONO<br />
CHANNEL 2<br />
PHONO<br />
CHANNEL 1<br />
POWER<br />
ON<br />
L<br />
L<br />
CD/LINE<br />
CD/LINE<br />
- +<br />
OUT<br />
VOYAGER 1<br />
Beat Xtractor<br />
R<br />
IN OUT<br />
IN OUT<br />
RED Sound Systems Ltd<br />
R<br />
9v DC<br />
OFF<br />
MADE IN ENGLAND<br />
CAUTION: DO NOT OPEN CASE<br />
REFER TO QUALIFIED SERVICE PERSONNEL<br />
NO USER SERVICEABLE PARTS INSIDE<br />
8 9<br />
1 MIDI OUT Connector<br />
Use a suitable MIDI cable to connect the MIDI 'IN' of your MIDI sequencer<br />
to this connector .<br />
2 CHANNEL 2 Input select switch<br />
This selects the Channel 2 input signal level. NOTE: The setting of this<br />
switch must always match the input channel on your mixing desk. i.e if<br />
'PHONO' input is selected on the VOYAGER 1 use a 'PHONO' level input<br />
on your mixing desk. Nominal input levels - CD/Line 2.0V - Phono 5mV<br />
3 CHANNEL 2 Input connectors<br />
Connect the left (L) <strong>and</strong> right (R) output of the Channel 2 sound source<br />
(CD, phono, tape etc.) to these connectors.<br />
4 CHANNEL 1 Input select switch<br />
This selects the Channel 1 input signal level - see NOTE at 2 above.<br />
5 CHANNEL 1 Input connectors<br />
Connect the left (L) <strong>and</strong> right (R) output of the Channel 1 sound source<br />
(or the mixing desks MASTER outputs (see Option B) to these connectors.<br />
6 DC POWER IN connector<br />
Only use the AC/DC adaptor supplied with this product - 'RED PSU'.<br />
7 POWER switch<br />
This turns the power on/off.<br />
5 VOYAGER 1 - REAR PANEL
MIDI SETTINGS<br />
8 CHANNEL 2 Output connectors<br />
Connect the channel 2 audio outputs to a suitable mixing desk input.<br />
9 CHANNEL 1 Output connectors<br />
Connect the channel 1 audio outputs to a suitable mixing desk input.<br />
EXTERNAL MIDI SEQUENCER SETTINGS<br />
Before the VOYAGER 1 can operate correctly you must first ensure that<br />
your MIDI sequencer is set to respond to External MIDI Clock comm<strong>and</strong>s.<br />
Please consult the manufacturers operation manual to make the necessary<br />
settings. Here are some typical examples:<br />
ROLAND MC-303<br />
In System Settings, set the 'SYNCHRONIZATION SETTING' to 'Slave'<br />
mode.<br />
E-MU Orbit / Planet Phatt etc.<br />
In Master Menu, set 'GLOBAL TEMPO' down below 1 BPM to 'External'<br />
mode <strong>and</strong> set the 'BEATS MODE to 1, 2 or 3.<br />
QUASIMIDI RAVE-O-LUTION 309<br />
In the 'EDIT' page press F3 to select 'SYSTEM'. Select page 3 with the<br />
'PAGE' dial. Use the 'EDIT VALUE' wheel to set MIDI SYNC to 'EXT'.<br />
OPERATING CRITERIA<br />
This product has been designed to operate most effectively with<br />
dance music - i.e. music which is based on strong regular beats <strong>and</strong><br />
patterns. However, as the range of pre-recorded dance material is<br />
virtually limitless (<strong>and</strong> the audio mix of individual tracks unknown) we<br />
cannot guarantee the performance of the VOYAGER 1 with every<br />
dance track.<br />
The VOYAGER 1 may operate unsatisfactorily if the beat information<br />
is either unavailable or indefinable within the audio track. Please note<br />
this when selecting your audio source material.<br />
VOYAGER 1 MISSION GUIDE<br />
6
INPUT LEVELS<br />
CD/LINE LEVEL SETTINGS<br />
Selecting the correct input level is critical to the performance of the<br />
VOYAGER 1. If the incorrect range setting is used you may experience<br />
problems with the VOYAGER 1's ability to detect the BPM (due to internal<br />
low or overloaded signal levels).<br />
The VOYAGER 1 is shipped with it's CD/Line levels preset for 'DJ' type<br />
CD players. i.e. those which have a nominal output level of 2V 0dB.<br />
If you wish to use the VOYAGER 1 with a Hi-Fi type CD player (or any<br />
other player which has a nominal output level between 100 to 350mV) you<br />
must first make changes to the jumper links for that channel within the<br />
product.<br />
1. Turn off the power <strong>and</strong> remove all the connectors from the back panel.<br />
2. Turn the product over <strong>and</strong> remove the 4 screws holding the rear panel.<br />
3. Lift off the rear panel <strong>and</strong> identify the 8 'jumper' links located on the<br />
circuit card behind the rear panel connectors as detailed below.<br />
CHANNEL 2 CHANNEL 1<br />
J5<br />
J6<br />
DJ<br />
J7<br />
J8<br />
DJ<br />
J9<br />
LOW<br />
J10<br />
CH 2<br />
J11<br />
LOW<br />
J12<br />
CH 1<br />
'DJ' = 1V to 2.5V 'LOW' = 140mV to 350mV<br />
5. To set Channel 1 to 'LOW ' level operation remove the two links J7, J8<br />
<strong>and</strong> re-fit to J11, J12. To set Channel 2 to 'LOW ' level operation remove<br />
the two links J5, J6 <strong>and</strong> re-fit to J9,J10. Press links firmly into position.<br />
6. Check that no loose parts are left inside the product.<br />
7. Replace the rear panel <strong>and</strong> refit the 4 screws.<br />
7 VOYAGER 1 - INPUT LEVELS
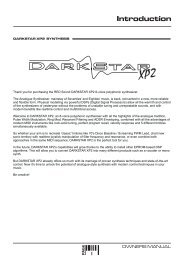
CONNECTIONS - OPTION A<br />
2 channel /2xsound source operation<br />
SOUND SOURCE 2<br />
SOUND SOURCE 1<br />
VINYL TURNTABLE<br />
OR<br />
OR<br />
VINYL TURNTABLE<br />
CD / TAPE etc.<br />
R L R L<br />
CD / TAPE etc.<br />
www.<strong>redsound</strong>.com<br />
MIDI CLOCK<br />
PHONO<br />
CHANNEL 2<br />
PHONO<br />
CHANNEL 1<br />
POWER<br />
ON<br />
L<br />
L<br />
CD/LINE<br />
CD/LINE<br />
- +<br />
OUT<br />
VOYAGER 1<br />
Beat Xtractor<br />
R<br />
IN OUT<br />
IN OUT<br />
RED Sound Systems Ltd<br />
R<br />
9v DC<br />
OFF<br />
MADE IN ENGLAND<br />
CAUTION: DO NOT OPEN CASE<br />
REFER TO QUALIFIED SERVICE PERSONNEL<br />
NO USER SERVICEABLE PARTS INSIDE<br />
R<br />
L<br />
R<br />
L<br />
SUITABLE<br />
MIDI CABLE<br />
MIDI IN<br />
AUDIO OUT<br />
RED PSU<br />
TO<br />
AC WALL<br />
SOCKET<br />
MIDI SEQUENCER / TONE MODULE<br />
MIXING DESK<br />
VOYAGER 1 MISSION GUIDE<br />
8
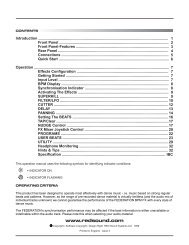
CONNECTIONS - OPTION B<br />
Single channel / multiple sound source operation<br />
MULTIPLE SOUND SOURCE'S<br />
VINYL TURNTABLE CD / TAPE etc. CD / TAPE etc.<br />
VINYL TURNTABLE<br />
MASTER<br />
OUTPUT<br />
MAIN MIXING DESK<br />
RED PSU<br />
USE 'CD/LINE'<br />
LEVEL SETTING<br />
ONLY<br />
R<br />
L<br />
TO<br />
AC WALL<br />
SOCKET<br />
www.<strong>redsound</strong>.com<br />
MIDI CLOCK<br />
PHONO<br />
CHANNEL 2<br />
PHONO<br />
CHANNEL 1<br />
POWER<br />
ON<br />
L<br />
L<br />
CD/LINE<br />
CD/LINE<br />
- +<br />
OUT<br />
VOYAGER 1<br />
Beat Xtractor<br />
R<br />
IN OUT<br />
IN OUT<br />
RED Sound Systems Ltd<br />
R<br />
9v DC<br />
OFF<br />
MADE IN ENGLAND<br />
CAUTION: DO NOT OPEN CASE<br />
REFER TO QUALIFIED SERVICE PERSONNEL<br />
NO USER SERVICEABLE PARTS INSIDE<br />
SUITABLE<br />
MIDI CABLE<br />
MIDI IN<br />
AUDIO OUT<br />
R<br />
L<br />
MIXED AUDIO + MIDI<br />
AUDIO TO POWER AMP<br />
MIDI SEQUENCER / TONE MODULE<br />
SUB MIXING DESK<br />
9 VOYAGER 1 - CONNECTIONS
OPERATION<br />
GETTING STARTED<br />
Connect the VOYAGER 1 to your system using either connection OPTION<br />
A or B as detailed on pages 8/9.<br />
If you choose Option B, avoid changing the volume <strong>and</strong>/or tone controls on<br />
the mixing desk during a performance as this will greatly affect the<br />
VOYAGER 1's input signal (Example: a Bass tone control turned down<br />
could eliminate all the bass drum beat information from the track).<br />
Also, a sub-mixer must be used to eliminate any MIDI driven audio feeding<br />
back into the VOYAGER 1 from the main mixers MASTER OUTPUT (this<br />
would cause the VOYAGER 1 to follow it's own tempo rather than the audio<br />
track's).<br />
Make sure the correct input signal level(s) have been selected to match<br />
your sound source(s) <strong>and</strong> mixing desk.<br />
NOTE: When a channel is not in use (e.g. no physical input/output<br />
connections) always set it's level switch to the 'CD/LINE' position (this will<br />
avoid any r<strong>and</strong>om BPM readings being displayed).<br />
EXTREMELY IMPORTANT - When using vinyl record decks as the<br />
sound source always check the individual earth lead connections are<br />
in good condition <strong>and</strong> firmly secured to the grounding post on the<br />
mixing desk. If the earth lead(s) is broken or disconnected, the<br />
resultant low noise hum will not only degrade the audio quality of<br />
your system but also greatly affect the BPM detection performance of<br />
the VOYAGER 1.<br />
POWERING-UP<br />
Press the rear panel 'Power' on/off switch to the ON position (in). The<br />
software version will be shown briefly on the displays as in the following<br />
example:<br />
Software version =1.01<br />
CH 1 BPM<br />
CH 2 BPM<br />
VOYAGER 1 MISSION GUIDE<br />
10
OPERATION<br />
Afterwards the displays should look like this:<br />
CH1BPM<br />
CH 2 BPM<br />
Three static centre<br />
bars indicate a 'no<br />
audio beat detected'<br />
condition<br />
With no audio signal present the centre bars show that both channels are<br />
currently inactive.<br />
BPM Displays<br />
The VOYAGER 1 features two audio input channels, each having a 3 digit<br />
BPM display. When a tempo is detected on either input the BPM reading<br />
will be shown on the relevant display.<br />
NOTE: Although the displayed BPM has a resolution of I BPM, the internal<br />
working resolution is much higher, enabling the VOYAGER 1 to track to an<br />
accuracy of 0.01 of a BPM.<br />
When audio is present on both channels simultaneously, the BPM readings<br />
can be used to visually align the tempo's of two separate audio tracks.<br />
THE MIDI CLOCK - Selecting The Active Channel<br />
Check that the MIDI sequencer is set to respond to external MIDI Clock<br />
comm<strong>and</strong>s - see page 6.<br />
The audio input from channel 1 or 2 can be selected to drive the MIDI clock<br />
output. The selected channel is called the 'ACTIVE CHANNEL'.<br />
To select Channel 1 as the active channel, press the Channel 1 button. The<br />
indicator will light to show Channel 1 is the active channel.<br />
To select Channel 2 as the active channel, press the Channel 2 button. The<br />
indicator will light to show Channel 2 is the active channel.<br />
NOTE : The channel selection process within the VOYAGER 1 will not<br />
affect the audio signal fed to the mixing desk in any way.<br />
11 VOYAGER 1 - OPERATION - THE MIDI CLOCK
OPERATION<br />
THE MIDI CLOCK - Controlling the MIDI Clock<br />
With the active channel selected you can run the MIDI Clock. In Example 1<br />
we will assume the following set up using connection OPTION B:<br />
CHANNEL 1 Input = Mixer's Master Output with audio track @ 126 BPM<br />
CHANNEL 2 Input = No Input - set level switch to CD/Line<br />
Select Channel 1 as the active channel <strong>and</strong> start the audio track playing on<br />
the sound source. When the VOYAGER 1 detects the tempo from beat<br />
information within the track the Channel 1 display will change from:<br />
to...<br />
CH 1 BPM<br />
The display may briefly show a range of BPM readings as the VOYAGER 1<br />
calculates the exact tempo. When the correct BPM has been locked-in, the<br />
'Beat One' indicator in the 'MIDI CLOCK' display <strong>and</strong> 'RUN/PAUSE'<br />
indicator will flash at the detected BPM speed (126) to indicate 'PAUSE<br />
READY' mode.<br />
INPUT SIGNAL OVERLOAD DISPLAY<br />
If the input levels are setup incorrectly the internal signal may overload<br />
(distort). If this occurs, the display will show the following:<br />
CH1BPM<br />
CH 1 BPM<br />
CH 1 BPM<br />
3 rising centre bars<br />
indicate 'input overload'<br />
condition<br />
NOTE: the audio track monitored from the mixing desk will NOT sound<br />
distorted. The overload display is only used to warn that the signals within<br />
the VOYAGER 1 are overloading <strong>and</strong> that it's performance will be affected.<br />
If the overload display comes on, check the settings of the rear panel<br />
switch <strong>and</strong> internal jumpers to ensure they match the sound source.<br />
VOYAGER 1 MISSION GUIDE<br />
12
OPERATION<br />
RUN/PAUSE Button<br />
Select a suitable pattern on your MIDI sequencer. To Run the MIDI<br />
sequencer, press the 'RUN/PAUSE' button once.<br />
NOTE: To set the initial alignment of the MIDI sequence <strong>and</strong> audio track,<br />
press this button accurately on the desired beat. Any misalignment error at<br />
this stage will be automatically corrected during the first few seconds of<br />
operation.<br />
The 'RUN/PAUSE' indicator will stay on <strong>and</strong> the 'MIDI CLOCK' display will<br />
'rotate' in synchronisation with the detected BPM to indicate 'RUN' mode.<br />
Your MIDI sequencer's pattern should now be playing in synchronisation<br />
with the audio track.<br />
To Pause the MIDI sequencer at any time, press the 'RUN/PAUSE' button<br />
once. The 'MIDI CLOCK' display will stop rotating <strong>and</strong> the 'RUN/PAUSE' /<br />
'Beat One' indicators will flash to indicate 'PAUSE' mode . The MIDI<br />
sequencer's pattern or song will be held at the pause position <strong>and</strong> will only<br />
continue from that point when the 'RUN/PAUSE' button is pressed again.<br />
If you want to start the pattern or song from the begining (beat 1/bar1) <strong>and</strong><br />
not the paused point, press the 'BEAT ONE RE-SET' button before<br />
pressing the 'RUN/PAUSE' button again.<br />
IMPORTANT NOTE: The VOYAGER 1 has been designed to continue<br />
running the MIDI Clock indefinitely at the last detected BPM if the strong<br />
regular beats in the audio track become unavailable. This feature allows<br />
your MIDI sequencer to fill in parts during quite passages of the audio track<br />
without interuption or to continue playing after the track has finished.<br />
If the strong regular beats in the audio track become unavailable at any<br />
time, the active channel's 3 decimal point indicators will flash continuously<br />
as shown:<br />
CH1BPM<br />
3 flashing decimal points indicate<br />
'free-wheeling' condition<br />
13 VOYAGER 1 - OPERATION - RUN/PAUSE BUTTON
OPERATION<br />
This will occur approx. 5 seconds after the last detected BPM reading was<br />
taken to warn that the VOYAGER 1 is now 'free-wheeling' <strong>and</strong> the BPM<br />
display is no longer being updated from the audio track.<br />
When the strong regular beats in the audio track return, the VOYAGER 1<br />
will automatically detect the BPM information <strong>and</strong> make any necessary<br />
adjustments, at which time the flashing decimal point indicators will go out<br />
to indicate a 'locked-in' condition.<br />
BEAT ONE RE-SET Button<br />
This button is used to re-align the start point of the MIDI pattern or song<br />
(beat1/bar1) with any chosen beat in the audio track.<br />
Press the 'RUN/<br />
PAUSE' button to run your MIDI sequencer.<br />
Press <strong>and</strong> hold down the 'BEAT ONE RE-SET' button. The MIDI<br />
sequencer will stop <strong>and</strong> reset to beat1/bar1. When the button is released<br />
the MIDI sequencer will restart. This feature allows you to set the relative<br />
synchronisation of the audio <strong>and</strong> MIDI sequencer "on the fly".<br />
NOTE: If this button is pressed momentarily, a minimum reset period of 1/4<br />
second will elapse before automatic restart. This allows all MIDI<br />
sequencers to respond correctly to the series of MIDI clock comm<strong>and</strong>s.<br />
TAP<br />
(STOP)<br />
Button<br />
This dual function button allows you to either enter / adjust a tempo by<br />
h<strong>and</strong> (TAP/TEMPO EDIT) or stop the MIDI clock (STOP). The 'TAP' feature<br />
can be used to set <strong>and</strong> run the MIDI Clock in the following conditions:<br />
1. If there is no audio input present <strong>and</strong> you want to run your MIDI<br />
sequencer before starting the audio track.<br />
2. If beat information becomes unavailable <strong>and</strong> the unit is 'free-wheeling<br />
during a quite section of an audio track (intro, middle eight etc.).<br />
To enter a tempo when there is no audio input present you can either:<br />
VOYAGER 1 MISSION GUIDE<br />
14
OPERATION<br />
TAP - (Coarse changes) Use your finger to tap in a tempo on the 'TAP'<br />
button. After 3-4 taps the tempo will be shown on the active channel's BPM<br />
display.<br />
Tempo Edit - ( Fine changes) Press the 'TAP' button once. The 'TAP'<br />
indicator will come on.<br />
-/Down<br />
+/ Up Tempo Edit<br />
Tap indicator<br />
ON indicates<br />
'Tempo Edit'<br />
mode<br />
CUE<br />
BEAT ONE<br />
RE-SET<br />
TAP<br />
(STOP)<br />
The VOYAGER 1 is now in 'Tempo Edit' mode. Pressing either the '-/Down'<br />
or '+/ Up' button once will bring up the default tempo (120 BPM) on the<br />
active channel's display.<br />
You can now use the '-/Down' or '+/ Up' buttons to set a tempo anywhere<br />
within the range of the VOYAGER 1. If necessary, use the 'RUN/PAUSE'<br />
button to check the tempo as you make the adjustments.<br />
When you have set the desired BPM, press the 'TAP' button again. The<br />
indicator will go out. The 'CUE' <strong>and</strong> 'BEAT ONE RE-SET' buttons will revert<br />
to their normal operation.<br />
To make adjusments to a detected BPM when beat information becomes<br />
unavailable you can either:<br />
TAP - ( Coarse changes) Use your finger to tap in your tempo on the 'TAP'<br />
button. After 3-4 taps the new tempo will be shown on the active channel's<br />
BPM display <strong>and</strong> the MIDI clock will run at that speed.<br />
Tempo Edit - ( Fine changes) Press the 'TAP' button once. The 'TAP'<br />
indicator will come on. The current detected BPM reading will be displayed.<br />
Pressing either the '-/Down' or '+/ Up' buttons will change the displayed<br />
BPM <strong>and</strong> update the MIDI clock speed in real-time.<br />
15 VOYAGER 1 - OPERATION - TAP (STOP) BUTTON
OPERATION<br />
NOTE: Beat information detected from the audio track will override any<br />
BPM changes made with the 'Tempo Edit' function.<br />
The manual 'TAP' function can be used to assist the VOYAGER 1's initial<br />
BPM detection of more complex rhythm tracks. Tapping along with the<br />
tempo of the track can help the software to recognise patterns within the<br />
music <strong>and</strong> so lock-in <strong>and</strong> adjust the BPM <strong>and</strong>/or beat tracking.<br />
The Stop function is used to stop the MIDI Clock or 'clear' incorrect BPM<br />
readings from the active channel. Press <strong>and</strong> hold down the 'TAP(STOP)'<br />
button for approx.1 sec. The BPM readings will be replaced by three centre<br />
bars <strong>and</strong> the 'MIDI CLOCK' display <strong>and</strong> 'RUN/PAUSE' indicators will go out.<br />
CUE Button<br />
This button is used to pre-set the VOYAGER 1 to the BPM of an audio track<br />
prior to the actual performance. The MIDI sequencer <strong>and</strong> audio track can<br />
then be started simultaneously from any predetermined cue point within the<br />
audio track.<br />
In Example 2 the VOYAGER 1 is setup using connection Option A:<br />
CHANNEL 1 Input = CD player connected with audio track @ 106 BPM<br />
CHANNEL 2 Input = Turntable connected with audio track @ 133 BPM<br />
Select Channel 2 as the active channel <strong>and</strong> start the audio track playing on<br />
the Channel 2 sound source.<br />
NOTE: For the Cue function to operate, the VOYAGER 1 must first be<br />
detecting a BPM - i.e. the Cue function will not operate if a 'no audio beat<br />
detected' condition exists.<br />
The active channel's display will show:<br />
CH2BPM<br />
VOYAGER 1 MISSION GUIDE<br />
16
OPERATION<br />
When you are satisfied with the BPM reading, press the 'CUE' button once.<br />
The 'CUE', 'RUN/PAUSE' <strong>and</strong> 'Beat One' indicators will flash to indicate<br />
Cue Pause mode.<br />
Flashing indicator<br />
CUE<br />
The VOYAGER 1 is now held in Cue Pause mode <strong>and</strong> will not respond to<br />
any further audio signals which appear on the active channel input. You can<br />
now find a suitable cue point on the audio track using the cue facilities on<br />
the playback device without activating the VOYAGER 1.<br />
NOTE: the Cue function will work most effectively from a strong cue point<br />
on the audio track. For the best results, always try to find a cue point<br />
fractionally before a well defined bass drum.<br />
Once you have set the cue point on the audio playback device, press the<br />
'CUE' button again. The 'CUE' indicator will stay on (stop flashing) to<br />
indicate Cue Ready mode. The 'RUN/PAUSE' <strong>and</strong> 'Beat One' indicators<br />
will continue to flash.<br />
Cue indicator ON indicates<br />
'Cue Ready'mode<br />
CUE<br />
The VOYAGER 1 is now waiting for the same audio track to start again.<br />
Ensure that you have selected a suitable pattern or song on your MIDI<br />
sequencer.<br />
Start the audio track playback on the Channel 2 sound source. The MIDI<br />
sequencer will immediately run in synchronisation with the audio track. The<br />
MIDI Clock display will start to rotate <strong>and</strong> the 'CUE' indicator will go out.<br />
The 'RUN/PAUSE' indicator <strong>and</strong> BPM display will stay on to indicate 'RUN'<br />
mode.<br />
To cancel either 'Cue Pause' or 'Cue Ready' modes at any time simply use<br />
the 'STOP' function - press <strong>and</strong> hold the 'TAP(STOP)' button for 1 second.<br />
17 VOYAGER 1 - OPERATION - CUE BUTTON
OPERATION<br />
BEAT TRACKING Indicator<br />
This indicator shows any beat synchronisation adjustments between the<br />
audio track <strong>and</strong> MIDI sequence. The VOYAGER 1 constantly analyses the<br />
accuracy of the relative beat positions <strong>and</strong> will either 'PULL' or 'PUSH' the<br />
MIDI clock output to maintain synchronisation.<br />
When the audio <strong>and</strong> MIDI are synchronised the 'OK' indicator will light.<br />
PULL<br />
OK<br />
PUSH<br />
BEAT TRACKING<br />
If the MIDI clock is ahead of the audio, the 'PULL' indicator will light.<br />
PULL<br />
OK<br />
PUSH<br />
BEAT TRACKING<br />
If the MIDI clock is behind the audio, the 'PUSH' indicator will light.<br />
PULL<br />
OK<br />
PUSH<br />
BEAT TRACKING<br />
The VOYAGER 1's automatic beat tracking software can be temporarily<br />
disengaged. In 'RUN' mode, press <strong>and</strong> hold down the active channel's<br />
button. The indicator will flash to show a 'tracking disengaged' condition.<br />
CH 1 BPM<br />
CH 2 BPM<br />
CHANNEL 1<br />
SELECT<br />
PULL OK PUSH<br />
BEAT TRACKING<br />
CHANNEL 2<br />
Flashing<br />
indicates<br />
'tracking<br />
disengaged'<br />
condition<br />
When released, the beat tracking will automatically take over again.<br />
NOTE: This feature allows the VOYAGER 1 to ignore any erratic, offbeat<br />
material present in some sections of the audio track which would otherwise<br />
cause unnecessary adjustments <strong>and</strong> disrupt the synchronisation.<br />
VOYAGER 1 MISSION GUIDE<br />
18
OPERATION<br />
BACKGROUND CHANNEL OPERATION<br />
As previously explained in ' Selecting The Active Channel' on page 11,<br />
only one channel at a time can be selected to drive the MIDI Clock i.e. the<br />
'ACTIVE CHANNEL'.<br />
The channel which is NOT selected at any time is called the<br />
'BACKGROUND CHANNEL' ( in example 2 this would be Channel 1).<br />
The background channel's function is solely to detect <strong>and</strong> display current<br />
BPM readings from the connected audio source. It will only display a BPM<br />
reading if it detects a strong regular beat in the audio track. If the beats<br />
become unavailable at any time, the background channel's display will flash<br />
three times <strong>and</strong> change from:<br />
3 flashes indicates<br />
'BPM lost' mode<br />
CH1BPM<br />
to...<br />
When a valid BPM reading is detected, the display will again show:<br />
CH1BPM<br />
SWITCHING BETWEEN CHANNELS<br />
You can switch the 'ACTIVE CHANNEL' at any time, providing both<br />
channels are detecting a BPM reading. If Channel 1 <strong>and</strong> 2 are receiving<br />
audio tracks with different BPM values, the MIDI Clock will 'jump' to the new<br />
tempo. Using Example 2's set-up, the 'ACTIVE CHANNEL' is currently<br />
Channel 2.<br />
CH 1 BPM<br />
CH2BPM<br />
CHANNEL 1<br />
SELECT<br />
CHANNEL 2<br />
Active<br />
Channel<br />
19 VOYAGER 1 - SWITCHING BETWEEN CHANNELS
TROUBLESHOOTING<br />
The MIDI Clock output is running at 133 BPM. Press the 'CHANNEL 1'<br />
button.<br />
CH 1 BPM<br />
CH 2 BPM<br />
Active<br />
Channel<br />
CHANNEL 1<br />
SELECT<br />
CHANNEL 2<br />
The MIDI Clock will now run at 106 BPM.<br />
TROUBLESHOOTING<br />
Erratic/Poor performance<br />
* Check input level settings match the sound source's output level.<br />
* Low output level from sound source.<br />
* Poor quality phono leads/bad earth connection.<br />
* Monitored channel not selected as the active channel.<br />
* Vinyl deck - earth cable not connected to mixing desk <strong>and</strong>/or damaged.<br />
* Vinyl deck - worn cartridge or stylus (low output).<br />
* MIDI driven audio being fed back into VOYAGER 1 input ( Connection -<br />
option -B).<br />
HINTS & TIPS<br />
Tempo Changes<br />
* Always make slow changes when adjusting the sound source pitch<br />
control.<br />
* Never make tempo changes during quite passages (when beat<br />
information is unavailable) as the VOYAGER 1 will lose synchronisation.<br />
Synchronisation<br />
* Use the 'Tempo Edit' feature to manually adjust any synchronisation error<br />
during quite passages (when beat information is unavailable).<br />
* Disengage the beat tracking prior to breaks which contain erratic beats.<br />
VOYAGER 1 MISSION GUIDE<br />
20
SPECIFICATION<br />
SPECIFICATION<br />
Performance<br />
BPM Range = 90 to 180 BPM<br />
Lock-in time =2to4sec's(from introduction of readable beat information)<br />
Input Levels<br />
CD/ Line 'DJ' = 1V to 2.5V<br />
CD/ Line 'LOW' = 140mV to 350mV<br />
Phono = 1.5 to 15 mV<br />
Level setting = AGC (automatic gain control) circuitry<br />
Displays<br />
2 x 7 Segments, 3 character (LED)<br />
MIDI Clock rotating display (8xLEDs), Beat Tracking display (3xLEDs)<br />
Controls<br />
Channel 1 select, Channel 2 select, Run/Pause, Cue, Beat One Re-Set,<br />
Tap(Stop)<br />
MIDI Implementation<br />
System Real Time / Clock comm<strong>and</strong>s = Transmitted<br />
Connectors<br />
Channel 1 Input/Output, Channel 2 Input/Output, MIDI Clock Out,<br />
AC adaptor<br />
Power Supply<br />
9vDC, 250mA (RED PSU)<br />
Dimensions/Weight<br />
180(W)x132(D)x50(H)mm, 1.65 Kg<br />
NOTE: channel 1-2 crosstalk occurs if the VOYAGER 1's power is turned<br />
off with the sound sources still connected. (Audible on the mixing desk<br />
output - i.e. Low level audio from channel 1 will be heard on channel 2 <strong>and</strong><br />
vice-versa)<br />
21 VOYAGER 1 - SPECIFICATION
FEDERAL COMMUNICATIONS COMMISSION<br />
RADIO FREQUENCY INTERFERENCE STATEMENT<br />
For the USA<br />
This equipment has been tested <strong>and</strong> found to comply with the limits listed for a Class B digital<br />
device, pursuant to Part 15 of the FCC Rules. These limits are designed to provide reasonable<br />
protection against harmful interference in a residential installation. This equipment generates,<br />
uses, <strong>and</strong> can radiate radio frequency energy <strong>and</strong>, if not installed <strong>and</strong> used in accordance with<br />
the instructions, may cause harmful interference to radio communications. However, there is<br />
no guarantee that interference will not occur in a particular installation. If this equipment does<br />
cause harmful interference to radio or television reception, which can be determined by turning<br />
the equipment off <strong>and</strong> on, the user is encouraged to try to correct the interference by one or<br />
more of the following measures:<br />
- Reorient or relocate the receiving antenna.<br />
- Increase the separation between the equipment <strong>and</strong> receiver.<br />
- Connect the equipment into an outlet on a circuit different from that to which the receiver is<br />
connected.<br />
- Consult the dealer or an experienced radio/TV technician for help.<br />
Unauthorized changes or modifications to this system can void the users authority to operate<br />
this equipment.<br />
This equipment requires shielded interface cables in order to meet FCC class B limit.<br />
For Europe<br />
This product complies with the requirements of European Directive 89/336/EEC<br />
For Canada<br />
CLASS B<br />
NOTICE<br />
This digital apparatus does not exceed the Class B limits for radio noise emissions set out in<br />
the Radio Interference Regulations of the Canadian Department of Communications.<br />
CLASSE B<br />
AVIS<br />
Cet appareil numerique ne depasse pas les limites de la Classe B au niveau des emissions de<br />
bruits radioelectriques fixes dans le Reglement des signaux parasites par le ministere<br />
Canadien des Communications.<br />
* Specifiction <strong>and</strong> / or appearance subject to change without prior notice<br />
due to product improvement.<br />
Copyright / Software Copyright / Design Right RED Sound Systems Ltd. 1997<br />
Printed in Engl<strong>and</strong>
TM<br />
RED<br />
MUSIC,MIND,BODY&SOUL<br />
RED Sound Systems Ltd., Chancery Court Business Centre<br />
Lincolns Inn, Lincoln Road, High Wycombe, Bucks. HP12 3RE Engl<strong>and</strong><br />
Phone : +44 (0)1494 429321<br />
Fax : +44 (0)1494 446321<br />
www.<strong>redsound</strong>.com