NOW ITS EASY TO GET IN THE LOOP - Red Sound Systems
NOW ITS EASY TO GET IN THE LOOP - Red Sound Systems
NOW ITS EASY TO GET IN THE LOOP - Red Sound Systems

Create successful ePaper yourself
Turn your PDF publications into a flip-book with our unique Google optimized e-Paper software.
Introduction<br />
<strong>NOW</strong> <strong>ITS</strong> <strong>EASY</strong> <strong>TO</strong> <strong>GET</strong> <strong>IN</strong> <strong>THE</strong> <strong>LOOP</strong><br />
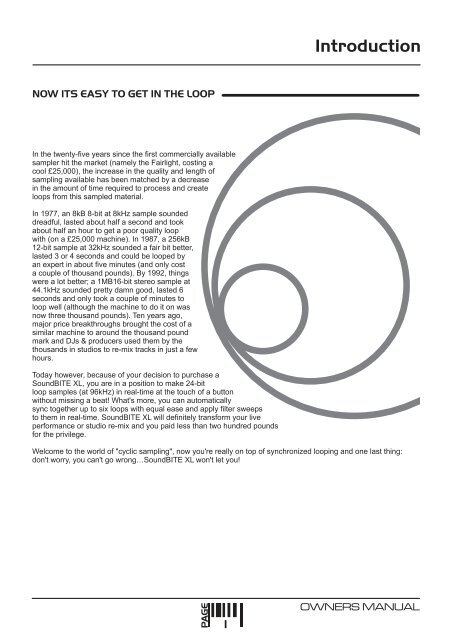
In the twenty-five years since the first commercially available<br />
sampler hit the market (namely the Fairlight, costing a<br />
cool £25,000), the increase in the quality and length of<br />
sampling available has been matched by a decrease<br />
in the amount of time required to process and create<br />
loops from this sampled material.<br />
In 1977, an 8kB 8-bit at 8kHz sample sounded<br />
dreadful, lasted about half a second and took<br />
about half an hour to get a poor quality loop<br />
with (on a £25,000 machine). In 1987, a 256kB<br />
12-bit sample at 32kHz sounded a fair bit better,<br />
lasted 3 or 4 seconds and could be looped by<br />
an expert in about five minutes (and only cost<br />
a couple of thousand pounds). By 1992, things<br />
were a lot better; a 1MB16-bit stereo sample at<br />
44.1kHz sounded pretty damn good, lasted 6<br />
seconds and only took a couple of minutes to<br />
loop well (although the machine to do it on was<br />
now three thousand pounds). Ten years ago,<br />
major price breakthroughs brought the cost of a<br />
similar machine to around the thousand pound<br />
mark and DJs & producers used them by the<br />
thousands in studios to re-mix tracks in just a few<br />
hours.<br />
Today however, because of your decision to purchase a<br />
<strong>Sound</strong>BITE XL, you are in a position to make 24-bit<br />
loop samples (at 96kHz) in real-time at the touch of a button<br />
without missing a beat! What's more, you can automatically<br />
sync together up to six loops with equal ease and apply filter sweeps<br />
to them in real-time. <strong>Sound</strong>BITE XL will definitely transform your live<br />
performance or studio re-mix and you paid less than two hundred pounds<br />
for the privilege.<br />
Welcome to the world of "cyclic sampling", now you're really on top of synchronized looping and one last thing:<br />
don't worry, you can't go wrong…<strong>Sound</strong>BITE XL won't let you!<br />
PAGE<br />
1<br />
OWNERS MANUAL
Top/Front Panels<br />
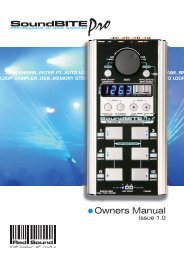
<strong>TO</strong>P/FRONT PANEL FEATURES<br />
POWER<br />
<strong>IN</strong>PUT<br />
<strong>LOOP</strong>S OUT<br />
1<br />
REV<br />
[-/down]<br />
FWD<br />
[+/up]<br />
9<br />
DISENGAGE<br />
ENG<strong>IN</strong>E<br />
EDIT<br />
TAP/CLEAR<br />
(*BPM RANGE)<br />
8<br />
2<br />
BPM<br />
ERASE ALL<br />
(SELECT)<br />
1<br />
2<br />
3<br />
GROUP<br />
<strong>Red</strong> <strong>Sound</strong><br />
the colour of music<br />
RE-SAMPLE<br />
(VIEW)<br />
3 7<br />
<strong>Sound</strong>BITE<br />
AU<strong>TO</strong> - <strong>LOOP</strong> MODULEXL<br />
1<br />
1/4 1/4<br />
BEATS<br />
2<br />
1/2 1/2<br />
BEATS<br />
4<br />
4<br />
1 1<br />
BEATS<br />
4<br />
4 4<br />
BEATS<br />
8 16<br />
8 4<br />
16 32<br />
BEATS<br />
BEATS<br />
SAMPLE MODE<br />
CYCLIC / FILTER / REVERSE<br />
PHONES<br />
5 6<br />
1. EDIT: This knob can be used to manually set a BPM value if no beat information is detected and also to adjust<br />
the synchronisation point of all the recorded loops relative to the audio input source. In <strong>LOOP</strong> EDIT mode this knob<br />
can be used to adjust the synchronisation point of individual recorded loops relative to the audio input source and<br />
also set the output level of each loop [+6/-20dB]. In FILTER mode, this knob can be used to change the loop<br />
playback sound (or straight-thru audio sound) by filtering elements of the output signal in real-time.<br />
<strong>Sound</strong>BITE XL - DJ Loop Sampler<br />
PAGE<br />
2
Top/Front Panel Features<br />
2. BPM DISPLAY: The four digit BPM reading of the audio input signal will be displayed here. Also, information<br />
will be displayed in <strong>LOOP</strong> EDIT, FILTER EDIT and BPM EDIT modes.<br />
3. ERASE ALL: This button is used to erase ALL six loops simultaneously and to [SELECT] the preferred loop<br />
GROUP. This button also selects STRAIGHT-THRU FILTER mode allowing filter effects to be applied to the<br />
incoming audio in real-time.<br />
4. <strong>LOOP</strong>S: These six buttons are used to record and playback the loop samples. There are three loop ‘groups’ to<br />
choose from. In these groups, each button has a pre-determined sample length in musical ‘beats’ e.g.<br />
Grp1 = 1, 2, 4, 4, 8 and 16 preset beat loops.<br />
5. SAMPLE MODE: This switch selects the three loop modes: CYCLIC (auto-loop generation), FILTER (autoloop<br />
generation + filter effects) and REVERSE (auto-loop generation + filter effects with playback in reverse)<br />
6. HEADPHONE OUTPUT: <strong>Sound</strong>BITE XL uses the headphone output on your mixing desk for its’ audio input<br />
source, so connect your headphones to this socket for normal DJ monitoring purposes.<br />
7. RE-SAMPLE: This button is used to over-record any pre-recorded loop samples and also [VIEW] the current<br />
loop GROUP setting.<br />
8. TAP/CLEAR [BPM RANGE]: This button is used to clear the BPM reading and tap in a tempo if there is<br />
no defined beat information available. Also, when pressed and held down, the [EDIT] jog dial selects the active<br />
range for the BPM engine (60 >120, 90 >180 and 115 >230BPM range settings are available).<br />
9. DISENGAGE ENG<strong>IN</strong>E: This button is used to disengage and re-engage the BPM engine. In FILTER mode it<br />
can also be used to set the filter RESONANCE level.<br />
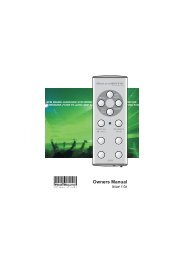
REAR PANEL FEATURES<br />
<strong>Sound</strong>BITE<br />
AU<strong>TO</strong> - <strong>LOOP</strong> MODULE<br />
XL<br />
[ 9vDC ]<br />
<strong>LOOP</strong>S OUT <strong>IN</strong>PUT POWER<br />
R<br />
L<br />
R<br />
L<br />
- +<br />
1 2 3<br />
1. <strong>LOOP</strong>S OUT: Use the supplied cables [1 into 2 RCA] to connect <strong>Sound</strong>BITE XL’s output to a spare input<br />
channel on your mixing desk.<br />
2. <strong>IN</strong>PUT: Use the supplied cable [1/4 jack to RCA] to connect the headphone monitor output from your mixing<br />
desk to <strong>Sound</strong>BITE XL’s audio input.<br />
3. 9vDC POWER <strong>IN</strong>:<br />
Only use the RED <strong>Sound</strong> PSU supplied with <strong>Sound</strong>BITE XL to power the unit.<br />
PAGE<br />
3<br />
OWNERS MANUAL
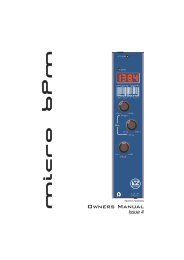
Connections<br />
CONNECTIONS<br />
CONNECT <strong>TO</strong><br />
FRONT PANEL<br />
SOCKET<br />
<strong>Sound</strong>BITE<br />
AU<strong>TO</strong> - <strong>LOOP</strong> MODULE<br />
<strong>LOOP</strong>S OUT<br />
<strong>IN</strong>PUT<br />
XL<br />
POWER<br />
[ 9vDC ]<br />
R<br />
L<br />
R<br />
L<br />
- +<br />
R<br />
L<br />
R<br />
L<br />
HEADPHONES<br />
STEREO RCA <strong>TO</strong> RCA<br />
RED PSU<br />
<strong>TO</strong><br />
AC WALL<br />
SOCKET<br />
CONNECT <strong>TO</strong><br />
SPARE <strong>IN</strong>PUT<br />
CHANNEL ON<br />
MIX<strong>IN</strong>G DESK<br />
R<br />
L<br />
<strong>IN</strong>PUT CABLE [SUPPLIED] -<br />
6.3mm <strong>TO</strong> RCA STEREO<br />
ALTERNATIVE ‘<strong>LOOP</strong>S OUT’ CONNECTION<br />
FOR USE WITH 2 CHANNEL MIX<strong>IN</strong>G DESK +<br />
V<strong>IN</strong>YL RECORD DECK SYSTEM<br />
DJ MIX<strong>IN</strong>G DESK<br />
HEADPHONE<br />
MONI<strong>TO</strong>R<br />
OUTPUT<br />
2 x OUTPUT CABLES [SUPPLIED] -<br />
1 x RCA <strong>TO</strong> TW<strong>IN</strong> RCA<br />
R<br />
<strong>LOOP</strong>S OUT<br />
L<br />
The unused CD/line<br />
inputs on a 2 channel<br />
desk + vinyl deck<br />
system can be<br />
connected to the<br />
[<strong>LOOP</strong>S OUT] sockets<br />
using the special 1 into<br />
2 RCA cables supplied.<br />
In this way, the loops<br />
can always be brought<br />
in on the crossfader by<br />
switching the cue<br />
channel to CD/Line.<br />
CHANNEL 2 CHANNEL 1<br />
SIGNAL PHONO CD/L<strong>IN</strong>E<br />
SIGNAL PHONO CD/L<strong>IN</strong>E<br />
GND<br />
GND<br />
R<br />
R<br />
L<br />
L<br />
ANALOG TURNTABLE<br />
ANALOG TURNTABLE<br />
<strong>Sound</strong>BITE XL - DJ Loop Sampler<br />
PAGE<br />
4
CYCLIC / FILTER / REVERSE<br />
Operation<br />
MOUNT<strong>IN</strong>G OPTIONS<br />
Rotate the chrome brackets to lineup<br />
with the 19” rack mounting holes<br />
on your mixing desk.<br />
POWER<br />
<strong>IN</strong>PUT<br />
<strong>LOOP</strong>S OUT<br />
REV<br />
[-/down]<br />
FWD<br />
[+/up]<br />
DISENGAGE<br />
ENG<strong>IN</strong>E<br />
EDIT<br />
TAP/CLEAR<br />
(*BPM RANGE)<br />
BPM<br />
<strong>Red</strong> <strong>Sound</strong><br />
the colour of music<br />
ERASE ALL<br />
(SELECT)<br />
RE-SAMPLE<br />
(VIEW)<br />
19” RACK<br />
Hole pitch<br />
range =<br />
Min 90mm<br />
Max 240mm<br />
1<br />
2<br />
3<br />
GROUP<br />
<strong>Sound</strong>BITE<br />
AU<strong>TO</strong> - <strong>LOOP</strong> MODULEXL<br />
1<br />
2<br />
1/4 1/4<br />
1/2 1/2<br />
BEATS<br />
BEATS<br />
M6 SCREW<br />
BRACKET<br />
4<br />
1 1<br />
BEATS<br />
4<br />
4 4<br />
BEATS<br />
M3 SCREW<br />
(LENGTH = 6mm MAX)<br />
8 16<br />
8 4<br />
16 32<br />
BEATS<br />
BEATS<br />
19” RACK MOUNT HOLE<br />
DJ MIX<strong>IN</strong>G DESK <strong>TO</strong>P PANEL<br />
SAMPLE MODE<br />
PHONES<br />
M6 NUT<br />
MIX<strong>IN</strong>G DESK<br />
Alternatively, you can use the supplied rubber feet or double-sided sticky pads to flat-mount <strong>Sound</strong>BITE XL in any<br />
convenient location.<br />
QUICK START<br />
If you want to quickly try out the basic performance of <strong>Sound</strong>BITE XL, please read the following points carefully:<br />
CONNECTIONS: Before making any connections, make sure that the power on all your equipment is turned OFF.<br />
Connect the audio cables for a basic system setup as shown on page 4.<br />
TURN<strong>IN</strong>G ON <strong>THE</strong> POWER: Make sure all connections have been made correctly and that the volume controls on<br />
the mixing desk and amplifier system are completely turned down. Connect the power supply (included) to the<br />
‘power in’ socket on the rear panel of <strong>Sound</strong>BITE XL and plug it into a suitable AC outlet. Turn on the power of the<br />
mixing desk and then turn on the power to the amplifier system.<br />
START-UP <strong>IN</strong>DICATIONS: When <strong>Sound</strong>BITE XL is first powered up, the display will briefly show the current<br />
sample mode setting (as defined by the position of the [SAMPLE MODE] switch) and then show four illuminated<br />
centre bars. If this does not happen, check the power supply is of the correct type and the unit is connected<br />
correctly as shown on page 4.<br />
SETT<strong>IN</strong>G UP: Select a suitable audio track (dance orientated music with defined beat information), start the<br />
playback on the connected sound source and route this signal to the headphone monitor output on the mixing desk<br />
(check this using the headphones now connected to the headphone output on <strong>Sound</strong>BITE XL). The input level is<br />
automatically set by <strong>Sound</strong>BITE’s AGC (automatic gain control). The main BPM display should now show the BPM<br />
value of the audio track.<br />
RECORD<strong>IN</strong>G/PLAY<strong>IN</strong>G BACK <strong>LOOP</strong>S: Ensure the [SAMPLE MODE] switch is set to the [CYCLIC] position. Now<br />
simply press one of the six loop buttons whenever you want to start recording - the display will show ‘rEC’ and<br />
count down the number of beats as the loop is recorded. If for instance, you pressed the [4 BEATS] loop button, the<br />
display would count down 4-3-2-1 and then instantly playback the 4 beat loop. To mute the loop, simply press the<br />
same loop button again [this button now switches the loop on/off].<br />
PAGE<br />
5<br />
OWNERS MANUAL
Operation<br />
Now try recording some of the other loops and playing them back in combination. To clear all the loops press the<br />
[ERASE ALL] button once. To replace a single loop, press the [RE-SAMPLE] button once, then press the desired<br />
loop button to start the re-sample recording process. Try changing the [SAMPLE MODE] setting to FILTER (rotate<br />
the [EDIT] jog dial to alter the sound) and REVERSE to see the effect they have on the loop playback.<br />
Please read the following “OPERATION” section fully to appreciate the range of features and facilities <strong>Sound</strong>BITE<br />
XL has to offer.<br />
BPM DISPLAY & CONTROLS<br />
After connecting <strong>Sound</strong>BITE XL to your system as detailed on page 4, plug in the power connector on the rear<br />
panel to turn the power on. The [SAMPLE MODE] switch setting will now be shown briefly on the main display:<br />
BPM<br />
Example = [SAMPLE MODE] is CYCLIC mode<br />
Afterwards, the four centre bars will illuminate to indicate the ‘IDLE’ status of the BPM engine.<br />
BPM<br />
Four static centre bars<br />
indicate no beat detected<br />
‘IDLE’ condition<br />
<strong>Sound</strong>BITE XL is now ready to use!<br />
BPM RANGE<br />
This is where you set the working range of the BPM engine. There are three individual operating ranges covering a<br />
total range of 60 - 230 BPM. This allows <strong>Sound</strong>BITE XL to work with most current dance music styles, from the<br />
slowest Soul to the fastest Drum & Bass. The range setting can be changed using the front panel [TAP/CLEAR]<br />
button and the [EDIT] jog dial, as shown in the following example:<br />
2. Rotate to<br />
change BPM<br />
range<br />
REV<br />
[-/down]<br />
FWD<br />
[+/up]<br />
DISENGAGE<br />
ENG<strong>IN</strong>E<br />
EDIT<br />
TAP/CLEAR<br />
(*BPM RANGE)<br />
1. Press & hold<br />
The display will scroll through the three range settings as follows:<br />
RANGE<br />
60-120BPM<br />
90-180BPM<br />
115-230BPM<br />
DISPLAY<br />
90 BPM<br />
135 BPM<br />
172.5 BPM<br />
<strong>Sound</strong>BITE XL - DJ Loop Sampler<br />
PAGE<br />
6
Operation<br />
If the BPM engine is active [displaying a value] it will be automatically cleared when the [TAP/CLEAR] button is held<br />
and the [EDIT] jog dial moved. The BPM engine will then re-calculate the value within the new range, provided that<br />
beat information is present.<br />
NOTE: BPM values outside of the selected range limit cannot be accurately analysed. Always check the general<br />
tempo of the music you are playing falls within the selected BPM range. For most applications we recommend the<br />
default Mid BPM range of 90-180BPM.<br />
BPM DISPLAY<br />
Start the playback of a suitable audio track (containing definable beat information). The BPM display should now<br />
show the tempo of the track in beats per minute, as in the following example:<br />
BPM<br />
Example reading = 138.2 BPM<br />
The indicators in the 6 [<strong>LOOP</strong>] buttons will flash at the detected BPM rate. <strong>Sound</strong>BITE XL is now ready to record<br />
synchronised loops - see ‘RECORD<strong>IN</strong>G AND PLAY<strong>IN</strong>G ‘CYCLIC’ <strong>LOOP</strong>S’ on page 9. During tempo analysis of the<br />
audio track, the right-hand digit in the display may fluctuate slightly as the BPM reading is constantly updated in<br />
real-time. Any progressive shift in tempo (slowly changing the audio playback speed using a CD/vinyl deck’s pitch<br />
control) will be tracked and displayed by <strong>Sound</strong>BITE XL.<br />
IMPORTANT NOTE: The BPM engine will continue looping the samples indefinitely at the last detected BPM rate if<br />
the strong regular beats in the audio track become unavailable. This feature allows the loops to continue operating<br />
through quiet passages or at the end of the audio track.<br />
DISENGAG<strong>IN</strong>G <strong>THE</strong> BPM ENG<strong>IN</strong>E<br />
The BPM engine can be temporarily disengaged when there is a possibility of erratic audio input tempo (during<br />
cueing procedures etc) disrupting the playback speed of the pre-recorded loops. To disengage the BPM engine at<br />
any time press the [DISENGAGE] button once, as shown in the following example:<br />
REV<br />
[-/down]<br />
FWD<br />
[+/up]<br />
Press once to<br />
disengage BPM<br />
engine<br />
DISENGAGE<br />
ENG<strong>IN</strong>E<br />
EDIT<br />
TAP/CLEAR<br />
(*BPM RANGE)<br />
The display will now show the following:<br />
‘dIS’ for disengage<br />
BPM<br />
followed by...<br />
BPM<br />
BPM value flashes to<br />
indicate ‘BPM engine<br />
disengaged’ condition<br />
The last detected BPM value will continue to flash on the display and any further beat information will be ignored<br />
until such time as the BPM engine is re-engaged.<br />
PAGE<br />
7<br />
OWNERS MANUAL
Operation<br />
To re-engage the BPM engine simply press the [DISENGAGE] button again. The display will now show the<br />
following:<br />
‘EnG’ for engage<br />
BPM<br />
followed by...<br />
BPM<br />
BPM value remains on to<br />
indicate normal BPM engine<br />
condition<br />
The BPM engine is now re-engaged and operating normally.<br />
TAP/CLEAR BUT<strong>TO</strong>N<br />
This multi-function button allows you to manually enter a tempo by hand or erase the current BPM reading. The<br />
TAP feature should be used to set the BPM rate if there is no audio signal present or when the beat information<br />
becomes unavailable during a quite passage of the audio track (intro, middle eight etc). The CLEAR feature can be<br />
used to cancel the current BPM reading.<br />
TAP - Tempo Edit: To enter a BPM rate from an ‘IDLE’ condition (no audio beat detected) use your finger to tap in<br />
a tempo on the TAP button (within the current BPM range). After 4- 6 taps the tempo will be shown on the main<br />
BPM display.<br />
The TAP feature can be used to override the BPM engine if it is in 'free-wheeling’ mode only. Use a finger to tap in<br />
the new tempo. After 4- 6 taps the updated tempo will be shown on the main BPM display and the loop playback<br />
will immediately change to the new BPM rate. The TAP function can also be used to assist the BPM engine as it<br />
analyses more complex rhythm tracks. Tapping along with the tempo of the track can help the software recognise<br />
patterns within the music and so lock-in and adjust the BPM and/or synchronisation itself.<br />
NOTE: Subsequent valid beat information detected by the BPM engine will override manual changes made with the<br />
TAP function.<br />
REV<br />
[-/down]<br />
FWD<br />
[+/up]<br />
DISENGAGE<br />
ENG<strong>IN</strong>E<br />
EDIT<br />
TAP/CLEAR<br />
(*BPM RANGE)<br />
Press & hold to clear the<br />
current BPM value or tap 4-6<br />
times to enter a new BPM<br />
value<br />
CLEAR BPM: The current BPM value can be cleared (erased) at any time to allow for tempo re-calculation. This<br />
feature can be useful if the audio playback tempo changes (major pitch adjustments/new track starting) or if any<br />
unusual beat information confuses the BPM engine. To clear the current BPM reading and reset <strong>Sound</strong>BITE XL to<br />
‘IDLE’ status, press and hold down the [TAP/CLEAR] button for approximately 1 second. Four centre bars will<br />
replace the BPM reading in the main display.<br />
The BPM engine will now re-calculate the tempo however, if no new tempo is detected, the recorded loops can still<br />
be played back at the last detected BPM rate - e.g. the cleared BPM value is memorised for loop playback<br />
purposes.<br />
<strong>Sound</strong>BITE XL - DJ Loop Sampler<br />
PAGE<br />
8
Operation<br />
MANUALLY SETT<strong>IN</strong>G A BPM VALUE<br />
You can manually set a BPM value when there is no beat information available for the BPM engine or when<br />
[DISENGAGE ENG<strong>IN</strong>E] is selected. To manually set a BPM value, first ensure the BPM engine is ‘idle’ (four centre<br />
bars on display) or disengaged (BPM value flashing). Press and hold down the [RE-SAMPLE] button, then (after a<br />
one second protection period) move the [EDIT] jog dial clockwise to increment or anti-clockwise to decrement the<br />
BPM value [default setting is 100BPM from an idle condition], as shown in the following example:<br />
RE-SAMPLE<br />
REV<br />
[-/down]<br />
FWD<br />
[+/up]<br />
1: Press & hold<br />
2: Rotate to increase/<br />
decrease BPM value<br />
EDIT<br />
Default BPM = 100.0<br />
BPM<br />
incremented to...<br />
BPM<br />
New, manually set<br />
BPM value = 123.6<br />
The default value (100BPM) will only apply if the BPM engine has not previously registered a tempo value.<br />
RECORD<strong>IN</strong>G & PLAY<strong>IN</strong>G ‘CYCLIC’ <strong>LOOP</strong>S<br />
This is where you create the loop samples. You can record and playback up to 6 individual loops simultaneously,<br />
each with different beat durations in one of three loop ‘groups’. There are no input level settings to adjust as the onboard<br />
AGC takes care of all level adjustments automatically. To record perfect loops, the BPM engine must be<br />
active and registering a BPM value (you can record loops without the BPM engine but the loops will not be<br />
automatically synchronised to the input source - see “H<strong>IN</strong>TS AND TIPS” on page 17).<br />
Loop Groups - there are three loop GROUPS to choose from (as indicated on the front panel), each with its own<br />
set of six preset loop samples. Choose the most suitable group to work with before recording any loops as follows:<br />
Group 1: 1, 2, 4, 4, 8, 16 beats (default power-up group)<br />
Group 2: 1/4, 1/2, 1, 4, 8, 16 beats<br />
Group 3: 1/4, 1/2, 1, 4, 4, 32 beats<br />
To change the GROUP setting, first press & hold the [ERASE ALL] button. After the erase function message has<br />
cleared, the display will show the current GROUP setting. Still holding down the [ERASE ALL] button, you can now<br />
use the [EDIT] jog dial (within 3 secs) to select a new GROUP as shown in the following example:<br />
1: Press & hold<br />
ERASE ALL<br />
(SELECT)<br />
1<br />
2<br />
3<br />
GROUP<br />
IMPORTANT NOTE: when changing the GROUP<br />
EDIT<br />
setting you must move the [EDIT] jog dial within 3 secs<br />
of the ERASE function message appearing. If the [EDIT] control is not moved within this period the software will<br />
automatically step forwards and set FILTER STRAIGHT-THRU mode - see page 13 for further details.<br />
PAGE<br />
9<br />
REV<br />
[-/down]<br />
FWD<br />
[+/up]<br />
<br />
Within 3 seconds!<br />
2: When display<br />
shows ‘GrP1’ rotate<br />
to change loop<br />
GROUP setting<br />
OWNERS MANUAL
Operation<br />
Default GROUP setting = GrP 1<br />
BPM<br />
incremented to...<br />
BPM<br />
Example: new GROUP = GrP3<br />
To view the current GROUP setting without erasing any loops simply press & hold the [RE-SAMPLE] button at any<br />
time. The main display will now show the current GROUP setting. To cancel the GROUP view mode simply release<br />
the [RE-SAMPLE] button (then press the button once again to cancel RE-SAMPLE mode if required).<br />
Recording Loops - Only one loop can be recorded at a time. From boot-up (or after pressing the [ERASE ALL]<br />
button/changing the GROUP setting) the six loop pads will be empty. Empty loop pads are shown by flashing blue<br />
indicators in the [<strong>LOOP</strong>] buttons. To start recording a loop, first ensure the display is reading a BPM value (wait a<br />
few seconds for the BPM value to settle to ensure accurate synchronisation), then simply press the desired [<strong>LOOP</strong>]<br />
button once, as shown in the following example:<br />
Recording a 4 beat loop...<br />
1<br />
1/4 1/4<br />
2<br />
1/2 1/2<br />
BEATS<br />
BEATS<br />
Indicators flash<br />
when loop pads<br />
are empty<br />
4<br />
1 1<br />
BEATS<br />
4<br />
4 4<br />
BEATS<br />
Press once to start recording<br />
a 4 beat loop<br />
8 16<br />
8 4<br />
16 32<br />
BEATS<br />
BEATS<br />
During the sampling process the main display will show a count-down of the number of beats in the loop, as shown<br />
in the following example:<br />
BPM<br />
BPM<br />
BPM<br />
BPM<br />
When the recording cycle is complete the display will revert back to its normal BPM readout. The recorded loop will<br />
now play back automatically, the indicator in the button staying ON to show that the loop pad contains a sample. To<br />
mute the sample playback simply press the [<strong>LOOP</strong>] button again, the indicator in the button now goes OFF to show<br />
that the loop is muted. Toggling the button on/off will play/mute the loop accordingly.<br />
Recording Start Point - the exact timing of when you press the button is not critical with regard to loop creation<br />
e.g. if you start recording a 4 beat loop slightly after the beat (missing a down-beat kick drum for instance),<br />
<strong>Sound</strong>BITE XL will automatically create a perfect 4 beat loop and include the last kick drum of the phrase instead<br />
(i.e. the loop will be in synchronisation and have a precise 4 beat duration no matter where you start the recording).<br />
This feature allows you to easily capture and loop any section of the audio track, as shown in the following<br />
example:<br />
A four beat section of a song...<br />
Bar 1 >>>>>>>>>>>>>>>>>>>>>>>>>>>>>>>>>>>>>>>>>>>>>>>>>>>Bar 2 >>>><br />
Beats:<br />
1 2 3 4 1<br />
Kick Drum:<br />
Vocal: Ohhh~~yeeaahhhhhhhhhh Get ‘n the loop!<br />
<strong>Sound</strong>BITE XL - DJ Loop Sampler<br />
PAGE<br />
10
Operation<br />
A four beat loop of the same section - recording triggered just before the 1st beat...<br />
Beats:<br />
1<br />
2<br />
3<br />
4<br />
Kick Drum:<br />
Vocal: yeeaahhhhhhhhhh Get ‘n the<br />
1<br />
A four beat loop of the same section - recording triggered 1/2 beat before the 1st beat...<br />
Beats:<br />
1<br />
2<br />
3<br />
4<br />
Kick Drum:<br />
Vocal: Ohhh~~yeeaahhhhhhhhhh Get ‘n the<br />
1<br />
A four beat loop of the same section - recording triggered 1/2 beat after the 1st beat...<br />
Beats:<br />
1<br />
2<br />
3<br />
4<br />
1<br />
Kick Drum:<br />
Vocal: hhhhhhhh Get ‘n the loop!<br />
Aborting the Loop Recording: You can abort the loop recording process at any time during the recording phase<br />
by simply pressing the selected [<strong>LOOP</strong>] button again.<br />
Now try recording some more loops using the other loop pads. A total of six loops can be recorded and then played<br />
back simultaneously or individually muted as desired. You can even mute/playother pre-recorded loops as another<br />
loop pad is being recorded!<br />
NOTE 1: the loop recording start point accuracy becomes more critical on the shorter 1/2 and 1/4 beat loop<br />
settings.<br />
NOTE 2: <strong>Sound</strong>BITE XL’s memory is non-volatile so please remember that all recorded loops will be lost after disconnecting<br />
the power supply.<br />
ERAS<strong>IN</strong>G <strong>LOOP</strong>S<br />
This is where you erase all the loops simultaneously. To erase all recorded loops simply press the [ERASE ALL]<br />
button and hold for approximately half a second, as shown in the following example:<br />
ERASE ALL<br />
Press & hold for 0.5 sec to<br />
ERASE ALL recorded loops<br />
BPM<br />
‘ErAS’ = All loops erased<br />
When the ERASE ALL function has been completed the display will briefly show ‘ErAS’. All previous recorded loops<br />
have now been erased. The six loop pads are empty and ready for the next recording session.<br />
PAGE<br />
11<br />
OWNERS MANUAL
Operation<br />
SAMPLE MODE<br />
This is where you change the way <strong>Sound</strong>BITE XL plays back samples. In addition to the normal [CYCLIC] mode<br />
described in the previous chapter <strong>Sound</strong>BITE XL also features two additional playback modes, namely [FILTER]<br />
and [REVERSE]. To select a different sample mode, use the front panel [SAMPLE MODE] switch as shown in the<br />
following examples:<br />
SAMPLE MODE SAMPLE MODE SAMPLE MODE<br />
CYCLIC / FILTER / REVERSE CYCLIC / FILTER / REVERSE CYCLIC / FILTER / REVERSE<br />
CYCLIC mode selected FILTER mode selected REVERSE mode selected<br />
FILTER MODE: With the switch set to the [FILTER] position you can use the on-board analog-style filter effects to<br />
modify the loop playback in real-time. There are three types of filter available, namely:<br />
LOW-PASS FILTER - this progressively removes the higher frequencies (Example: use this filter type to create<br />
popular filter sweep effects, taking the loop playback sound down to just a pumping bass element and back up<br />
again)<br />
HIGH-PASS FILTER - this progressively removes the lower frequencies (Example: use this filter type to modify the<br />
sound or reduce low-end frequencies from the loop output to prevent bass overload in your audio+loop mix)<br />
BAND-PASS FILTER - this removes lower and higher frequencies leaving a ‘band’ of passable frequencies<br />
(Example: use this filter type to isolate a particular frequency section of the audio track)<br />
In FILTER mode the [EDIT] jog dial becomes the master control for editing the FILTER sound (NOTE: loop synchronisation<br />
adjustments to ALL <strong>LOOP</strong>S as described on page 16 cannot be made in this mode). The default setting<br />
for the FILTER is OFF (after power-up or ERASE-ALL). To progressively start applying either the HIGH-PASS or<br />
LOW-PASS filter effects, rotate the [EDIT] jog dial as shown below:<br />
Rotate clockwise<br />
to increase<br />
amount of<br />
HI-PASS filter<br />
effect<br />
Rotate anticlockwise<br />
to<br />
increase amount<br />
of LOW-PASS<br />
filter effect<br />
REV<br />
[-/down]<br />
FWD<br />
[+/up]<br />
REV<br />
[-/down]<br />
FWD<br />
[+/up]<br />
EDIT<br />
EDIT<br />
The main display will now show the current FILTER setting, as shown in the following examples:<br />
LOW-PASS FILTER - [EDIT] control moved anti-clockwise from default<br />
BPM<br />
Default level setting = OFF Example: LOW-PASS filter set to 37<br />
decremented to...<br />
BPM<br />
HIGH-PASS FILTER - [EDIT] control moved clockwise from default<br />
BPM<br />
Default level setting = OFF Example: HIGH-PASS filter set to 45<br />
incremented to...<br />
BPM<br />
<strong>Sound</strong>BITE XL - DJ Loop Sampler<br />
PAGE<br />
12
Operation<br />
RANGE = 01 > 99 for all three filter types<br />
The BAND-PASS filter is accessed between the maximum LOW-PASS and HIGH-PASS filter settings e.g. rotating<br />
the [EDIT] jog dial past the ‘Lo99’ or ‘hi99’ settings will ‘morph’ the filter effect into the BAND-PASS filter type, the<br />
display now changing to show the BAND-PASS filter setting, as shown in the following example:<br />
BAND-PASS FILTER - [EDIT] control moved anti-clockwise past maximum LOW-PASS filter setting<br />
Moving from LOW-PASS<br />
filter type into BAND-PASS<br />
area<br />
BPM<br />
morphs into...<br />
BPM<br />
Example: BAND-PASS filter set to 01<br />
Moving the [EDIT] jog dial onwards through the maximum BAND-PASS filter setting (bp99) morphs the filter type<br />
into the HIGH-PASS filter type. In this respect the three filter types are seamlessly joined together in a continuous<br />
‘3-sectioned cycle’ allowing you to move between LOW, BAND and HIGH filter types by simply rotating the [EDIT]<br />
jog dial continuously in either direction.<br />
FILTER RESONANCE: This feature allows you to adjust the level of filter RESONANCE. Filter resonance is a<br />
boost in level of the frequencies around the filter frequency cut-off point. Increasing the RESONANCE value will<br />
add more harmonic dynamics to the sound. To adjust the filter RESONANCE setting, first press and hold the<br />
[DISENGAGE ENG<strong>IN</strong>E] button and then rotate the [EDIT] jog dial, as shown in the following example:<br />
1.Press & hold to<br />
access filter<br />
RESONANCE<br />
function<br />
REV<br />
[-/down]<br />
DISENGAGE<br />
ENG<strong>IN</strong>E<br />
EDIT<br />
FWD<br />
[+/up]<br />
2. Rotate clockwise<br />
to increase<br />
or anti-clockwise<br />
to decrease the<br />
filter RESONANCE<br />
level<br />
BPM<br />
3: Example: display shows filter<br />
RESONANCE setting ‘07’<br />
RANGE = 01(min) > 32 (max)<br />
The filter settings are memorized during normal operation so you can switch between sample modes without losing<br />
a particular filter setup. The [ERASE-ALL] function resets the FILTER setting to OFF.<br />
REVERSE MODE: When the [SAMPLE MODE] switch is set to the [REVERSE] position, loop recording and<br />
playback will automatically be made in reverse. Filter levels set in FILTER mode will also be applied to the playback<br />
sound in REVERSE mode.<br />
STRAIGHT - THRU FILTER MODE<br />
In this special mode, <strong>Sound</strong>BITE XL operates as an ‘insert’ effects module allowing you to use the on-board filter<br />
effects to process the incoming audio signal in real-time before feeding it straight back to your mixing desk input.<br />
NOTE: The BPM engine and loop sampling functions are de-activated in this mode and any pre-recorded loop<br />
samples will be auto-erased when it is selected.<br />
Before selecting STRAIGHT-THRU filter mode first ensure the input channel level control on your mixing desk is<br />
turned down. Now, press & hold the [ERASE ALL] button for 3.5 seconds without touching any of the other<br />
<strong>Sound</strong>BITE XL buttons/controls. During this period the following functions/messages will automatically occur:<br />
Function Display Message Duration<br />
ERASE ALL ‘ErAS’ 0.5 seconds<br />
GROUP SET ‘GrP1’ 3 seconds<br />
PAGE<br />
13<br />
OWNERS MANUAL
Operation<br />
NOTE: If no loops are recorded the ERASE ALL display/function will not occur.<br />
STRAIGHT-THRU filter mode will now be activated, as confirmed by the following display:<br />
BPM<br />
‘FiLt’ shown continuously = Filter ‘STRAIGHT-THRU’<br />
mode actived<br />
The audio signal connected to the rear panel [<strong>IN</strong>PUT] connectors will now be routed (via the DSP filter effect)<br />
directly to the rear panel [<strong>LOOP</strong>S OUT] connectors. Make any necessary level re-adjustments to the level controls<br />
on your mixing desk. The <strong>Sound</strong>BITE XL is now operating purely as a real-time filter effects module!<br />
Use the [EDIT] jog dial to change the sound by altering the filter settings as previously described on pages 12/13.<br />
The normal [RE-SAMPLE] and 6 x [<strong>LOOP</strong>] button functions are all de-activated in this mode however, these<br />
buttons can now be used to access additional FILTER effect parameters as follows:<br />
<strong>IN</strong>PUT LEVEL: the analog input signal level can be adjusted to ensure the straight-thru signal does not overload<br />
and cause distortion. The software automatically sets a default level when STRAIGHT-THRU FILTER mode is<br />
activated. To adjust the input signal level, press and hold the [RE-SAMPLE] button and then rotate the [EDIT] jog<br />
dial, as shown in the following example:<br />
1.Press & hold to<br />
set <strong>IN</strong>PUT level<br />
RE-SAMPLE<br />
2. Rotate [EDIT]<br />
jog dial...<br />
BPM<br />
3. Display shows <strong>IN</strong>PUT level<br />
setting<br />
RANGE = 00 (min) > 99 (max)<br />
FILTER MEMORY: the 6 x [<strong>LOOP</strong>] buttons can be used as ‘hot-keys’ to memorize filter settings making it easy to<br />
jump to a favorite filter starting-point. To set the filter memory hot-keys simply rotate the [EDIT] jog dial until you find<br />
the preferred filter setting and then press and hold (for approx 0.5 seconds) one of the 6 loop buttons. The blue<br />
indicator in the pressed button will light to confirm the filter setting has been stored. Try setting various filter values<br />
on different buttons and then switch between them to hear the filter ‘jump’ to the next setting.<br />
To cancel STRAIGHT-THRU FILTER mode simply move the [SAMPLE MODE] switch to the CYCLIC or REVERSE<br />
positions or alternatively, press & hold the [ERASE ALL] button for 0.5 seconds (the display shows ‘OFF’ briefly to<br />
confirm this operation). BPM display and loop recording functionality is now re-activated.<br />
NOTE: remember, you cannot record/playback loop samples or use the BPM engine in STRAIGHT-THRU FILTER<br />
mode!<br />
RE-SAMPL<strong>IN</strong>G <strong>LOOP</strong>S<br />
This is where you re-sample (replace) existing loops individually without erasing all the loops as detailed in<br />
previous sections. You can also use this mode to record empty loop pads if desired. To enter this mode press the<br />
[RE-SAMPLE] button once, as shown in the following example:<br />
RE-SAMPLE<br />
‘rEc’ = RE-SAMPLE mode active<br />
BPM<br />
Press once = RE-SAMPLE mode<br />
The indicators in the [<strong>LOOP</strong>] pads will now flash. Un-recorded loop pad indicators will flash alternately to those loop<br />
pads that contain recorded samples to identify the two different conditions, as shown in the following example:<br />
<strong>Sound</strong>BITE XL - DJ Loop Sampler<br />
PAGE<br />
14
Operation<br />
Example = these loop<br />
pads have loops recorded -<br />
indicators flash at different<br />
time to other ‘empty’ loop<br />
pads<br />
4<br />
1 1<br />
BEATS<br />
4<br />
4 4<br />
BEATS<br />
8 16<br />
8 4<br />
16 32<br />
BEATS<br />
BEATS<br />
To re-sample or record a loop, simply press the desired [<strong>LOOP</strong>] button once (whether it is pre-recorded or empty).<br />
The main display will show a count-down of the number of beats in the loop whilst the sample is recorded as with<br />
normal record mode. When the recording process is complete, re-sample mode is automatically cancelled, the<br />
main display reverting to show the BPM value.<br />
O<strong>THE</strong>R <strong>LOOP</strong> EDIT FEATURES<br />
These additional features allow you to control the output level of the loop samples and vary the synchronisation of<br />
the loops in relation to the incoming audio.<br />
<strong>LOOP</strong> OUTPUT LEVEL<br />
When a loop has been recorded you can adjust its output level if desired - e.g. the Auto Gain Control may boost<br />
quieter passages and so this feature lets you trim the level to suit. To boost/cut the output level of a loop, first press<br />
and hold down the [<strong>LOOP</strong>] button when it is in PLAY mode (indicator ON), as shown in the following example:<br />
8 16<br />
8 4 16 32<br />
BEATS<br />
BEATS<br />
REV<br />
[-/down]<br />
FWD<br />
[+/up]<br />
Rotate to increase/<br />
decrease loop volume<br />
Press & hold in PLAY mode<br />
(indicator ON) to enter<br />
‘LEVEL TRIM’ mode<br />
EDIT<br />
Default level setting = 0dB<br />
BPM<br />
incremented to...<br />
BPM<br />
Example: new level = +4 dB<br />
RANGE = -20dB to +6dB (due to display limitations the two lowest settings are indicated as -EdB (-16) and -FdB<br />
(-20)<br />
To increase/decrease the volume simply rotate the [SHIFT <strong>LOOP</strong>S/EDIT] jog dial whilst still holding down the<br />
[<strong>LOOP</strong>] button. To exit this mode simply release the [<strong>LOOP</strong>] button.<br />
<strong>LOOP</strong> SYNCHRONISATION ADJUSTMENTS - <strong>IN</strong>DIVIDUAL <strong>LOOP</strong>S<br />
You can use this feature to manually adjust the synchronisation of each loop independently. This may be necessary<br />
if the BPM engine loses input beat information during a track and the loop starts to drift-out of synchronisation or<br />
you may wish to creatively move the relative position of individual loops (try moving a loop half a beat compared to<br />
the input audio/other loops to achieve a new syncopated rhythm).<br />
PAGE<br />
15<br />
OWNERS MANUAL
Operation<br />
To adjust the synchronisation point of an individual loop, first press and hold down the [<strong>LOOP</strong>] button when it is in<br />
MUTE mode (indicator OFF), as shown in the following example:<br />
8 16<br />
8 4 16 32<br />
BEATS<br />
BEATS<br />
Press & hold in MUTE mode<br />
(indicator OFF) to enter<br />
‘SYNC ADJUST’ mode<br />
The display will now show the following:<br />
BPM<br />
Default sync setting = 1/1<br />
(beat 1, measure 1)<br />
Beat<br />
Measure<br />
Each loop is divided into 32 measures per beat so, in this example having pressed the [16 BEAT <strong>LOOP</strong>] button, the<br />
two left-hand digits will show the beat position (1 to 16) whilst the two right-hand digits will show the measure<br />
position within each of the 16 beats, as shown in the following example:<br />
REV<br />
[-/down]<br />
FWD<br />
[+/up]<br />
Rotate to advance/<br />
retard individual<br />
loop sync point<br />
EDIT<br />
Default sync setting = 1/1<br />
(beat 1, measure 1)<br />
BPM<br />
moved to...<br />
BPM<br />
Example: new sync point =<br />
beat 8 / measure24<br />
To increment/decrement the loops’ sync point simply rotate the [SHIFT <strong>LOOP</strong>S/EDIT] jog dial whilst still holding<br />
down the [<strong>LOOP</strong>] button.<br />
TIME STRETCH<strong>IN</strong>G - As the loop synchronisation is adjusted, the loop playback will be automatically ‘time<br />
stretched’ (playback speed slowed down or speeded up) whilst keeping the same pitch. You can use this feature for<br />
special effects during loop playback.<br />
To exit this mode simply release the [<strong>LOOP</strong>] button.<br />
Beat Measure Beat Measure<br />
<strong>LOOP</strong> SYNCHRONISATION ADJUSTMENT - ALL <strong>LOOP</strong>S<br />
You can adjust the synchronisation point of ALL recorded loops simultaneously in a similar manner. With more than<br />
one loop recorded, simply move the [SHIFT <strong>LOOP</strong>S/EDIT] jog dial to adjust the overall synchronisation setting (do<br />
not press any buttons before adjusting the [SHIFT <strong>LOOP</strong>S/EDIT] jog dial). The display will show the same<br />
beat/measure indication as previously described whilst the jog dial is rotated and time stretching will be applied to<br />
the audio playback.<br />
IMPORTANT NOTE: this function is dis-abled in FILTER mode. To make synchronisation adjustments to ALL<br />
<strong>LOOP</strong>S simultaneously first ensure that you have selected CYCLIC or REVERSE sample modes.<br />
<strong>Sound</strong>BITE XL - DJ Loop Sampler<br />
PAGE<br />
16
Hints and Tips<br />
RECORD<strong>IN</strong>G <strong>LOOP</strong>S WITHOUT <strong>THE</strong> BPM ENG<strong>IN</strong>E<br />
You can still record loops, even if there is no beat information available to trigger the BPM engine. First, manually<br />
set the BPM value (see page 9), then press the [RE-SAMPLE] button and [<strong>LOOP</strong>] button to create the nonsynchronised<br />
loops.<br />
DIS-ENGAG<strong>IN</strong>G <strong>THE</strong> BPM ENG<strong>IN</strong>E - A FEW APPLICATIONS<br />
As you cue and/or move the pitch slider back and forth whilst monitoring in the headphones, all this musical and<br />
rhythmical information gets transmitted to <strong>Sound</strong>BITE XL via PFL. Naturally this cueing 'tempo' you create is<br />
irregular, sending small fluctuations to <strong>Sound</strong>BITE XL, which will intelligently track the BPM and time stretch any<br />
stored samples accordingly.<br />
The times when you would not want <strong>Sound</strong>BITE XL to do this are in the first two examples below. Imagine beat<br />
mixing against a track on a turntable whose tempo constantly changes with small fluctuations, it would be nearly<br />
impossible. Therefore, you can instruct the sampler not to analyse tempo changes (see page 7, Disengaging the<br />
BPM engine ) and no matter how fast/slow or in which direction you spin the forthcoming track, <strong>Sound</strong>BITE XL will<br />
play any samples back at a fixed tempo, steady as a rock.<br />
LEARN<strong>IN</strong>G <strong>TO</strong> MIX - You can use <strong>Sound</strong>BITE XL as an aid to enhance your beat mix skills. It's always easier to<br />
practice beat mixing against a clean 4/4 rhythm with minimal melody/vocals. Now you can have an infinite looping<br />
clean sample of your choice to practice mixing against. Just record/playback the loop and dis-engage the BPM<br />
engine.<br />
MIX<strong>IN</strong>G V<strong>IN</strong>YL <strong>TO</strong> V<strong>IN</strong>YL US<strong>IN</strong>G ONE TURNTABLE - Most dance tracks are structured to have a clean<br />
introduction (intro) and exit (outro) to facilitate mixing and to avoid melody clashes. Now you can sample either the<br />
start or the end of the track (we recommend 8, 16 or 32 beat loops) and, using your crossfader, blend the outgoing<br />
track into your long sample, put a new record on the same turntable and mix against the sample. Just<br />
record/playback the loops and dis-engage the BPM engine. This also addresses...<br />
<strong>THE</strong> DREADED TURNTABLE/STYLUS FAILURE - You can use <strong>Sound</strong>BITE XL as a security blanket in the<br />
unfortunate event of a turntable failing.<br />
SO, RULE OF THUMB -<br />
<strong>Sound</strong>BITE XL sampling from Master Track - Do not disengage the BPM engine.<br />
Beat Mixing against <strong>Sound</strong>BITE XL - Disengage before attempting to attain beat sync on next track, then reengage<br />
before recording new samples.<br />
O<strong>THE</strong>R USES - (taken from IDJ magazine)<br />
“SCRATCH GOD - Just imagine this little beauty in the hands of someone like the Scratch Perverts - the<br />
possibilities are awesome! For home scratchers, on a basic level you could set up breaks to scratch over. But<br />
really, for the turntablist, this unit is an extra deck, from which you can drop in individual scratches, samples or<br />
beats - this could take turntablism to a whole new level.”<br />
“ACAPELLAS - So for you house and garage DJ’s, how about having a bunch of vocal acapellas at your fingertips,<br />
ready to drop into the mix at any time. Record the samples on the fly and drop them back in as you build that<br />
ultimate roof-raising climax!”<br />
Special thanks to IDJ magazine - Note: quotations are taken from review of previous model in this range.<br />
Tips for getting the very best out of your <strong>Sound</strong>BITE XL:<br />
*When triggering multiple samples simultaneously, turn the bass EQ anticlockwise on the mixer channel used by<br />
<strong>Sound</strong>BITE XL (due to the fantastic accuracy of the <strong>Sound</strong>BITE it’s possible to have the equivalent of 7 kick drums<br />
(the master track + 6 sample banks) playing simultaneously). Alternatively, use the on-board high-pass filter to<br />
attenuate the lower frequencies.<br />
continued over...<br />
PAGE<br />
17<br />
OWNERS MANUAL
Specification<br />
*Because audio input/loop sync can drift as time progresses due to factors such as fluctuating deck drive speed,<br />
slipmat and the quality of the acetate/vinyl record (the master track) itself, you may wish to PFL the individual<br />
sample (or all recorded [<strong>LOOP</strong>] pads) and realign using the [EDIT] jog dial. <strong>Sound</strong>BITE XL will have time stretched<br />
the samples for you to play at the same speed as the master output but you will need to beat mix the kick/snare/hi<br />
hats as you would on a real turntable.<br />
*On shorter loop lengths, you can shift the sample to play on the off beat relative to where it is on the original track<br />
by rotating the [EDIT] jog dial in either direction 16 steps ( i.e. from beat 1/measure 1 to beat 1/measure 16)<br />
<strong>Sound</strong>BITE XL SPECIFICATION<br />
Sample rate/Conversion resolution:<br />
96kHz / 24 bit<br />
Polyphony:<br />
6 sample loops<br />
Effects:<br />
Low-Pass Filter<br />
High-Pass Filter<br />
Band-Pass Filter<br />
Sample loop length:<br />
Grp1:- 1, 2, 4, 4, 8, 16 (default)<br />
Grp2:- 1/4, 1/2, 1, 4, 8, 16<br />
Grp3:- 1/4, 1/2, 1, 4, 4, 32<br />
BPM range:<br />
60 - 230BPM (3 ranges)<br />
Connections:<br />
Audio input, Loops output, Monitor output, AC adapter input<br />
Power Supply:<br />
9vDC 500mA minimum - Output plug = 2.1mm wired centre pin +<br />
Dimensions:<br />
202(H)x106(W)x30(D)mm<br />
8”(H)x 4 1/4”(W)x 1 1/4”(D) inches<br />
Weight:<br />
1Kg (2lb 4oz)<br />
Accessories (included):<br />
Connecting Cables ( input -1x1/4” Jack to RCA ) (output -1xsingle RCA to twin RCA )<br />
Mounting kit<br />
* Specification and /or appearance subject to change without prior notice due to product improvement.<br />
<strong>Sound</strong>BITE XL - DJ Loop Sampler<br />
PAGE<br />
18