redsound voyager 1 ownersmanual.pdf - bleeps and peeps
redsound voyager 1 ownersmanual.pdf - bleeps and peeps
redsound voyager 1 ownersmanual.pdf - bleeps and peeps
You also want an ePaper? Increase the reach of your titles
YUMPU automatically turns print PDFs into web optimized ePapers that Google loves.
OPERATION<br />
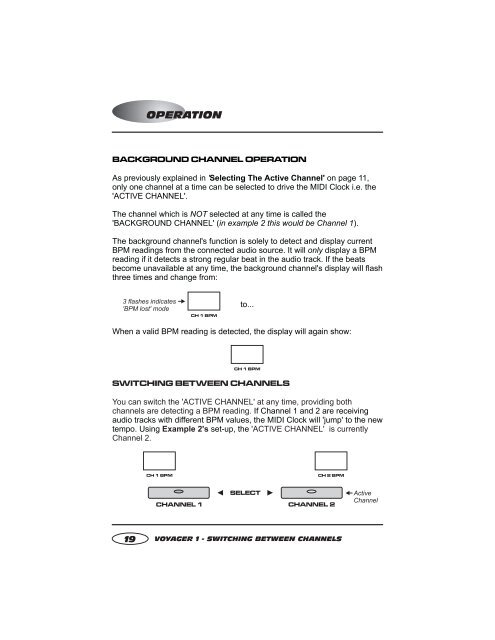
BACKGROUND CHANNEL OPERATION<br />
As previously explained in ' Selecting The Active Channel' on page 11,<br />
only one channel at a time can be selected to drive the MIDI Clock i.e. the<br />
'ACTIVE CHANNEL'.<br />
The channel which is NOT selected at any time is called the<br />
'BACKGROUND CHANNEL' ( in example 2 this would be Channel 1).<br />
The background channel's function is solely to detect <strong>and</strong> display current<br />
BPM readings from the connected audio source. It will only display a BPM<br />
reading if it detects a strong regular beat in the audio track. If the beats<br />
become unavailable at any time, the background channel's display will flash<br />
three times <strong>and</strong> change from:<br />
3 flashes indicates<br />
'BPM lost' mode<br />
CH1BPM<br />
to...<br />
When a valid BPM reading is detected, the display will again show:<br />
CH1BPM<br />
SWITCHING BETWEEN CHANNELS<br />
You can switch the 'ACTIVE CHANNEL' at any time, providing both<br />
channels are detecting a BPM reading. If Channel 1 <strong>and</strong> 2 are receiving<br />
audio tracks with different BPM values, the MIDI Clock will 'jump' to the new<br />
tempo. Using Example 2's set-up, the 'ACTIVE CHANNEL' is currently<br />
Channel 2.<br />
CH 1 BPM<br />
CH2BPM<br />
CHANNEL 1<br />
SELECT<br />
CHANNEL 2<br />
Active<br />
Channel<br />
19 VOYAGER 1 - SWITCHING BETWEEN CHANNELS


