Industrial Vane Pumps - Corken
Industrial Vane Pumps - Corken
Industrial Vane Pumps - Corken

Create successful ePaper yourself
Turn your PDF publications into a flip-book with our unique Google optimized e-Paper software.
though the pressure gauge shows no pressure. As the<br />
"refrigerated" liquid begins to warm, more gas will escape<br />
causing a dangerous condition. Take your time in bleeding<br />
your system and make proper provisions to vent or capture<br />
the gas in accordance with local regulations.<br />
ONLY A PROPERLY TRAINED INDIVIDUAL<br />
SHOULD BE ALLOWED TO BLEED A PUMPING<br />
SYSTEM.<br />
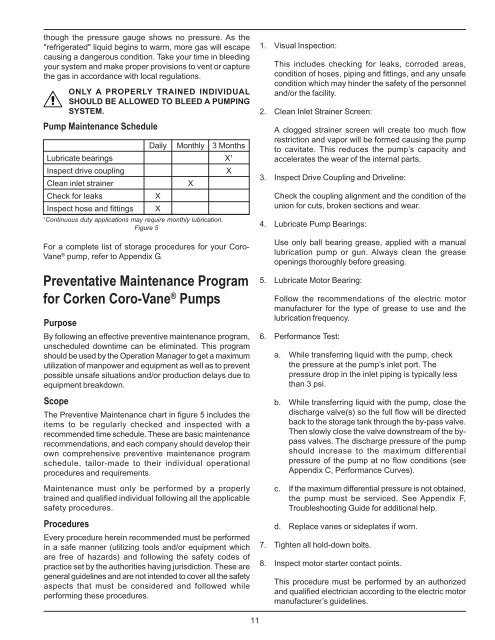
Pump Maintenance Schedule<br />
Daily Monthly 3 Months<br />
Lubricate bearings X 1<br />
Inspect drive coupling<br />
Clean inlet strainer<br />
Check for leaks<br />
Inspect hose and fittings X<br />
1<br />
Continuous duty applications may require monthly lubrication.<br />
Figure 5<br />
For a complete list of storage procedures for your Coro-<br />
<strong>Vane</strong> ® pump, refer to Appendix G.<br />
Preventative Maintenance Program<br />
for <strong>Corken</strong> Coro-<strong>Vane</strong> ® <strong>Pumps</strong><br />
Purpose<br />
By following an effective preventive maintenance program,<br />
unscheduled downtime can be eliminated. This program<br />
should be used by the Operation Manager to get a maximum<br />
utilization of manpower and equipment as well as to prevent<br />
possible unsafe situations and/or production delays due to<br />
equipment breakdown.<br />
Scope<br />
The Preventive Maintenance chart in figure 5 includes the<br />
items to be regularly checked and inspected with a<br />
recommended time schedule. These are basic maintenance<br />
recommendations, and each company should develop their<br />
own comprehensive preventive maintenance program<br />
schedule, tailor-made to their individual operational<br />
procedures and requirements.<br />
Maintenance must only be performed by a properly<br />
trained and qualified individual following all the applicable<br />
safety procedures.<br />
Procedures<br />
Every procedure herein recommended must be performed<br />
in a safe manner (utilizing tools and/or equipment which<br />
are free of hazards) and following the safety codes of<br />
practice set by the authorities having jurisdiction. These are<br />
general guidelines and are not intended to cover all the safety<br />
aspects that must be considered and followed while<br />
performing these procedures.<br />
X<br />
X<br />
X<br />
1. Visual Inspection:<br />
This includes checking for leaks, corroded areas,<br />
condition of hoses, piping and fittings, and any unsafe<br />
condition which may hinder the safety of the personnel<br />
and/or the facility.<br />
2. Clean Inlet Strainer Screen:<br />
A clogged strainer screen will create too much flow<br />
restriction and vapor will be formed causing the pump<br />
to cavitate. This reduces the pump’s capacity and<br />
accelerates the wear of the internal parts.<br />
3. Inspect Drive Coupling and Driveline:<br />
Check the coupling alignment and the condition of the<br />
union for cuts, broken sections and wear.<br />
4. Lubricate Pump Bearings:<br />
Use only ball bearing grease, applied with a manual<br />
lubrication pump or gun. Always clean the grease<br />
openings thoroughly before greasing.<br />
5. Lubricate Motor Bearing:<br />
Follow the recommendations of the electric motor<br />
manufacturer for the type of grease to use and the<br />
lubrication frequency.<br />
6. Performance Test:<br />
a. While transferring liquid with the pump, check<br />
the pressure at the pump’s inlet port. The<br />
pressure drop in the inlet piping is typically less<br />
than 3 psi.<br />
b. While transferring liquid with the pump, close the<br />
discharge valve(s) so the full flow will be directed<br />
back to the storage tank through the by-pass valve.<br />
Then slowly close the valve downstream of the bypass<br />
valves. The discharge pressure of the pump<br />
should increase to the maximum differential<br />
pressure of the pump at no flow conditions (see<br />
Appendix C, Performance Curves).<br />
c. If the maximum differential pressure is not obtained,<br />
the pump must be serviced. See Appendix F,<br />
Troubleshooting Guide for additional help.<br />
d. Replace vanes or sideplates if worn.<br />
7. Tighten all hold-down bolts.<br />
8. Inspect motor starter contact points.<br />
This procedure must be performed by an authorized<br />
and qualified electrician according to the electric motor<br />
manufacturer’s guidelines.<br />
11