FlexFrame Specification Guide - Steelcase
FlexFrame Specification Guide - Steelcase
FlexFrame Specification Guide - Steelcase

Create successful ePaper yourself
Turn your PDF publications into a flip-book with our unique Google optimized e-Paper software.
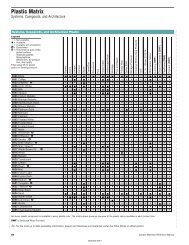
28 <strong>FlexFrame</strong> <strong>Specification</strong> <strong>Guide</strong><br />
22 5 /8" 47 15 /16" 64 7 /16" 80 15 /16"<br />
<strong>FlexFrame</strong> <strong>Specification</strong> <strong>Guide</strong> 29<br />
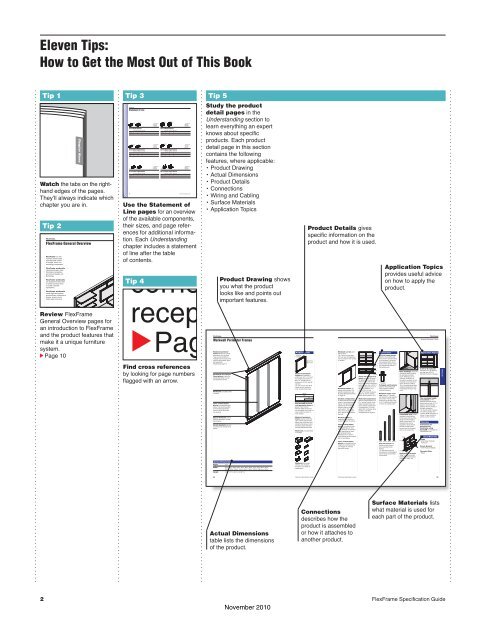
Eleven Tips:<br />
How to Get the Most Out of This Book<br />
.<br />
Tip 1<br />
Watch the tabs on the righthand<br />
edges of the pages.<br />
They’ll always indicate which<br />
chapter you are in.<br />
Tip 2<br />
<strong>FlexFrame</strong><br />
<strong>FlexFrame</strong> General Overview<br />
<strong>FlexFrame</strong> is a wall<br />
mounted, frame based,<br />
reconfigurable system<br />
of storage, skins, and<br />
technology components.<br />
<strong>FlexFrame</strong> workwalls<br />
maximize storage, make<br />
information accessible,<br />
and connect people with<br />
technology.<br />
<strong>FlexFrame</strong> workwalls<br />
are designed to blend with<br />
a variety of product lines<br />
to create complete<br />
applications.<br />
<strong>FlexFrame</strong> workwalls<br />
create high performance<br />
private offices, collaborative<br />
spaces, project rooms,<br />
media walls, and more.<br />
.<br />
Review <strong>FlexFrame</strong><br />
General Overview pages for<br />
an introduction to <strong>FlexFrame</strong><br />
and the product features that<br />
make it a unique furniture<br />
system.<br />
cPage 10<br />
Chapter Name<br />
.<br />
Tip 3<br />
Use the Statement of<br />
Line pages for an overview<br />
of the available components,<br />
their sizes, and page references<br />
for additional information.<br />
Each Understanding<br />
chapter includes a statement<br />
of line after the table<br />
of contents.<br />
Tip 4<br />
Find cross references<br />
by looking for page numbers<br />
flagged with an arrow.<br />
.<br />
Tip 5<br />
Study the product<br />
detail pages in the<br />
Understanding section to<br />
learn everything an expert<br />
knows about specific<br />
products. Each product<br />
detail page in this section<br />
contains the following<br />
features, where applicable:<br />
• Product Drawing<br />
• Actual Dimensions<br />
• Product Details<br />
• Connections<br />
• Wiring and Cabling<br />
• Surface Materials<br />
• Application Topics<br />
.<br />
<strong>FlexFrame</strong><br />
Product Drawing shows<br />
you what the product<br />
looks like and points out<br />
important features.<br />
Workwall Perimeter Frames<br />
Workwall perimeter<br />
frames define the outside<br />
dimensions of a workwall.<br />
They can be divided into<br />
multiple sections using inner<br />
vertical frame pieces, specified<br />
separately.<br />
cSpecifying, page 75<br />
Horizontal and vertical<br />
frame pieces create the<br />
outside perimeter of workwall<br />
perimeter frames.<br />
Workwalls are always wall<br />
mounted.<br />
Inner vertical frame<br />
pieces are specified separately.<br />
They must be added<br />
to the workwall perimeter<br />
frame to divide the frame<br />
into sections.<br />
Spacer brackets ensure<br />
accurate spacing of vertical<br />
frame pieces.<br />
Corner brackets connect<br />
horizontal and vertical frame<br />
pieces.<br />
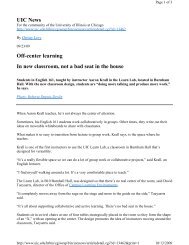
Actual Dimensions<br />
Depth 3 1⁄8"<br />
Width 247⁄8", 307⁄8", 367⁄8", 487⁄8", 547⁄8", 607⁄8", 667⁄8", 727⁄8", 787⁄8", 847⁄8", 907⁄8",<br />
96 7 ⁄8", 102 7 ⁄8", 108 7 ⁄8", 114 7 ⁄8", 120 7 ⁄8", 126 7 ⁄8", 132 7 ⁄8", 138 7 ⁄8", or 144 7 ⁄8"<br />
Height 22 5 ⁄8", 47 15 ⁄16", 64 7 ⁄16", or 80 15 ⁄16"<br />
Actual Dimensions<br />
table lists the dimensions<br />
of the product.<br />
Product Details<br />
24"W to<br />
144"W<br />
22 5 /8"H to<br />
80 15 /16"H<br />
Workwall perimeter<br />
frames are available in<br />
widths from 24" to 144" and<br />
four heights from 22 5 /8" to<br />
8015/16". Frames can be<br />
divided into 24", 30", and 36"<br />
sections.<br />
Tip: The 24", 30", and 36"W<br />
frames do not require an<br />
inner vertical frame piece.<br />
60 7 /8"<br />
60"<br />
30"<br />
Overall width of workwall<br />
perimeter frame is<br />
greater than nominal.<br />
Nominal width dimensions<br />
are calculated from center of<br />
outer vertical to center of<br />
outer vertical.<br />
Workwall perimeter<br />
frame consists of left and<br />
right outside vertical frame<br />
pieces, top and bottom horizontal<br />
frame pieces, corner<br />
brackets, spacer brackets,<br />
and wall attachment strips.<br />
Workwalls are assembled<br />
in the field.<br />
Workwall can accept<br />
shelves, bins, drawers,<br />
and skins in a variety of<br />
combinations.<br />
.<br />
Product Details gives<br />
specific information on the<br />
product and how it is used.<br />
.<br />
Connections<br />
describes how the<br />
product is assembled<br />
or how it attaches to<br />
another product.<br />
Application Topics<br />
provides useful advice<br />
on how to apply the<br />
product.<br />
<strong>FlexFrame</strong><br />
Workwall Perimeter Frames<br />
Connections<br />
Application Topics<br />
Workwall can be used<br />
without skins.<br />
2 5 /8"<br />
Vertical frame pieces<br />
Tip: If skins are not specified,<br />
use wire management<br />
attach to the building wall<br />
and carry the structural load<br />
of the workwall. Horizontal<br />
cut-out covers if wire routing<br />
frame pieces attach to the<br />
is needed.<br />
vertical frame pieces and do<br />
not mechanically attach to<br />
the building wall.<br />
Base<br />
3 1 /8"<br />
molding A 647/16"H workwall<br />
mounted 13/16" off the floor<br />
Base moldings should be<br />
2 9 /16"<br />
will align with 65 5 /8"H<br />
considered when locating<br />
Elective Elements 6 storage.<br />
the workwall perimeter<br />
2 9 /16"<br />
frame. Moldings can be<br />
removed, trimmed to fit<br />
There will always be a<br />
around the workwall, or the<br />
1 3 /16"<br />
space between the top of<br />
workwall can be mounted<br />
the uppermost component<br />
T-bracket<br />
above the base molding.<br />
and the frame and the bot-<br />
T-shaped wall brackets Tip: If mounted above base<br />
tom of the lowest component<br />
attach to the building wall molding misalignment with<br />
and the frame. For a 22 5 /8"H<br />
using customer/installer freestanding furniture may<br />
frame the space is 2 9 /16" at<br />
supplied fasteners.<br />
occur.<br />
Workwall frames are the top and bottom. For<br />
always wall-mounted. For 47 15 /16", 64 7 /16", and<br />
Workwall frame verti-<br />
specific requirements see 80 15 /16"H frames the space<br />
cals attach to T-shaped<br />
Building Wa l Requirements at the top is 2 5 /8" and the<br />
wall brackets using supplied<br />
on page 32.<br />
space at the bottom is 3 1 /8".<br />
set screws. The top most<br />
The maximum length<br />
screw will go through a slot<br />
of workwall is 144".<br />
Section configuration Workwall components<br />
in the T-shaped wall bracket<br />
Multiple workwalls can be<br />
is determined during specification<br />
of workwall perimeter 81/4" vertical module. Each<br />
allow for segmentation on a<br />
to serve as a safety catch.<br />
placed side by side. A 1 3 /16"<br />
space is recommended<br />
frames. The specification height workwall frame can<br />
determines the number of hold a specific combination<br />
between the two frames to<br />
facilitate installation.<br />
sections and the width of of components. For more<br />
Tip: Overa l width of perime-<br />
each section. The actual detail refer to Shelves, Bins,<br />
order of the sections from Drawers, and Skins<br />
ter frame is greater than<br />
nominal. Width dimension is<br />
left to right is determined in Arrangements on page 42.<br />
A threaded strip comes<br />
center of outer vertical to<br />
the field.<br />
installed in each vertical<br />
center of outer vertical.<br />
frame piece and has holes<br />
Section widths are<br />
along its entire length to<br />
measured from center of<br />
attach components. The<br />
Planning<br />
vertical to center of vertical.<br />
threaded strip can be<br />
adjusted to level shelves. Instructions for<br />
Outside vertical frame planning with<br />
Inner vertical frame<br />
pieces have the threaded <strong>FlexFrame</strong> using<br />
pieces are ordered sepa-<br />
strip on the inside only. AutoCAD are available on<br />
rately depending on how<br />
in2.steelcase.com.<br />
many sections are selected<br />
when specifying the workwall<br />
perimeter frame.<br />
Additional inner vertical<br />
1 3 /16"<br />
Surface Materials<br />
frame pieces can be ordered<br />
Frame<br />
later to reconfigure.<br />
1 3 /16"<br />
• 8043 Clear Anodized<br />
Inner vertical frame<br />
Aluminum<br />
Four set screws are<br />
pieces are available in four<br />
visible on both sides of<br />
heights to coincide with the<br />
Corner Bracket<br />
every workwall frame<br />
four heights of workwall<br />
• 4799 Platinum Metallic<br />
vertical.<br />
perimeter frames.<br />
Tip: Set screws may be 1 3 /16"<br />
Threaded Strip<br />
concealed on inside edge of<br />
frame vertical by workwa l Clearance of at least •Black<br />
components.<br />
13/16" is recommended<br />
between workwall frames<br />
and floors, walls, and<br />
ceilings.<br />
.<br />
.<br />
.<br />
.<br />
.<br />
.<br />
Surface Materials lists<br />
what material is used for<br />
each part of the product.<br />
Workwall<br />
.<br />
2 <strong>FlexFrame</strong> <strong>Specification</strong> <strong>Guide</strong><br />
November 2010