HOBO U12 Deep Ocean Temperature Logger (U12-015-03) Manual
HOBO U12 Deep Ocean Temperature Logger (U12-015-03) Manual
HOBO U12 Deep Ocean Temperature Logger (U12-015-03) Manual

Create successful ePaper yourself
Turn your PDF publications into a flip-book with our unique Google optimized e-Paper software.
<strong>HOBO</strong>® <strong>U12</strong> <strong>Deep</strong> <strong>Ocean</strong> <strong>Temperature</strong><br />
<strong>Logger</strong> (<strong>U12</strong>-<strong>015</strong>-<strong>03</strong>) <strong>Manual</strong><br />
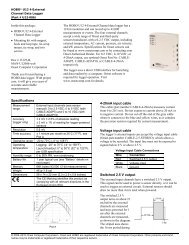
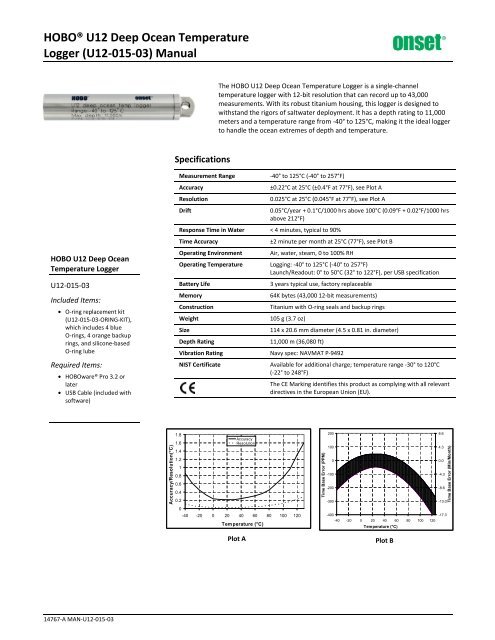
The <strong>HOBO</strong> <strong>U12</strong> <strong>Deep</strong> <strong>Ocean</strong> <strong>Temperature</strong> <strong>Logger</strong> is a single-channel<br />
temperature logger with 12-bit resolution that can record up to 43,000<br />
measurements. With its robust titanium housing, this logger is designed to<br />
withstand the rigors of saltwater deployment. It has a depth rating to 11,000<br />
meters and a temperature range from -40° to 125°C, making it the ideal logger<br />
to handle the ocean extremes of depth and temperature.<br />
Specifications<br />
<strong>HOBO</strong> <strong>U12</strong> <strong>Deep</strong> <strong>Ocean</strong><br />
<strong>Temperature</strong> <strong>Logger</strong><br />
<strong>U12</strong>-<strong>015</strong>-<strong>03</strong><br />
Included Items:<br />
• O-ring replacement kit<br />
(<strong>U12</strong>-<strong>015</strong>-<strong>03</strong>-ORING-KIT),<br />
which includes 4 blue<br />
O-rings, 4 orange backup<br />
rings, and silicone-based<br />
O-ring lube<br />
Required Items:<br />
• <strong>HOBO</strong>ware® Pro 3.2 or<br />
later<br />
• USB Cable (included with<br />
software)<br />
Measurement Range<br />
Accuracy<br />
Resolution<br />
Drift<br />
-40° to 125°C (-40° to 257°F)<br />
±0.22°C at 25°C (±0.4°F at 77°F), see Plot A<br />
0.025°C at 25°C (0.045°F at 77°F), see Plot A<br />
Response Time in Water < 4 minutes, typical to 90%<br />
Time Accuracy<br />
Operating Environment<br />
Operating <strong>Temperature</strong><br />
Battery Life<br />
Memory<br />
Construction<br />
Weight<br />
Size<br />
Depth Rating<br />
0.05°C/year + 0.1°C/1000 hrs above 100°C (0.09°F + 0.02°F/1000 hrs<br />
above 212°F)<br />
±2 minute per month at 25°C (77°F), see Plot B<br />
Air, water, steam, 0 to 100% RH<br />
Logging: -40° to 125°C (-40° to 257°F)<br />
Launch/Readout: 0° to 50°C (32° to 122°F), per USB specification<br />
3 years typical use, factory replaceable<br />
64K bytes (43,000 12-bit measurements)<br />
Titanium with O-ring seals and backup rings<br />
105 g (3.7 oz)<br />
114 x 20.6 mm diameter (4.5 x 0.81 in. diameter)<br />
11,000 m (36,080 ft)<br />
Vibration Rating Navy spec: NAVMAT P-9492<br />
NIST Certificate Available for additional charge; temperature range -30° to 120°C<br />
(-22° to 248°F)<br />
The CE Marking identifies this product as complying with all relevant<br />
directives in the European Union (EU).<br />
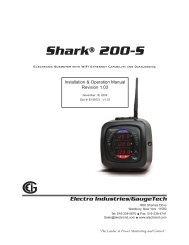
Accuracy/Resolution(°C)<br />
1.8<br />
1.6<br />
1.4<br />
1.2<br />
1<br />
0.8<br />
0.6<br />
0.4<br />
0.2<br />
0<br />
Accuracy<br />
Resolution<br />
-40 -20 0 20 40 60 80 100 120<br />
<strong>Temperature</strong> (°C)<br />
Plot A<br />
Time Base Error (PPM)<br />
200<br />
100<br />
0<br />
-100<br />
-200<br />
-300<br />
-400<br />
-40 -20 0 20 40 60 80 100 120<br />
<strong>Temperature</strong> (°C)<br />
Plot B<br />
8.6<br />
4.3<br />
0.0<br />
-4.3<br />
-8.6<br />
-13.0<br />
-17.3<br />
Time Base Error (Min/Month)<br />
14767-A MAN-<strong>U12</strong>-<strong>015</strong>-<strong>03</strong>
Connecting the <strong>Logger</strong><br />
To launch or read out the logger, use the USB cable supplied with <strong>HOBO</strong>ware to connect to the computer.<br />
<strong>HOBO</strong> <strong>U12</strong> <strong>Deep</strong> <strong>Ocean</strong> <strong>Temperature</strong> <strong>Logger</strong> <strong>Manual</strong><br />
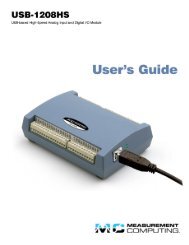
1. Remove the titanium end-cap from the logger by turning it counter-clockwise. If the cap is difficult to turn, place the stem of a small<br />
screwdriver through the hole in the end-cap for better leverage.<br />
2. Plug the large end of the cable into a USB port on the computer, and the small end into the logger as shown in the following diagram.<br />
End-cap<br />
<strong>Logger</strong><br />
USB Cable<br />
3. If the logger has never been connected to the computer before, it may take a few seconds for the new hardware to be detected.<br />
4. Open <strong>HOBO</strong>ware and click the Launch icon on the toolbar to set up the logger. Refer to the <strong>HOBO</strong>ware Help for additional details on<br />
launching.<br />
5. After the logger has started logging, you can read it out while it continues to log, stop it manually with the software, or let it record<br />
data until the memory is full. Refer to the <strong>HOBO</strong>ware Help for more details.<br />
6. After the logger is disconnected, reinstall the end-cap. To install the end-cap, press it in until it snaps in place with only the second set<br />
of O-rings showing, and then screw the end-cap into the logger housing. The end-cap must be securely in place with no visible gap<br />
between the housing and the end-cap.<br />
Note: Before opening the end-cap for read out, make sure that the logger is clean and dry. The logger should always be capped when it is<br />
not connected to a computer.<br />
Important: USB communications may not function properly at temperatures below 0°C (32°F) or above 50°C (122°F).<br />
Sample and Internal Event Logging<br />
The logger can record two types of data: samples and internal events. Samples are the sensor measurements recorded at each logging<br />
interval (for example, the temperature every minute). Internal events are independent occurrences triggered by a logger activity.<br />
Examples of events recorded asynchronously during deployment include when the logger is connected to the host, when the battery is<br />
low, and the end of a datafile once the logger is stopped. The logger stores 64K of data, and can record up to 43,000 samples.<br />
Mounting<br />
Use the 6.4 mm (0.25 in.) diameter hole in the end-cap to secure the logger to an object.<br />
Battery Information<br />
Expected battery life varies based on the temperature and the frequency at which the logger is recording data (the logging interval). With<br />
no more than 60 minutes of operation at 125°C (257°F) per day, a new battery will typically last approximately three years with logging<br />
intervals greater than one minute. Deployments in extremely cold or hot temperatures or logging intervals faster than one minute will<br />
significantly reduce battery life.<br />
The logger has the ability to report and log its own battery voltage. If the battery falls below 3.1 V, the logger will record a “bad battery”<br />
event in the datafile. If the datafile contains “bad battery” events, or if logged battery voltage repeatedly falls below 3.3 V, the battery is<br />
failing and the logger should be returned to Onset for battery replacement.<br />
Do not attempt to replace the battery. If the battery needs to be replaced, contact Onset or an Onset Authorized Dealer for factory<br />
replacement battery service.<br />
WARNING: Do not cut open, incinerate, heat above 150°C (302°F), or recharge the lithium battery. The battery may explode if the<br />
logger is exposed to extreme heat or conditions that could damage or destroy the battery case. Do not dispose of the logger or battery in<br />
fire. Do not expose the contents of the battery to water. Dispose of the battery according to local regulations for lithium batteries.<br />
Care and maintenance of the logger<br />
The logger can be permanently damaged by internal corrosion from condensation or foreign matter entering the case. The logger is<br />
shipped with installed Resilon O-rings and backup rings. The logger electronics depend on the integrity of the O-ring/backup ring seal<br />
1-800-LOGGERS 2 www.onsetcomp.com
<strong>HOBO</strong> <strong>U12</strong> <strong>Deep</strong> <strong>Ocean</strong> <strong>Temperature</strong> <strong>Logger</strong> <strong>Manual</strong><br />
for protection. Because pressure, temperature, and duration of deployment can affect O-rings and backup rings over time, it is important<br />
to inspect the rings before a new deployment. Replace the rings if they are beginning to deform in shape or if you have any doubt about<br />
the integrity of the seal. To replace the rings:<br />
1. Unscrew the end-cap and remove the orange and blue rings. You may need to use a plastic O-ring tool or similar plastic tool to<br />
remove the blue O-rings. Do not use a screwdriver or sharp metal tool as this could damage the O-ring grooves.<br />
2. Clean the two grooves on the end-cap with isopropyl alcohol.<br />
3. Lightly lubricate the blue O-rings with the silicone-based O-ring lube (included).<br />
4. Work one blue O-ring with your fingers or a plastic O-ring tool over the thread into the first O-ring groove and up into the second<br />
O-ring groove (flush with the end-cap flange). Do not use a screwdriver or sharp metal tool as this could damage the O-ring groove or<br />
the O-ring itself.<br />
5. Install the next blue O-ring over the thread and up to the flange that separates the two grooves.<br />
6. Next, install the orange backup rings below each O-ring. The backup rings are “scarf” cut to make them easier to install.<br />
7. Screw the end-cap back onto the logger. Make sure the backup rings are seated properly when the end-cap is screwed into the logger<br />
housing. The end-cap must be securely in place with no visible gap between the housing and the end-cap.<br />
Note: Static electricity may cause the logger to stop logging. To avoid electrostatic discharge, always transport the logger with its end-cap<br />
on, or in an anti-static bag. Ground yourself by touching an unpainted metal surface before handling the logger. For more information,<br />
search for “static discharge” in the FAQ section on onsetcomp.com.<br />
End-cap flange<br />
Second O-ring groove<br />
Flange separating two grooves<br />
First O-ring groove<br />
Thread<br />
O-ring: install in second O-ring groove against end-cap flange<br />
Backup ring: install in second O-ring groove against O-ring<br />
O-ring: install in first O-ring groove against flange separating two grooves<br />
Backup ring: install in first O-ring groove against O-ring<br />
End-cap with the correct order of O-rings and backup rings<br />
Assembled end-cap<br />
1-800-LOGGERS (564-4377) • 508-759-9500<br />
www.onsetcomp.com • loggerhelp@onsetcomp.com<br />
© 2011 Onset Computer Corporation. All rights reserved. Onset,<br />
<strong>HOBO</strong>, and <strong>HOBO</strong>ware are trademarks or registered trademarks of<br />
Onset Computer Corporation. All other trademarks are the property<br />
of their respective companies.<br />
14767-A MAN-<strong>U12</strong>-<strong>015</strong>-<strong>03</strong>